
Torchbeam 1996-2003 E320
Torchbeam AC Compressor with Clutch Instruction Manual
Model: 1996-2003 E320
Introduction
This manual provides essential information for the installation, operation, and maintenance of your Torchbeam AC Compressor with Clutch. Designed for specific Mercedes-Benz models, this compressor ensures efficient and reliable air conditioning performance. Please read these instructions thoroughly before installation and use to ensure proper function and safety.
Vehicle Compatibility
This A/C Compressor with Clutch is compatible with the following Mercedes-Benz models:
- Mercedes-Benz E-Class: 1996-2003 (3.2L, 4.2L, 4.3L, 5.0L engines)
- Mercedes-Benz ML-Class: 1998-2002 (3.2L, 4.3L engines)
- Mercedes-Benz C-Class: 1996-2000 (2.2L, 2.8L engines)
It also fits specific Chrysler and Freightliner models. For a detailed list, refer to the compatibility chart below. Always verify fitment using your vehicle's specific year, make, and model before proceeding with installation.

Image: Detailed compatibility information for various vehicle models.
Product Features
The Torchbeam AC Compressor is engineered for reliable performance and durability:
- Reliable Replacement: Undergoes strict pressure leak detection tests for durable longevity.
- Refrigerant Type: Designed for R134a refrigerant.
- Oil Type: Prefilled with PAG 46 oil.
- Pulley Specifications: 6 grooves, 4.75-inch diameter, Multi-Groove Serpentine type.
- Clutch Included: Yes.
- Low Noise Operation: Engineered for quiet performance.
- Compressor Model: 7SB16C.
- Efficient Refrigeration: Utilizes advanced cooling technology for effective temperature control in various climates.
- Defogging Function: Effective defogging for clear visibility in cold weather.
- Optimized Performance: Provides efficient cooling while managing energy consumption.
Construction Details

Image: The AC compressor features a durable aluminum housing for corrosion resistance and structural integrity.

Image: Components are precisely machined to OE specifications, ensuring accurate fitment and reliable operation.

Image: Overview of performance benefits including quick chill, lower noise, no leaking, and reduced fuel usage.
When to Consider Replacement
Several indicators suggest that your AC compressor may need replacement:
- Insufficient Cooling: The AC system does not cool effectively.
- Poor Heat Dissipation: Engine overheating or inefficient cooling.
- Abnormal Noise: Unusual sounds coming from the compressor area.
- Oil Leak: Visible refrigerant oil leaks around the compressor.

Image: Visual examples of common symptoms indicating a need for AC compressor replacement.
Setup and Installation
Installation of an AC compressor requires specialized tools and knowledge of automotive air conditioning systems. It is highly recommended that installation be performed by a certified professional to ensure proper function, prevent damage, and maintain system integrity.
Verifying Fitment
Before installation, confirm that this product is the correct fit for your vehicle. You can typically do this by using the "Amazon Confirmed Fit" tool on the product page or by cross-referencing the OEM part numbers provided in the specifications section with your vehicle's requirements.
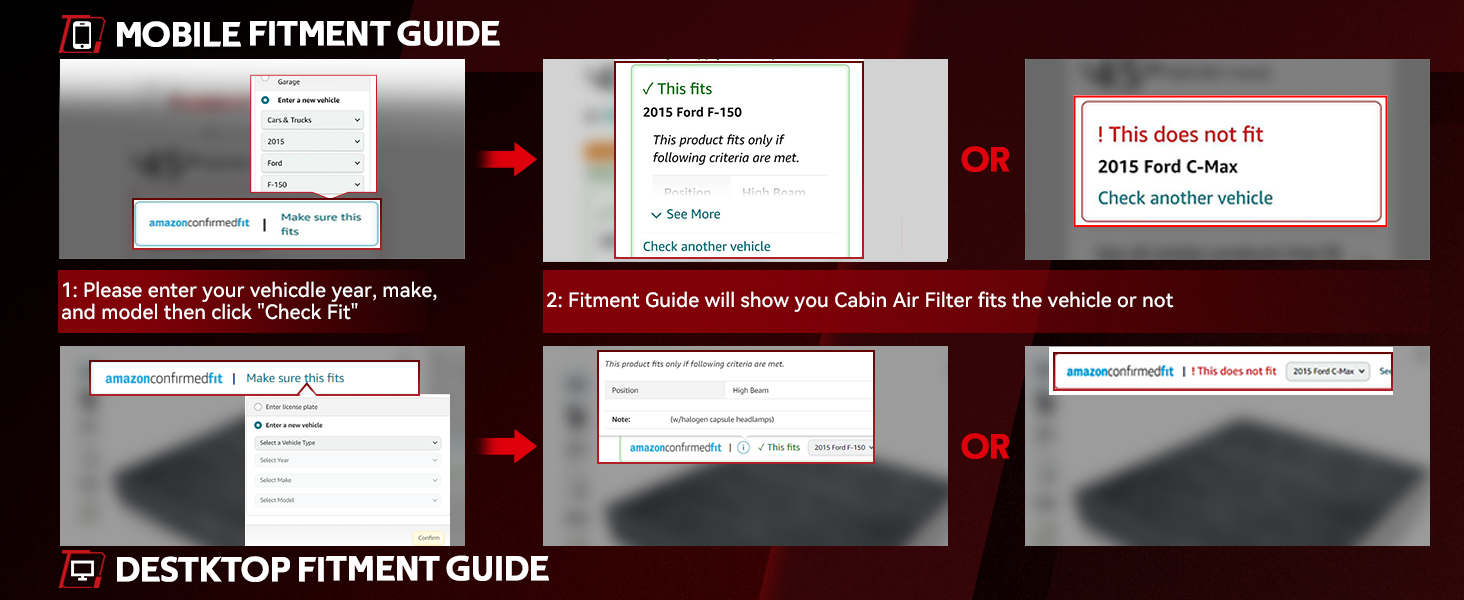
Image: Step-by-step guide on using online tools to confirm vehicle compatibility.
Key Components Overview
Video: A visual overview of the AC Compressor with Clutch, highlighting its main components and connection points. This video is provided by LZ-AUTO, a seller of this product.
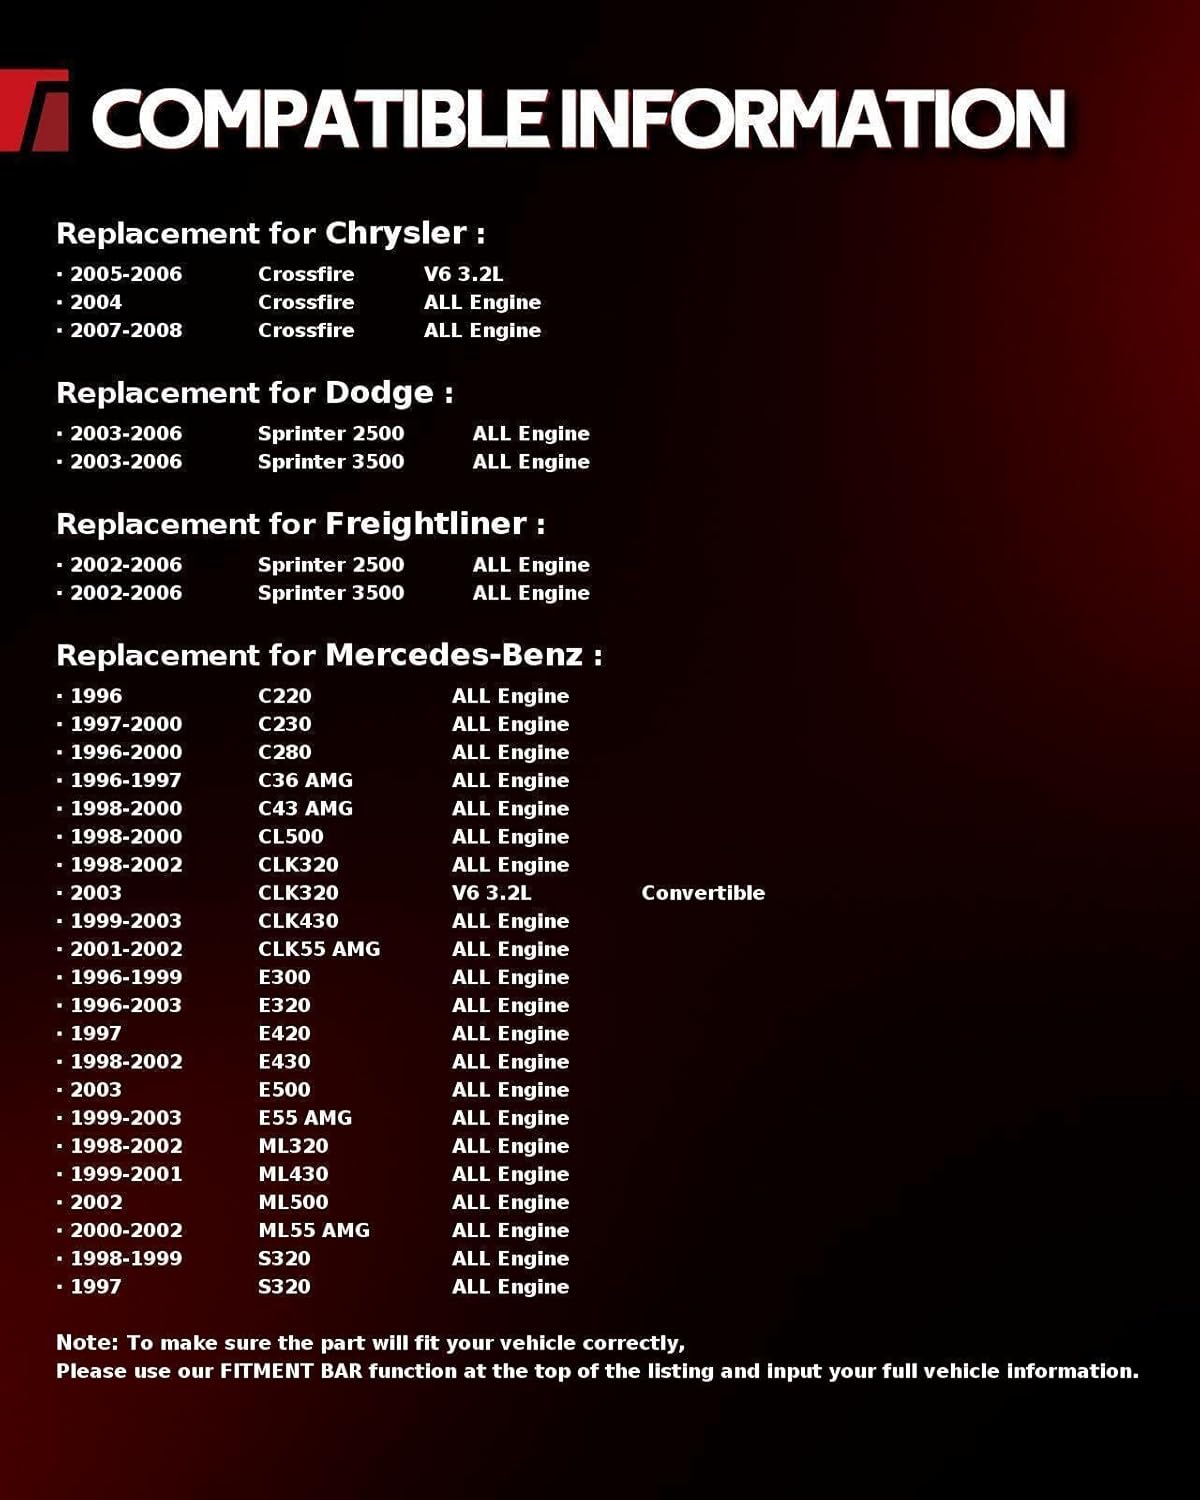
Image: A close-up view of the electrical connector on the AC compressor, showing its design and location.
General Installation Steps (Professional Installation Recommended):
- System Discharge: Safely discharge the existing refrigerant from the AC system using appropriate recovery equipment.
- Remove Old Compressor: Disconnect electrical connections, refrigerant lines, and mounting bolts from the old compressor.
- Inspect and Replace Components: Inspect and replace the accumulator/receiver drier and expansion valve/orifice tube. Flush the AC system to remove contaminants.
- Install New Compressor: Mount the new Torchbeam AC compressor, connect refrigerant lines, and electrical connections. Ensure all connections are secure.
- Vacuum and Recharge: Evacuate the AC system to remove air and moisture. Recharge with the correct type and amount of R134a refrigerant and PAG 46 oil as specified for your vehicle.
- Leak Test: Perform a leak test to ensure there are no refrigerant leaks.
- Test System: Start the vehicle and test the AC system for proper operation and cooling performance.
Warning: Improper installation or handling of refrigerants can cause serious injury or damage to the vehicle. Always consult a professional or refer to your vehicle's service manual.
Operating Instructions
Once installed and properly charged, the AC compressor operates automatically as part of your vehicle's air conditioning system. When you activate the AC system in your vehicle, the compressor engages to circulate refrigerant, providing cooling or heating as selected.
- AC Activation: Turn on your vehicle's air conditioning system using the dashboard controls.
- Temperature Control: Adjust the temperature settings to your desired comfort level.
- Fan Speed: Select the appropriate fan speed for optimal airflow.
- Defrost/Defog: Utilize the defrost or defog settings for clear windshield visibility, especially in humid or cold conditions. The compressor assists in removing moisture from the air.
Ensure your vehicle's engine is running when operating the AC system to prevent battery drain.
Maintenance
Regular maintenance helps prolong the life and efficiency of your AC compressor and entire air conditioning system:
- Regular System Checks: Have your AC system inspected annually by a qualified technician.
- Refrigerant Level: Ensure proper refrigerant levels. Low refrigerant can cause the compressor to overwork and fail.
- Belt Inspection: Check the serpentine belt that drives the compressor for wear, cracks, or proper tension. Replace if necessary.
- Condenser Cleaning: Keep the condenser (located in front of the radiator) free from debris, leaves, and dirt to ensure efficient heat exchange.
- Run AC Periodically: Even in cold weather, run your AC system for about 10-15 minutes once a month to keep seals lubricated and prevent refrigerant leaks.
- Cabin Air Filter: Replace your cabin air filter regularly to maintain good airflow and air quality.
Troubleshooting
If you experience issues with your AC system, consider the following common problems and potential solutions. For complex issues, professional diagnosis and repair are recommended.
| Problem | Possible Cause | Solution |
|---|---|---|
| AC not blowing cold air | Low refrigerant, faulty compressor clutch, electrical issue, clogged expansion valve. | Check refrigerant levels, inspect compressor clutch engagement, check fuses/wiring, professional diagnosis. |
| Unusual noises from AC | Worn compressor bearings, loose mounting, low oil, failing clutch. | Professional inspection to identify source of noise and repair/replace components. |
| AC compressor not engaging | Low refrigerant pressure, faulty pressure switch, electrical issue, worn clutch. | Check refrigerant, test pressure switch, inspect electrical connections, replace clutch or compressor. |
| Visible leaks | Damaged seals, cracked housing, loose connections. | Professional leak detection and repair. |
Specifications
| Feature | Detail |
|---|---|
| Brand | Torchbeam |
| Model Name | AC Compressor |
| Item Model Number | 1996-2003 E320 |
| Manufacturer Part Number | 1116ACC0435US |
| OEM Part Numbers | 1520971, 4711293, 000230701187, 2302011, 6511631, 0002307011, 351175511, 000230681180, 5511631, 254442, 4710293, 000230701188, 8FK351175511, 5117668AA, 0610045, 7512187, CO105111Z, CO105111DZ, CO4711478, 2369, 7511631, 2041697, 2011112, 8FK351175011, 6001188, 2307011, 5512187, RX097010AA, 5117666AA, 142986, CO105111C, TEM275638, 1440N, 5844, 5839, 142986C, 10000701, 000230201160, 000230681188, 000230201188, 275638, 142986NEW, 3003760, 89022, A0002302011, 6512187, 10347421, DW77356, 2011112AM, 2011112R, 77356, 4471705749, 78356, 5117680AA, 000362, 5117679AA, 639307, 0002306811, C1247, 0002340911, 5097010AA, 000230701180, 000230201180, 0002302011, 000230681187, 5117665AA, CS20084, 0230701180, 19193581, 517666AA, 975638, 903566, 1633X, ACP010604, 2021858R, 7512676, CWK639307, 204989N, AC1204989, 2011560, 202140, 204989, 7512222, 31751601NEW, 033171, 030700, 034742ND, 034742N, 9744728809, 7512309, 42511100985, CO105111G, 4710461, 3639307, 11178356, A75638 |
| Material | Aluminum |
| Item Weight | 15.25 pounds |
| Product Dimensions | 11.46 x 8.86 x 7.68 inches |
| Recommended Uses | Vehicle Air Conditioning Replacement |
| Power Source | Engine Powered |
| Special Feature | Silent Operation |
| Included Components | A/C Compressor with Clutch |
Warranty Information
For specific warranty details regarding your Torchbeam AC Compressor with Clutch, please refer to the warranty documentation included with your purchase or contact Torchbeam customer support directly. Warranty terms typically cover manufacturing defects and material flaws under normal use and service.
Customer Support
If you have any questions, require technical assistance, or need to report an issue, please contact Torchbeam customer support. You can typically find contact information on the product packaging, the official Torchbeam website, or through the retailer where the product was purchased.
For additional resources and product information, visit the official Torchbeam Store on Amazon.
Ask a question about this manual
Ask about setup, troubleshooting, compatibility, parts, safety, or missing instructions. Manuals+ will review the question and use this page’s manual context to help answer it.