1. Introduction
Thank you for choosing the Sanpyl Indoor Air Quality Monitor. This device is designed to provide real-time monitoring of carbon dioxide (CO2) concentration, temperature, and humidity in your indoor environment. Utilizing an advanced NDIR sensor, it offers accurate and rapid detection, helping you maintain a healthier living or working space. This manual provides detailed instructions for setup, operation, maintenance, and troubleshooting to ensure optimal performance of your device.
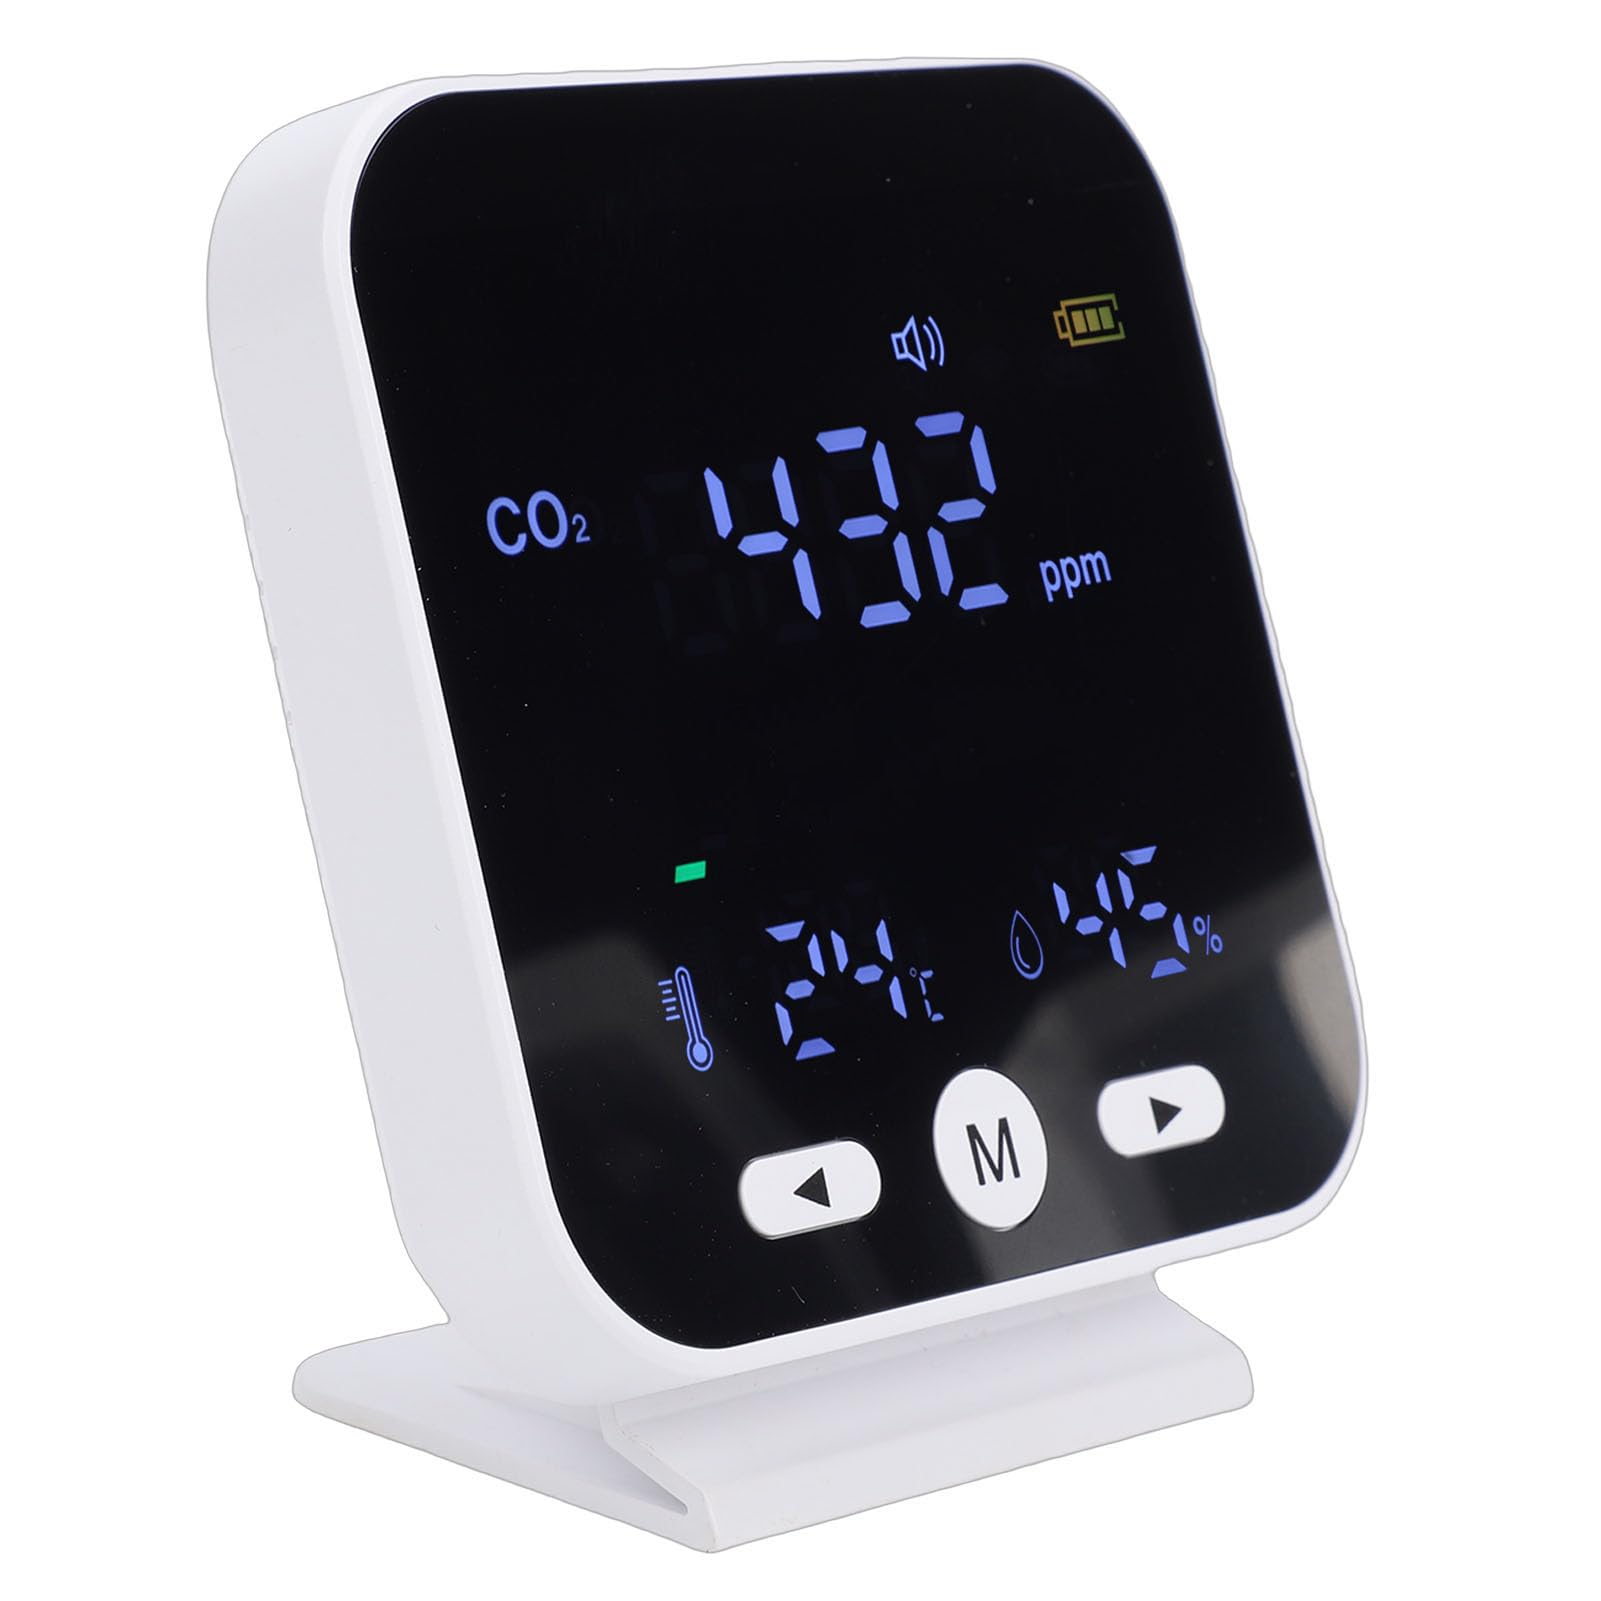
Figure 1: Sanpyl Indoor Air Quality Monitor
2. Safety Information
- Read all instructions carefully before using the device.
- Do not expose the device to extreme temperatures, direct sunlight, or high humidity.
- Avoid placing the device near strong electromagnetic fields.
- Do not attempt to disassemble or repair the device yourself. Contact customer support if service is required.
- Keep the device away from water and other liquids.
- Use only the provided charging cable for charging.
- Ensure proper ventilation around the device for accurate readings.
3. Package Contents
Please check the package contents upon unboxing to ensure all items are present:
- 1 x Sanpyl Indoor Air Quality Monitor
- 1 x User Manual (this document)
- 1 x USB Charging Cable

Figure 2: Included items in the package
4. Product Overview
Familiarize yourself with the components and display elements of your Sanpyl Indoor Air Quality Monitor.

Figure 3: Front and Rear View with Labeled Components
- CO2 Alarm Signal: Indicates when CO2 levels exceed the set threshold.
- CO2 Level Indicator: Visual representation of CO2 concentration (e.g., color bar).
- Temperature Display: Shows the current ambient temperature.
- Humidity Display: Shows the current ambient humidity.
- Left Button: Used for navigation or adjustments.
- Power Button (M): Used to power on/off the device and access menu options.
- Right Button: Used for navigation or adjustments.
- Air Inlet: Where ambient air enters for sensor readings.
- Micro USB Charging Port: For connecting the charging cable.

Figure 4: Clear LED Digital Display
5. Setup
5.1 Charging the Device
- Connect the provided USB charging cable to the Micro USB Charging Port on the device.
- Plug the other end of the USB cable into a standard USB power adapter (not included) or a computer USB port.
- The battery icon on the display will indicate charging status. A full charge provides approximately 2000mAh of battery life for extended standby time.
5.2 Powering On/Off
- To Power On: Press and hold the Power Button (M) for a few seconds until the display illuminates.
- To Power Off: Press and hold the Power Button (M) for a few seconds until the display turns off.
5.3 Placement
Place the monitor in a location where it can accurately sample the ambient air. Avoid placing it:
- Directly in front of air vents, windows, or doors.
- Near heat sources or in direct sunlight.
- In areas with high dust or moisture.
- In enclosed spaces where air circulation is poor.

Figure 5: Example Application Scenarios
6. Operating Instructions
6.1 Understanding the Display
The LED display provides real-time readings for CO2 concentration, temperature, and humidity.

Figure 6: Real-time Monitoring Display
- CO2 (ppm): Carbon dioxide concentration in parts per million.
- Temperature (°C): Ambient temperature in Celsius.
- Humidity (%): Relative humidity percentage.
- CO2 Level Indicator: A color bar or emoticon system visually represents CO2 levels:
- Green: Good air quality.
- Yellow: Moderate air quality.
- Red: Poor air quality, requiring ventilation.
6.2 CO2 Alarm and Reminders
The device is equipped with an audible alarm and visual reminder when CO2 concentration exceeds a preset value (default 1000 ppm).

Figure 7: Excessive Limit Reminder
- When the CO2 level reaches the reminder threshold, the device will emit an audible alert and the display may change color or show a specific icon.
- It is recommended to open windows or activate air purification systems when the alarm sounds.
- Custom Thresholds: The device supports custom CO2 thresholds. Refer to the on-screen menu (accessed via the 'M' button) for instructions on adjusting this setting.
6.3 Brightness Adjustment
The display brightness can be adjusted for comfort in various lighting conditions.

Figure 8: Brightness Adjustment
- Use the Left and Right buttons to navigate through menu options or adjust values.
- Press the 'M' button to enter the menu and select the brightness setting.
6.4 Calibration
The device supports calibration functions to ensure accuracy over time. Refer to the device's on-screen menu for specific calibration procedures. It is generally recommended to perform calibration in a well-ventilated outdoor environment with known CO2 levels (approximately 400 ppm).
7. Maintenance
7.1 Cleaning
- Ensure the device is powered off and unplugged before cleaning.
- Wipe the exterior of the device with a soft, dry cloth.
- Do not use abrasive cleaners, solvents, or spray directly onto the device.
- Keep the air inlet clear of dust and debris.
7.2 Battery Care
- Charge the device regularly to maintain battery health.
- Avoid completely draining the battery frequently.
- If storing the device for an extended period, charge it to approximately 50% and store in a cool, dry place.
8. Troubleshooting
| Problem | Possible Cause | Solution |
|---|---|---|
| Device does not power on. | Low battery or no charge. | Charge the device using the provided USB cable. Ensure the charging cable is properly connected. |
| Inaccurate CO2/Temp/Humidity readings. | Poor placement, blocked air inlet, or need for calibration. | Relocate the device to an open area. Clear any obstructions from the air inlet. Perform a calibration as per section 6.4. |
| Alarm sounds frequently. | High CO2 concentration in the environment. | Increase ventilation by opening windows or using an air purifier. Check the set alarm threshold (section 6.2). |
| Display is dim or unreadable. | Brightness setting is too low. | Adjust the display brightness (section 6.3). |
9. Specifications
| Item Type | CO2 Detector |
| Material | ABS |
| Display | LED Display |
| Sensor Type | NDIR (Non-Dispersive Infrared) |
| CO2 Detection Range | 400-5000 ppm |
| CO2 Excessive Reminder Value | 1000 ppm (default) |
| Temperature Display Unit | Celsius |
| Temperature Range | -10℃ to 50℃ (14°F to 122°F) |
| Humidity Range | 20% to 85% |
| Battery Capacity | 2000mAh |
| Dimensions (L x W x H) | 4.72 x 4.33 x 2.76 inches |
| Item Weight | 9.7 ounces |
10. Warranty and Support
10.1 Warranty Information
Sanpyl products are designed and manufactured to the highest quality standards. For specific warranty details, please refer to the warranty card included with your purchase or contact Sanpyl customer support. The warranty typically covers defects in materials and workmanship under normal use.
10.2 Customer Support
If you encounter any issues or have questions regarding your Sanpyl Indoor Air Quality Monitor, please contact our customer support team. For the most up-to-date contact information, please visit the official Sanpyl website or refer to your purchase documentation.
Online Support: Visit the Sanpyl Store on Amazon