
1. Product Overview
The kidoom FHSM-638 is a versatile electric sewing machine designed for household use, offering 39 stitch applications and both single and twin needle capabilities. Its compact design includes an expansion table for larger projects and a built-in LED light for enhanced visibility.
Included Components
- Sewing machine unit
- AC/DC Adapter
- Foot Pedal
- Instruction Manual
- Buttonhole Foot
- Double Spool Holder
- Single Spool Holder
- Spare Needles
- Spare Twin Needle
- Pre-filled Bobbins
- Thread Spool
- Needle Threader
- Thread Unpicker
- Scissors
- Tape Measure
- Thimble

The machine is factory-threaded and includes a test fabric. This is for quality assurance and does not indicate a used product.
2. Setup
2.1 Unpacking and Initial Inspection
Carefully remove all components from the packaging. Verify that all listed accessories are present. Inspect the machine for any visible damage from shipping.
2.2 Power Connection
Connect the AC/DC adapter to the machine's power input and plug it into a suitable electrical outlet. If using the foot pedal, connect it to the designated foot pedal input port.
2.3 Attaching the Expansion Table
For larger projects, attach the expansion table to the main unit. Align the table's connectors with the machine's slots and slide it into place until it clicks securely. This provides an extended work surface.
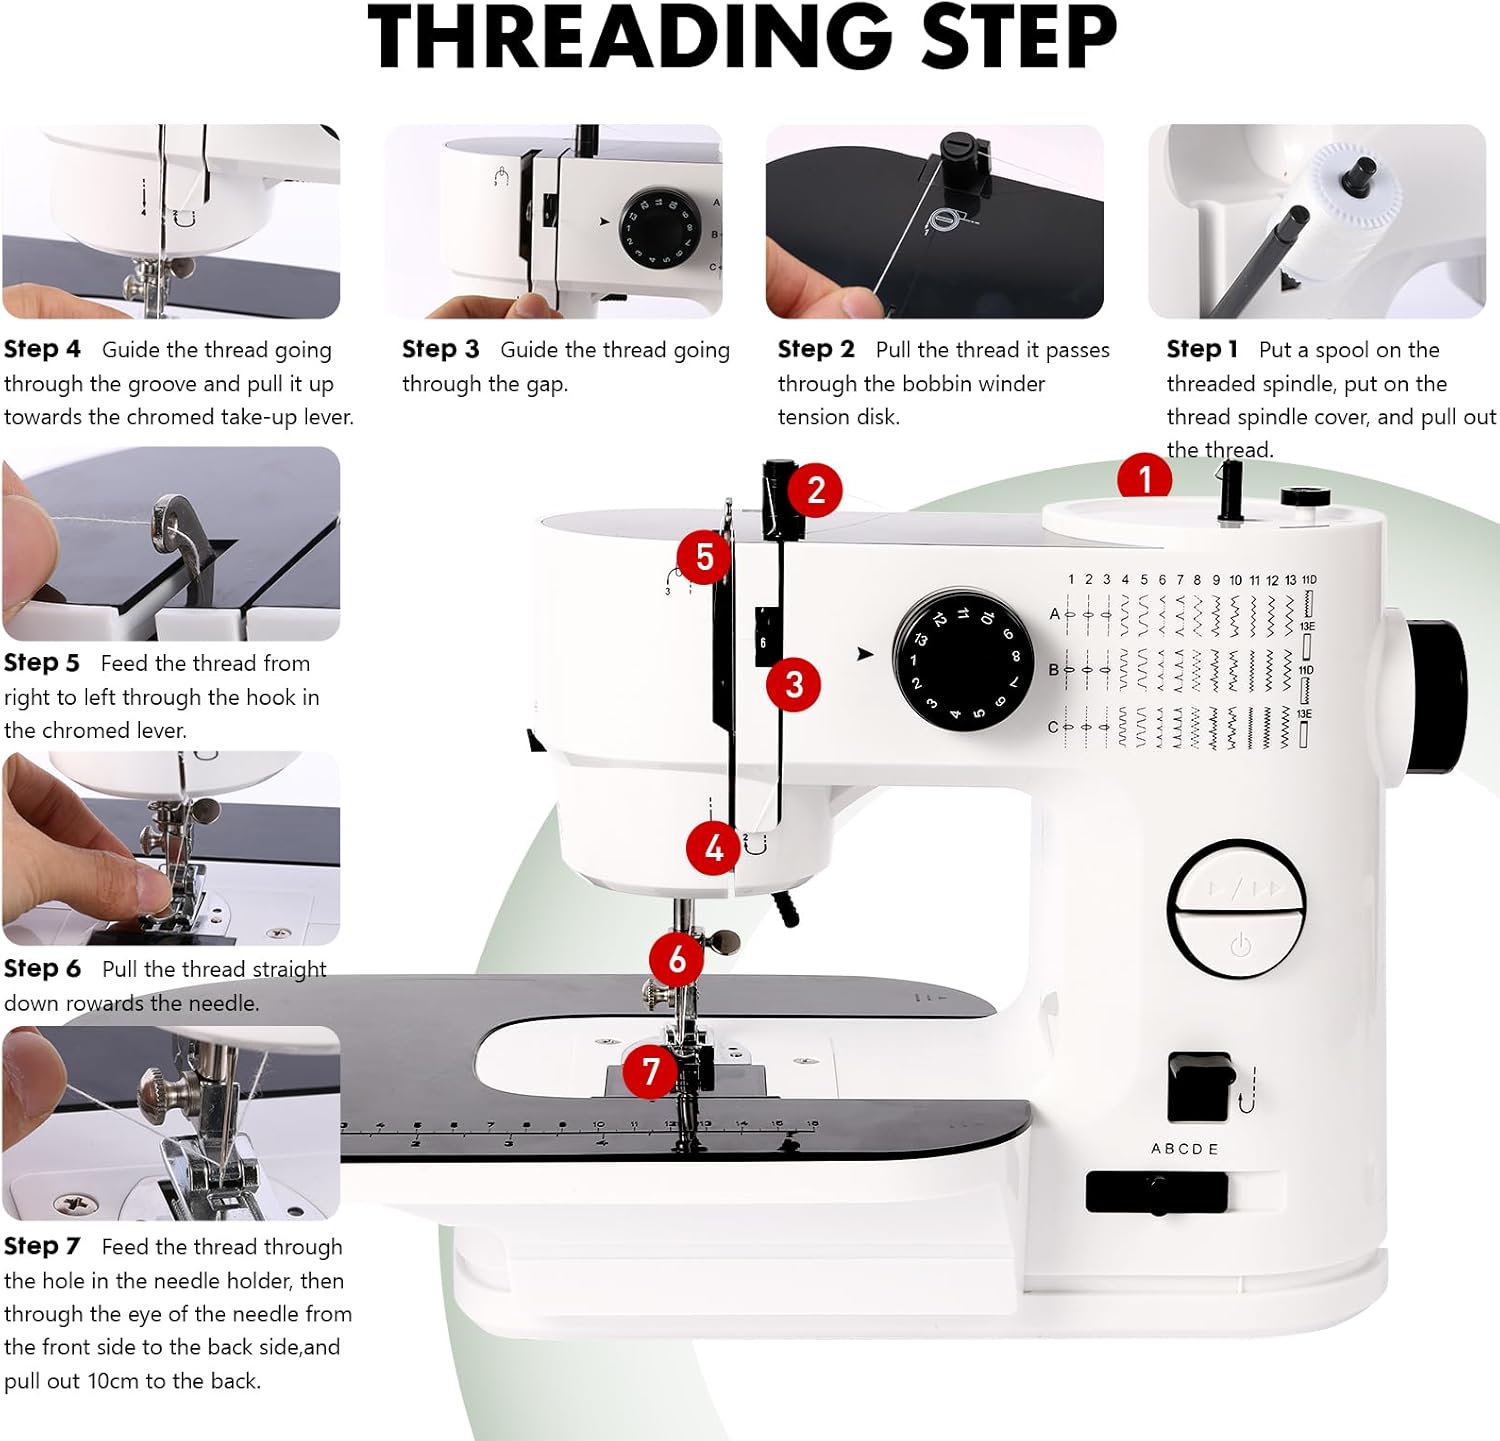
2.4 Threading the Machine
Proper threading is crucial for optimal performance. Follow these steps carefully:
- Step 1: Place a spool on the threaded spindle, put on the thread spindle cover, and pull out the thread.
- Step 2: Pull the thread so it passes through the bobbin winder tension disk.
- Step 3: Guide the thread going through the gap.
- Step 4: Guide the thread going through the groove and pull it up towards the chromed take-up lever.
- Step 5: Feed the thread from right to left through the hook in the chromed lever.
- Step 6: Pull the thread straight down towards the needle.
- Step 7: Feed the thread through the hole in the needle holder, then through the eye of the needle from the front side to the back side, and pull out 10cm to the back.
3. Operating Instructions
3.1 Selecting Stitches
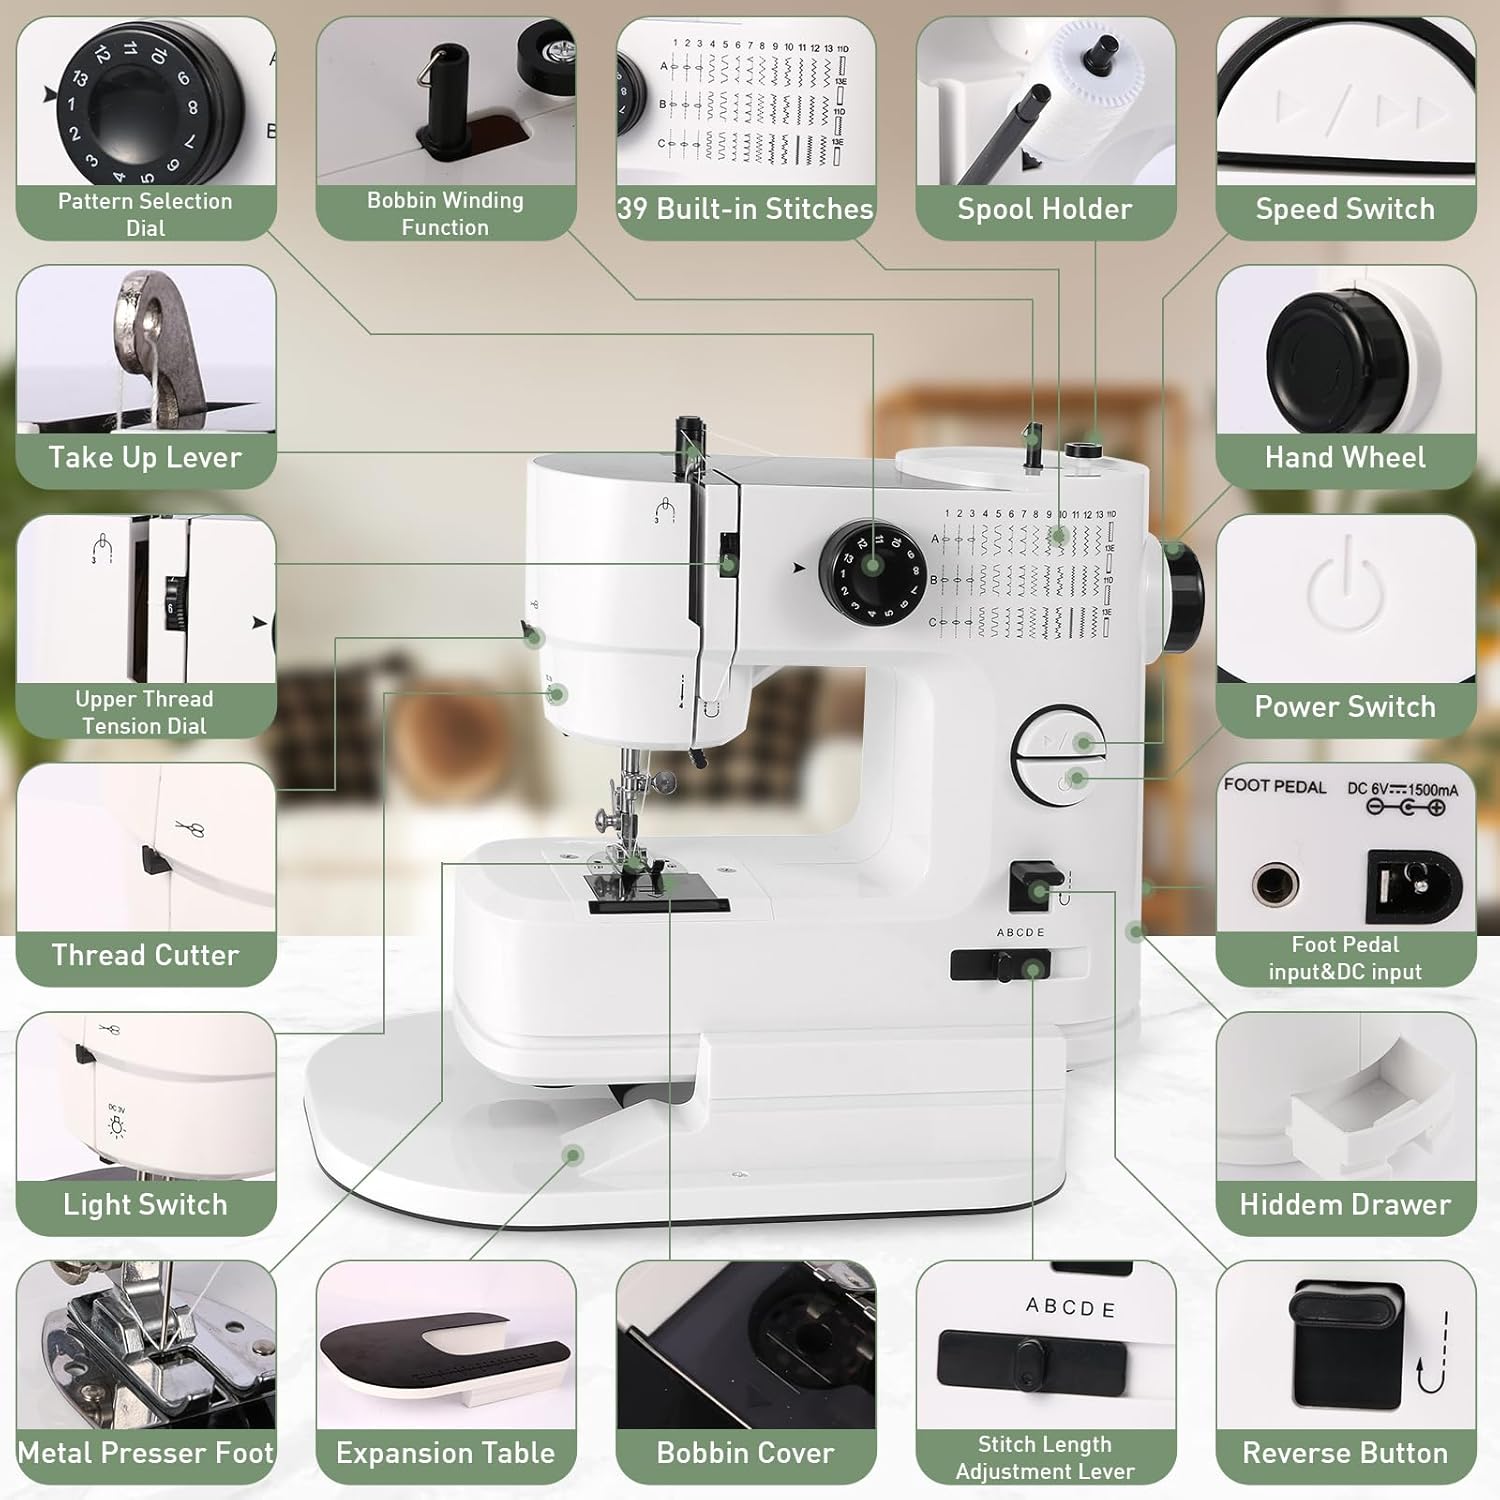
The machine offers 39 built-in stitches. To select a stitch, turn the Pattern Selection Dial to the desired number (1-13). Then, use the Stitch Length Adjustment Lever (A, B, C, D, E) to fine-tune the stitch type within that number range.


3.2 Adjusting Thread Tension
The adjustable thread tension dial (1-9 levels) allows you to control the tightness of your stitches. Adjust as needed to prevent loose or puckered stitches, ensuring a smooth and even seam.
3.3 Sewing with Single and Twin Needles
This machine supports both single and twin needle sewing. For twin needle sewing, ensure you have the twin needle installed and both upper threads are correctly routed. This feature is ideal for decorative stitching or creating strong, parallel seams.
3.4 Using the Foot Pedal and Speed Control
The included foot pedal provides variable speed control. Press gently for slower speeds and apply more pressure for faster sewing. Alternatively, use the speed switch on the machine for consistent speed settings.
3.5 Reverse Stitching
To reinforce stitches at the beginning and end of a seam, press and hold the reverse button. The machine will sew backward. Release the button to resume forward stitching.
3.6 Automatic Winding Function
The machine features an automatic bobbin winding function. Follow the instructions in the manual to wind bobbins quickly and efficiently.
3.7 Built-in LED Light
Activate the built-in LED light to illuminate your sewing area, reducing shadows and improving visibility for detailed work.
3.8 Fabric Compatibility
The kidoom FHSM-638 is designed to handle a variety of fabrics, including denim, cotton, elastic fabrics, thin fabrics, and chiffon. It can penetrate up to 6 layers of denim.

4. Maintenance
4.1 Cleaning
Regularly clean the machine to ensure smooth operation. Use a soft brush to remove lint and dust from the bobbin area, feed dogs, and needle plate. Disconnect power before cleaning.
4.2 Needle Replacement
Replace needles frequently, especially when sewing different fabric types or if the needle becomes dull or bent. A dull needle can cause skipped stitches or damage fabric. Ensure the flat side of the needle faces the back of the machine when inserting.
4.3 Bobbin Care
Keep bobbins clean and free of tangled threads. Use only bobbins designed for this machine to prevent tension issues.
5. Troubleshooting
If you encounter issues, consider the following common problems and solutions:
- Thread Jamming: Often caused by incorrect threading or improper bobbin insertion. Re-thread the machine completely, ensuring all guides are followed. Check the bobbin for tangles or incorrect placement.
- Skipped Stitches: Can be due to a bent or dull needle, incorrect needle size for the fabric, or improper threading. Replace the needle, ensure it's inserted correctly, and re-thread.
- Uneven Stitches: Adjust the upper thread tension dial. Test on a scrap piece of fabric until stitches are balanced.
- Machine Not Starting: Ensure the power adapter is securely plugged in and the power switch is on. If using the foot pedal, ensure it is connected.
Important Note: Before turning on the power or changing stitch types, manually turn the hand-wheel to ensure there is no thread jamming or other obstructions.
6. Specifications
| Feature | Detail |
|---|---|
| Brand | kidoom |
| Model Number | FHSM-638 |
| Material | Metal, Plastic |
| Product Dimensions (D x W x H) | 7.98" x 12.6" x 10.95" |
| Item Weight | 6.72 Pounds |
| Power Source | Electric |
| Stitch Applications | 39 |
| Needle Type | Single and Twin Needle Capable |
7. Warranty and Support
For information regarding product warranty, please refer to the documentation provided at the time of purchase or contact kidoom customer support. Extended protection plans may be available for purchase, offering additional coverage for 3 or 4 years, or a monthly Complete Protect plan.
For technical assistance or further inquiries, please contact kidoom customer service through their official channels.