
Anjfylque ANJ-48V-100A-MPPT
Contents
ANENJI ANJ-48V-100A-MPPT Solar Charge Controller User Manual
Model: ANJ-48V-100A-MPPT
1. Introduction
This manual provides essential information for the safe and efficient operation of your ANENJI ANJ-48V-100A-MPPT Solar Charge Controller. This device is designed to optimize power harvest from your solar panels and manage battery charging for 12V, 24V, and 48V systems. It features a high-efficiency MPPT algorithm, wide compatibility with various battery types, and comprehensive protection mechanisms.
Please read this manual thoroughly before installation and use to ensure proper functionality and longevity of the product.
2. Safety Instructions
Observe the following safety precautions during installation and operation:
- Ensure all wiring is performed by qualified personnel and complies with local electrical codes.
- Disconnect all power sources (solar panels and battery) before installing or servicing the controller.
- Wear appropriate personal protective equipment, including insulated gloves and eye protection.
- Do not short-circuit the solar panel or battery terminals.
- Install the controller in a well-ventilated area, away from flammable materials and direct sunlight.
- Ensure proper grounding of the system.
- Verify correct polarity for all connections to prevent damage to the controller and batteries.
- Keep children away from the solar power system components.
3. Product Overview
The ANENJI ANJ-48V-100A-MPPT Solar Charge Controller is a high-performance device designed for efficient solar energy management. Key features include:
- High-Efficiency MPPT Algorithm: Dynamically tracks the maximum power point of solar arrays for optimal energy harvest.
- Wide Compatibility: Automatically recognizes 12V, 24V, and 48V battery systems and supports various battery chemistries (sealed lead-acid, AGM, gel, flooded, lithium-ion).
- Three-Stage Smart Charging: Implements constant current/MPPT, balanced, and float stages for efficient and safe battery charging.
- Large Capacity: Supports up to 100A charging current and 4800W solar input for 48V systems.
- Comprehensive Protection: Includes input over-voltage, low-voltage recovery, short-circuit, reverse polarity, and over-temperature protection.
- User-Friendly LCD Display: Provides real-time monitoring and configurable settings.

Figure 3.1: Front view of the ANENJI ANJ-48V-100A-MPPT Solar Charge Controller, showing the LCD screen and overall design.
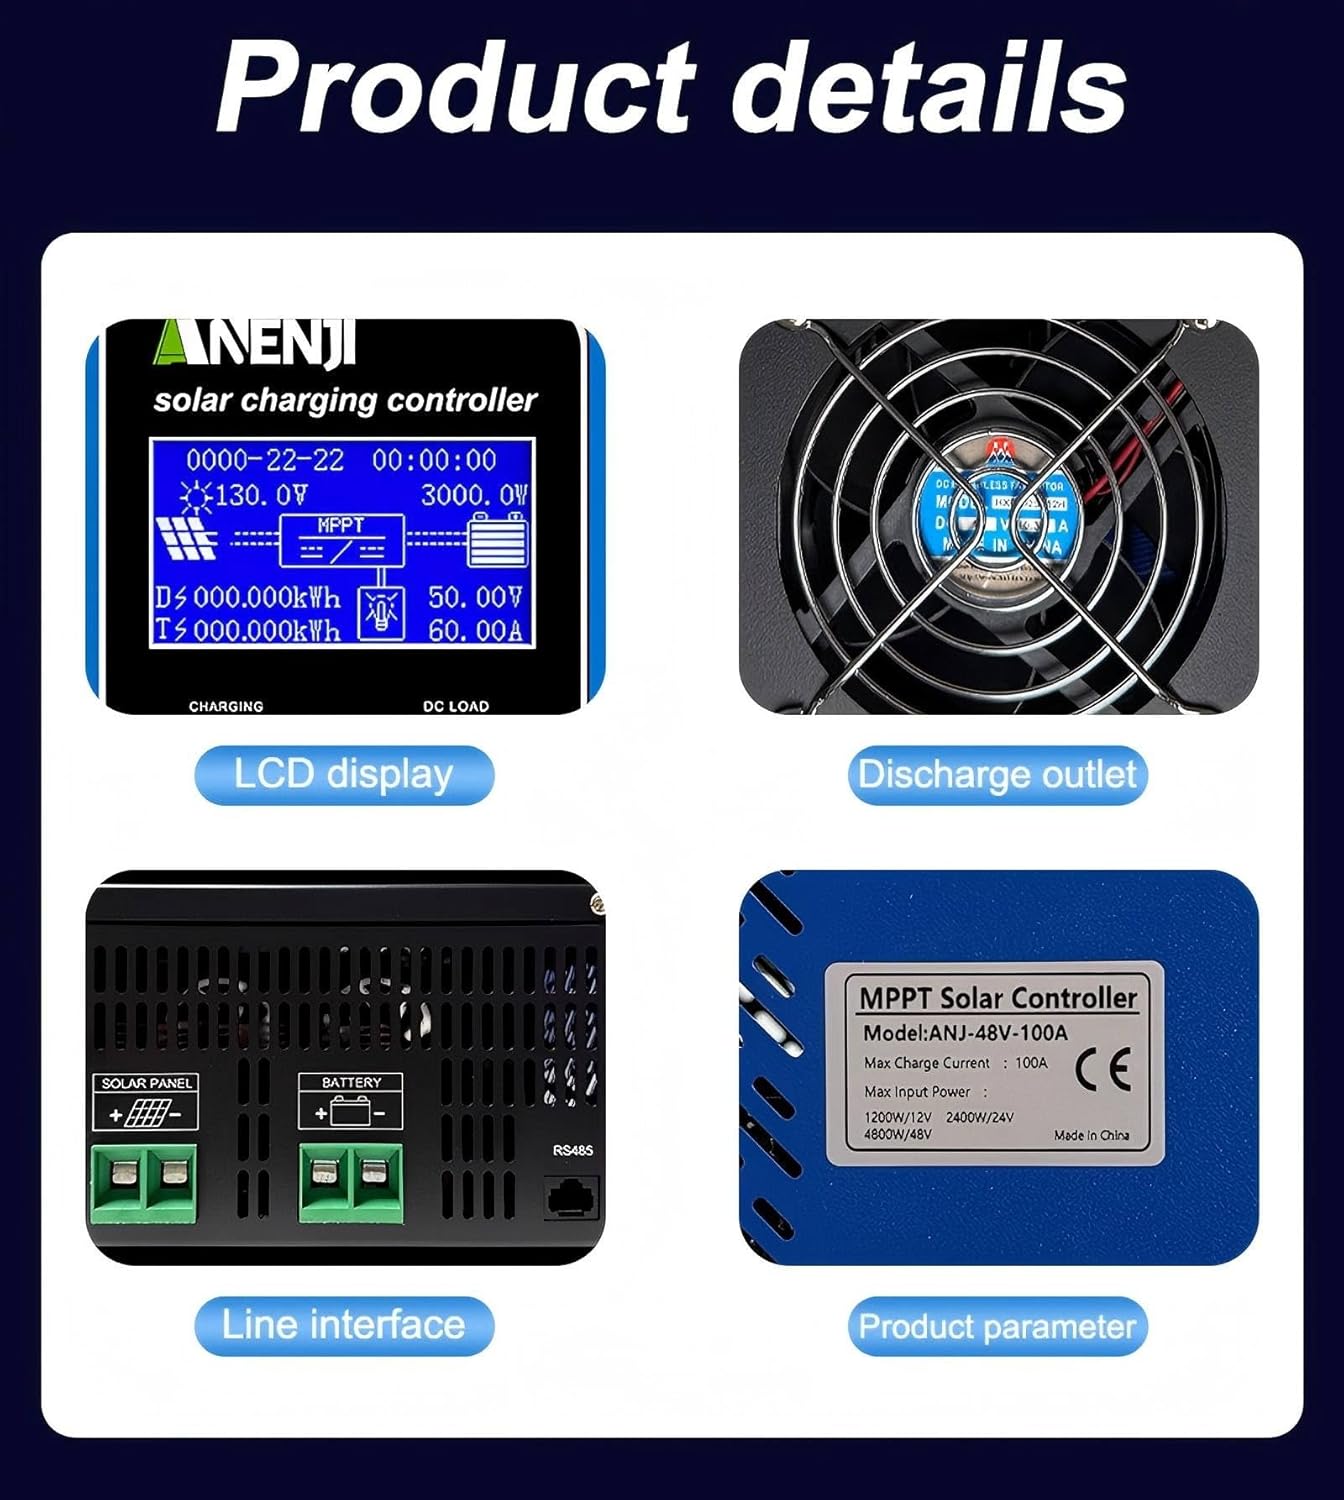
Figure 3.2: Detailed view highlighting the LCD display, discharge outlet, line interface for solar and battery connections, and product parameter label.
4. Setup and Installation
Follow these general steps for installing your solar charge controller. Always refer to local electrical codes and consult a professional if unsure.
- Mounting: Choose a suitable location for mounting the controller. It should be indoors, dry, well-ventilated, and protected from direct sunlight and moisture. Ensure adequate clearance around the unit for heat dissipation.
- Wiring Sequence:
- Connect the battery to the controller first. Ensure correct polarity (+ to + and - to -).
- Connect the solar panels to the controller. Ensure correct polarity.
- (Optional) Connect the DC load to the controller's load terminals, if applicable.
- Cable Sizing: Use appropriate cable gauges for all connections to minimize voltage drop and ensure safe operation.
- Grounding: Connect the controller to an earth ground.
- Verification: Double-check all connections for tightness and correct polarity before applying power.
Figure 4.1: Close-up of the line interface, showing terminals for solar panel input and battery connections. Note the RS485 communication port.
5. Operating Instructions
Once installed and powered, the controller will automatically detect the system voltage (12V/24V/48V) and begin operation.
5.1. LCD Display and Navigation
The clear backlit LCD screen provides real-time system data. Use the buttons below the screen to navigate through menus and adjust settings.
Figure 5.1: The LCD display showing PV voltage, current, battery voltage, charging mode, and fault alerts.
5.2. Charging Process
The controller employs a three-stage smart charging algorithm to optimize battery performance and longevity:
- MPPT (Constant Current) Stage: The controller actively tracks the maximum power point of the solar array to deliver the maximum possible current to the battery until it reaches a set voltage.
- Balanced Charging Stage: For lead-acid batteries, this stage applies a higher voltage for a limited time to equalize cell voltages and prevent sulfation. This stage is configurable or can be disabled for lithium batteries.
- Float Charging Stage: Once the battery is fully charged, the controller reduces the voltage to a lower "float" level to maintain the battery at full capacity and compensate for self-discharge, preventing overcharging.
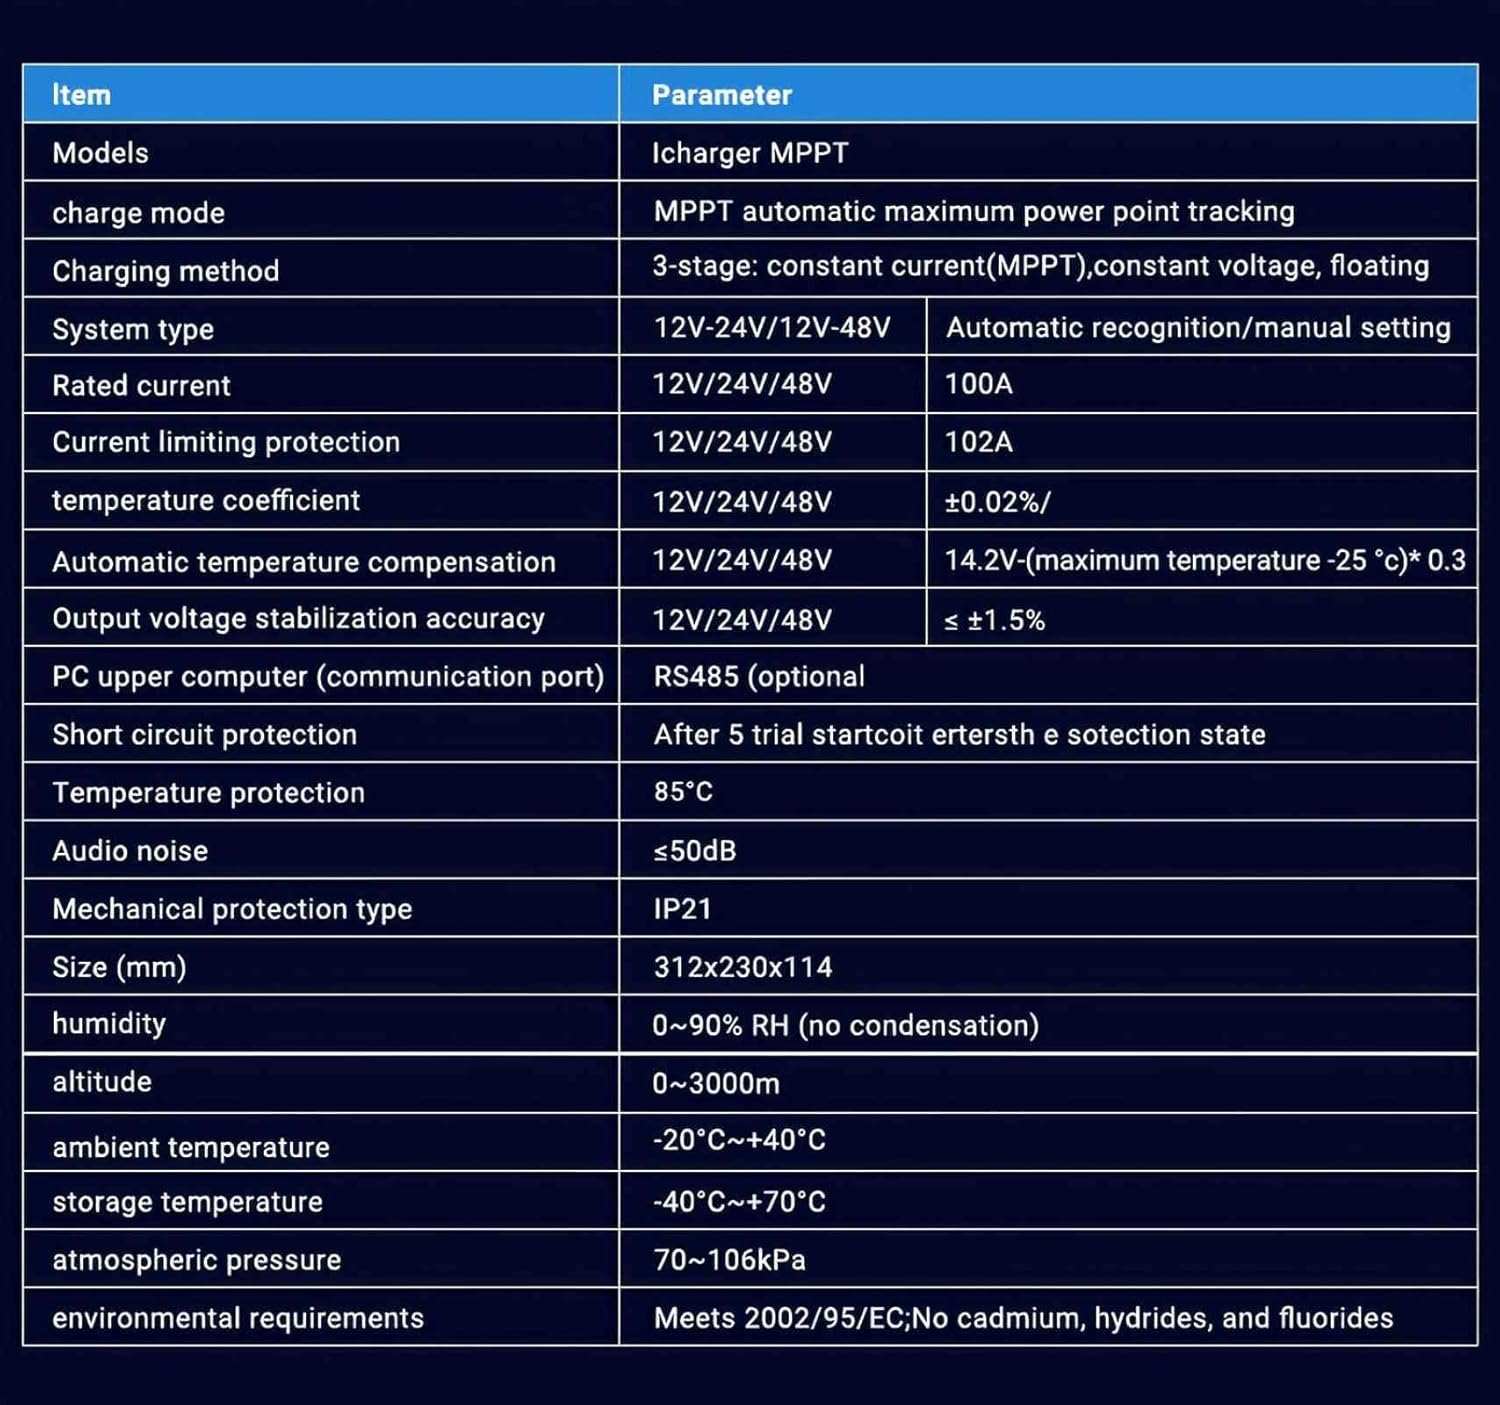
Figure 5.2: Visual representation of the 3-stage charging process, optimizing battery performance and extending lifespan.
5.3. Battery Type Configuration
The controller is compatible with various battery types. You can configure charging parameters via the LCD display to match your specific battery chemistry (e.g., Flooded, AGM, Gel, Lithium-ion). Refer to your battery manufacturer's specifications for recommended charging voltages.
6. Maintenance
Regular maintenance ensures optimal performance and extends the lifespan of your solar charge controller.
- Cleaning: Periodically clean the exterior of the controller with a dry cloth. Ensure ventilation openings are free from dust and debris.
- Connections: Annually check all wiring connections for tightness. Loose connections can cause overheating and damage.
- Ventilation Fans: The controller features a smart fan design for heat dissipation. The fans activate when the internal temperature exceeds 45°C and stop when below 40°C to save energy. Ensure these fans are not obstructed.
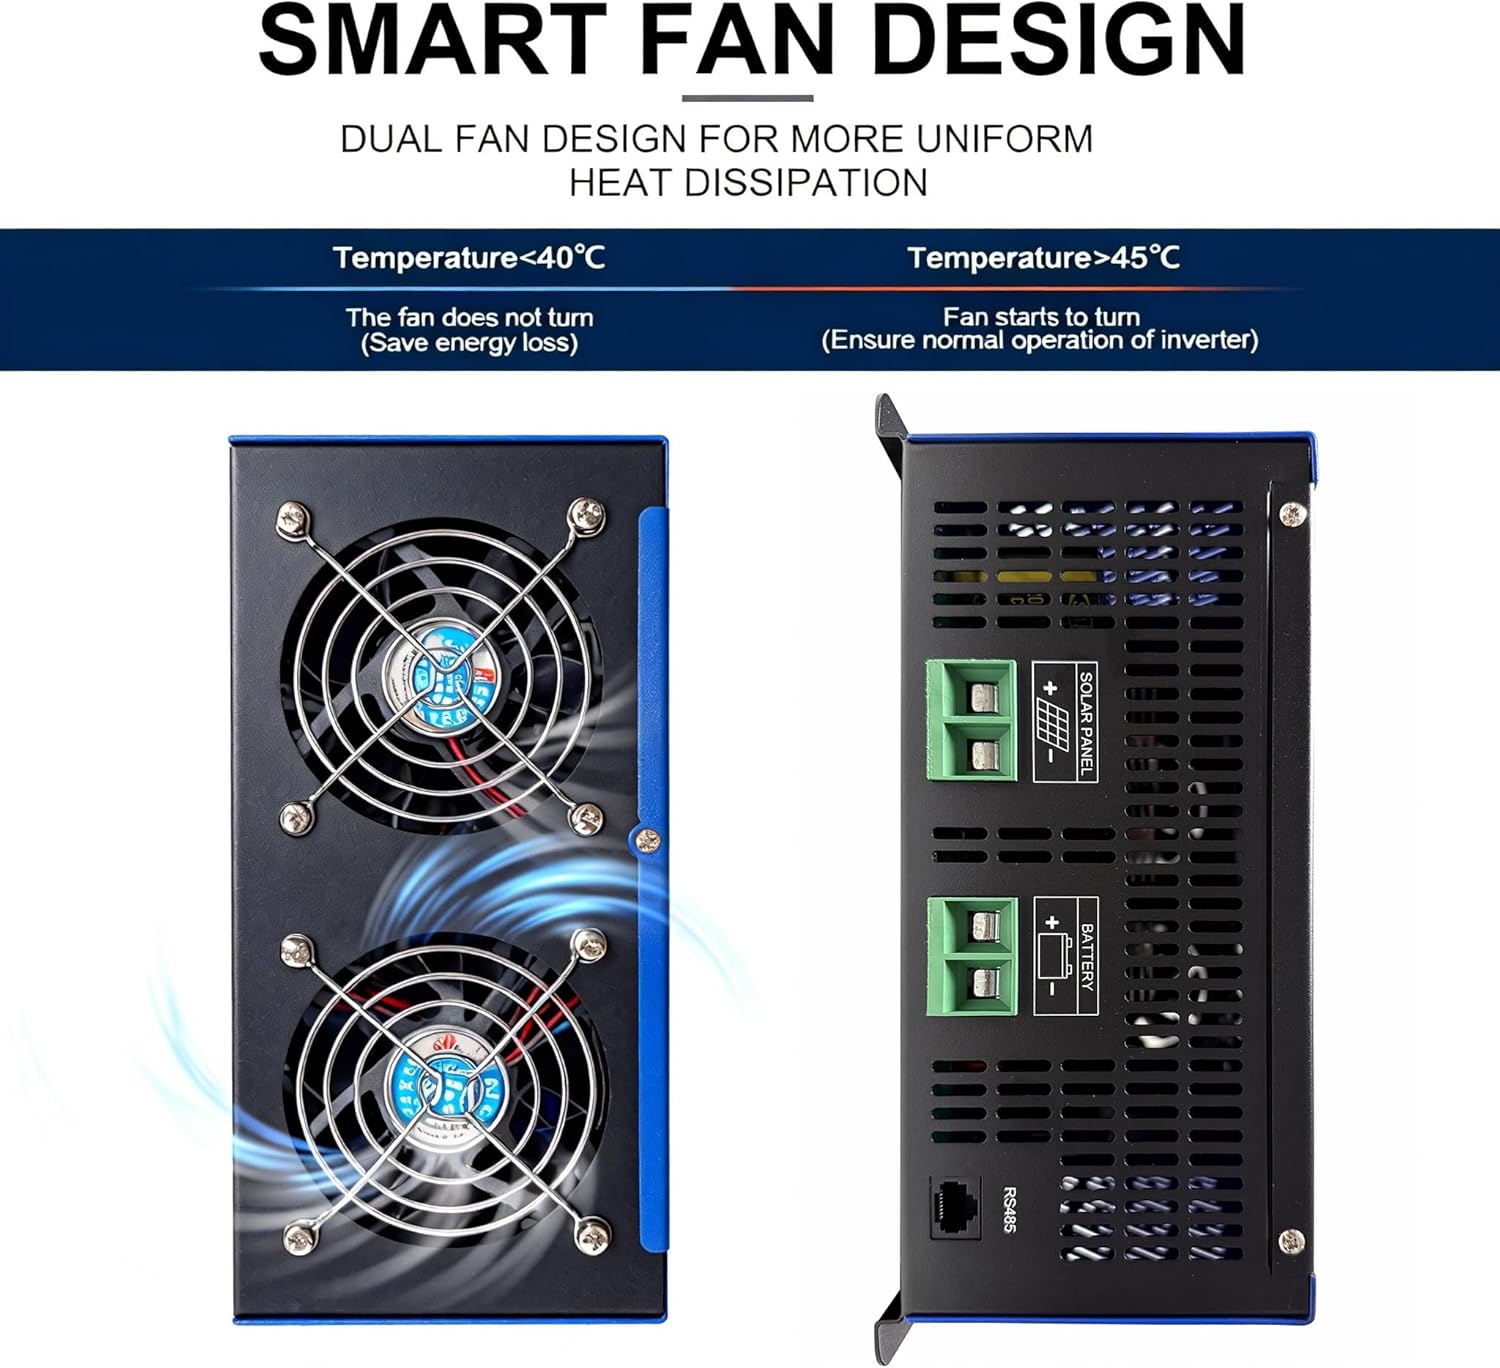
Figure 6.1: Illustration of the dual smart fan design, which ensures uniform heat dissipation and activates based on internal temperature to maintain optimal operating conditions.
- Monitoring: Regularly monitor the LCD display for any fault alerts or unusual readings.
- Battery Inspection: Inspect batteries for any signs of damage, corrosion, or swelling. Follow battery manufacturer's maintenance guidelines.
7. Troubleshooting
This section provides guidance for common issues. For complex problems, contact technical support.
| Problem | Possible Cause | Solution |
|---|---|---|
| No display/No power | Battery not connected or low voltage; reverse polarity; loose connections. | Check battery connections and voltage. Ensure correct polarity. Tighten all terminals. |
| No charging from solar panels | Solar panels not connected; low PV voltage; reverse polarity; shading on panels. | Check solar panel connections and voltage. Ensure correct polarity. Clear any shading. |
| Battery not fully charged | Insufficient solar input; incorrect battery settings; battery degradation. | Increase solar panel capacity or check for shading. Verify battery type and charging parameters. Test battery health. |
| Over-temperature warning | Poor ventilation; high ambient temperature; fan obstruction. | Ensure adequate airflow around the controller. Clear any obstructions from the fans. Relocate if ambient temperature is consistently too high. |
| System voltage error | Incorrect system voltage setting or battery voltage mismatch. | Verify the battery bank voltage matches the controller's auto-detected or manually set system voltage. |
8. Specifications
Detailed technical specifications for the ANENJI ANJ-48V-100A-MPPT Solar Charge Controller.

Figure 8.1: A table detailing various technical parameters of the solar charge controller, including charge mode, system type, rated current, and environmental requirements.
| Item | Parameter |
|---|---|
| Model | ANJ-48V-100A MPPT |
| Rated Charge Current | 100A |
| System Voltage | 12V / 24V / 48V Auto or Manual Selectable |
| Max. PV Input Power (48V system) | 4800W |
| Max. PV Open Circuit Voltage | 150V (for 48V system) |
| MPPT Operating Voltage Range | 65V-150V (48V system) |
| Charging Algorithm | Three-Stage (MPPT, Balanced, Float) |
| Compatible Batteries | Lead-Acid (Flooded, AGM, Gel), Lithium-ion (configurable) |
| Float Voltage (Lead-Acid Default) | 55.2V (48V), 27.6V (24V), 13.8V (12V) |
| Equalization Voltage (Lead-Acid Default) | 58V (48V), 29V (24V), 14.5V (12V) |
| Display | LCD with Button Control |
| Static Consumption | ≤2W |
| Efficiency | ≥96.5% |
| Operating Temperature | -35°C to +60°C |
| Protection | Overcharge, Over-discharge, Short Circuit, Reverse Polarity, Overload, Over Temperature |
| Package Dimensions | 12 x 9 x 4 inches |
| Item Weight | 7.92 pounds (3.6 Kilograms) |
| Material | Metal |
| Display Type | LED |
| UPC / GTIN | 757577878876 |
9. Warranty and Support
9.1. Warranty Information
This ANENJI Solar Charge Controller comes with a 2-Year Manufacturer's Warranty from the date of purchase. This warranty covers defects in materials and workmanship under normal use. It does not cover damage caused by improper installation, misuse, accidents, unauthorized modifications, or natural disasters.
Please retain your proof of purchase for warranty claims.
9.2. Technical Support
For technical assistance, troubleshooting beyond this manual, or warranty inquiries, please contact ANENJI customer support. Contact details can typically be found on the product packaging or the official ANENJI website.
When contacting support, please have your product model number (ANJ-48V-100A-MPPT) and purchase date available.
Documents and downloads
Ask a question about this manual
Ask about setup, troubleshooting, compatibility, parts, safety, or missing instructions. Manuals+ will review the question and use this page’s manual context to help answer it.