
1. Introduction
Thank you for choosing the LEXXSON 3-Inch Marine Radio. This device is designed to provide high-quality audio entertainment in various environments, including marine vessels, golf carts, RVs, UTVs, and yachts. Its robust, waterproof design ensures reliable performance under challenging conditions. This manual will guide you through the installation, operation, and maintenance of your new marine radio.

The LEXXSON Marine Radio is suitable for a wide range of applications, from marine to recreational vehicles.
2. Safety Information
- Water Resistance: This unit is IP6X rated for water resistance. Ensure all connections are properly sealed during installation to maintain this rating.
- Power Supply: Connect the unit only to a 12V DC power supply. Incorrect voltage can damage the device.
- Wiring: Ensure all wiring is correctly connected according to the wiring diagram to prevent short circuits or damage.
- Ventilation: Allow adequate ventilation around the unit to prevent overheating.
- Cleaning: Use a soft, damp cloth for cleaning. Avoid abrasive cleaners or solvents.
3. Package Contents
Verify that all items are present in the package:
- LEXXSON 3-Inch Marine Stereo Unit
- Wiring Harness
- Mounting Bracket
- Instruction Manual

Included components: Marine Stereo Unit, Wiring Harness, Instructions, and Mounting Bracket.
4. Product Overview
The LEXXSON Marine Radio is a compact and versatile audio system featuring:
- Bluetooth Music Streaming: Wirelessly connect your Bluetooth-enabled devices for audio playback.
- Waterproof & Weatherproof: IP6X water-resistant design suitable for various outdoor conditions.
- Multiple Inputs: USB port for media playback and phone charging, and an AUX port for external audio devices.
- Powerful Output: 4x50W output for clear and robust sound. RCA output ports are available for connecting external amplifiers or subwoofers.
- Media Playback: FM/AM radio with 18 FM and 12 AM station memory presets.
- HD LCD Display: A 3-inch digital LCD display provides clear readability even in direct sunlight.

Key features include Bluetooth audio streaming, high-temperature resistance, and IP6X waterproof design.

The unit offers FM/AM radio, 4x50W output, and convenient AUX/USB inputs.
4.1. Controls and Connections
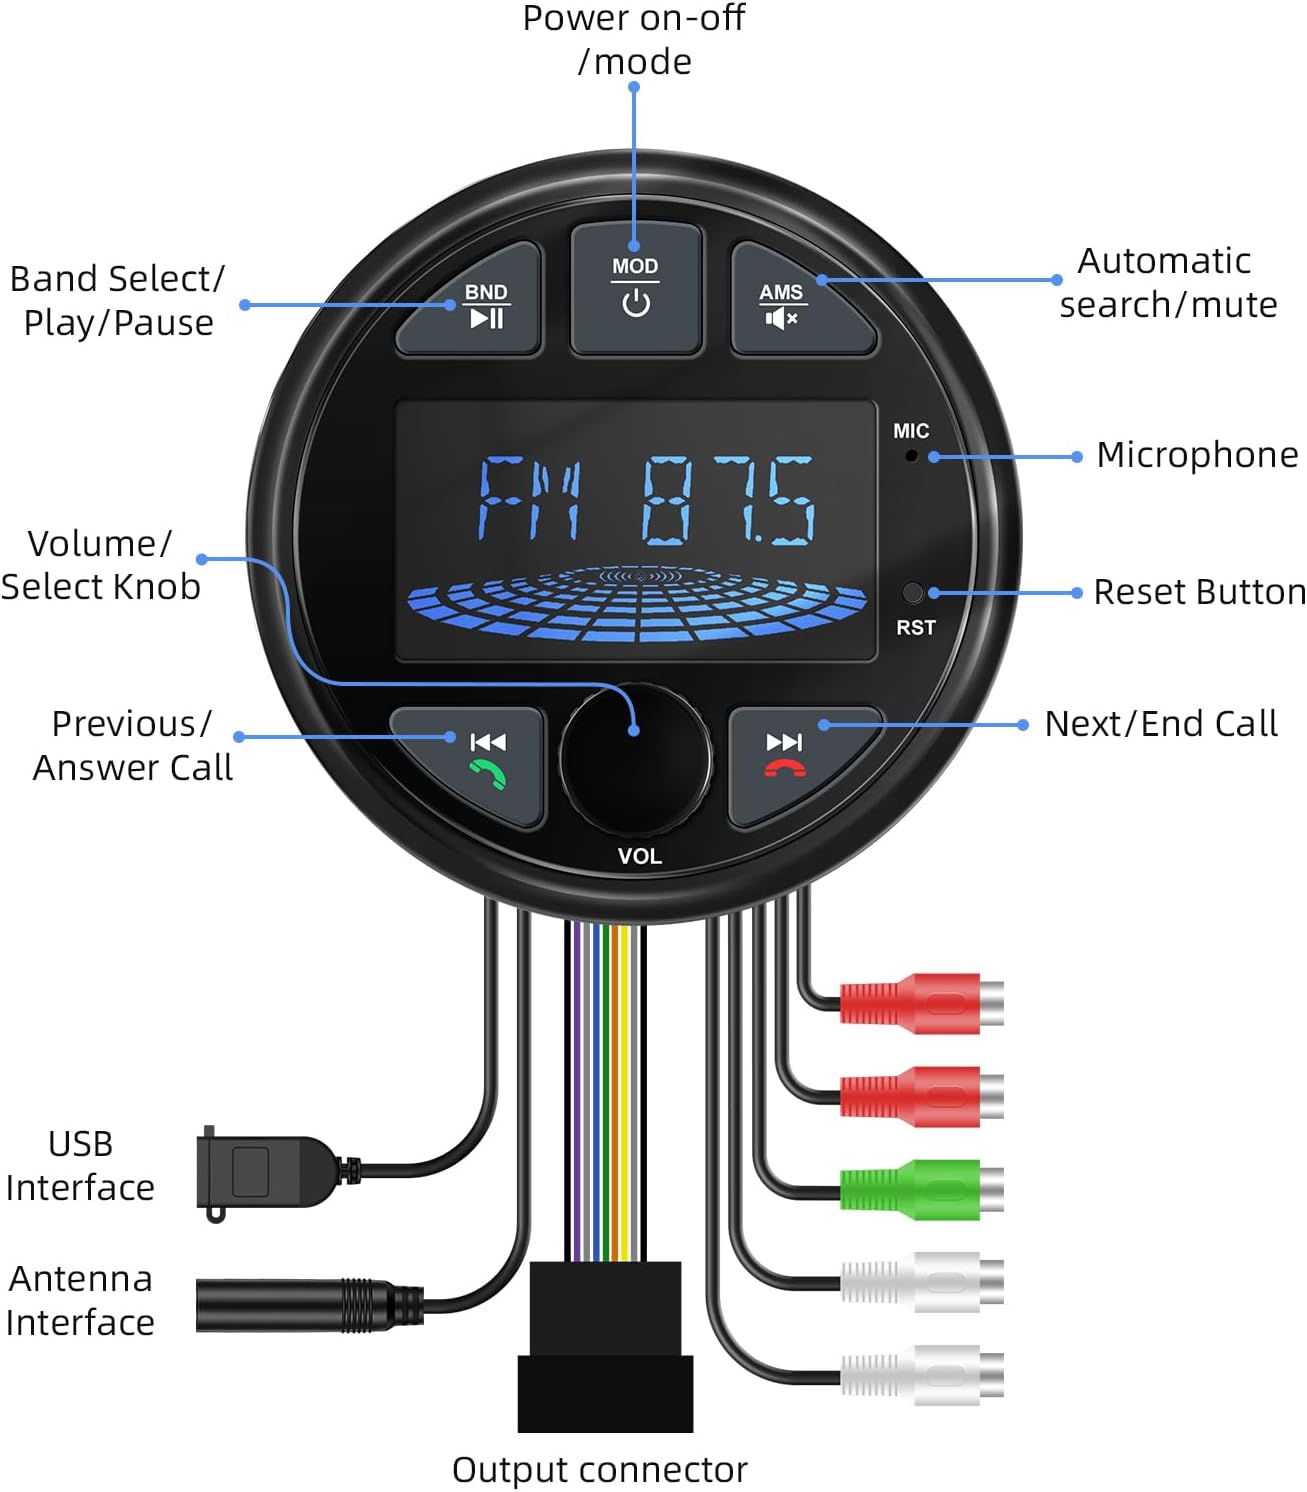
Detailed view of the front panel controls and the wiring diagram for installation.
- Power On-Off / Mode (MOD): Press to turn on/off or switch between audio sources (FM/AM, Bluetooth, USB, AUX).
- Band Select / Play/Pause (BND / ►►): Select radio band (FM1, FM2, FM3, AM1, AM2) or play/pause media.
- Automatic Search / Mute (AMS / 🔇): Auto-search for radio stations or mute audio.
- Microphone (MIC): For hands-free calling.
- Reset Button (RST): Press with a pointed object to reset the unit.
- Previous / Answer Call (◀◀ / ☎): Skip to previous track/station or answer an incoming call.
- Next / End Call (►► / ☎): Skip to next track/station or end a call.
- Volume / Select Knob (VOL): Rotate to adjust volume; press to access menu options.
- USB Interface: Connect USB devices for media playback or charging.
- Antenna Interface: Connect your marine antenna.
- Output Connector: Multi-pin connector for power, speakers, and RCA outputs.
5. Installation
Proper installation is crucial for the performance and longevity of your marine radio. It is recommended to have installation performed by a qualified technician.
5.1. Mounting
The unit is designed to fit a standard 3-inch gauge opening. Ensure there is sufficient depth and clearance behind the mounting surface for the unit and wiring.
- Cut a 3-inch (76mm) diameter hole in the desired mounting location.
- Insert the marine radio into the opening.
- Secure the unit using the provided mounting bracket and hardware.

Example of the marine radio installed in a boat dashboard.
5.2. Wiring Connections
Refer to the wiring diagram provided with your unit and the image in Section 4.1. Ensure all connections are secure and insulated to prevent corrosion and short circuits.
- Power: Connect the yellow wire to a constant 12V power source, the red wire to an ignition-switched 12V source, and the black wire to ground.
- Speakers: Connect speaker wires to the corresponding positive and negative terminals.
- Antenna: Connect the marine antenna to the antenna input.
- RCA Outputs: If connecting an external amplifier or subwoofer, use the RCA output cables.
6. Operation
6.1. Power On/Off and Mode Selection
- Press the MOD button to turn the unit on or off.
- Press the MOD button repeatedly to cycle through available audio sources: FM, AM, Bluetooth (BT), USB, and AUX.
6.2. Volume Control
- Rotate the VOL knob clockwise to increase volume and counter-clockwise to decrease volume.
6.3. Radio Operation (FM/AM)
- In FM or AM mode, press BND to select the desired band (FM1, FM2, FM3, AM1, AM2).
- Press ◀◀ or ►► to manually tune to the next/previous station.
- Press and hold ◀◀ or ►► for automatic seek tuning.
- Press AMS to automatically scan and store strong stations.
6.4. Bluetooth Pairing and Streaming
- Switch the unit to Bluetooth (BT) mode. The display will show "CONN" or a similar pairing indicator.
- On your mobile device, search for Bluetooth devices and select "LEXXSON" (or similar name).
- Once paired, you can stream audio from your device to the marine radio.
- Use ►► to play/pause, ◀◀ for previous track, and ►► for next track.
6.5. USB and AUX Playback
- USB: Insert a USB drive into the USB port. The unit will automatically switch to USB mode and begin playback.
- AUX: Connect an external audio device (e.g., MP3 player) to the AUX input using a 3.5mm audio cable. Switch the unit to AUX mode.
6.6. Call Handling
- When a call comes in, press the ☎ (answer call) button to answer.
- Press the ☎ (end call) button to end the call.
Official video demonstrating the LEXXSON Marine Radio's features and operation.
7. Maintenance
- Cleaning: Wipe the unit with a soft, damp cloth. Do not use harsh chemicals or abrasive materials.
- Connections: Periodically check all wiring connections for corrosion or looseness, especially in marine environments.
- Storage: If storing the vessel for an extended period, ensure the unit is powered off and protected from extreme temperatures.
8. Troubleshooting
| Problem | Possible Cause | Solution |
|---|---|---|
| No power | Blown fuse; incorrect wiring; loose power connection. | Check fuse; verify wiring connections; ensure power cables are secure. |
| No sound | Volume too low; incorrect source selected; speaker wires disconnected. | Increase volume; select correct source; check speaker connections. |
| Bluetooth not connecting | Unit not in BT mode; device not discoverable; interference. | Switch to BT mode; ensure device Bluetooth is on and discoverable; move closer to the unit. |
| Poor radio reception | Antenna not connected; damaged antenna; weak signal area. | Check antenna connection; replace antenna if damaged; try tuning in a different location. |
9. Specifications
| Feature | Detail |
|---|---|
| Brand | LEXXSON |
| Model Number | RM-ATV0002B |
| Connectivity Technology | Auxiliary, Bluetooth, USB |
| Special Feature | 3 Inch Color Screen, AM/FM Radio Receiver, MP3 Player, Weatherproof |
| Compatible Devices | Smartphone, MP3 Player |
| Connector Type | USB |
| Audio Output Mode | Stereo |
| Color | Black |
| Product Dimensions (D x W x H) | 3.74"D x 4.13"W x 4.13"H |
| Number of Channels | 4 |
| Output Wattage | 200 watts (4*50W) |
| Audio Output Type | RCA, Speakers |
| Wireless Technology | Bluetooth |
10. Warranty and Support
This LEXXSON Marine Radio comes with a 1-year warranty from the date of purchase, covering manufacturing defects. Please retain your proof of purchase for warranty claims.
For technical support, troubleshooting assistance, or warranty inquiries, please contact LEXXSON customer service through the retailer where the product was purchased or visit the official LEXXSON website for contact information.


