
1. Introduction
This manual provides detailed instructions for the installation, operation, and maintenance of your SUNVIE 300W Low Voltage Landscape Transformer. This unit converts 120V AC household current to a safe 12V/14V AC output, suitable for various low voltage landscape lighting systems. It features three independently controlled zones, a built-in timer, and a photocell sensor for automated operation.
2. Safety Information
Please read and understand all safety instructions before installing or operating this transformer. Failure to follow these instructions may result in electric shock, fire, or other hazards.
- Electrical Safety: Ensure the power supply is disconnected before any installation or maintenance. This transformer must be connected to a 120V AC grounded outlet.
- Outdoor Use: This unit is designed for outdoor use and is waterproof. However, ensure all connections are secure and protected from direct water exposure.
- Load Capacity: Do not exceed 80% of the transformer's rated power (240W for this 300W model) across all zones combined to prevent overload.
- Wiring: Use appropriate gauge low voltage landscape wire for your lighting system. Refer to local electrical codes for proper wiring practices.
- Photocell Sensor: Position the photocell sensor in a location that receives natural light and is not obstructed by artificial light sources at night.
3. Product Overview
The SUNVIE 300W transformer offers advanced control for your landscape lighting.
Key Features:
- 3 Independently Controlled Zones: Allows separate scheduling and modes for different lighting areas.
- 5 Setting Modes: Manual ON/OFF, Auto ON/OFF (Dusk to Dawn), Countdown (2/4/6/8 hours), Timer (ON/OFF at set times), Photocell ON Timer OFF.
- External Photocell Sensor: Removable and replaceable sensor with a 6.8ft UL listed cord for flexible placement.
- Circuit Protection: Built-in protection automatically stops output in case of abnormality, with a resettable circuit breaker.
- Memory Function: Retains last settings after power cycling.
- Durable Construction: Crafted from robust 304 stainless steel, resistant to rain, snow, dust, and abrasion.

Figure 1: Transformer Control Panel with Mode Options

Figure 2: Illustration of 3 Independently Controlled Zones
4. Specifications
| Specification | Value |
|---|---|
| Model | 300W |
| Input Voltage | 120V AC |
| Output Voltage | 12V/14V AC |
| Max Power Output | 300W (Do not exceed 240W in use) |
| Number of Zones | 3 |
| Material | 304 Stainless Steel |
| Mounting Type | Wall Mount |
| Product Dimensions | 12.1"D x 6.2"W x 4.2"H |
| Item Weight | 11.46 pounds |
| Photocell Cord Length | 6.8 ft |
| Power Source | Corded Electric |
| Certification | FCC |

Figure 3: Transformer Dimensions
5. Setup and Installation
Follow these steps for proper installation of your landscape transformer.
5.1 Mounting the Transformer
- Choose a suitable wall-mount location near a 120V AC grounded outlet. The location should be protected from direct impact and allow for proper ventilation.
- Use appropriate mounting hardware (not included) to securely fasten the transformer to the wall. Ensure the mounting surface can support the unit's weight (approximately 11.46 lbs).
5.2 Connecting Landscape Lights
The transformer features three terminal outputs for independent zone control. Each zone has a common (COM) terminal and selectable 12V or 14V AC output terminals.
- Prepare Wires: Strip approximately 1/2 inch of insulation from the ends of your low voltage landscape wires.
- Connect to Terminals: Loosen the screws on the desired zone's terminals (COM and either 12V or 14V). Insert one wire into the COM terminal and the other into the chosen voltage terminal (12V or 14V). The 14V output can compensate for voltage drop on longer wire runs.
- Secure Connections: Tighten the screws firmly to ensure a secure electrical connection. Repeat for all desired lighting zones.
- Route Wires: Ensure all low voltage wires are properly routed and buried according to local codes and best practices to prevent damage.
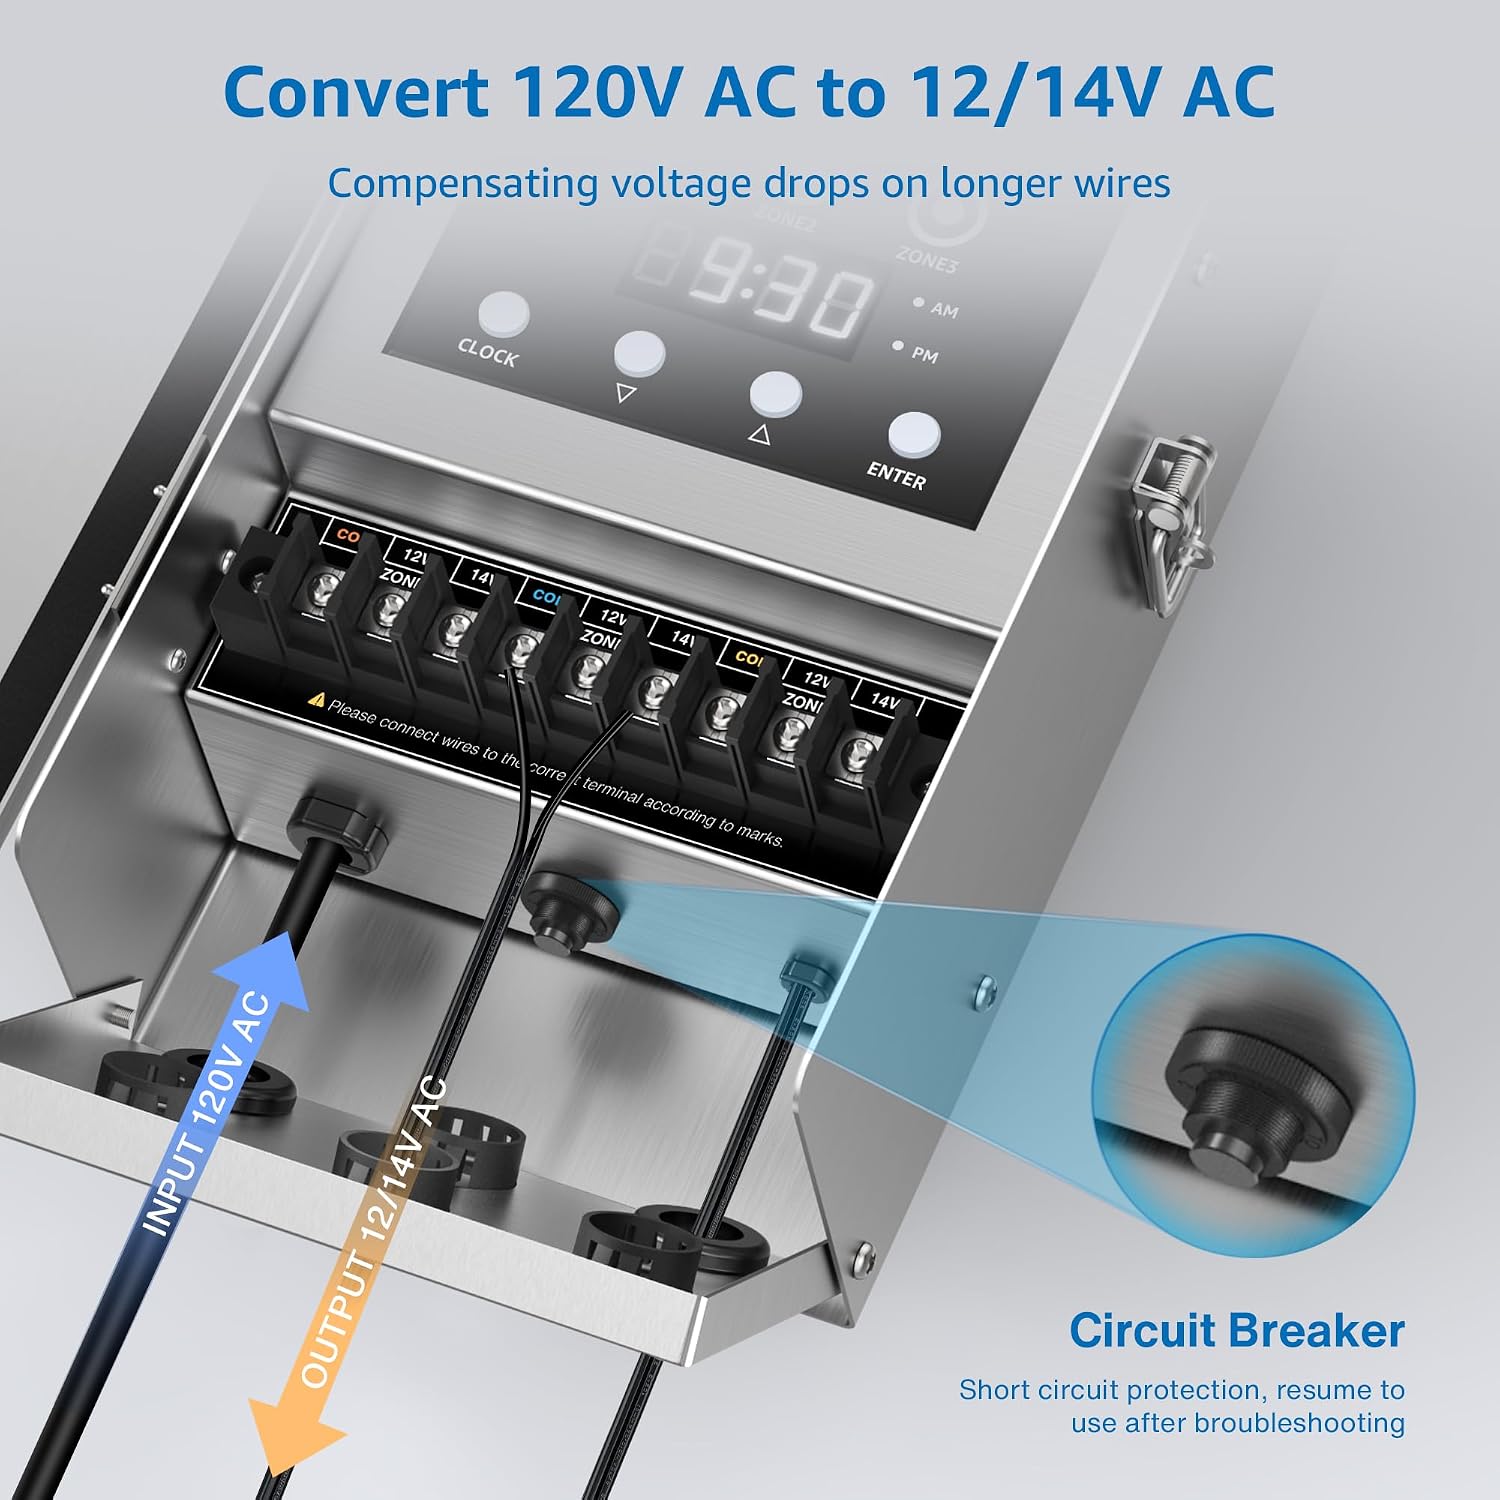
Figure 4: Wiring Terminals and Circuit Breaker
5.3 Photocell Sensor Installation
The external photocell sensor detects ambient light levels to activate dusk-to-dawn or timed operations.
- Connect the photocell sensor's cord to the designated port on the transformer.
- Mount the photocell sensor in a location that receives unobstructed natural light throughout the day and is not affected by artificial light sources (e.g., porch lights, streetlights) at night. This ensures accurate dusk and dawn detection.
6. Operating Instructions
The transformer's control panel allows you to set the clock and select operating modes for each of the three zones.
6.1 Setting the Clock
- Press the 'CLOCK' button. The hour display will flash.
- Use the '▲' (Up) and '▼' (Down) buttons to adjust the hour.
- Press 'CLOCK' again to set the minutes. Use '▲' and '▼' to adjust.
- Press 'CLOCK' a third time to confirm the time.
6.2 Selecting Operating Modes for Each Zone
Each zone can be programmed independently. Press the 'ZONE 1', 'ZONE 2', or 'ZONE 3' button to select the zone you wish to configure. Then, use the 'ENTER' button to cycle through the available modes:
- MANUAL ON/OFF: Lights remain continuously ON or OFF, overriding all other settings.
- AUTO ON/OFF (Dusk to Dawn): Lights turn ON automatically at dusk and turn OFF at dawn, controlled by the photocell sensor.
- COUNTDOWN (2/4/6/8 hours): Lights turn ON at dusk and remain ON for a set duration (2, 4, 6, or 8 hours), then turn OFF.
- TIMER ON/OFF: Allows you to set specific ON and OFF times for the lights.
- PHOTOCELL ON TIMER OFF: Lights turn ON at dusk and turn OFF at a specific set time.
The memory function ensures that your last settings are retained even after a power interruption.

Figure 5: Automatic Light Operation (Dusk to Dawn)
7. Maintenance
The SUNVIE 300W transformer is designed for durability and minimal maintenance.
- Cleaning: Periodically wipe the exterior of the transformer with a soft, damp cloth to remove dust and debris. Do not use abrasive cleaners or solvents.
- Photocell Sensor: Ensure the photocell sensor remains clean and free from obstructions (e.g., leaves, dirt) to maintain accurate light detection.
- Connections: Annually inspect all wiring connections for tightness and signs of corrosion.
- Environmental Protection: While weatherproof, avoid submerging the unit in water or exposing it to extreme conditions beyond its design specifications.

Figure 6: Weatherproof Design
8. Troubleshooting
If you encounter issues with your transformer, refer to the following common problems and solutions:
| Problem | Possible Cause | Solution |
|---|---|---|
| Lights not turning on | No power to transformer, circuit breaker tripped, incorrect mode setting, faulty photocell, loose wiring. | Check power outlet, reset circuit breaker, verify mode settings, ensure photocell is clean and unobstructed, inspect wiring connections. |
| Lights stay on/off constantly | Photocell obstructed or exposed to artificial light, incorrect mode setting. | Relocate photocell, ensure no artificial light interferes, check and adjust mode settings. |
| Lights flicker or are dim | Overload, voltage drop due to long wire runs or incorrect wire gauge, loose connections. | Reduce total wattage, use 14V output for longer runs, use heavier gauge wire, tighten all connections. |
| Circuit breaker trips repeatedly | Overload, short circuit in wiring or lights. | Reduce load, inspect wiring and lights for damage or short circuits. |
9. Warranty and Support
Your SUNVIE 300W Low Voltage Landscape Transformer is backed by a 12-month free replacement warranty. Additionally, SUNVIE provides lifetime after-sales support for this product. For warranty claims, technical assistance, or any questions, please contact SUNVIE customer service through the retailer where the product was purchased or visit the official SUNVIE website.
