Introduction
Thank you for choosing the IRONCK Farmhouse Kitchen Pantry Cabinet. This 72-inch tall storage cabinet is designed to provide extensive organization for your kitchen, dining room, or other living spaces. Featuring two pull doors, a central drawer, and multiple shelves, it combines rustic style with practical functionality. This manual provides essential information for assembly, safe use, and maintenance of your new cabinet.
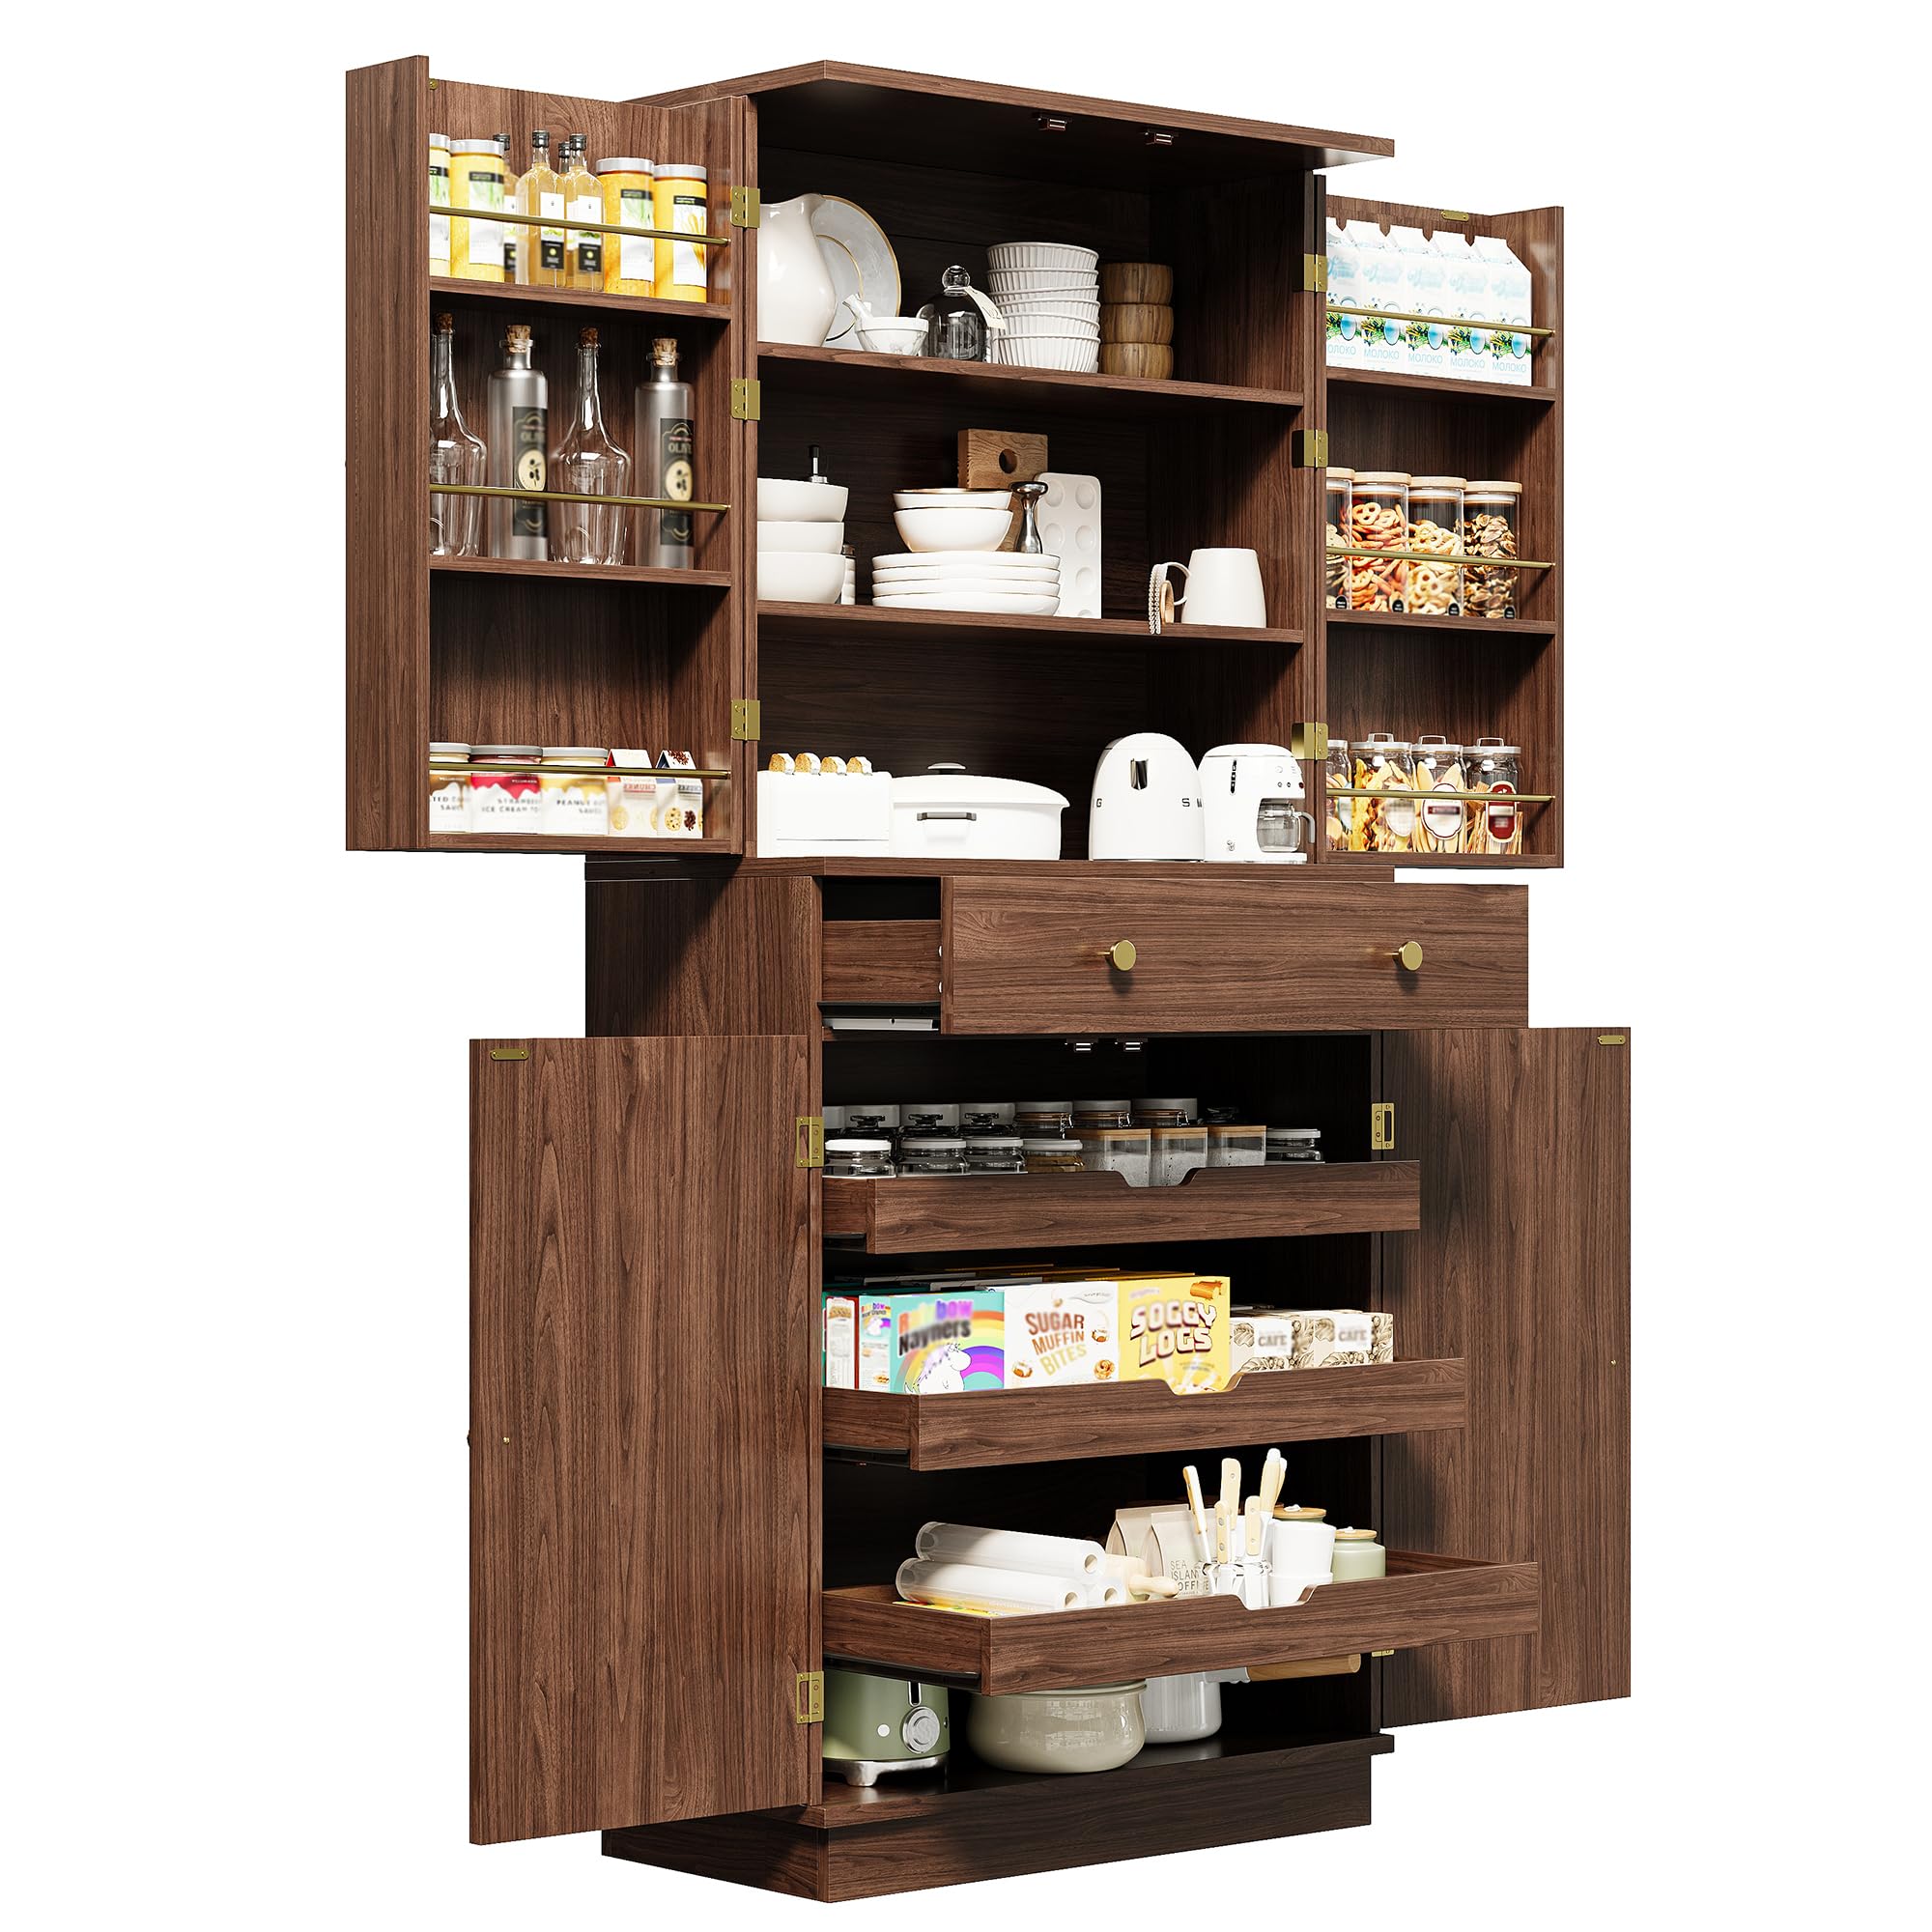
This image displays the IRONCK Farmhouse Kitchen Pantry Cabinet with all doors open, revealing its extensive storage capabilities. The upper section features multiple shelves and door racks filled with spices, bottles, and dishes. The middle section includes a drawer and open shelves. The lower section shows pull-out shelves with various pantry items. The cabinet is made of walnut brown engineered wood.
Safety Information
Always secure the cabinet to the wall using the included anti-tip kit to prevent tipping, especially around children and seniors. Do not exceed the load limit of 50 lbs per shelf to ensure safe and stable use. Ensure all screws and fasteners are tightened securely during assembly and periodically check for any loosening. Place the cabinet on a level surface to prevent instability.

This image shows a close-up of the anti-tipping device, a metal L-bracket designed to secure the cabinet to the wall, enhancing stability and safety.
Assembly Instructions
This cabinet requires assembly. Please follow the detailed instructions provided in the separate assembly manual included with your product. Ensure all parts are present before beginning assembly. It is recommended to assemble the cabinet on a soft, clean surface to prevent scratches.
- Unpack and Identify: Carefully unpack all components and hardware. Verify against the parts list in your assembly manual. All parts are typically numbered or labeled.
- Tools Required: Typically, a Phillips head screwdriver and a hammer are needed. Power tools are not recommended for tightening screws to avoid overtightening or stripping.
- Step-by-Step Assembly: Follow the diagrams and instructions in the provided manual sequentially. Do not skip steps.
- Hardware: Ensure correct hardware is used for each step. Avoid forcing screws; if a hole does not align, re-check the part orientation.
- Anti-Tip Kit: Install the anti-tip kit as instructed in the manual to secure the cabinet to a wall stud.

This diagram provides precise measurements for the IRONCK Farmhouse Kitchen Pantry Cabinet. It illustrates the overall height (72 inches), width (31.5 inches), and depth (15.7 inches), along with internal shelf heights, drawer dimensions, and door rack depths. These measurements are crucial for assembly and planning placement.

This image illustrates key construction details of the IRONCK pantry cabinet. It shows a close-up of the anti-tipping device for wall attachment, the elegant gold metal handles, a magnetic lock for secure door closure, a premium hinge, and the smooth slide rails for drawers and pull-out shelves. These components contribute to the cabinet's safety, functionality, and aesthetic.
Setup
Once assembled, choose a suitable location for your pantry cabinet. Ensure the floor is level and stable. For optimal safety, especially in households with children or pets, it is crucial to install the anti-tip kit.
- Positioning: Place the cabinet against a solid wall where you intend it to be permanently located.
- Leveling: Check if the cabinet is level. If not, use shims under the base as needed to ensure stability.
- Anti-Tip Kit Installation:
- Locate a wall stud behind the cabinet at the desired height for the anti-tip bracket.
- Attach one end of the bracket to the top rear edge of the cabinet using the provided screws.
- Mark the wall through the other end of the bracket. Drill a pilot hole into the wall stud.
- Secure the bracket to the wall using the appropriate screw.
- Ensure the strap or cable (if included) is taut and securely fastened between the cabinet and the wall.
Operating the Cabinet Features
The IRONCK pantry cabinet is designed with various storage solutions for efficient organization.
Upper Door Shelves
The upper section features doors with integrated shelves. These shelves are ideal for storing smaller items like spice jars, bottles, and condiments, keeping them visible and easily accessible.
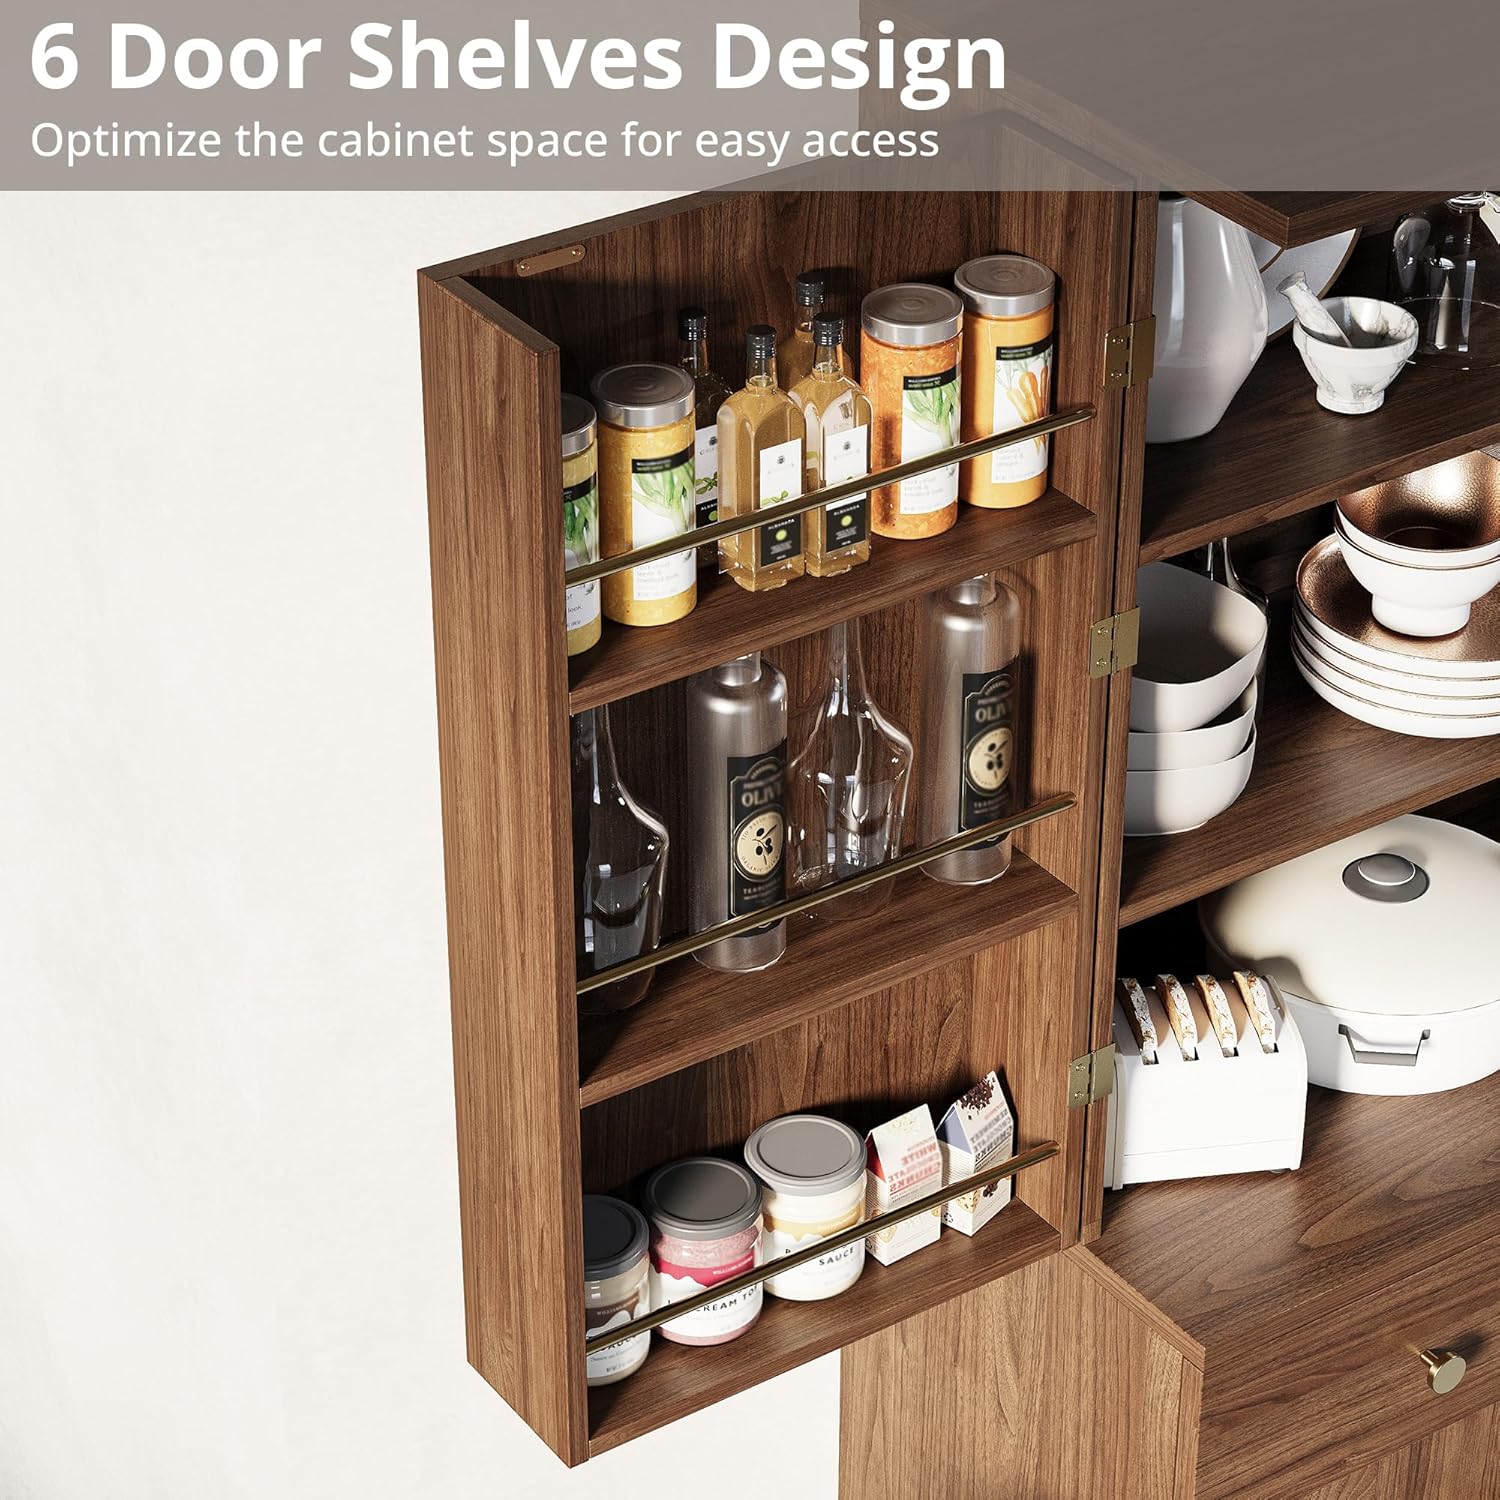
This image focuses on the six door shelves integrated into the cabinet doors. These shelves, equipped with retaining bars, are designed to hold bottles, spice jars, and other small items, optimizing storage space and keeping frequently used ingredients easily accessible.
Central Storage Drawer
The cabinet includes a spacious central drawer, perfect for organizing silverware, kitchen towels, or other household items. The drawer operates on smooth slide rails for effortless opening and closing.

This image highlights the spacious central drawer of the pantry cabinet, shown open and organized with cutlery trays holding various silverware and kitchen utensils. The drawer features smooth slide rails for easy access and is ideal for storing smaller household items.
Lower Pull-Out Sliding Racks
The lower section features three practical pull-out sliding storage racks. These racks allow for easy access to items stored at the back, eliminating the need to bend over or reach awkwardly. They are suitable for larger items like food boxes, small appliances, or cookware.

This image shows the three practical pull-out sliding storage racks located in the lower part of the cabinet. Each rack is extended, displaying various food boxes, jars, and kitchen tools, demonstrating easy access to items without bending or reaching deep into the cabinet.
Maintenance
Proper care will ensure the longevity and appearance of your IRONCK pantry cabinet.
- Cleaning: Wipe surfaces with a soft, damp cloth. Avoid harsh chemicals, abrasive cleaners, or excessive moisture, which can damage the engineered wood finish.
- Spills: Clean up spills immediately to prevent staining or damage to the wood.
- Hardware Check: Periodically check all screws, hinges, and drawer slides to ensure they remain tight. Tighten any loose hardware with a screwdriver.
- Avoid Overloading: Do not exceed the recommended weight capacity of 50 lbs per shelf to prevent structural damage.
Troubleshooting
If you encounter issues with your cabinet, refer to the following common solutions:
- Doors or Drawers Not Aligning:
- Ensure the cabinet is placed on a level surface. Adjust shims if necessary.
- Check hinge adjustments. Most hinges allow for minor adjustments to align doors. Refer to your assembly manual for specific hinge adjustment instructions.
- Verify that all assembly screws are fully tightened.
- Loose Hardware: Regularly inspect and tighten any loose screws on hinges, handles, or drawer slides. Avoid overtightening.
- Missing or Damaged Parts: If you received missing or damaged parts during unpacking, do not proceed with assembly. Contact IRONCK customer support immediately for replacements.
- Difficulty with Assembly: Re-read the assembly manual carefully. Ensure each step is followed precisely and that parts are oriented correctly. Sometimes, a small detail can affect subsequent steps.
Specifications
| Feature | Detail |
|---|---|
| Brand | IRONCK |
| Model Number | HK-BZCWG-04-02 |
| Product Dimensions | 15.7"D x 31.5"W x 72"H |
| Color | Walnut Brown |
| Material | Engineered Wood |
| Item Weight | 134.9 Pounds |
| Number of Shelves | 6 (internal) + 6 (door racks) |
| Mounting Type | Freestanding with Wall Mount (Anti-tip kit) |
| Assembly Required | Yes |
| Recommended Uses | Cutlery, Decorative items, Dish, Kitchen Appliances, Pans, Pots, Tableware, Utensils |
Warranty and Support
For any questions, concerns, or to report missing/damaged parts, please contact IRONCK customer support. Refer to your purchase documentation for specific warranty details and contact information. Please have your model number (HK-BZCWG-04-02) and purchase date ready when contacting support.
Online Support: Visit the official IRONCK website for FAQs and support resources.


