
1. Introduction
This manual provides detailed instructions for the installation, operation, and maintenance of your Uthfy 12000BTU 115V Mini Split AC/Heating System, Model HY12GWH115. This ETL-certified unit features a 1-ton high-performance inverter heat pump compressor, designed to provide efficient cooling and heating for spaces up to 750 sq. ft. Please read this manual thoroughly before installation and use to ensure proper function and safety.
2. Safety Information
Important Safety Instructions:
- Installation must be performed by qualified professionals to prevent electric shock, fire, or serious injury.
- Ensure the power supply matches the unit's specifications (115V).
- Do not attempt to repair or modify the unit yourself. Contact qualified service personnel.
- Keep children and pets away from the unit during operation and maintenance.
- Ensure proper grounding to prevent electrical hazards.
- Do not block air inlets or outlets.
- Use only R32 refrigerant as specified.
3. Package Contents
Your Uthfy Mini Split AC/Heating System is shipped in two separate boxes. Please verify all components are present before beginning installation.
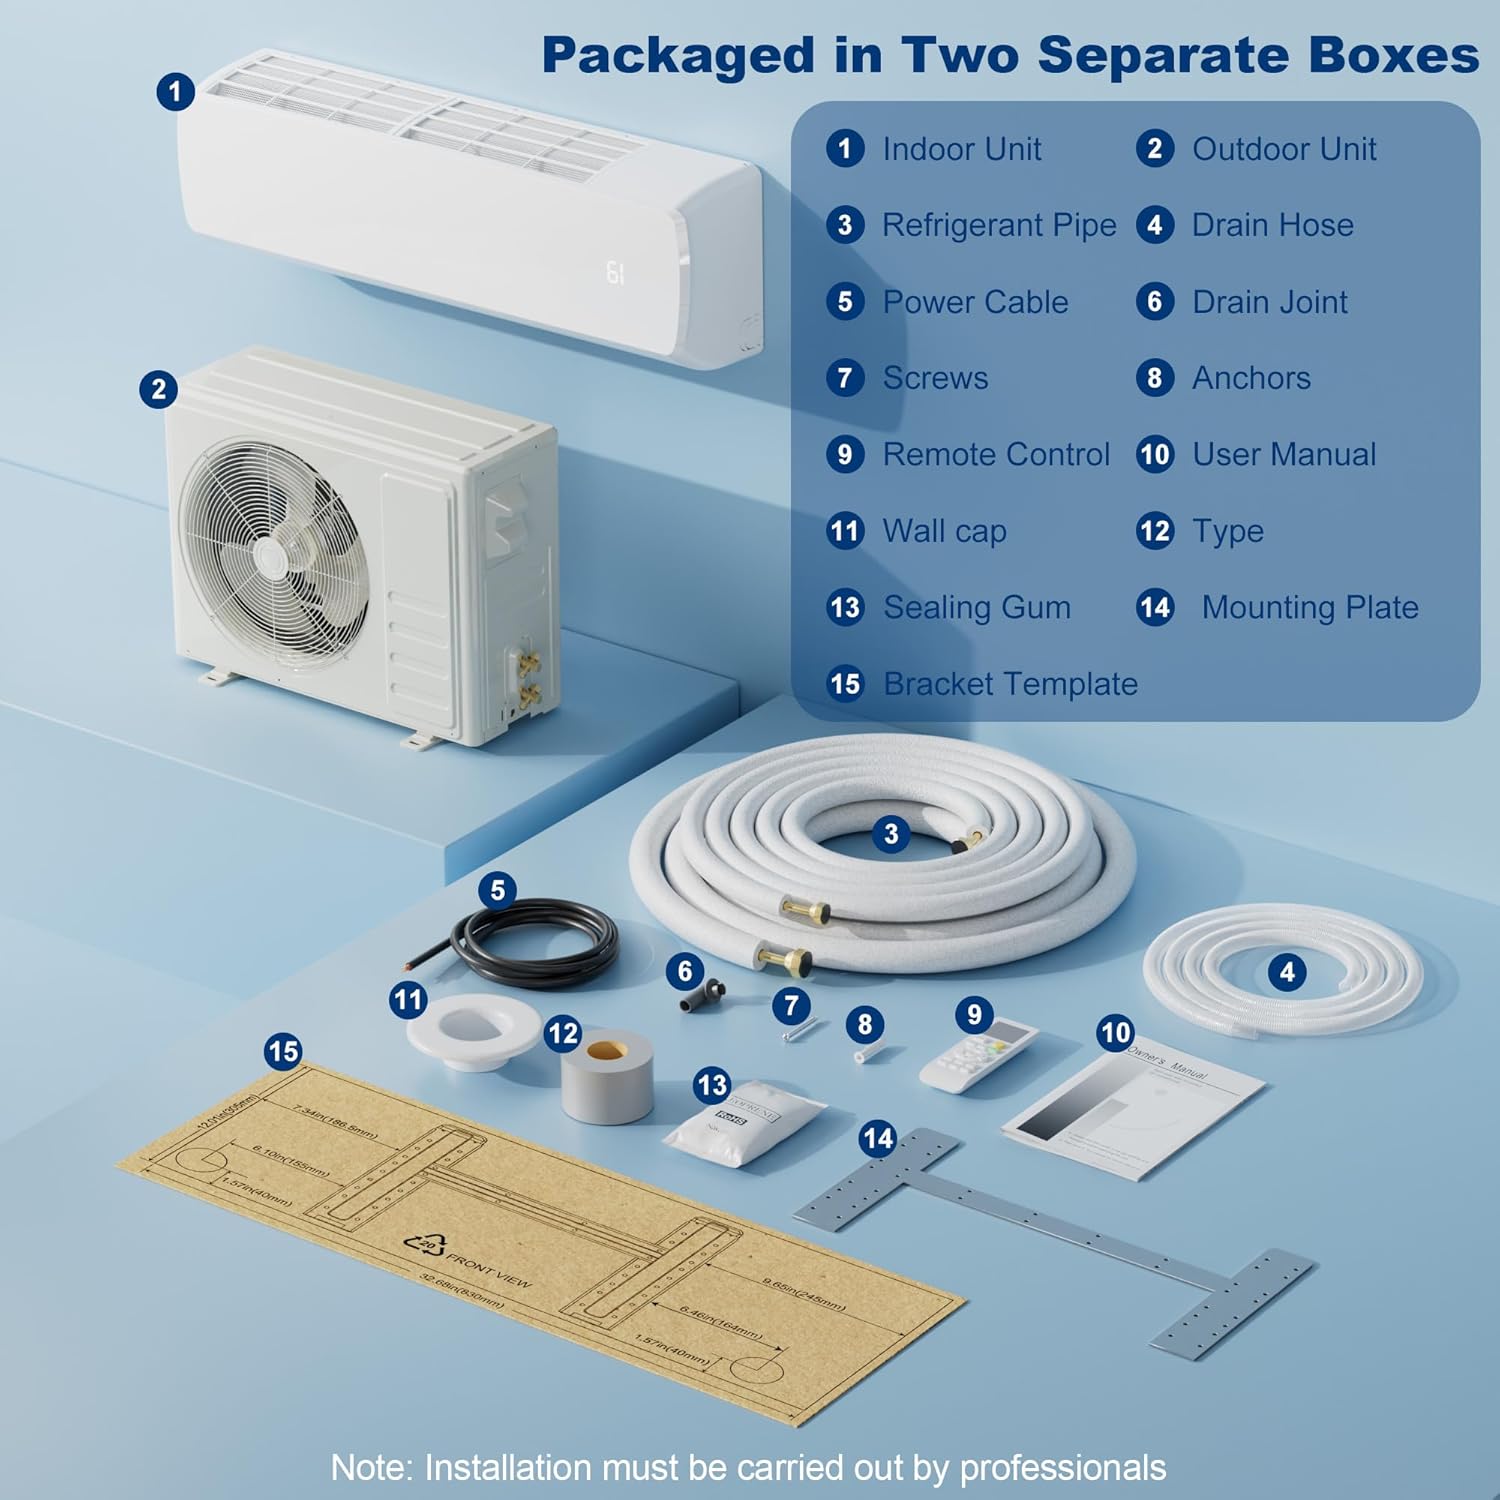
Figure 3.1: Included Components. The image displays the indoor unit, outdoor unit, refrigerant pipes, drain hose, power cable, drain joint, anchors, screws, remote control, user manual, wall cap, sealing gum, mounting plate, and bracket template.
The package typically includes:
- Indoor Unit
- Outdoor Unit
- Refrigerant Pipes (Pre-charged)
- Drain Hose
- Power Cable
- Drain Joint
- Anchors and Screws
- Remote Control
- User Manual (this document)
- Wall Cap
- Sealing Gum
- Mounting Plate
- Bracket Template
4. Product Overview
4.1 Key Features
- Energy-Efficient Inverter Technology: Dynamically adjusts power frequency to reduce energy consumption by approximately 25% compared to traditional units, maintaining stable temperatures.
- All-Season Comfort: Offers 7 versatile working modes (including Turbo, Mute, Sleep, ECO, Swing, Fan) and 4 fan speeds (Low, Mid, High, Auto) for year-round climate control.
- Ultra-Quiet Operation: Operates at a low speed noise level of 25 dB, ensuring minimal disturbance.
- Eco-Friendly Refrigerant: Pre-charged with R32 refrigerant, contributing to environmental sustainability.
- Smart Functions: Includes a 24-hour intelligent timer for scheduled operation and a dimmable display.
- Auto-Cleaning: Features an automatic interior cleaning function to maintain air quality.

Figure 4.1: Performance overview showing quick cooling and heating capabilities for areas up to 750 sq.ft.

Figure 4.2: Illustrates the 4-in-One functionality, including cooling, heating, fan, and dry modes.
5. Installation
Professional installation is strongly recommended for this mini split system. The following steps provide a general overview. Refer to the detailed instructions in the included user manual for specific guidance.
5.1 Indoor Unit Installation
- Select Location: Choose a location on an interior wall that can support the unit's weight and allows for proper airflow. Ensure there is enough space around the unit for maintenance.
- Mounting Plate Installation: Use the provided bracket template to mark drilling points on the wall. Drill holes and secure the mounting plate firmly to the wall using anchors and screws.
- Drill Wall Hole: Drill a hole (typically 2.5-3 inches in diameter) through the wall for the refrigerant lines, drain hose, and electrical cables to pass through to the outdoor unit.
- Connect Wiring: Open the electrical cover on the indoor unit. Connect the power cable and communication wires to the designated terminals as shown in the wiring diagram. Ensure all connections are secure.
- Route Pipes and Cables: Route the refrigerant pipes, drain hose, and electrical cables through the wall hole.
- Mount Indoor Unit: Carefully lift the indoor unit and hook it onto the mounting plate. Ensure it is securely seated and level.
Video 5.1: This video demonstrates the process of connecting electrical wiring to the indoor unit, routing the pipes and cables, and mounting the indoor unit to the wall. It also shows the connection of the refrigerant lines.
5.2 Outdoor Unit Installation
- Select Location: Choose a stable, level surface outdoors, away from direct sunlight and obstructions, with adequate clearance for airflow.
- Secure Unit: Place the outdoor unit on a sturdy base (e.g., concrete pad or specialized mounting brackets). Secure it to prevent vibration and movement.
- Connect Refrigerant Lines: Connect the pre-charged refrigerant lines from the indoor unit to the corresponding valves on the outdoor unit. Ensure connections are tight to prevent leaks.
- Connect Electrical Wiring: Open the electrical cover on the outdoor unit. Connect the communication wires and power supply wires to the designated terminals. Ensure proper grounding.
- Vacuum and Leak Test: After all connections are made, a vacuum pump must be used to evacuate air and moisture from the refrigerant lines. Perform a leak test to ensure system integrity.
- Open Valves: Once the system is vacuumed and leak-free, fully open the service valves on the outdoor unit to release the refrigerant into the system.
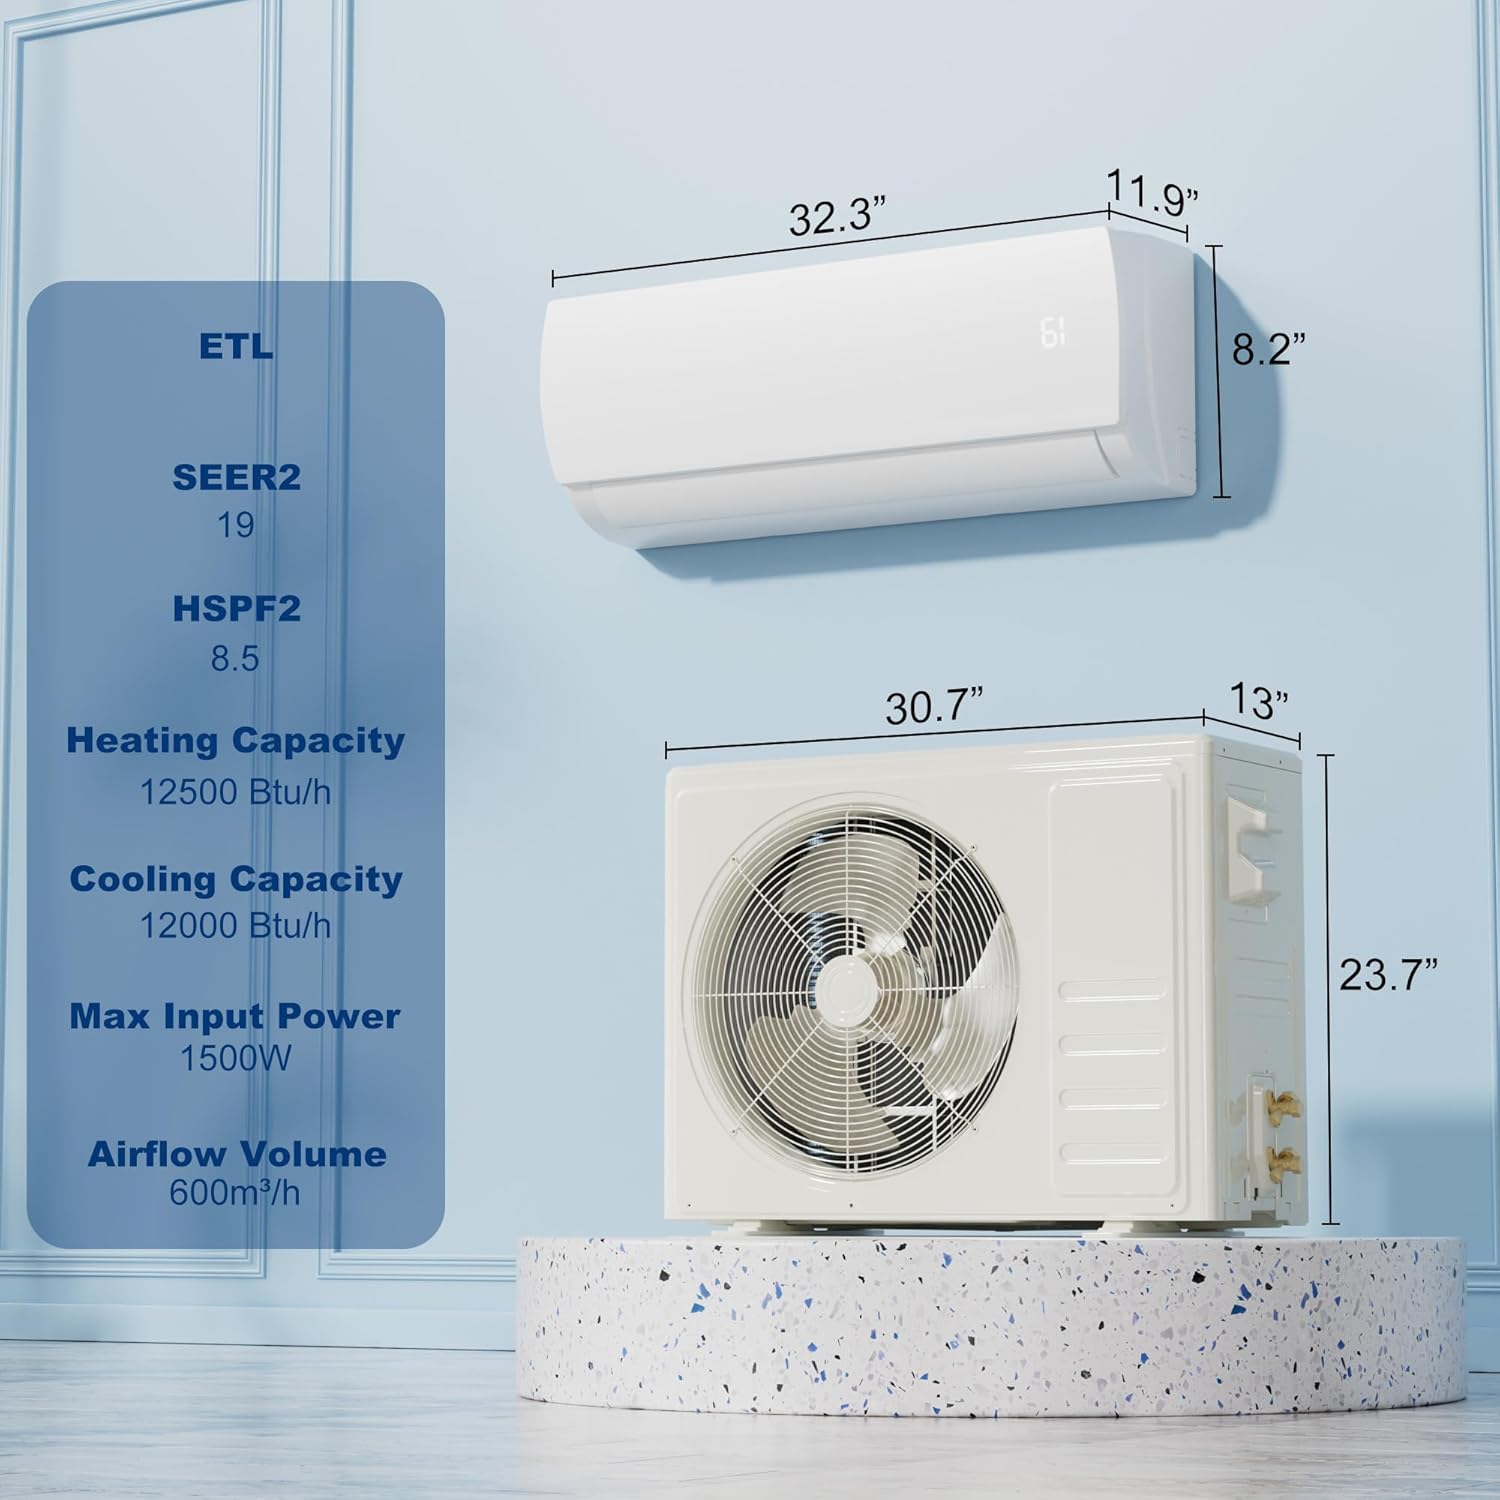
Figure 5.1: Dimensions of the indoor and outdoor units. Indoor unit: 32.3"D x 11.9"W x 8.2"H. Outdoor unit: 30.7"D x 13"W x 23.7"H.
6. Operation
Your Uthfy Mini Split AC/Heating System can be controlled using the included remote control.
6.1 Remote Control Functions
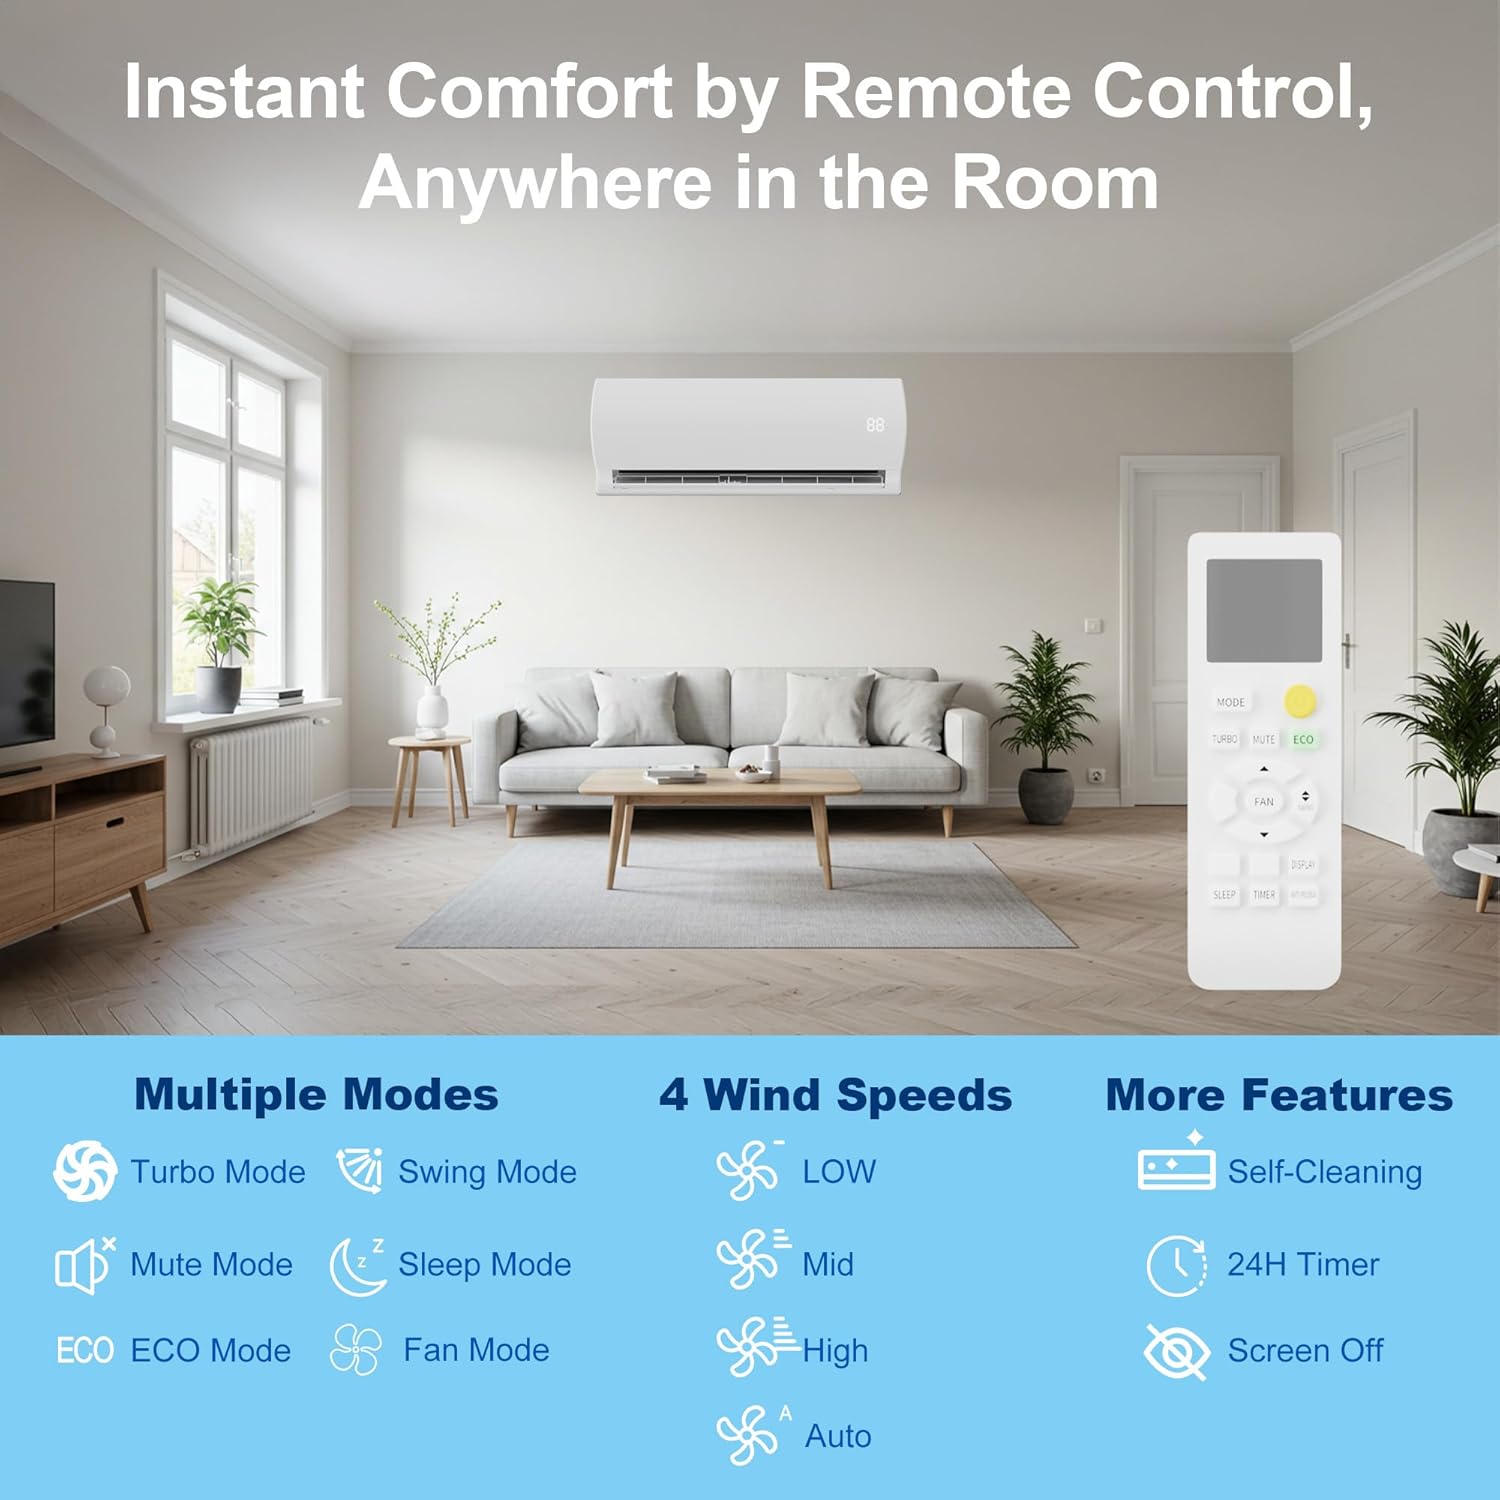
Figure 6.1: Remote control and available operating modes. The remote allows selection of Turbo Mode, Swing Mode, Mute Mode, Sleep Mode, ECO Mode, Fan Mode, and adjustment of fan speeds (Low, Mid, High, Auto). Additional features include Self-Cleaning, 24H Timer, and Screen Off.
Familiarize yourself with the remote control buttons and their corresponding functions:
- MODE Button: Cycles through operating modes: Cool, Heat, Fan, Dry, Auto.
- FAN Button: Adjusts fan speed: Low, Mid, High, Auto.
- TEMP +/- Buttons: Adjusts the desired temperature setting.
- SWING Button: Controls the vertical louver movement for air distribution.
- SLEEP Mode: Optimizes temperature and fan speed for comfortable sleep and energy saving.
- ECO Mode: Provides energy-efficient operation by adjusting settings automatically.
- TURBO Function: Activates maximum cooling or heating for rapid temperature change.
- TIMER Button: Sets the 24-hour timer for automatic on/off operation.
- SCREEN OFF Button: Turns off the indoor unit's display for undisturbed rest.
6.2 Operating Modes
| Mode | Description |
|---|---|
| Cool Mode | Cools the room to the set temperature. |
| Heat Mode | Heats the room to the set temperature. |
| Fan Mode | Circulates air without cooling or heating. |
| Dry Mode | Dehumidifies the room. |
| Auto Mode | Automatically selects cooling or heating based on room temperature. |
| Sleep Mode | Adjusts temperature and fan speed for quiet, comfortable sleep. |
| ECO Mode | Optimizes operation for maximum energy efficiency. |

Figure 6.2: Quiet operation in Sleep Mode, with noise levels as low as 25 dB.
7. Maintenance
Regular maintenance ensures optimal performance and longevity of your unit.
7.1 Filter Cleaning
The indoor unit features washable air filters. Clean them regularly (every 2-4 weeks, depending on usage) to maintain air quality and efficiency.
- Turn off the unit and disconnect power.
- Open the front panel of the indoor unit.
- Remove the air filters.
- Wash filters with lukewarm water and mild detergent. Rinse thoroughly.
- Allow filters to dry completely before reinstalling.
- Close the front panel.
7.2 Auto-Cleaning Function
This unit includes an auto-cleaning function to help prevent mold and bacteria buildup inside the indoor unit. Refer to your remote control instructions for activating this feature.
8. Troubleshooting
Before contacting customer support, please refer to the following common issues and solutions:
| Problem | Possible Cause | Solution |
|---|---|---|
| Unit does not start | No power, circuit breaker tripped, remote control batteries low. | Check power supply, reset breaker, replace remote batteries. |
| Insufficient cooling/heating | Dirty air filters, blocked outdoor unit, incorrect mode setting, low refrigerant. | Clean filters, clear obstructions, select correct mode, contact professional for refrigerant check. |
| Unusual noise | Loose parts, fan obstruction, unit not level. | Check for loose components, remove obstructions, ensure unit is level. If noise persists, contact service. |
| Water leakage from indoor unit | Clogged drain hose, improper installation. | Check and clear drain hose, ensure proper slope. If issue persists, professional inspection is needed. |
9. Specifications
Detailed technical specifications for the Uthfy 12000BTU 115V Mini Split AC/Heating System (Model HY12GWH115).
| Feature | Specification |
|---|---|
| Brand | Uthfy |
| Model Name | HY12GWH115 |
| Capacity | 1 Ton |
| Cooling Power | 12000 British Thermal Units (BTU) |
| Heating Capacity | 12500 BTU/h |
| Voltage | 115 Volts |
| SEER2 Rating | 19 |
| HSPF2 Rating | 8.5 |
| Noise Level (Low Speed) | 25 Decibels |
| Product Dimensions (Indoor Unit) | 32.28"D x 11.93"W x 8.23"H |
| Item Weight | 73.9 Pounds |
| Refrigerant Type | R32 (Pre-charged) |
| Installation Type | Split System |
| Included Components | Installation Kit |
10. Warranty and Support
Warranty: This Uthfy Mini Split AC/Heating System comes with a 1-Year Manufacturer Warranty.
Customer Support: For technical assistance, troubleshooting beyond this manual, or warranty claims, please contact Uthfy customer support. Refer to the contact information provided in your product packaging or visit the official Uthfy website.

