
1. Introduction
Thank you for choosing the Blütezeit MJ-300 Sliding Gate Opener. This manual provides detailed instructions for the safe installation, operation, and maintenance of your gate opener system. Please read this manual thoroughly before installation and keep it for future reference.
2. Safety Information
Important Safety Instructions:
- Read and follow all instructions carefully.
- Do not allow children to operate the gate opener or play near the gate.
- Keep the gate area clear of obstructions.
- Ensure the gate is properly installed and moves freely before installing the opener.
- Disconnect power before performing any service or maintenance.
- Only qualified personnel should perform electrical connections.
- Install the gate opener on the inside of the gate, away from public access.
- Always use the manual release in case of power failure or emergency.
3. Product Overview
The Blütezeit MJ-300 is a robust sliding gate opener system designed for residential and light commercial applications. It supports gates up to 900 lbs and includes a wired keypad for secure multi-user access.
3.1 Main Components
- MJ-300 Gate Motor: 130W AC110V copper motor, capable of moving gates up to 900 lbs.
- Nylon Gear Racks: Four 3.28ft reinforced nylon racks with metal core, totaling 13.12ft.
- MWK20 Wired Keypad: IP68 waterproof metal keypad with PIN, RFID, and dual authentication. Supports up to 2000 users.
- Adjustable Keypad Post: Telescopic aluminum alloy post (23.6"–47.2") for optimal keypad positioning.
- Remote Controls: Two 433.92MHz remotes.
- RFID Cards: Two RFID cards for keypad access.
- Magnetic Limit Switches: Red for gate close, blue for gate open.
3.2 Key Features
- Powerful Motor: 130W AC110V copper motor with 400N pull force for smooth operation.
- Durable Gear Racks: Reinforced nylon with metal core for wear and corrosion resistance, low-noise.
- Secure Access: MWK20 keypad offers PIN, RFID, or dual authentication for up to 2000 users.
- Adjustable Keypad Post: Provides flexible height adjustment for various driveway setups.
- DIY-Friendly: Complete hardware and instructions for straightforward installation.
- Weather Resistant: Designed for reliable performance in temperatures from -13°F to 122°F.
- Auto-Close Function: Adjustable auto-close time from 5 to 120 seconds.
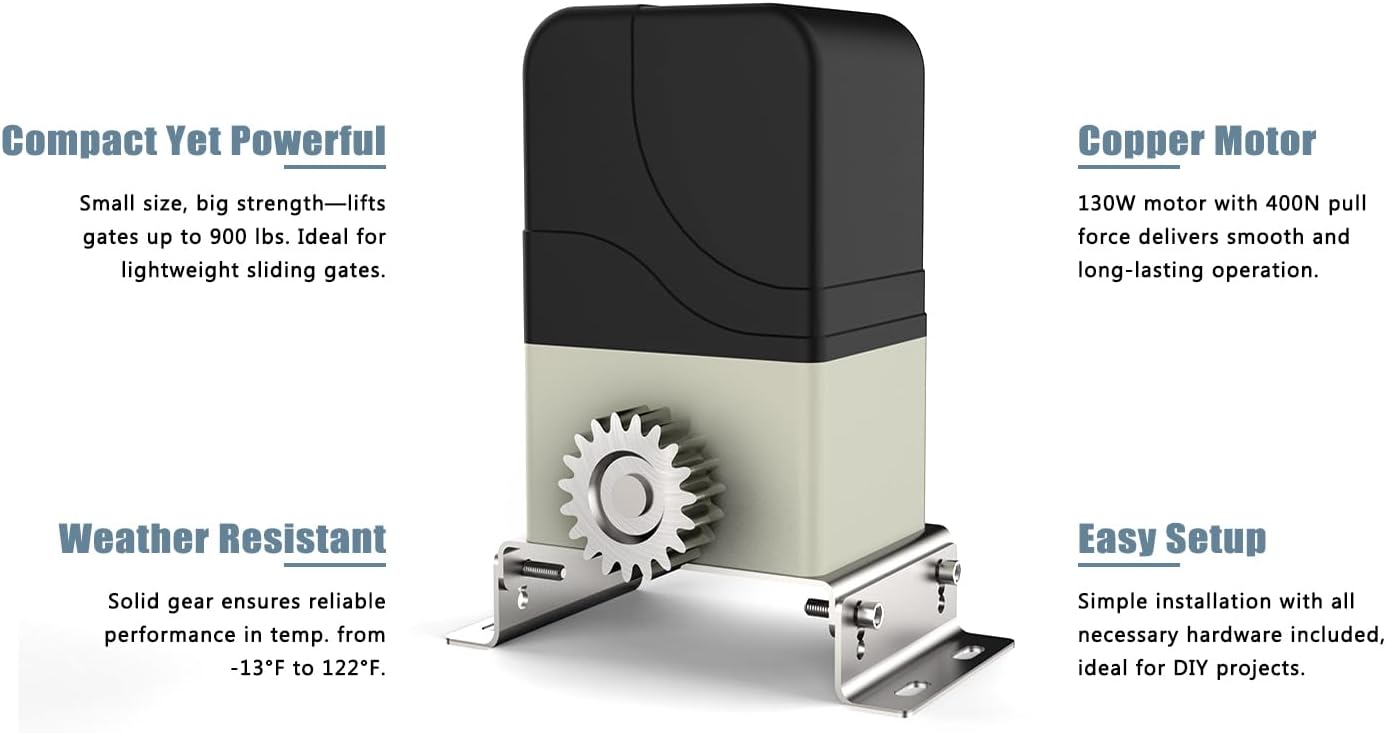
Figure 3.2.1: Blütezeit MJ-300 Gate Opener Motor Unit. This image shows the compact motor unit with its gear, highlighting its powerful 130W copper motor, weather-resistant design, and easy setup features for gates up to 900 lbs.

Figure 3.2.2: Remote Control and Magnetic Limit Switches. This image displays the safety remote with rolling code technology and the red and blue magnetic switches used for precise gate open and close positioning, along with the auto-close function.
4. Installation
Before beginning installation, ensure you have all components and tools required. Refer to the included hardware list for verification.
4.1 Gate Opener Motor Installation
- Prepare a stable, level concrete pad or mounting base next to the gate opening.
- Position the motor unit on the pad, ensuring proper alignment with the gate's path.
- Secure the motor unit to the base using the provided mounting hardware.
- Ensure the motor's gear aligns correctly with the future position of the gear rack on the gate.
4.2 Gear Rack Installation
The system includes 13.12ft of nylon gear racks (four 3.28ft sections).

Figure 4.2.1: Nylon Gear Rack Dimensions. This image illustrates the dimensions of a single gear rack section, showing its 40-inch length, 3/4-inch width, and 1-inch height.
- Attach the gear racks horizontally along the bottom edge of the gate, ensuring they are level.
- Maintain a small gap (approximately 1-2mm) between the gear rack teeth and the motor's gear to allow for smooth operation and expansion.
- Use the provided screw mounting hardware to secure each rack section firmly to the gate.
- Connect subsequent rack sections, ensuring continuous and even alignment.

Figure 4.2.2: Gear Rack Screw Mounting. This image demonstrates how the gear racks are mounted to the gate using screws and square washers, showing the secure attachment method.
4.3 MWK20 Wired Keypad and Post Installation
The MWK20 keypad provides secure access and is designed for outdoor use with its IP68 rating.

Figure 4.3.1: MWK20 Wired Keypad, RFID Cards, and Cable. This image shows the keypad unit, two RFID access cards, and the 16.4ft connection cable, illustrating the components for secure access control.
- Keypad Post Assembly: Assemble the adjustable keypad post using the internal connecting sleeves and secure bolts. The post height can be adjusted from 23.6" to 47.2".
- Post Mounting: Mount the keypad post in a suitable location near the gate, ensuring it is stable and accessible.
- Keypad Mounting: Attach the MWK20 keypad to the top of the post.
- Wired Connection: Connect the keypad to the gate opener control board using the provided 16.4ft cable. Ensure all connections are secure and follow the wiring diagram in the main control board manual.

Figure 4.3.2: Keypad Wired Connection. This image highlights the wired connection of the keypad, emphasizing its stability, interference-free signal, and zero latency compared to wireless alternatives.

Figure 4.3.3: Adjustable Keypad Post. This image shows the white, adjustable post designed to hold the keypad at an optimal height, featuring a durable aluminum alloy construction.

Figure 4.3.4: Keypad Mounted on Post. This image displays the keypad securely mounted on the adjustable post, ready for use.
4.4 Magnetic Limit Switch Installation
- Install the red magnetic switch to define the gate's fully closed position.
- Install the blue magnetic switch to define the gate's fully open position.
- Ensure the magnets are securely fastened to the gate and align with the magnetic sensors on the motor unit when the gate is in its respective open/closed position.
5. Operation
5.1 Remote Control Operation
The included 433.92MHz remotes use rolling code technology for security. They can be configured for single-button or three-button modes.
- Single-Button Mode: Each press cycles through Open, Stop, Close, Stop.
- Three-Button Mode: Dedicated buttons for Open, Close, and Stop functions. Refer to the control board manual for programming instructions.
5.2 MWK20 Keypad Operation
The MWK20 keypad allows access via PIN code, RFID card, or a combination of both. It supports up to 2000 users.
- PIN Code Access: Enter your programmed PIN code followed by '#'.
- RFID Card Access: Present your RFID card to the keypad reader.
- Dual Authentication: Requires both PIN code and RFID card for access (if programmed).
- User Management: Refer to the MWK20 keypad manual for instructions on adding, deleting, and managing user PINs and RFID cards.
5.3 Auto-Close Function
The gate opener can be programmed to automatically close after a set period. The auto-close time is adjustable from 5 to 120 seconds. Consult the control board manual for instructions on enabling and setting this feature.
5.4 Manual Release
In case of power failure or emergency, the gate can be operated manually. Locate the manual release mechanism on the motor unit, typically a key-operated lever. Turn the key and disengage the motor to move the gate by hand.
6. Maintenance
Regular maintenance ensures the longevity and reliable operation of your gate opener system.
- Monthly:
- Inspect the gate for proper balance and free movement.
- Check all mounting hardware for tightness.
- Clean the gear rack and motor gear to remove debris.
- Quarterly:
- Lubricate moving parts as recommended by the manufacturer (refer to the main motor manual).
- Test the safety features, including the manual release.
- Inspect electrical wiring for any signs of wear or damage.
- Annually:
- Have a qualified technician inspect the system for optimal performance and safety.
7. Troubleshooting
This section addresses common issues you might encounter. For more complex problems, contact customer support.
| Problem | Possible Cause | Solution |
|---|---|---|
| Gate does not move. | No power; remote battery dead; safety sensor obstructed; manual release engaged. | Check power supply; replace remote battery; clear sensor path; disengage manual release. |
| Gate stops unexpectedly. | Obstruction detected; limit switch misaligned; motor overheating. | Remove obstruction; check and adjust limit switches; allow motor to cool. |
| Remote control not working. | Battery dead; remote out of range; remote not programmed. | Replace battery; move closer to gate; reprogram remote (refer to control board manual). |
| Keypad not granting access. | Incorrect PIN/RFID; keypad not powered; user not programmed. | Verify PIN/RFID; check keypad wiring; program user (refer to keypad manual). |
8. Specifications
| Component | Specification |
|---|---|
| Gate Opener Model | Blütezeit MJ-300 |
| Max Gate Weight | 900 lbs (408 kg) |
| Motor Power | 130W AC110V |
| Pull Force | 400N |
| Gear Rack Length | 13.12 ft (4 x 3.28 ft sections) |
| Gear Rack Material | Reinforced Nylon with Metal Core |
| Keypad Model | MWK20 Wired Keypad |
| Keypad User Capacity | Up to 2000 users |
| Keypad Protection | IP68 Waterproof |
| Keypad Post Height | Adjustable 23.6" – 47.2" |
| Operating Temperature | -13°F to 122°F (-25°C to 50°C) |
| Remote Frequency | 433.92 MHz |
9. Warranty and Support
Blütezeit products are manufactured to high-quality standards. For warranty information and technical support, please refer to the warranty card included with your product or visit the official Blütezeit website. Keep your purchase receipt as proof of purchase.
For assistance, please contact Blütezeit customer service.