
1. Introduction
This manual provides essential information for setting up, operating, and maintaining your Prechen 15.6 Inch Portable Touchscreen Monitor. Featuring a 10-point multi-touch IPS FHD 1080P display with a 60Hz refresh rate, this monitor is designed for versatility and clear visuals. It includes built-in stereo speakers and supports various connectivity options, making it suitable for diverse environments and applications.
2. What's in the Box
Verify that all the following items are included in your package:
- Prechen 15.6 Inch Portable Touchscreen Monitor
- HDMI to HDMI Cable
- USB-A to USB-C Cable
- USB-C to USB-C Cable
- Power Adapter
- Protective Carry Sleeve
- User Manual & Quick Start Guide

3. Product Overview
3.1 Ports and Controls
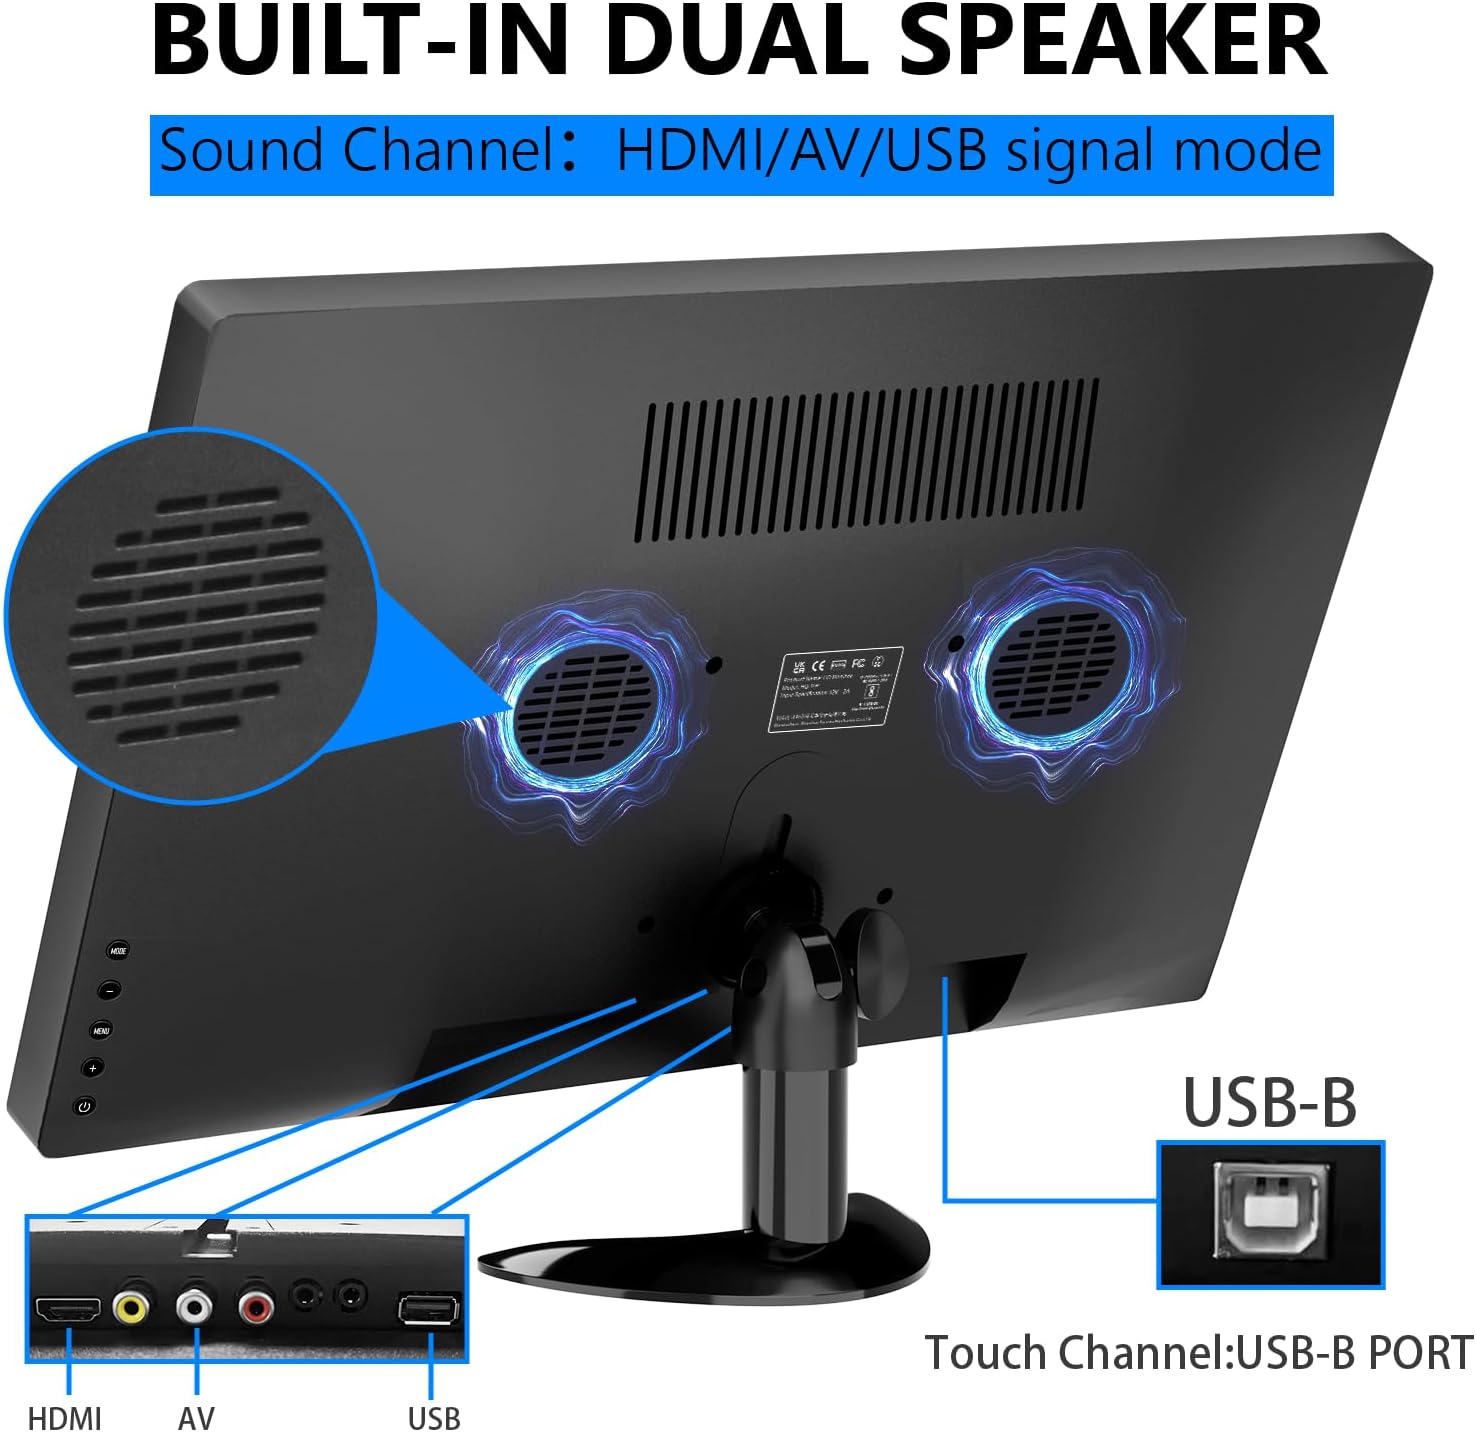
The monitor features various ports and control buttons for connectivity and settings adjustment:
- DC Power Input: For external power supply.
- VGA Input: For connecting to devices with VGA output.
- HDMI Input: For high-definition video and audio input.
- AV Input: For analog video and audio input.
- Mic Input: For microphone connection.
- Earphone Jack: For connecting headphones or external speakers.
- USB Port: For connecting USB devices.
- USB-B Port: Essential for enabling touch functionality when connected to a compatible device.
- Control Buttons: For navigating the On-Screen Display (OSD) menu, adjusting brightness, volume, and other settings.

3.2 Adjustable Stand
The monitor features an integrated adjustable stand that allows for up to 180° rotation, providing versatile viewing angles for various uses.

4. Setup
4.1 Power Connection
Connect the power adapter to the DC power input on the monitor and plug it into a power outlet. Alternatively, if using a USB-C connection that supports power delivery, the monitor can draw power directly from the connected device.
4.2 Video and Touch Connection
The monitor supports multiple connection methods. For touch functionality, a USB-B connection is required in addition to the video input.
- HDMI Connection: Connect one end of the HDMI cable to your device and the other end to the HDMI input on the monitor. For touch functionality, also connect the USB-B cable from your device to the USB-B port on the monitor.
- USB-C Connection: If your device has a full-featured USB-C port (supporting video, audio, and power delivery), connect the USB-C to USB-C cable directly from your device to one of the USB-C ports on the monitor. This single cable can provide video, audio, power, and touch functionality.
- VGA/AV Connection: Connect the appropriate VGA or AV cable from your device to the monitor. For touch functionality, a separate USB-B connection from your device to the monitor is required.

4.3 Compatibility Notes for Touch Function
The touch function is compatible with Windows and Chromebook systems. However, it is incompatible with the following devices:
- PS3/4/5
- Nintendo Switch
- Xbox consoles
- Steam Deck
- Fire TV Stick
- Fire TV Cube
- Some Apple products

5. Operating the Monitor
5.1 Power On/Off
Press the power button located on the side of the monitor to turn it on or off. The power indicator light will illuminate when the monitor is active.
5.2 On-Screen Display (OSD) Menu
Use the control buttons to navigate the OSD menu. Here you can adjust various settings:
- Brightness & Contrast: Adjust display luminosity and contrast levels.
- Volume: Control the output level of the built-in stereo speakers.
- Input Source: Select between HDMI, USB-C, VGA, or AV inputs.
- Color Effect: Choose from various color modes to optimize your viewing experience.
- Language: Select your preferred language for the OSD menu.
- System Settings: Access advanced display and power management options.
5.3 Touchscreen Gestures
The 10-point multi-touch display supports intuitive gestures for navigation and interaction:
- Tap: Single tap to select items or activate functions.
- Double Tap: Double tap to open files or applications.
- Drag: Touch and drag to move items or scroll through content.
- Zoom In/Out: Use a two-finger pinch gesture to zoom in or out.
- Rotate: Use a two-finger twist gesture to rotate images or objects.
- Swipe: Swipe across the screen to navigate between pages or applications.

5.4 Built-in Speakers
The monitor is equipped with integrated dual stereo speakers, providing audio output without the need for external devices. Volume can be adjusted via the control buttons or the OSD menu.
6. Mounting Options
In addition to the adjustable stand, the monitor supports VESA 75x75mm wall mounting for fixed installations in offices, homes, or kiosks.

7. Specifications
| Feature | Detail |
|---|---|
| Product Dimensions | 14.17 x 1.18 x 9.05 inches |
| Item Weight | 4.2 pounds |
| Screen Size | 15.6 Inches |
| Resolution | 1920 x 1080 Pixels (FHD 1080p) |
| Aspect Ratio | 16:9 |
| Image Brightness | 300 Candela |
| Screen Surface Description | Glossy |
| Total USB Ports | 1 (USB-B for touch) |
| Manufacturer | Shenzhen Kenowa Electronics Co., LTD |
8. Troubleshooting
- No Display: Ensure the monitor is powered on and all video cables (HDMI, USB-C, VGA, AV) are securely connected to both the monitor and your source device. Try different cables or ports if available.
- Touch Function Not Working: Verify that the USB-B cable is correctly connected from your device to the monitor. Confirm your device's operating system (Windows/Chromebook) is compatible with the touch function. Note that gaming consoles and some Apple products do not support touch.
- No Sound: Check the monitor's volume settings via the OSD menu. Ensure your audio source is correctly selected and that any external headphones/speakers are properly connected to the earphone jack.
- Touch Screen Effect Displayed on Main Screen (Windows): If the touch effect is incorrectly displayed on your main laptop screen instead of the portable monitor, you may need to calibrate the touch screen. Access the 'Control Panel' -> 'Hardware and Sound' -> 'Tablet PC Settings'. In the 'Display Options', select 'InnoView' (or the corresponding name for your portable monitor) and then click 'Setup'. Follow the on-screen prompts to tap the portable monitor to identify it as the touchscreen.
9. Maintenance
- Cleaning the Screen: Use a soft, lint-free cloth to gently wipe the screen. For stubborn smudges, slightly dampen the cloth with water or a screen-cleaning solution. Avoid using harsh chemicals, abrasive cleaners, or alcohol-based solutions.
- General Cleaning: Wipe the exterior of the monitor with a soft, dry cloth. Keep vents clear of dust and debris to ensure proper airflow.
- Storage: When not in use or during travel, store the monitor in its protective carry sleeve to prevent scratches and damage.
10. Warranty & Support
For warranty information, technical support, or service inquiries, please refer to the documentation included in your product package or contact Prechen customer service directly. Keep your purchase receipt for warranty claims.