
1. Introduction
This manual provides detailed instructions for the installation, operation, and maintenance of your DeerTalk Security Floodlight Camera Outdoor. Please read this manual thoroughly before installation and use, and retain it for future reference.
The DeerTalk Security Floodlight Camera is designed to enhance your home security with advanced features including 2K HD video, motion detection, two-way audio, and powerful floodlights. It supports both 2.4G and 5G Wi-Fi for stable connectivity and offers flexible storage options.
Video: DeerTalk Smart Floodlight Camera Overview. This video provides a general overview of the camera's features and capabilities.

Image: Overview of the DeerTalk Security Floodlight Camera's main features.
2. What's in the Box
Please check the contents of your package. If any items are missing or damaged, contact customer support.
- DeerTalk Security Floodlight Camera (Model B0G4K2GFF7)
- Mounting Bracket
- Gasket
- Wire Connectors
- Mounting Screws
- User Manual

Image: DeerTalk Security Floodlight Camera showing dimensions and key functions.
3. Setup and Installation
Safety Warning: Always cut off power at the circuit breaker before beginning any electrical installation to prevent electric shock.
3.1. Physical Installation
- Prepare the Mounting Location: Ensure the power is off. Remove any existing fixture.
- Install the Mounting Bracket: If an electrical box is not pre-installed, install one first. Fix the provided metal mounting bracket to the electrical junction box using the screws.
- Affix the Gasket: Peel the adhesive backing from the gasket and firmly attach it to the underside of the floodlight camera's base. This provides weatherproofing.
- Wire Connections:
- Connect the black wire from the camera to the black wire from the electrical box using a wire connector.
- Connect the white wire from the camera to the white wire from the electrical box using a wire connector.
- Connect the green (ground) wire from the camera to the bare copper or green ground wire from the electrical box, typically secured to a green screw on the mounting bracket or electrical box.
- Mount the Camera: Carefully tuck all wires into the electrical box. Align the floodlight camera's base with the mounting bracket and secure it using the long screws provided.
- Adjust Angle: Adjust the light panels and camera to your desired angle for optimal coverage.
- Restore Power: Turn the power back on at the circuit breaker.
Video: DeerTalk Floodlight Camera Installation Tutorial. This video demonstrates the step-by-step process of physically installing the floodlight camera, including wiring connections and mounting.
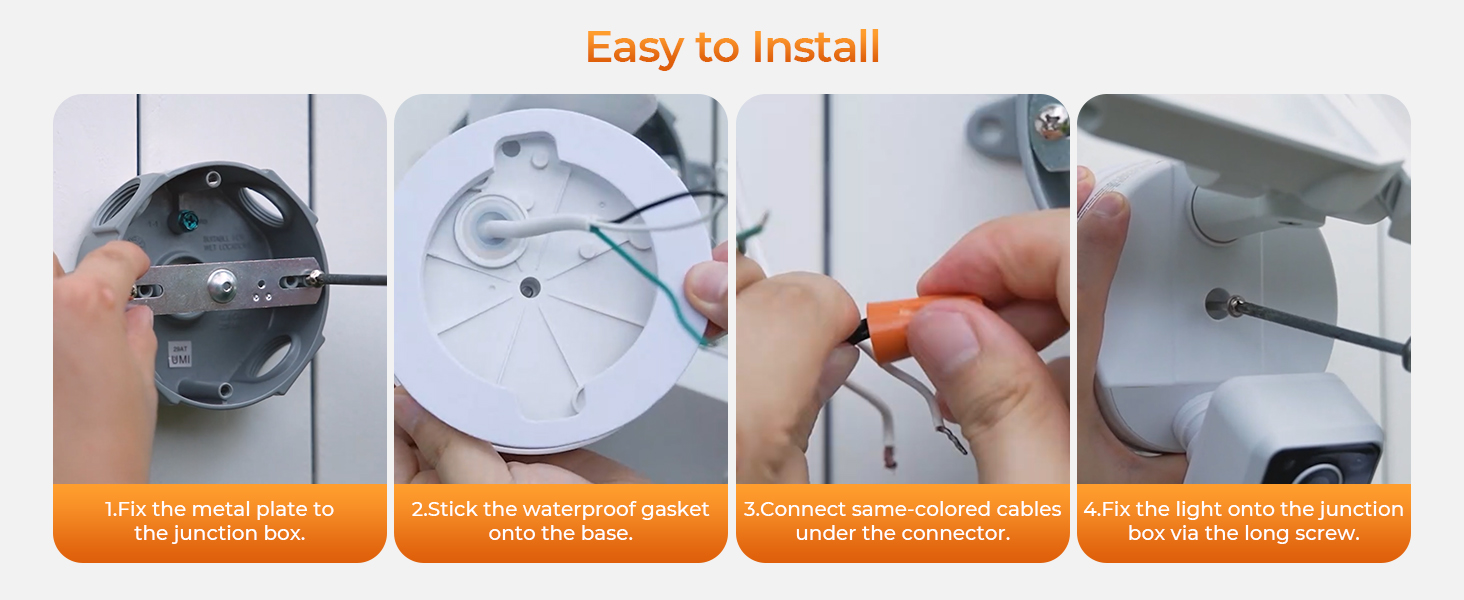
Image: Visual guide for the installation steps of the DeerTalk Floodlight Camera.
3.2. App Pairing and Initial Setup
- Download the App: Download the "Smart Life" app from your smartphone's app store (available on iOS and Android).
- Create Account: Register for a new account or log in if you already have one.
- Reset Device: Locate the reset button on the camera (usually under a protective tab). Press and hold it for 5 seconds until you hear a beep or see the indicator light flashing rapidly (red and blue).
- Add Device: In the Smart Life app, tap the '+' icon to add a new device. Select "Floodlight Camera" from the list of devices.
- Connect to Wi-Fi: Follow the in-app instructions to connect the camera to your 2.4G or 5G Wi-Fi network. You may need to scan a QR code displayed on your phone with the camera.
- Completion: Once connected, the camera will alarm to indicate a successful connection, and protection will begin.
Video: Smart Life APP Pairing Tutorial. This video guides you through connecting your DeerTalk Floodlight Camera to the Smart Life application on your smartphone.
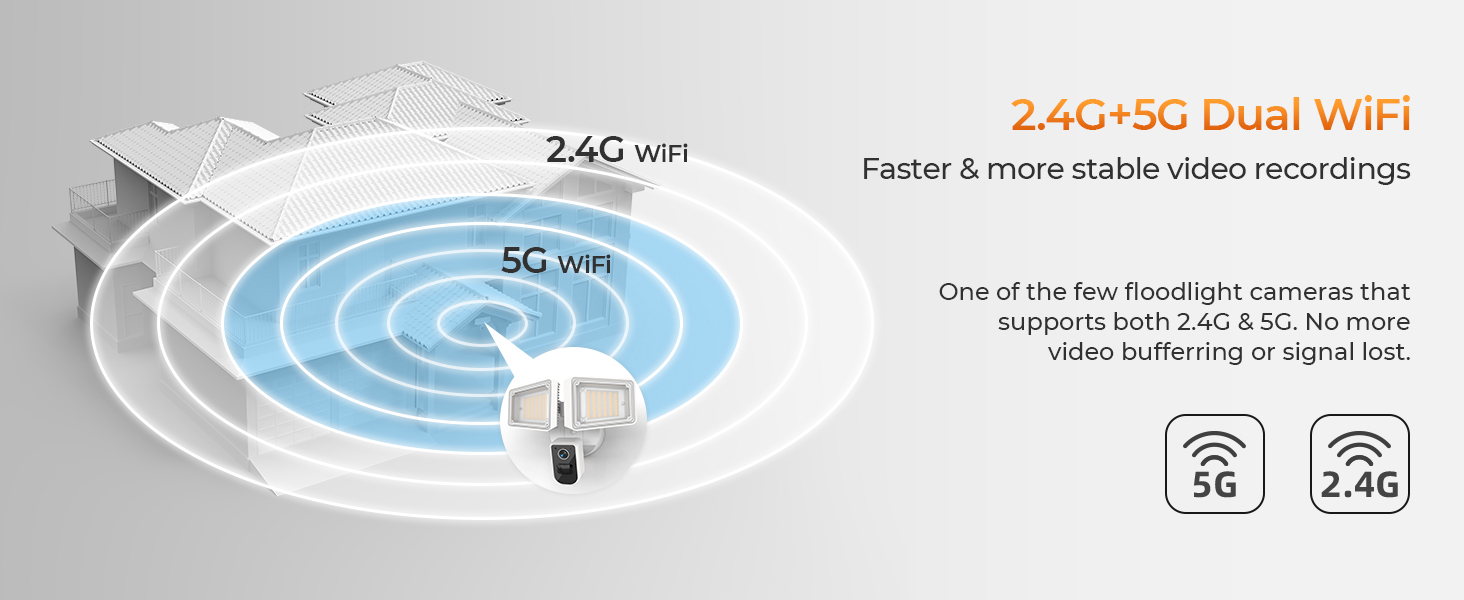
Image: The camera supports both 2.4G and 5G dual Wi-Fi for enhanced connectivity.
4. Operating Instructions
The DeerTalk Security Floodlight Camera is controlled primarily through the Smart Life app. Below are key features and how to use them.
4.1. Live View and Recording
- Open the Smart Life app and select your camera to view the live feed.
- You can manually record video or take screenshots directly from the live view interface.
- Review recorded footage via the "Playback" option, which accesses content stored on the local SD card or cloud storage.

Image: Crystal clear 2K camera quality ensures no details are missed.
4.2. Motion Detection and Alerts
- The camera features a PIR sensor for smart motion detection.
- Customize detection zones and sensitivity levels within the app to reduce false alarms.
- Receive real-time alerts on your smartphone when motion is detected in the specified areas.

Image: Customizable PIR motion detection area to focus on relevant zones.

Image: Customizable detection area helps prevent false alarms by focusing on specific zones.
4.3. Two-Way Audio and Siren
- Use the two-way audio feature to communicate with visitors or deter intruders directly through the app.
- Activate the powerful 150dB motion-activated siren from the app or set it to trigger automatically upon motion detection.

Image: Instant 2-way audio allows communication with visitors via your phone.
4.4. Floodlight Control
- Adjust the brightness and color temperature (3000K-5000K) of the floodlights via the app.
- Set schedules for the lights to turn on/off automatically (Dusk to Dawn automation).
- The lights can also be motion-activated.

Image: Ultra brightness with adjustable 2CCT for warm light or bright security light.

Image: Dusk to Dawn auto turn ON & OFF functionality.
5. Maintenance
- Cleaning: Periodically wipe the camera lens and floodlight covers with a soft, damp cloth to ensure clear vision and optimal light output. Do not use harsh chemicals.
- Firmware Updates: Check the Smart Life app regularly for firmware updates to ensure your camera has the latest features and security enhancements.
- Storage Management: Regularly review and manage your recorded footage. If using an SD card, ensure it is functioning correctly and has sufficient space. Consider cloud storage for reliable backup.
- Weather Protection: The camera is IP65 weatherproof, designed to withstand rain and snow. However, avoid direct high-pressure water jets.
Image: Weatherproof with IP65 rating, ensuring security in various weather conditions.
6. Troubleshooting
- Camera Not Connecting to Wi-Fi:
- Ensure your Wi-Fi network is 2.4GHz or 5GHz and your router is within range.
- Check Wi-Fi password accuracy.
- Reset the camera and try the pairing process again.
- Poor Video Quality:
- Check your Wi-Fi signal strength. A weak signal can affect streaming quality.
- Clean the camera lens.
- Ensure adequate lighting for optimal night vision performance.
- Motion Detection Not Working:
- Verify motion detection is enabled in the app settings.
- Adjust sensitivity levels and detection zones.
- Ensure there are no obstructions blocking the PIR sensor.
- Lights Not Turning On:
- Check power connection and circuit breaker.
- Verify light settings and schedules in the app.
- Ensure the light sensor is not obstructed if using Dusk to Dawn mode.
7. Specifications
| Feature | Detail |
|---|---|
| Model | B0G4K2GFF7 |
| Brand | DeerTalk |
| Resolution | 2K HD |
| Light Output | 4230 Lumens |
| Color Temperature | 3000-5000K (Adjustable) |
| Siren | 150dB Motion-Activated |
| Connectivity | 2.4G & 5G Wi-Fi |
| Storage | Local (up to 128GB microSD) & Cloud Storage |
| Motion Detection | PIR Sensor with Customizable Zones |
| Two-Way Audio | Yes |
| Night Vision | Color Night Vision |
| Weather Resistance | IP65 |
| Dimensions | 12.2 x 6.5 x 5.5 inches |
| Item Weight | 2.33 pounds |
| Compatible Devices | Smartphone, Amazon Alexa |
8. Warranty and Support
For warranty information and customer support, please refer to the official DeerTalk website or contact the seller directly. Keep your purchase receipt for warranty claims.
Typical return policy duration is 30 days from purchase. Protection plans may be available for extended coverage.