1. Introduction and Overview
The ACMER K1 is a compact desktop laser engraver machine designed for precision engraving and cutting on various materials. This manual provides essential information for the safe and effective use of your K1 laser engraver, covering setup, operation, maintenance, and troubleshooting.
Key features of the ACMER K1 include:
- Class 1 Enclosed Design: Ensures engraving activities are safely contained within the chamber.
- Built-in Exhaust Fan: Reduces smoke and odors for a cleaner working environment.
- Multi-Power Blue Diode Laser: Available in 3.5W, 7W, and 12W options, utilizing a 455±5nm blue diode laser with beam-combining technology.
- Precision Engraving: Features a 0.08×0.08mm laser spot and 0.01mm repeat positioning accuracy for fine details.
- Compact and Lightweight: Weighs only 2.4kg with a 150×150mm working area, ideal for home workshops and small businesses.
- Wide Software Compatibility: Supports AcmerTool (free), LightBurn, and LaserGRBL, compatible with macOS, Windows, and Linux.
- Smart Safety Protection: Includes Lid Induction Design (stops operation when lid opens) and Tilt Detection Design (shuts down if tilt exceeds 13°).

Image: The ACMER K1 Laser Engraver in use at a craft fair, demonstrating its suitability for small businesses and personalized crafts.
2. Setup
Follow these steps to set up your ACMER K1 Laser Engraver machine:
- Unboxing: Carefully remove all components from the packaging. Verify that all parts listed in the user manual are present.
- Laser Module Installation: Install the laser module into its designated slot on the machine. Ensure it is securely fastened and the electrical connector is properly attached.
- Exhaust Pipe Installation: Attach the exhaust pipe to the designated port on the machine to manage smoke and odors during operation.
- Power and Data Connection: Connect the power adapter to the machine and a power outlet. Connect the USB data cable from the machine to your computer.
- Emergency Stop Switch: Before powering on, ensure the emergency stop switch on the back of the machine is rotated to the released position.
- Focusing the Laser: Use the provided focusing shim from the tool kit to correctly set the focal length of the laser module. Place the shim on your material and adjust the laser module until it lightly touches the shim.
Video: A detailed guide on how to set up and use the ACMER K1 Laser Engraver, including unboxing, component installation, and initial connections.
3. Operating Instructions
The ACMER K1 is compatible with various software, including AcmerTool, LightBurn, and LaserGRBL. This section outlines general operating procedures.
3.1 Software Installation and Configuration (LightBurn Example)
To begin, you will need to install compatible laser control software on your computer. For LightBurn, visit lightburnsoftware.com to download the appropriate version for your operating system (macOS, Windows, or Linux).
After installation, configure the device within the software:
- Launch LightBurn and navigate to the 'Devices' section.
- Create a new device, selecting 'GRBL' as the controller type.
- Choose 'Serial/USB' for connection.
- Customize the device name (e.g., "ACMER K1").
- Set the workspace dimensions to 150mm x 150mm, matching the physical travel of the machine.
- Configure the origin of your laser (Front Left is common).
- Enable 'Auto home your laser on startup' for convenience.
3.2 Engraving and Cutting Process
Once the software is configured and the laser is focused, you can proceed with your engraving or cutting project:
- Design: Create or import your design into the software.
- Material Placement: Place your material securely on the working area.
- Parameter Settings: Adjust engraving or cutting parameters (speed, power, passes) based on the material type and desired outcome. Refer to the material compatibility chart below for guidance.
- Preview: Use the software's preview function to ensure the design is correctly positioned and scaled.
- Start Operation: Initiate the engraving or cutting process from the software. Monitor the machine during operation.
Video: Demonstration of the ACMER K1 laser engraver creating a detailed leaf engraving, showcasing its precision.
Video: The ACMER K1 Engraver carving on various materials, illustrating its versatility.
3.3 Material Compatibility and Power Options
The K1 laser engraver supports a range of materials. The cutting depth varies with the laser power option (3.5W, 7W, 12W) and material type.

Image: Material compatibility chart detailing cutting depths for different laser power options (3.5W, 7W, 12W) across various materials like plywood, black acrylic, and Paulownia wood.
For optimal results, always perform test engravings on scrap material to determine the best speed and power settings.
4. Safety Information
The ACMER K1 is designed with safety in mind, featuring a Class 1 enclosed body to keep laser activity contained. However, proper safety precautions must always be observed:
- Eye Protection: Always wear the provided safety glasses when operating the machine, especially if the lid is open or during maintenance.
- Lid Induction Design: The machine automatically stops operation if the lid is opened during a task. Do not attempt to bypass this safety feature.
- Tilt Detection: The K1 will shut down if it detects a tilt exceeding 13°, preventing accidents from unstable placement. Ensure the machine is on a stable, level surface.
- Ventilation: The built-in exhaust fan helps manage fumes. For prolonged use or materials that produce significant smoke, ensure adequate room ventilation.
- Supervision: Never leave the machine unattended during operation.
- Flammable Materials: Avoid placing flammable materials near the machine.
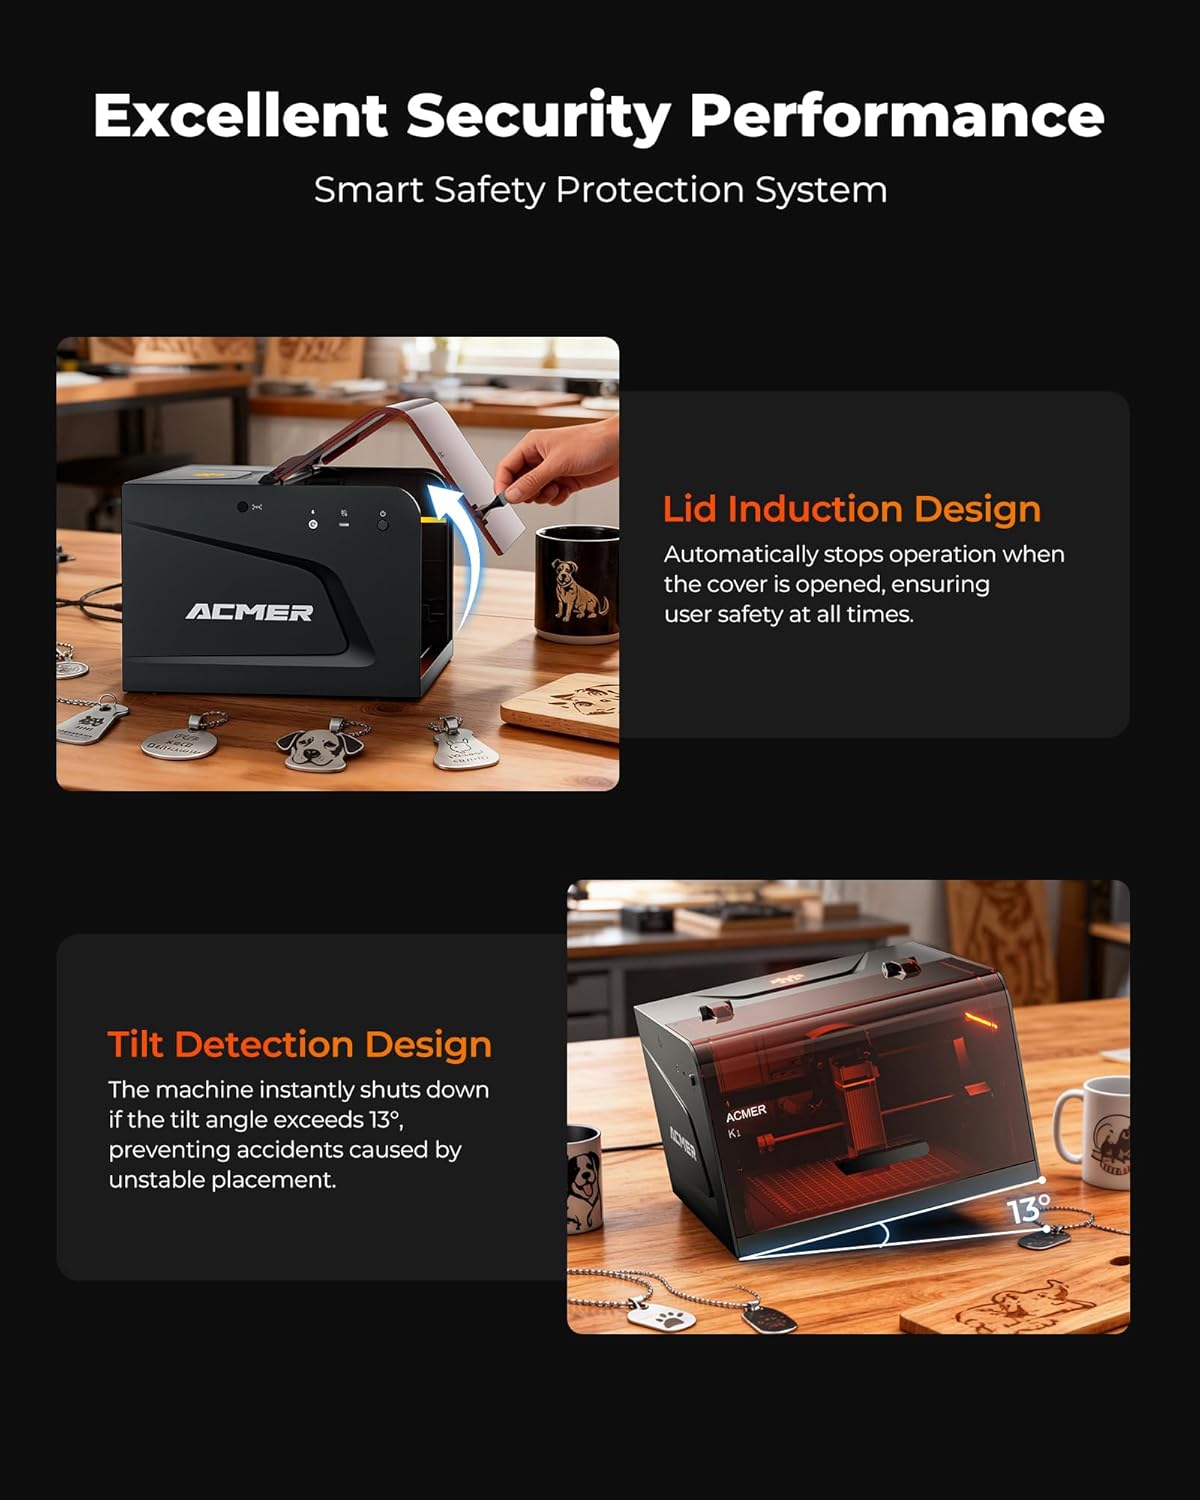
Image: Visual representation of the ACMER K1's safety features, including the lid induction design and tilt detection system.
5. Maintenance
Regular maintenance ensures optimal performance and longevity of your ACMER K1 laser engraver:
- Cleaning the Lens: Periodically clean the laser lens with a soft, lint-free cloth and lens cleaning solution to maintain engraving quality.
- Cleaning the Working Area: Remove debris and dust from the working area and grid after each use.
- Lubrication: Lightly lubricate the guide rails and moving parts as recommended in the full product manual to ensure smooth operation.
- Firmware Updates: Check the official ACMER website for any available firmware updates to ensure your machine has the latest features and improvements.

Image: The built-in exhaust fan of the ACMER K1, which helps in maintaining a clean engraving environment by removing smoke and odors.
6. Troubleshooting
If you encounter issues with your ACMER K1, refer to the following common troubleshooting tips:
- Machine Not Responding: Ensure the power cable and USB data cable are securely connected. Check if the emergency stop switch is released. Restart the machine and your computer.
- Poor Engraving Quality: Verify the laser focus is correctly set using the focusing shim. Adjust speed and power settings in your software. Clean the laser lens. Ensure the material is flat and securely placed.
- Software Connection Issues: Confirm that the correct device (e.g., ACMER K1) is selected in your software and that the correct COM port is chosen. Reinstall the software drivers if necessary.
- Machine Stops Mid-Operation: Check if the lid was accidentally opened or if the machine was bumped, triggering the safety features. Ensure the machine is on a stable surface.
- Excessive Smoke/Odor: Ensure the exhaust fan is functioning correctly and that the exhaust pipe is properly installed and vented. Consider additional room ventilation.
For persistent issues, consult the comprehensive user manual or contact ACMER customer support.
7. Specifications
| Feature | Detail |
|---|---|
| Model Number | K1 |
| Laser Power | 3500mW (3.5W) |
| Work Area | 150mm × 150mm |
| Laser Spot Size | 0.08mm × 0.08mm |
| Repeat Positioning Accuracy | 0.01mm |
| Maximum Motion Speed | 10,000mm/min |
| Item Weight | 6.66 pounds (approx. 3.02 kg) |
| Package Dimensions | 14.41 x 13.62 x 10.47 inches |
| Manufacturer | ACMER |
| Compatibility | macOS, Windows, Linux |
| Supported File Formats | NC, DXF, BMP, JPG, PNG, etc. |

Image: Detailed view of the ACMER K1's working area, highlighting its 150mm x 150mm engraving space.
8. Warranty and Support
For warranty information, technical support, or service inquiries, please contact ACMER Official directly. Refer to the product packaging or the official ACMER website for the most current contact details and warranty terms.


