
Jingelsye 12.2inch
Jingelsye 12.1-Inch Vertical Screen Android Car Stereo for Ford Mustang (2015-2025) Instruction Manual
Model: 12.2inch | Brand: Jingelsye
Introduction
This manual provides detailed instructions for the installation, operation, and maintenance of your Jingelsye 12.1-Inch Vertical Screen Android Car Stereo. Designed specifically for Ford Mustang models from 2015 to 2025, this head unit integrates advanced features to enhance your driving experience. Please read this manual thoroughly before installation and use to ensure proper functionality and safety.
Product Features
- Massive 12.1-Inch Vertical Screen & Custom Mustang Fit: Command your dashboard with a massive 12.1-inch vertical touchscreen, exclusively designed for Ford Mustang 2015-2025 models. Perfect OEM-style integration enhances your cockpit with a bold, modern look that complements Mustang's iconic interior design.
- Powerful 6GB RAM + 128GB ROM Performance: Experience elite-level performance with 6GB RAM and massive 128GB storage. The advanced processor handles demanding apps, high-resolution music, and seamless multitasking, ensuring your infotainment system keeps pace with your Mustang's performance.
- Wireless CarPlay & Android Auto Integration: Enjoy true wireless freedom with automatic smartphone connectivity. Your iPhone or Android device seamlessly projects onto the large vertical display, providing instant access to navigation, music, and communication without cable clutter.
- 5G WiFi & Advanced DSP Audio Technology: Stream and update at blazing speeds with 5G WiFi connectivity. The built-in Digital Signal Processor (DSP) delivers studio-quality sound, allowing precise audio customization to match your Mustang's acoustics and your personal preferences.
- Complete Factory Feature Retention: Maintain all original Mustang features including steering wheel controls (SWC), backup camera functionality, and vehicle settings. Plug-and-play installation ensures seamless integration with your Mustang's existing systems.
- Mustang-Specific Customization: Exclusive Mustang-themed interfaces, startup screens, and performance displays that celebrate your car's heritage. Customize the display with performance gauges and brand-specific elements that enhance your driving experience.
- Future-Ready Technology Platform: Advanced Android platform with regular updates and extensive app compatibility through Google Play Store. This system evolves with your needs, ensuring long-term relevance and performance.
What's in the Box
The package includes all necessary components for installation and operation:
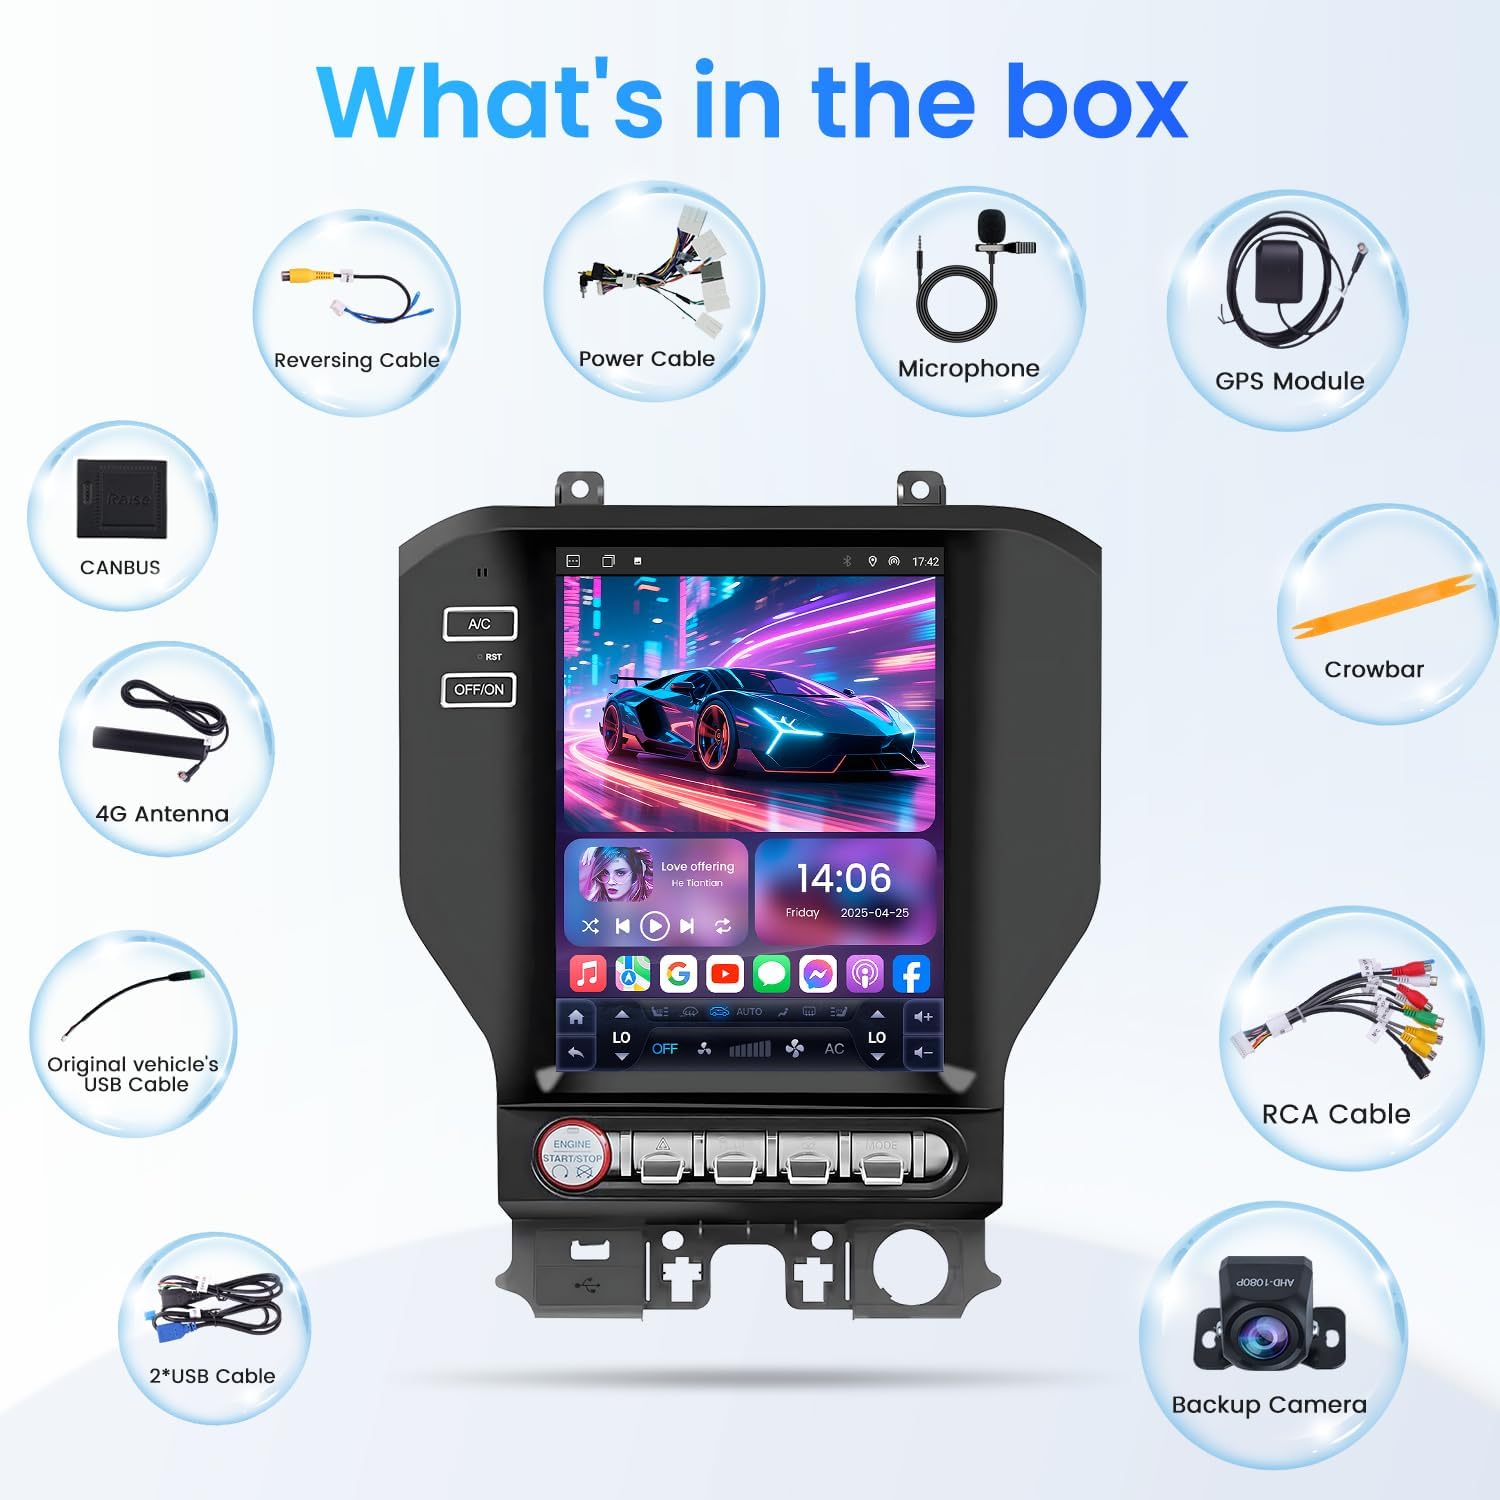
Image Description: A detailed view of all items included in the product box. This includes the 12.1-inch vertical screen head unit, a reversing cable, power cable, microphone, GPS module, CANBUS box, 4G antenna, crowbar, original vehicle's USB cable, 2 USB cables, RCA cables, and a backup camera.
- 12.1-Inch Vertical Screen Head Unit
- Power Cable
- Reversing Cable
- Microphone
- GPS Module
- CANBUS Box
- 4G Antenna
- Crowbar (Pry Tool)
- Original Vehicle's USB Cable
- 2 x USB Cables
- RCA Cables
- Backup Camera
Setup and Installation
Proper installation is crucial for optimal performance. It is recommended that installation be performed by a qualified professional. Always disconnect the vehicle's battery before beginning any electrical work.
1. Disassembly of Original Head Unit
Carefully remove the trim panels and screws securing the original radio and associated components. Use the provided crowbar tool to prevent damage to interior surfaces.
Video Description: A detailed video demonstrating the disassembly and removal process of the original Ford Mustang radio and dashboard panels. This includes removing the glove box trim, dashboard trim, center console trim, and unscrewing the factory radio unit.
- Open the glove compartment and use the pry tool to carefully remove the side panel.
- Pry off the long silver trim piece above the glove compartment and the center console.
- Remove the lower side panels of the center console on both the driver and passenger sides.
- Unscrew any visible screws securing the main radio bezel.
- Carefully pull the main radio bezel forward to detach it. Disconnect all electrical connectors from the back of the bezel.
- Unscrew the bolts holding the original CD player/radio module in place and carefully remove it, disconnecting all cables.
2. Microphone and USB Cable Installation
Install the external microphone and route the USB cables for easy access.

Image Description: A view of the dashboard with panels removed, showing where the microphone cable is routed near the steering column and USB cables are installed into the glove compartment.
- Connect the external microphone to the designated port on the new head unit. Route the microphone cable to a suitable location, such as near the rearview mirror or steering column, ensuring it does not interfere with driving.
- Connect the provided USB cables to the head unit. Route these cables to the glove compartment or center console for convenient access.
3. Wiring Harness and Module Connections
Connect all necessary wiring harnesses, including the CANBUS decoder, GPS antenna, and Wi-Fi antenna.

Image Description: The back of the 12.1-inch head unit showing multiple ports for power, audio/video inputs/outputs, USB, GPS antenna, and Wi-Fi antenna, with various cables connected.
- Connect the main power harness to the new head unit and the vehicle's factory wiring.
- Connect the CANBUS decoder to the appropriate harness. Ensure the correct configuration is selected in the system settings (refer to the Operating section).
- Attach the GPS antenna and route it to a location with a clear view of the sky, such as on the dashboard near the windshield.
- Connect the Wi-Fi antenna to the head unit.
- Connect all RCA cables for audio output, camera input, and other auxiliary functions as needed.
4. Bottom Bracket Installation
Attach the bottom bracket to the main bezel using the provided screws.

Image Description: A diagram illustrating the three steps to attach the bottom bracket to the main bezel of the T-Radio. Step 1 shows locating the screws, Step 2 shows attaching the bracket with screws, and Step 3 shows the finished installation.
- Locate the 3 screws (PA2.6 x 6mm) provided in the package.
- Attach the bottom bracket to the main bezel using these 3 screws.
5. Final Assembly
Carefully reassemble the dashboard components.
- Mount the new head unit into the dashboard opening.
- Reconnect all trim panels and secure them with screws. Ensure all clips are properly engaged.
- Reconnect the vehicle's battery.
Operating Instructions
1. Initial Power-On and System Configuration
After installation, power on the vehicle to start the head unit. You may need to configure initial settings.
Video Description: A demonstration of the initial setup and configuration of the Android car stereo, including navigating through settings, changing homepage styles, adjusting dimmer settings, and selecting the radio region (e.g., N. America).
- Navigate to Settings > System > Factory Settings. Enter the password (usually 8888 or 0000).
- In the Car Choose menu, select CanBox: 09: LuZheng, Cars for: 41: Ford, and Models for: 1a: Mustang.
- Select the appropriate Config (e.g., HighConfig or LowConfig) based on your vehicle's original configuration. Confirm the selection to update the protocol.
- The system may reboot during this process.
2. Wireless CarPlay & Android Auto
Connect your smartphone wirelessly for seamless integration.

Image Description: A four-step visual guide on how to connect Wireless CarPlay. It shows enabling Bluetooth on the iPhone, selecting the device (SYU-Android), entering the PIN (0000), and confirming "Use CarPlay".
- Ensure Bluetooth and Wi-Fi are enabled on your smartphone.
- On the head unit, navigate to the Bluetooth settings.
- Search for available devices on your phone and select the head unit's Bluetooth name (e.g., "G16-BT-AF22").
- Enter the pairing code (usually 0000) on your phone when prompted.
- Once connected, a prompt for CarPlay or Android Auto will appear on your phone. Authorize the connection.
3. DSP Equalizer Adjustments
Customize your audio experience with the built-in Digital Signal Processor (DSP).

Image Description: A visual representation of the built-in EQ settings and sound priority adjustments within the car stereo's DSP. It shows various frequency bands and options to customize the audio output and sound stage.
- Navigate to Settings > Audio > Equalizer.
- Adjust the frequency bands to your preference. You can also select preset equalizer modes (e.g., Normal, Jazz, Pop, Classical).
- Use the sound field adjustment to optimize audio for different seating positions (e.g., Driver mode, Passenger mode).
4. Air-Conditioning Control
Control your vehicle's air conditioning directly from the touchscreen.
Video Description: A demonstration of the air conditioning settings on the 12.1-inch vertical screen. It shows how to adjust fan speed, temperature, and air direction using the touchscreen interface.
- Tap the A/C icon on the main screen or use the dedicated physical buttons on the side panel.
- Adjust temperature, fan speed, and air direction using the on-screen controls.
5. Steering Wheel Control (SWC)
The head unit retains original steering wheel control functionality.

Image Description: A visual guide demonstrating the functionality of steering wheel controls with the new car stereo. It highlights buttons for volume, track control, and call management, showing their corresponding actions on the screen.
- Ensure the CANBUS decoder is correctly configured (see Initial Power-On section).
- Test all steering wheel buttons (volume, track skip, call answer/end) to confirm proper operation.
- If any buttons are not functioning, navigate to Settings > System > Wheel Settings to manually configure them.
6. Split Screen Function
Utilize the split-screen feature to run two applications simultaneously.

Image Description: Three examples of the split-screen function in action, showing a media player alongside a navigation map, and another configuration with two different applications running side-by-side on the vertical display.
- Open the first application you wish to use.
- Press and hold the recent apps button (usually a square icon) or swipe up from the bottom and hold to enter split-screen mode.
- Select the second application from the recent apps list or app drawer.
Maintenance
- Screen Cleaning: Use a soft, lint-free cloth to clean the touchscreen. For stubborn smudges, lightly dampen the cloth with a screen cleaner designed for electronics. Avoid harsh chemicals or abrasive materials.
- Software Updates: Regularly check for system updates via the Wi-Fi connection (Settings > System > Upgrade). Keeping your software up-to-date ensures optimal performance and access to new features.
- Data Backup: Periodically back up important data and settings to prevent loss.
- Avoid Extreme Temperatures: Do not expose the unit to extreme temperatures for prolonged periods, as this can affect performance and longevity.
Troubleshooting
- No Power: Check all power connections and fuses. Ensure the vehicle's battery is properly connected and charged.
- No Sound: Verify speaker connections. Check volume levels on both the head unit and your smartphone (if using CarPlay/Android Auto). Ensure DSP settings are not muting audio.
- CarPlay/Android Auto Not Connecting: Ensure Bluetooth and Wi-Fi are active on both devices. Re-pair the devices. Check for any software updates for the head unit or your smartphone.
- Steering Wheel Controls Not Working: Verify CANBUS decoder connection and configuration in Factory Settings. If necessary, manually re-map the buttons in Wheel Settings.
- GPS Signal Issues: Ensure the GPS antenna has a clear line of sight to the sky. Check antenna connection.
- Screen Freezes/Unresponsive: Perform a soft reset by pressing the reset button (if available) or by turning off the vehicle and restarting it.
Specifications
| Feature | Detail |
|---|---|
| Brand | Jingelsye |
| Vehicle Service Type | Car |
| Screen Size | 12.1 Inches |
| Special Feature | Wireless CarPlay & Android Auto Integration, 5G WiFi, Advanced DSP Audio Technology |
| Connectivity Technology | WiFi, Bluetooth, Wired (SWC) |
| Memory Storage Capacity | 128 GB |
| Item Weight | 2.7 Kilograms |
| Touch Screen Type | Capacitive |
| Display Type | Touch Screen |
| Human-Interface Input | Touchscreen |
| Control Method | Touch, Voice |
| Supported Satellite Navigation System | GPS |
| UPC | 754148690301 |
Warranty and Support
For warranty information and technical support, please refer to the product packaging or contact Jingelsye customer service directly. Keep your purchase receipt as proof of purchase.
Ask a question about this manual
Ask about setup, troubleshooting, compatibility, parts, safety, or missing instructions. Manuals+ will review the question and use this page’s manual context to help answer it.