
MAXLANDER ML8G601
MAXLANDER ML8G601 40V Cordless Tiller Cultivator Instruction Manual
Model: ML8G601 | Brand: MAXLANDER
1. Safety Information
WARNING: Read and understand all instructions before using this product. Failure to follow all instructions listed below may result in electric shock, fire, and/or serious personal injury.
- Always wear appropriate safety gear, including gloves and eye protection, when operating the tiller.
- Keep hands and other body parts away from moving parts.
- Do not operate the tiller in wet or damp conditions.
- Always turn off and unplug the tiller before performing any maintenance or cleaning.
- Always follow the double start button safety feature to prevent accidental start-up.
- Ensure the work area is clear of debris, rocks, and other obstacles that could be thrown by the tines.
- Keep children and bystanders at a safe distance from the operating area.
2. Product Overview
The MAXLANDER ML8G601 is a 40V cordless tiller cultivator designed for efficient garden preparation. It features a powerful brushless motor and durable steel tines for effective soil cultivation.
Key Features:
- Cordless Design: Freedom of movement without the limitations of power cords. Includes 2x4.0Ah batteries and a fast charger.
- Brushless Powerful Motor: Provides robust power to break up hard soil with 280 RPM.
- Working Size & 4 Steel Tines: Cultivates an area 12-inches wide and up to 8-inches deep.
- Folding Handle: Designed for convenient storage and transport.
- Double Safety Protection: Requires both the safety button and trigger to be pressed for operation, preventing accidental starts.
Components:

Figure 2.1: Key Components of the MAXLANDER Tiller
3. Setup
3.1 Assembly
Follow these steps to assemble your MAXLANDER Tiller Cultivator:
- Unboxing: Carefully remove all components from the packaging.
- Attach Wheels: Secure the wheels to the main unit using the provided pins and caps.
- Install Lower Handle: Connect the lower handle section to the main body.
- Install Upper Handle: Attach the upper handle section to the lower handle.
- Secure Cables: Use the provided clips to secure the power cable along the handle.
- Adjust Handle Height: The handle height can be adjusted to your preference for comfortable operation.

Figure 3.1: Unboxing the Tiller

Figure 3.2: Attaching the Wheels

Figure 3.3: Installing the Lower Handle

Figure 3.4: Installing the Upper Handle

Figure 3.5: Securing the Power Cable

Figure 3.6: Handle Height Adjustment
3.2 Battery Installation and Charging
The tiller operates on two 40V batteries. Ensure batteries are fully charged before use.
- Charging: Use the provided fast charger to charge both 4.0Ah batteries.
- Installation: Insert the charged batteries into the designated battery compartments on the tiller. Ensure they click securely into place.

Figure 3.7: Batteries and Fast Charger

Figure 3.8: Installing Batteries
3.3 Assembly Video Guide
Video 3.1: MAXLANDER Cordless Tiller Assembly Guide. This video demonstrates the step-by-step assembly process for the tiller, including attaching wheels, handles, and installing batteries.
4. Operating Instructions
4.1 Starting and Stopping
- To Start: Ensure batteries are installed. Press and hold the safety button, then squeeze the trigger switch. The tines will begin to rotate.
- To Stop: Release the trigger switch. The tines will stop rotating.
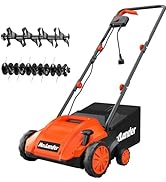
Figure 4.1: Easy Push Button Start
4.2 Tilling Techniques
For best results, follow these guidelines:
- Begin tilling in an area with softer soil, gradually moving to harder sections.
- Allow the tiller to work at its own pace. Do not force it into the soil.
- For deeper cultivation, make multiple passes over the same area, gradually increasing the depth.
- Overlap each pass slightly to ensure even tilling.

Figure 4.2: Tiller in Operation

Figure 4.3: Tilling Depth and Effectiveness
5. Maintenance
Regular maintenance ensures optimal performance and extends the life of your tiller.
- Cleaning: After each use, remove any soil, debris, or tangled weeds from the tines and housing. Use a stiff brush or cloth. Do not use water directly on electrical components.
- Tine Inspection: Periodically inspect the steel tines for wear, damage, or bending. Replace worn or damaged tines immediately to maintain performance and safety.
- Battery Care: Store batteries in a cool, dry place away from direct sunlight. Do not store fully discharged batteries for extended periods.
- Storage: Clean the tiller thoroughly before storing. The folding handle allows for compact storage. Store in a dry, secure location out of reach of children.

Figure 5.1: Folding Handle for Easy Storage
6. Troubleshooting
| Problem | Possible Cause | Solution |
|---|---|---|
| Tiller does not start | 1. Batteries not charged 2. Safety button/trigger not engaged correctly 3. Batteries not properly inserted | 1. Charge batteries fully 2. Ensure both safety button and trigger are pressed simultaneously 3. Reinsert batteries firmly until they click |
| Tines stop during operation | 1. Overload due to hard soil/obstruction 2. Battery low | 1. Release trigger, clear obstruction, restart. Reduce tilling depth. 2. Recharge or replace batteries |
| Poor tilling performance | 1. Worn or damaged tines 2. Incorrect tilling depth | 1. Inspect and replace tines if necessary 2. Adjust tilling depth for optimal results |
7. Specifications
| Feature | Specification |
|---|---|
| Brand | MAXLANDER |
| Model Number | ML8G601 |
| Power Source | Battery Powered (2x40V) |
| Motor Type | Brushless |
| Tine Speed | 280 RPM |
| Working Width | 12 inches |
| Working Depth | Up to 8 inches |
| Number of Tines | 4 Steel Tines |
| Product Dimensions | 14"D x 54"W x 11"H |
| Material | Steel |
| Color | Coral |
8. Warranty and Support
For warranty information, technical support, or to order replacement parts, please refer to the contact information provided in your product packaging or visit the official MAXLANDER website. Keep your purchase receipt as proof of purchase for warranty claims.
Ask a question about this manual
Ask about setup, troubleshooting, compatibility, parts, safety, or missing instructions. Manuals+ will review the question and use this page’s manual context to help answer it.