
Introduction
This manual provides essential instructions for the safe operation, assembly, maintenance, and troubleshooting of your MAXLANDER 20V 10'' Cordless Weed Wacker & Edger. Please read this manual thoroughly before first use and retain it for future reference.
Safety Information
WARNING: To reduce the risk of injury, always follow these safety precautions.
Always wear eye protection, long pants, closed-toe shoes, and hearing protection when using this string trimmer. Keep bystanders and pets at a safe distance during operation. Ensure the battery is removed before performing any maintenance or adjustments.
Package Contents
Verify that all items listed below are included in your package:
- 1 x MAXLANDER 20V 10'' Cordless String Trimmer
- 2 x 20V 2.0Ah Lithium-ion Batteries
- 1 x Quick Charger
- 8 x Replacement Trimmer Lines (Spools)
- 1 x User Manual
- Front Handle
- Spacer Guard
- AFS Automatic Feed Spool
- Protection Lock-off Button
- Trigger Switch
- Edger Function Switch
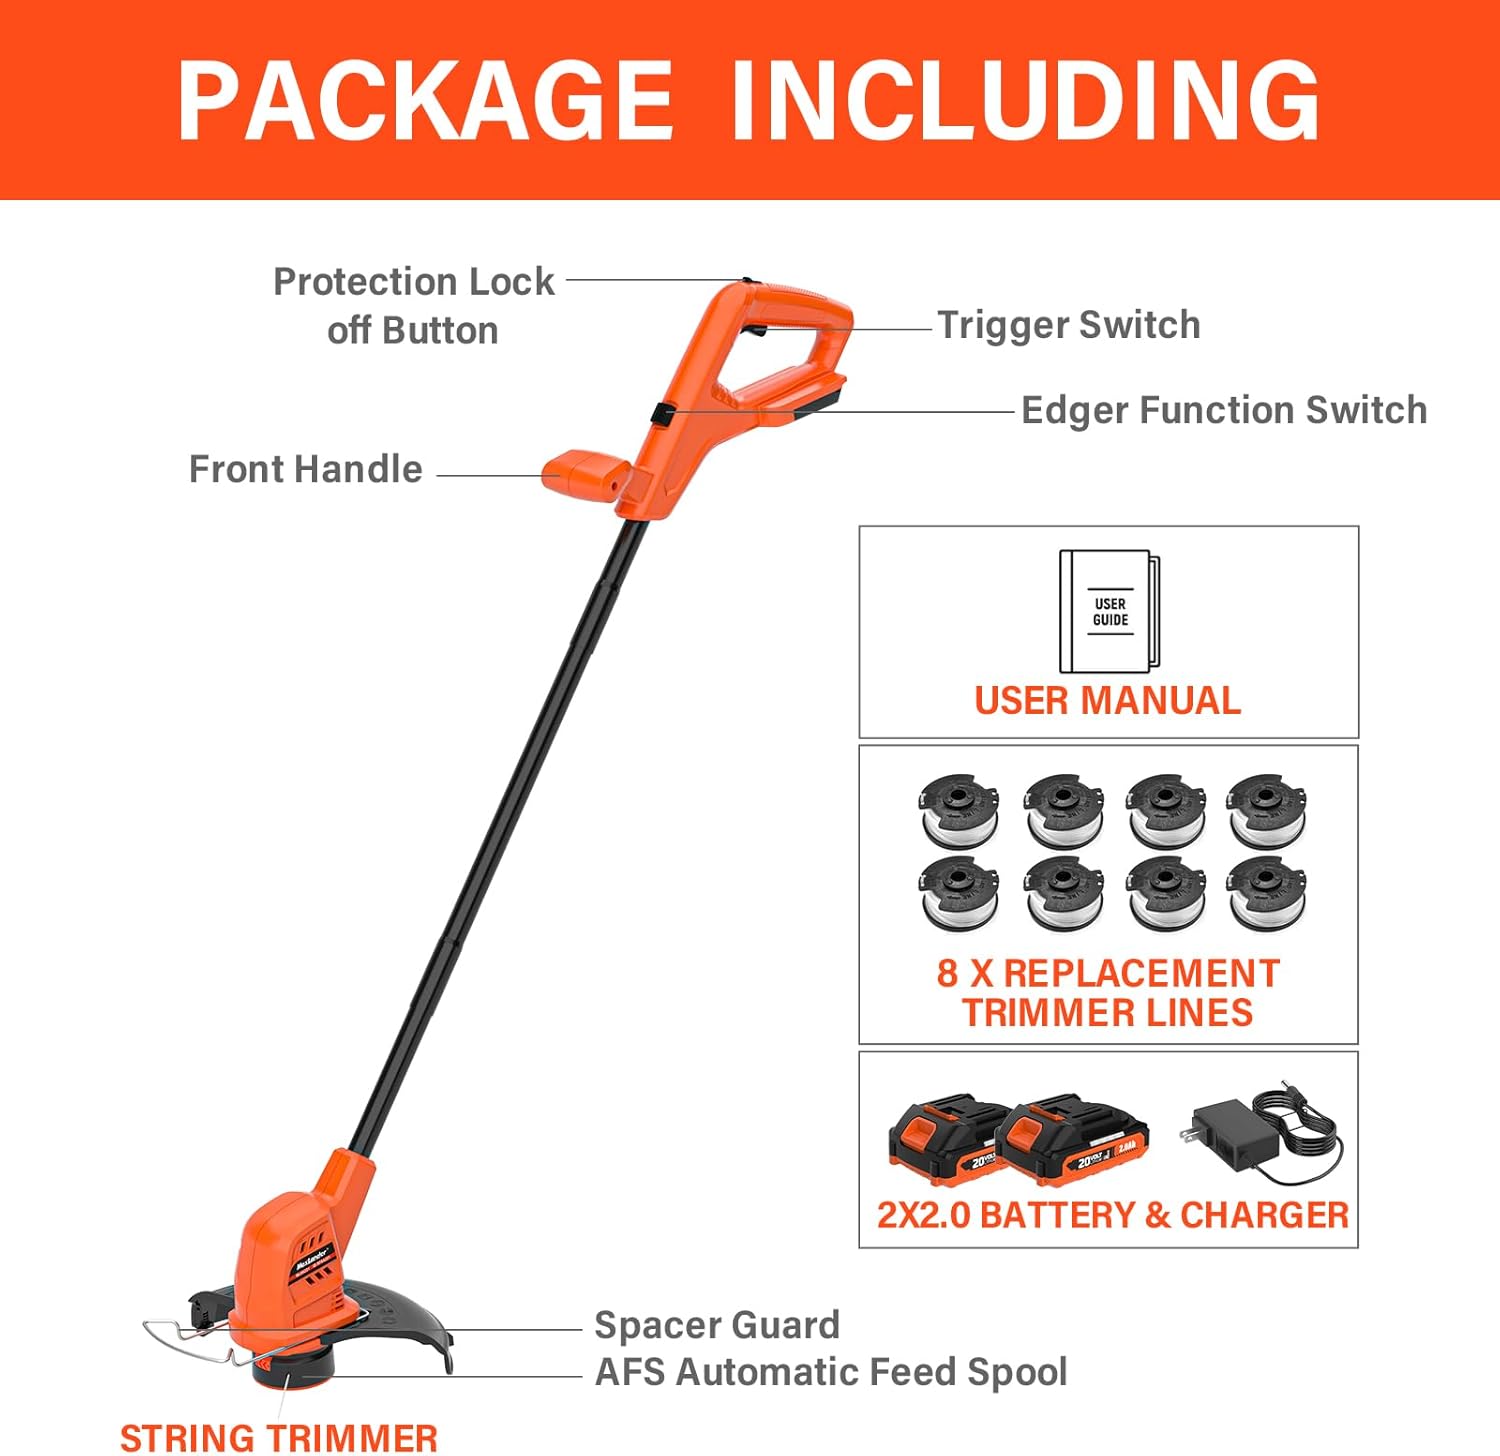
Image: Diagram showing all components included in the MAXLANDER weed wacker package: the trimmer, two batteries, charger, and eight replacement spools.
Setup
- Unpacking: Carefully remove all components from the packaging. Inspect for any damage.
- Handle Assembly: Attach the front handle to the main shaft. Ensure it is securely fastened.
- Guard Installation: Install the safety guard over the cutting head. This guard protects against debris.
- Battery Charging: Fully charge both 20V 2.0Ah lithium-ion batteries using the provided quick charger. The charger typically indicates a full charge within 1 hour.
- Battery Insertion: Insert a charged battery into the battery slot on the tool handle until it clicks into place.
Operating Instructions
- Starting the Trimmer: Press and hold the protection lock-off button, then squeeze the trigger switch to start the trimmer. Release the lock-off button once the motor starts.
- Trimming Function: Hold the trimmer firmly with both hands. Maintain a comfortable distance from the cutting head. Move the trimmer in a sweeping motion to cut grass and weeds. The automatic feed spool (AFS) will advance the line as needed.
- Edging Function: To convert to an edger, rotate the head 90 degrees using the edger function switch. Position the wheel along the edge of your lawn or pathway. Guide the edger along the desired line for a clean edge.
- Stopping the Trimmer: Release the trigger switch to stop the motor.
- Battery Life: Each 2.0Ah battery provides approximately 20-30 minutes of runtime. Use the second battery for extended operation.

Image: A person using the MAXLANDER weed wacker, highlighting the automatic line feed feature.

Image: The MAXLANDER weed wacker in edger mode, creating a clean edge along a pathway.
Product Demonstration Video
Video: Official video demonstrating the features and operation of the MAXLANDER 10-inch Cordless Weed Wacker.
Maintenance
- Cleaning: After each use, disconnect the battery and clean the tool with a damp cloth. Remove any grass clippings or debris from the cutting head and guard.
- Line Replacement: When the trimmer line is depleted, replace the spool with a new MAXLANDER 0.065" replacement spool. Ensure the line is properly wound and fed through the eyelets.
- Battery Care: Store batteries in a cool, dry place. Do not expose to extreme temperatures. Charge batteries fully before long-term storage.
- Storage: Store the trimmer in a dry, secure location, out of reach of children. The detachable design allows for compact storage.
Troubleshooting
- Trimmer does not start:
- Ensure the battery is fully charged and properly inserted. Verify the protection lock-off button is pressed before squeezing the trigger.
- Trimmer line does not feed:
- Check if the line is tangled or jammed in the spool. Ensure the automatic feed spool mechanism is clear of debris. Replace the spool if the line is too short or damaged.
- Reduced cutting performance:
- The battery may be low; replace with a fully charged battery. The trimmer line may be worn or too short; replace the spool. Ensure the cutting head is free of excessive debris.
- Short battery runtime:
- Ensure batteries are fully charged before use. Battery performance can decrease over time; consider replacing older batteries. Cutting thick or dense vegetation can reduce runtime.
Specifications
| Feature | Detail |
|---|---|
| Brand | MAXLANDER |
| Model Number | ML8A221 |
| Power Source | 20V Lithium-ion Battery |
| Cutting Width | 10 inches |
| Product Dimensions | 12"L x 10"W |
| Battery Type | 20V 2.0Ah Lithium-ion (2 included) |
| Charger | Quick Charger (1 included) |
| Battery Average Life | Approx. 25 minutes per 2.0Ah battery |
| Weight | Less than 6 pounds |
Warranty and Support
For warranty information or technical support, please refer to the contact details provided with your purchase documentation or visit the official MAXLANDER website. Keep your proof of purchase for warranty claims.