1. Product Overview
This manual provides instructions for the Inexaccessories Android 13 Car Radio Stereo, a multimedia system designed to upgrade your vehicle's infotainment capabilities. It features a 6.8-inch QLED touchscreen, wireless CarPlay and Android Auto, GPS navigation, and various audio enhancements.

Image 1.1: Front view of the Inexaccessories Android 13 Car Radio Stereo unit.
2. Compatible Vehicle Models
This car radio is designed for seamless integration into various vehicle models. Please verify your vehicle's compatibility before installation.
- For Dodge: RAM (2002-2006), 1500/2500/3500 Pickup (2004-2005), Dakota (2002-2004), Neon (2004-2005), Stratus (2004-2006), Intrepid (2002-2004), Caravan (2004-2007), Viper (2005-2006), Durango (2002-2003)
- For Jeep: Grand Cherokee (1999-2004), Liberty (2002-2007), Wrangler (2003-2006)
- For Chrysler: 300M (2002-2004), PT Cruiser (2003-2005), Sebring Sedan (2002-2006), Concorde (2002-2004), Town & Country (2004-2007), Grand Voyager (2001-2003)

Image 2.1: Comparison of a Dodge Ram dashboard before and after installing the car radio.

Image 2.2: Examples of compatible vehicle dashboards, including Jeep and Chrysler models, with the car radio installed.
3. What's in the Box
Please ensure all components are present before beginning installation:
- Android 13 Car Radio Stereo Unit
- Power cable & RCA Cable
- USB Cable & Microphone cable
- Back-up camera & Camera Cable
- GPS Antenna & Signal Cable
- Protocol Box (if applicable for your vehicle)
- User Manual (this document)
4. Setup and Installation
Professional installation is recommended. Ensure the vehicle's battery is disconnected before starting. Refer to the wiring diagram for correct connections.
4.1 Wiring Connections
Connect the provided power cables, RCA cables, USB cables, microphone cable, and GPS antenna cable to the corresponding ports on the car radio and your vehicle's wiring harness. If your vehicle requires a protocol box for CAN-bus integration, connect it as shown in the diagram.

Image 4.1: Comprehensive wiring diagram showing connections for power, RCA, USB, microphone, GPS, and backup camera.
4.2 Backup Camera Installation
Connect the backup camera cable to the designated input on the car radio. Route the camera cable to the rear of the vehicle and mount the camera in a suitable location, ensuring a clear view of the rear. Connect the camera's power to the vehicle's reverse light circuit for automatic activation.
4.3 GPS Antenna Placement
Mount the GPS antenna in a location with a clear view of the sky, typically on the dashboard or under the windshield, to ensure optimal signal reception.
5. Operating Instructions
5.1 Wireless CarPlay & Android Auto
Connect your iPhone or Android smartphone wirelessly via Bluetooth to enable CarPlay or Android Auto. This allows access to navigation, music, messaging, and voice assistants directly on the car radio's screen. Wired connections are also supported.

Image 5.1: Display showing Wireless CarPlay and Android Auto functionality.
5.2 GPS Navigation
The unit supports both offline and online navigation. Pre-install offline maps or use popular online navigation apps like Google Maps or Waze. The included GPS antenna ensures accurate positioning.
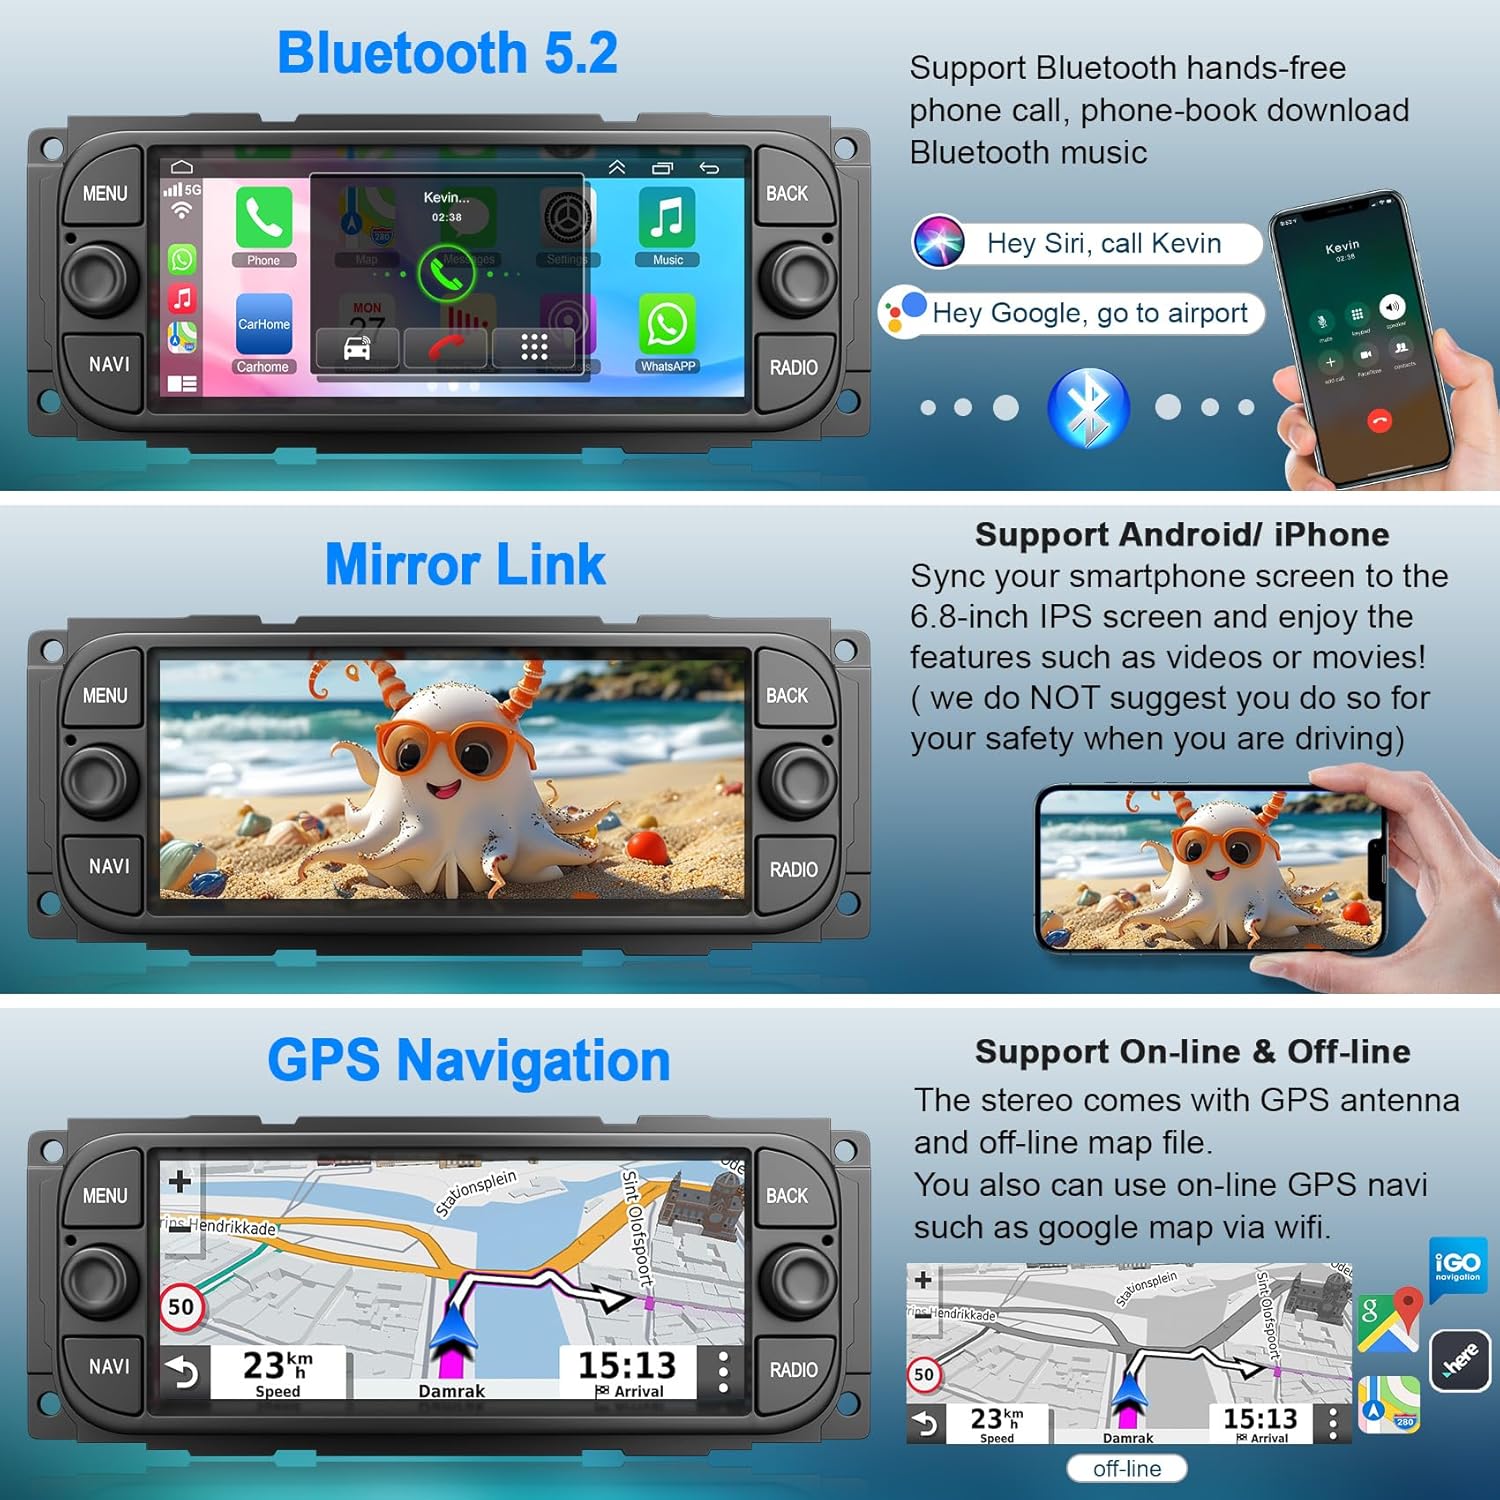
Image 5.2: GPS navigation display, also showing Bluetooth and Mirror Link features.
5.3 FM Radio
Tune into your favorite FM radio stations. The built-in RDS (Radio Data System) provides station information where available.

Image 5.3: FM Radio interface, also showing WiFi connection and EQ/DSP settings.
5.4 Bluetooth Connectivity
Connect your smartphone via Bluetooth 5.2 for hands-free calling, phonebook download, and audio streaming. Voice control features are supported.
5.5 WiFi Connection
Connect the car radio to a Wi-Fi hotspot (e.g., from your smartphone) to access online features, download apps, and browse the internet directly on the QLED touchscreen.
5.6 DSP & EQ Settings
Utilize the built-in Digital Sound Processor (DSP) and Equalizer (EQ) settings to fine-tune the audio output to your preference, creating a customized listening experience.
5.7 Steering Wheel Control (SWC)
The unit supports retaining your vehicle's original steering wheel controls for safe and convenient operation of the car radio's functions.

Image 5.4: Illustration of steering wheel control functionality and backup camera display.
5.8 Backup Camera Display
When the vehicle is shifted into reverse gear, the car radio automatically displays the feed from the connected backup camera, providing a 170-degree wide view with parking guidelines for safer reversing.
5.9 Split Screen Functionality
The split-screen feature allows you to run two applications simultaneously, such as navigation and music playback, enhancing multitasking capabilities.
5.10 Mirror Link
Mirror Link allows you to display your smartphone's screen directly onto the car radio's 6.8-inch IPS screen. For safety, avoid using this feature for video playback while driving.
6. Maintenance
To ensure optimal performance and longevity of your car radio:
- Cleaning: Use a soft, dry cloth to clean the screen and unit. Avoid abrasive cleaners or solvents.
- Software Updates: Periodically check for and install available software updates to improve performance and add new features.
- Environmental Conditions: Avoid exposing the unit to extreme temperatures, direct sunlight for prolonged periods, or excessive moisture.
7. Troubleshooting
If you encounter issues, refer to the following common solutions:
- No Power: Check all power connections, including the main power cable and ground wire. Ensure the vehicle's fuse for the radio is intact.
- No Sound: Verify speaker connections. Check volume levels and EQ settings. Ensure the audio source is correctly selected.
- GPS Signal Loss: Ensure the GPS antenna is properly connected and placed in a location with a clear view of the sky.
- CarPlay/Android Auto Not Connecting: Ensure Bluetooth is enabled on both the car radio and your smartphone. Try forgetting and re-pairing the device. Check for any software updates for your phone or the car radio.
- Touchscreen Unresponsive: Try restarting the unit. If the issue persists, a factory reset might be necessary (note: this will erase all user data).
- Backup Camera Not Displaying: Check the camera's power and video signal connections. Ensure the camera is properly wired to the reverse light trigger.
For persistent issues, please contact customer support.
8. Specifications
| Feature | Detail |
|---|---|
| Operating System | Android 13 |
| Screen Size | 6.8 Inches |
| Display Type | QLED IPS Touch Screen |
| Memory (RAM) | 4GB |
| Storage (ROM) | 64GB |
| Processor | Quad-Core CPU |
| Connectivity | Bluetooth 5.2, Wi-Fi |
| Special Features | Wireless CarPlay & Android Auto, GPS Navigation, DSP, EQ, Split Screen, Mirror Link, Steering Wheel Control, Backup Camera Support |
| Audio Output Mode | Stereo |
| Mounting Type | Dashboard Mount |
| Item Weight | 3 Pounds |
9. Warranty and Support
This product comes with a 2-Year Warranty from the date of purchase. For warranty claims or technical assistance, please contact Inexaccessories customer support through the retailer where the product was purchased or visit the official Inexaccessories website for contact information.
Please have your product model number (B0G47BBXWN) and proof of purchase ready when contacting support.