1. Introduction
This manual provides detailed instructions for the installation, operation, and maintenance of your DESLOC C110 Smart Lock with LockVue Display and C100 Handle Set. Please read this manual thoroughly before installation and use to ensure proper function and safety.
2. Safety Information
- Do not attempt to disassemble or repair the lock yourself. Contact customer support for assistance.
- Use only specified batteries. Do not mix old and new batteries or different types of batteries.
- Ensure all components are securely installed according to the instructions to prevent malfunction.
- Keep keys in a secure location away from the lock.
- Avoid exposing the lock to extreme temperatures or direct water immersion, despite its IP54 rating.
3. Product Overview
The DESLOC C110 Smart Lock offers multiple entry methods and features a LockVue display for direct management. The C100 Handle Set complements the smart lock for a complete door security solution.
3.1 Key Features
- LockVue Display: Integrated display for managing settings, users, and passcodes without an app or Wi-Fi.
- 3-in-1 Keyless Entry: Access via fingerprint, passcode, or traditional key.
- FlashPrint Sensor: Fast and accurate fingerprint recognition (0.3 seconds, 99% accuracy).
- User Capacity: Stores up to 50 fingerprints and 100 access codes.
- Guest Access: Generate up to 4 one-time PINs that expire after single use.
- Auto-Lock: Adjustable auto-lock feature (5-120 seconds).
- Long Battery Life: Up to 12 months with low-battery warnings.
- Emergency Power: Type-C port for external power bank in case of battery depletion.
- Enhanced Security: BHMA Grade 3 certified, IP54 weather resistance, anti-peep PIN protection, local data storage.
3.2 Components
The package includes the DESLOC C110 Smart Lock, C100 Handle Set, mounting hardware, and two spare keys. (4 AA batteries are not included).

Image: Overview of the DESLOC C110 Smart Lock, highlighting its 3-in-1 keyless entry methods: fingerprint, passcode, and key. It also shows the capacity for 50 fingerprints, 4 one-time codes, 100 user codes, and includes 2 spare keys.
4. Installation
Installation of the DESLOC C110 Smart Lock and C100 Handle Set typically takes less than 15 minutes with a screwdriver. Ensure your door meets the compatibility requirements before beginning.
4.1 Compatibility Check

Image: Diagram illustrating door compatibility requirements for the DESLOC C110 Smart Lock. It shows measurements for hole diameter (2-1/8" or 54mm), door thickness (1-3/8" to 2" or 35 to 50mm), door hole diameter (1" or 25mm), backset (2-3/8" or 2-3/4" or 60 or 70mm), and recommended distance (5-1/2" or 140mm). Both right and left doors are compatible.
- Door Thickness: 1-3/8" to 2" (35 to 50mm)
- Hole Diameter: 2-1/8" (54mm)
- Door Hole Diameter: 1" (25mm)
- Backset: 2-3/8" or 2-3/4" (60 or 70mm)
- Recommended Distance: 5-1/2" (140mm)
- Both right and left-hand doors are compatible.
4.2 Installation Steps
- Prepare the door: Ensure the door is properly drilled according to the compatibility specifications.
- Install the latch: Insert the latch into the door edge and secure it with screws.
- Install the exterior assembly: Route the cable through the door hole and attach the exterior assembly. Use the adhesive back cover for quick alignment.
- Install the interior assembly: Connect the cable from the exterior assembly to the interior assembly. Secure the interior assembly to the door.
- Install batteries: Insert 4 AA batteries into the battery compartment.
- Test the lock: Manually test the deadbolt and handle operation.
- Automatic Door Handing Detection: The lock will automatically detect your door's swing direction upon initial power-up or after battery replacement.
5. Operation
The DESLOC C110 Smart Lock provides multiple ways to secure and access your door.
5.1 LockVue Display Navigation

Image: Close-up of the DESLOC C110 Smart Lock's LockVue display, showing menu options such as '1. Add Admin', '2. Add User', '3. Del User', and '4. Lock Settings'. This illustrates the on-device control without a phone or app.
The LockVue display allows direct management of all lock settings. Use the keypad to navigate menus and confirm selections. Common menu options include adding/deleting users, setting passcodes, and adjusting lock settings.
5.2 Unlocking the Door
- Fingerprint: Place your registered finger on the FlashPrint Sensor. The lock will unlock in approximately 0.3 seconds upon successful recognition.
- Passcode: Enter your registered passcode on the keypad, then press the '#' key to confirm.
- Key: Insert the physical key into the keyhole and turn to unlock.

Image: A finger is shown pressing the fingerprint sensor on the DESLOC C110 Smart Lock, with the display indicating 'Successful'. Text on the image highlights '<0.3s Recognition Time', '>99% Success Rate', and '50 Fingerprints'.
5.3 Locking the Door
- Manual Lock: Press and hold the '#' key on the keypad for 2 seconds.
- Auto-Lock: The lock will automatically engage the deadbolt after a set period (5-120 seconds) if the door is closed. This feature can be configured via the LockVue display.

Image: A man is shown walking away from his house with a dog, while the DESLOC C110 Smart Lock on the door is depicted with an 'Auto-lock' indicator, showing the feature activates within 5-120 seconds. This illustrates the convenience of the auto-lock function.
5.4 Anti-Peep Passcode
To enhance privacy when entering your passcode, you can input random digits before or after your actual passcode. The lock will still recognize the correct sequence within the longer string of numbers.

Image: A visual representation of the anti-peeping feature on the DESLOC C110 Smart Lock. It shows how random digits (e.g., '45' and '89') can be entered before and after the correct password ('612347') to obscure the actual code from onlookers.
6. User Management
Manage administrators, regular users, and guest access directly through the LockVue display.
6.1 Adding Users
- Access the menu on the LockVue display.
- Select 'Add Admin' or 'Add User'.
- Follow the on-screen prompts to register a fingerprint or set a new passcode.
6.2 Deleting Users
- Access the menu on the LockVue display.
- Select 'Del User'.
- Choose the user to delete and confirm.
6.3 Guest Access (One-Time PINs)
The lock supports generating up to 4 one-time PINs simultaneously for temporary access. Each code automatically expires after a single use, ensuring security.
- Access the menu on the LockVue display.
- Select the option to generate one-time PINs.
- The display will show the generated PINs. Provide these to your guests or service personnel.
7. Maintenance
Proper maintenance ensures the longevity and reliable performance of your smart lock.
7.1 Battery Replacement

Image: The DESLOC C110 Smart Lock highlighting its 'PowerMax: 12-Month Battery Life' feature, powered by 4 AA batteries (not included). It also shows icons for 'Low Battery Alert', 'Type-C Emergency Charging', and 'Power Bank as Backup Power', with a Type-C cable connected to the lock.
The lock is powered by 4 AA batteries and offers up to 12 months of battery life. The LockVue display will provide proactive low-battery warnings.
- When a low battery warning appears, replace all 4 AA batteries promptly.
- Open the battery compartment cover on the interior assembly.
- Remove the old batteries and insert new ones, ensuring correct polarity.
- Close the battery compartment cover.
7.2 Emergency Power
If the batteries completely deplete before replacement, you can use a power bank to temporarily power the lock via the emergency Type-C port located at the bottom of the exterior assembly. This allows you to unlock the door and replace the batteries.
7.3 Cleaning
Wipe the lock's surface with a soft, dry cloth. Avoid using abrasive cleaners or solvents that could damage the finish or electronic components.
8. Troubleshooting
| Problem | Possible Cause | Solution |
|---|---|---|
| Lock does not respond. | Dead batteries. | Replace batteries or use emergency Type-C power. |
| Fingerprint not recognized. | Finger is wet/dirty, or not properly registered. | Ensure finger is clean and dry. Re-register fingerprint if issue persists. Try another registered finger or entry method. |
| Passcode not working. | Incorrect passcode entered, or passcode expired (for one-time PINs). | Verify the passcode. Ensure it's not a one-time PIN that has already been used. Re-enter carefully. |
| Auto-lock not engaging. | Auto-lock feature disabled or door not fully closed. | Check auto-lock settings via LockVue display. Ensure the door is completely closed. |
| Lock makes unusual noises. | Mechanical obstruction or loose components. | Check for any obstructions around the deadbolt. Ensure all mounting screws are tight. If issue persists, contact support. |
9. Specifications
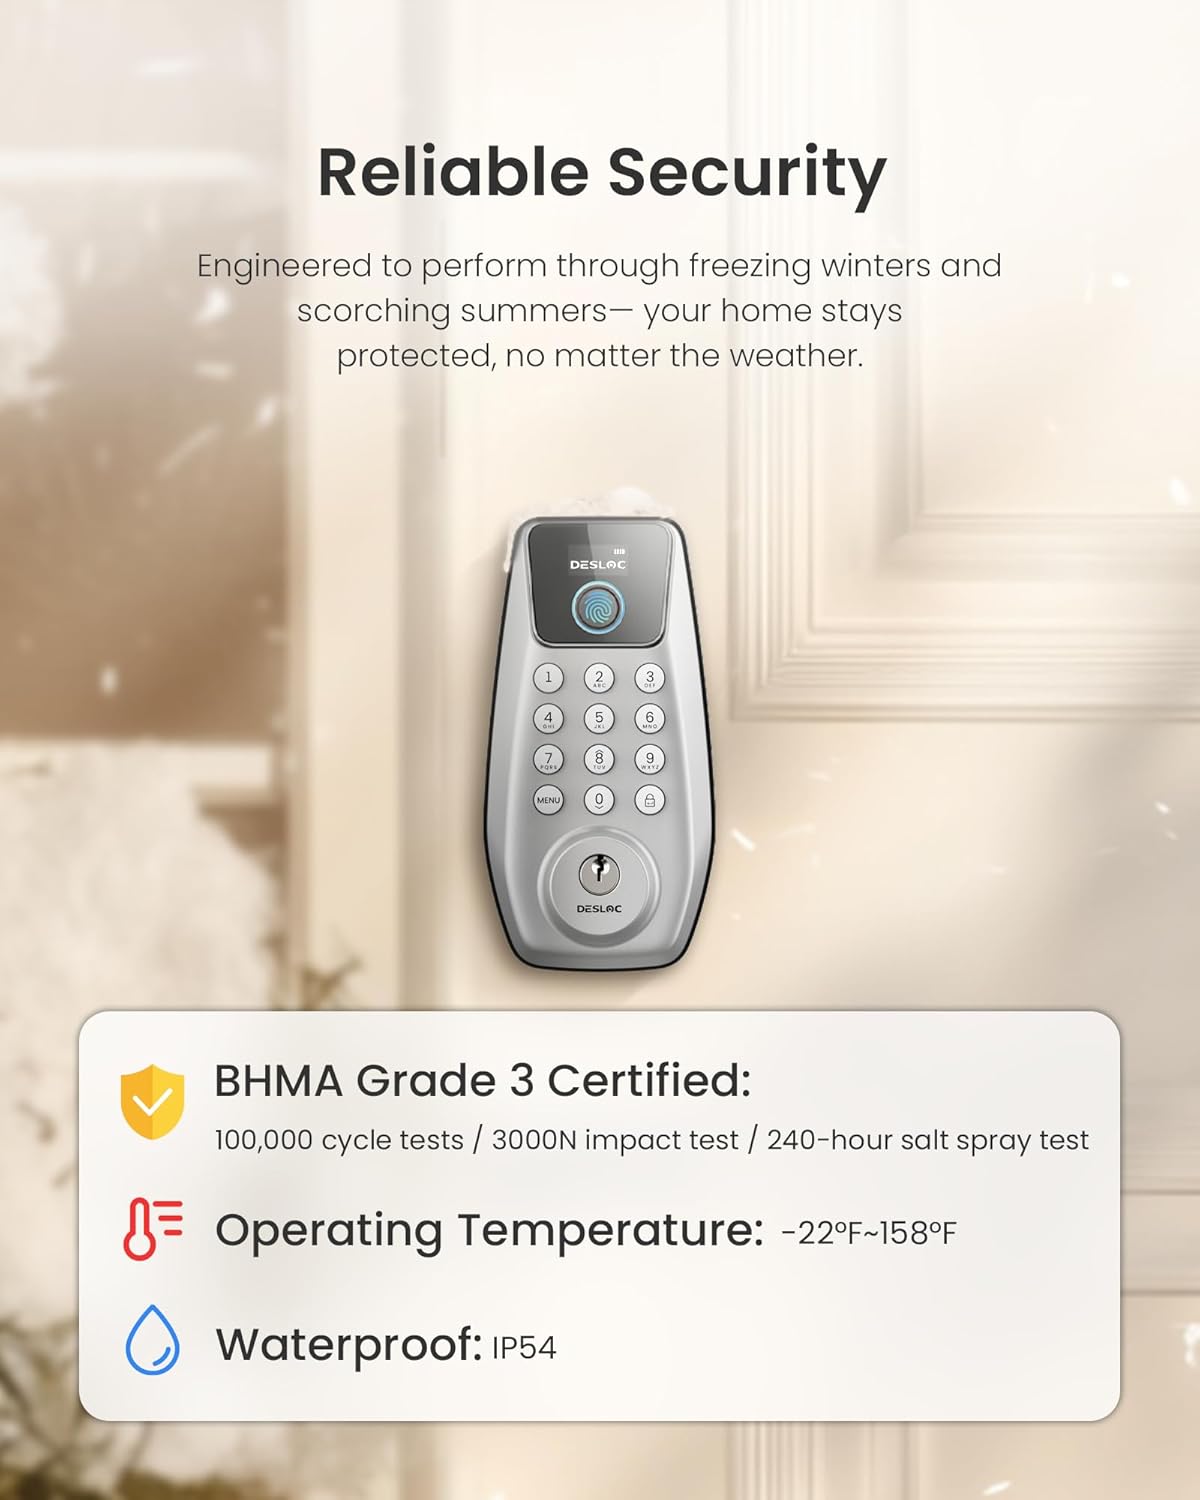
Image: The DESLOC C110 Smart Lock highlighting its 'Reliable Security' features. It states 'BHMA Grade 3 Certified' (100,000 cycle tests / 3000N impact test / 240-hour salt spray test), 'Operating Temperature: -22°F~158°F', and 'Waterproof: IP54'.
- Model: DESLOC C110 Smart Lock & C100 Handle Set
- Entry Methods: Fingerprint, Passcode, Key
- Fingerprint Recognition Speed: <0.3 seconds
- Fingerprint Recognition Accuracy: >99%
- Fingerprint Capacity: Up to 50
- Passcode Capacity: Up to 100 user codes, 4 simultaneous one-time PINs
- Auto-Lock Duration: 5-120 seconds (adjustable)
- Power Supply: 4 x AA batteries (not included)
- Battery Life: Up to 12 months (depending on usage)
- Emergency Power: Type-C USB port
- Operating Temperature: -22°F to 158°F (-30°C to 70°C)
- Weather Resistance: IP54
- Certifications: BHMA Grade 3 (100,000 cycle tests, 3000N impact test, 240-hour salt spray test)
- Data Storage: Local
10. Warranty and Support
Your DESLOC C110 Smart Lock and C100 Handle Set comes with a 1-year warranty.
- Warranty Period: 1 year from the date of purchase.
- Customer Support: 24/7 customer support is available for any questions or issues.
- For warranty claims or technical assistance, please refer to the contact information provided with your product packaging or visit the official DESLOC website.