
1. Introduction
Thank you for choosing the Wiltec Airbrush Compressor HO-826. This manual provides essential information for the safe and efficient operation, maintenance, and troubleshooting of your new airbrush compressor. Please read these instructions carefully before initial use and keep them for future reference.
2. Safety Instructions
Always observe basic safety precautions to reduce the risk of fire, electric shock, and personal injury.
2.1 General Safety
- Ensure the compressor is placed on a stable, level surface to prevent tipping.
- Operate the compressor in a well-ventilated area.
- Keep children and unauthorized persons away from the operating area.
- Do not operate the compressor if it is damaged or malfunctioning.
- Wear appropriate personal protective equipment, such as eye protection, when operating the airbrush system.
- Never direct the air stream at people or animals.
2.2 Electrical Safety
- Connect the compressor only to a grounded power outlet with the correct voltage.
- Do not use extension cords unless absolutely necessary, and ensure they are rated for the compressor's power requirements.
- Never operate the compressor with wet hands or in damp conditions.
- Unplug the compressor from the power source before performing any maintenance or when not in use.
2.3 Pressure Safety
- Do not exceed the maximum operating pressure of the airbrush or connected tools.
- Regularly check all hoses and connections for leaks or damage.
- Always release residual air pressure from the system before disconnecting hoses or performing maintenance.
3. Product Overview
The Wiltec Airbrush Compressor HO-826 is designed for quiet and efficient airbrush applications. It features an oil-lubricated motor, automatic start/stop function, and a 2000 ml oil tank for stable air supply.
3.1 Key Features
- Quiet Operation: Operates at a low noise level of 39 dB, suitable for studios and hobby rooms.
- High Performance: Air flow rate of 43-52 l/min for consistent results.
- Automatic Function: Starts automatically at 3 bar and stops at 8 bar, ensuring efficient energy use.
- Versatile Use: Compatible with common airbrush accessories for various applications, including modeling, art, and nail airbrushing.
- Reliable Design: Features a 2000 ml oil tank for stable and reliable compressed air supply.
3.2 Components Diagram
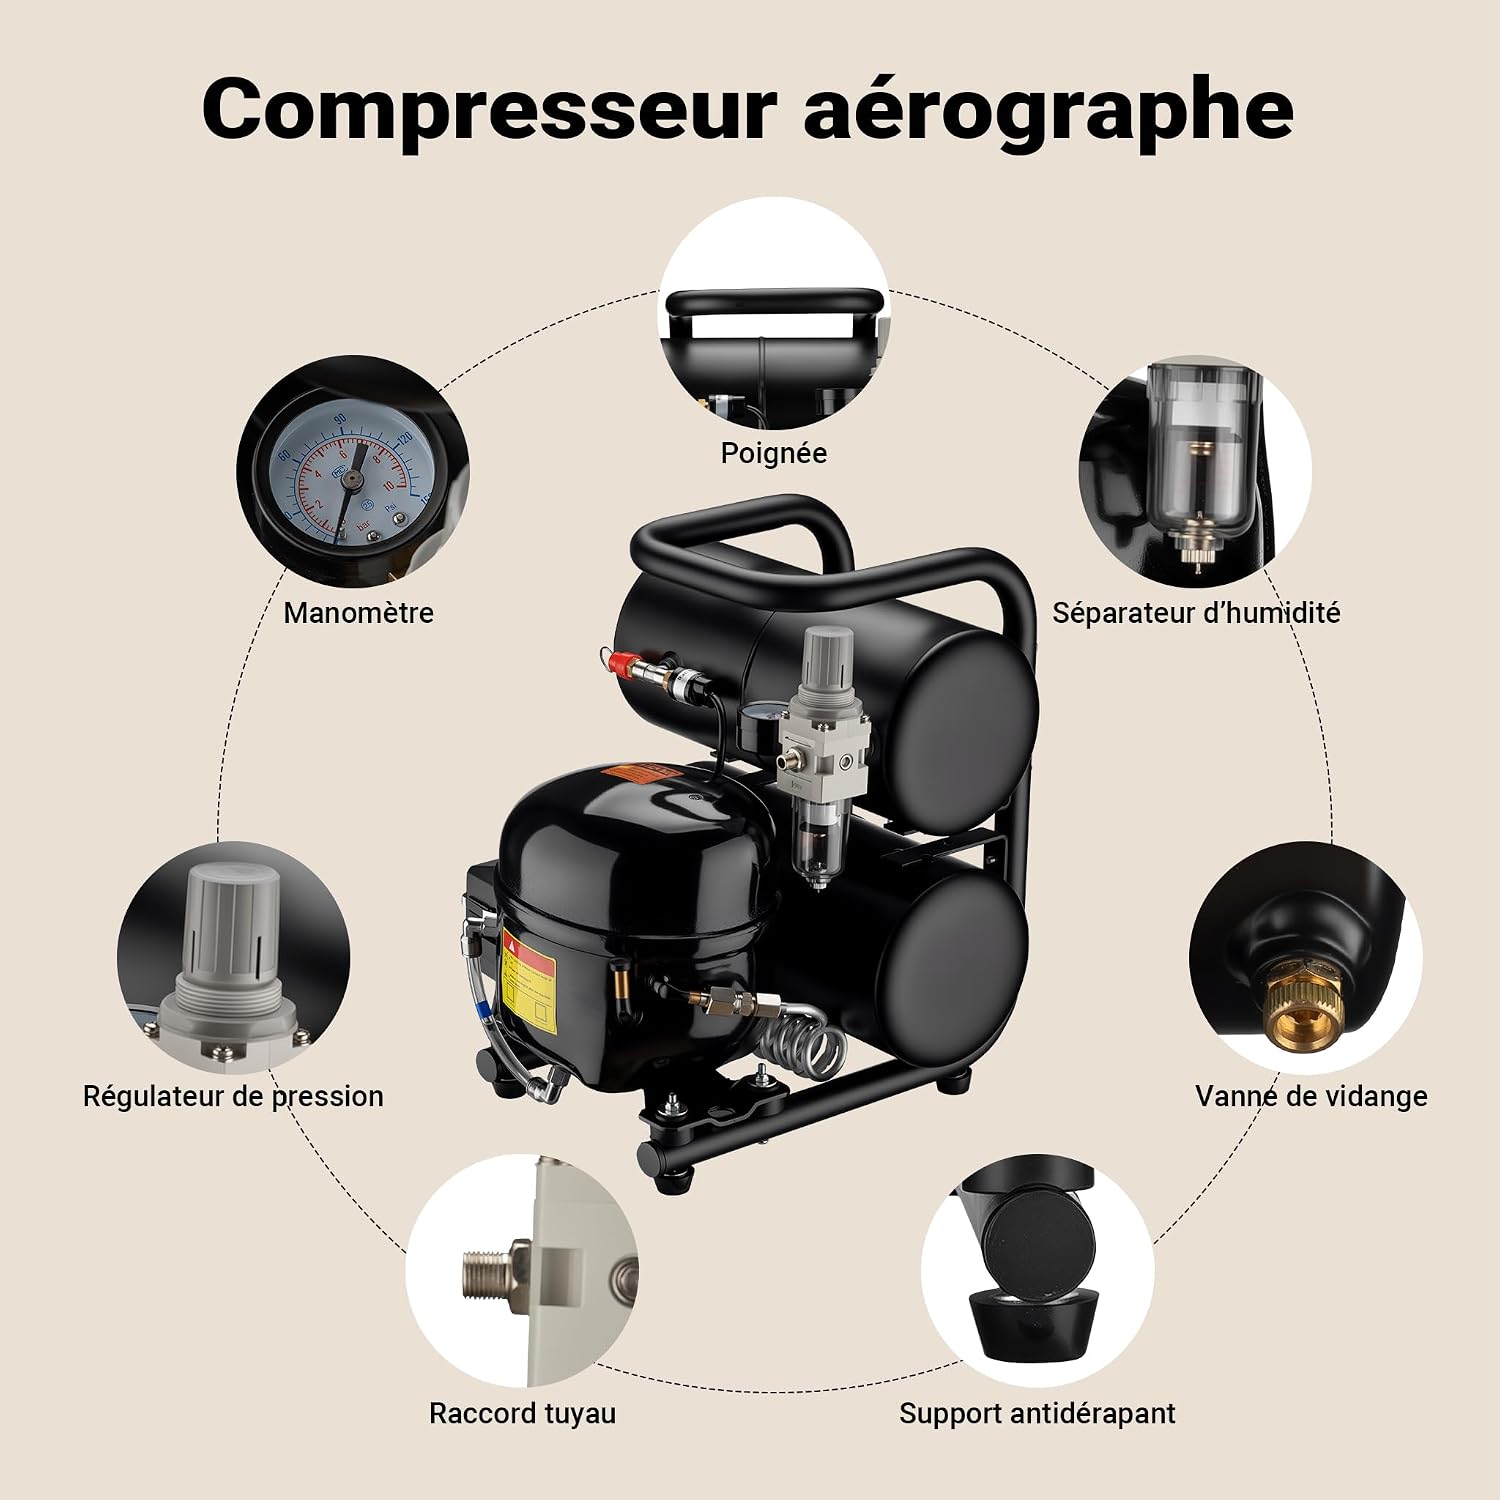
- Handle: For easy transport.
- Pressure Gauge: Displays current air pressure.
- Moisture Separator: Filters moisture from the air supply.
- Pressure Regulator: Adjusts output air pressure.
- Drain Valve: For draining condensation from the air tanks.
- Hose Connection: Point for attaching airbrush hoses.
- Anti-slip Support: Provides stability during operation.
4. Setup
4.1 Unpacking and Inspection
- Carefully remove the compressor from its packaging.
- Inspect the unit for any signs of damage during transit. If damaged, do not operate and contact customer support.
- Ensure all components listed in the packaging are present.
4.2 Initial Oil Filling
The compressor is oil-lubricated and requires oil before its first use. A 200ml bottle of oil is typically supplied with the compressor.
- Locate the oil filler cap on the compressor.
- Carefully pour the supplied oil into the oil tank. Do not overfill; check the oil level indicator if available.
- Securely replace the oil filler cap.
4.3 Placement and Connections
- Place the compressor on a firm, level, and stable surface in a well-ventilated area.
- Connect your airbrush hose to the compressor's hose connection point. Ensure a secure fit.
- Plug the power cord into a grounded electrical outlet.
5. Operation
5.1 Powering On and Automatic Function
- Turn on the compressor using the power switch.
- The compressor will automatically start when the pressure drops to 3 bar and stop when it reaches 8 bar. This maintains a consistent working pressure.
5.2 Adjusting Air Pressure

The compressor features an adjustable pressure range of 3 to 8 bars.
- Locate the pressure regulator knob.
- To adjust the pressure, pull the knob outwards to unlock it.
- Turn the knob clockwise to increase pressure or counter-clockwise to decrease pressure.
- Observe the pressure gauge to set the desired working pressure for your airbrush.
- Push the knob inwards to lock the setting. Caution: Do not force the knob; it has a locking mechanism.
5.3 Airbrushing Applications

This compressor is suitable for a wide range of airbrushing tasks:
- Modeling (e.g., 3D models)
- Art and illustration
- Airbrush tattoos
- Cake decoration
- Ceramics and crafts
- Nail art
6. Maintenance
Regular maintenance ensures the longevity and optimal performance of your compressor.
6.1 Oil Level Check and Change
- Check the oil level regularly before each use. Ensure it is within the recommended range on the oil level indicator.
- Change the oil according to the manufacturer's recommendations or if it appears discolored. Refer to the oil filling procedure in Section 4.2.
- Use only compressor oil specified for airbrush compressors.
6.2 Draining Condensation
Condensation will accumulate in the air tanks. Frequent draining is crucial to prevent rust and extend the lifespan of the tanks.
- Ensure the compressor is turned off and unplugged.
- Place a suitable container beneath the drain valve(s) located at the bottom of the air tanks.
- Slowly open the drain valve(s) to release accumulated water and air.
- Close the drain valve(s) securely once all condensation has been expelled.
6.3 Cleaning
- Wipe down the exterior of the compressor with a damp cloth. Do not use harsh chemicals or abrasive cleaners.
- Periodically check and clean the air filter if accessible, following manufacturer guidelines.
7. Troubleshooting
| Problem | Possible Cause | Solution |
|---|---|---|
| Compressor does not start. | No power supply; power switch off; faulty power cord. | Check power connection; ensure switch is on; inspect power cord for damage. |
| Low air pressure or inconsistent flow. | Air leak in hose/connections; pressure regulator set too low; clogged air filter; low oil level. | Check all connections for leaks; adjust pressure regulator; clean/replace air filter; check and refill oil. |
| Compressor runs continuously. | Air leak in system; faulty pressure switch. | Check for air leaks; if problem persists, contact customer support. |
| Excessive noise or vibration. | Loose components; compressor not on a stable surface; low oil level. | Check for loose parts and tighten; ensure stable placement; check and refill oil. |
| Water in air supply. | Condensation buildup in tanks; moisture separator needs draining. | Drain air tanks frequently; check and drain moisture separator. |
8. Specifications

| Brand: | WilTec |
| Model Name: | Wiltec Compressor HO-826 |
| Model Number: | 65659 |
| Power Source: | Corded |
| Noise Level: | 39 Decibels |
| Item Weight: | 15.64 Kilograms |
| Oil Tank Capacity: | 2000 Milliliters (2 Liters) |
| Air Flow Capacity: | 43-52 Liters per minute |
| Operating Pressure Range: | 3-8 Bars (Automatic Start/Stop) |
| Color: | Black |
| Country of Origin: | China |
9. Warranty and Support
For warranty information, technical support, or spare parts, please contact Wiltec customer service or visit the official Wiltec website. Keep your purchase receipt as proof of purchase.
You can find more information and products from Wiltec by visiting their official store: Wiltec Store


