
Introduction
Thank you for choosing the Aheaplus Tall Shoe Cabinet. This manual provides detailed instructions for the safe assembly, operation, and maintenance of your new shoe storage unit. Please read all instructions carefully before beginning assembly and retain this manual for future reference.

The Aheaplus Tall Shoe Cabinet provides efficient storage for various spaces.
Safety Information
To ensure safe use and prevent damage, please observe the following:
- Always assemble the shoe rack according to the instructions provided.
- Do not overload the shelves. The maximum weight capacity is designed for approximately 20-22 pairs of adult shoes or 20-25 pairs of kids' shoes.
- Utilize the included anti-tipping device to secure the cabinet to a wall, especially in households with children or pets, to prevent accidental tipping.
- Place the cabinet on a flat, stable surface to ensure stability.
- Keep small parts and packaging materials away from children during assembly.
Package Contents
Before assembly, verify that all components are present and undamaged. If any parts are missing or damaged, please contact customer service.
| Part | Description | Quantity |
|---|---|---|
| Side Panels | Main structural sides | 2 |
| Top/Bottom Panels | Top and base of the cabinet | 2 |
| Fixed Shelves | Non-adjustable shelves | Varies (typically 2-4) |
| Adjustable Shelves | Removable/height-adjustable shelves | Varies (typically 6-8) |
| Back Panel | Rear support panel | 1 |
| Hardware Kit | Screws, dowels, cam locks, shelf pins, anti-tipping kit | 1 set |
| Hooks | For hanging items | 2 |
Setup and Assembly Instructions
Assembly typically requires two people and a Phillips head screwdriver. Follow the numbered steps provided in your physical instruction manual for detailed diagrams.
- Prepare the Area: Clear a spacious, clean, and flat area for assembly. Lay out all parts and hardware.
- Assemble the Base: Attach the bottom panel to the side panels using the provided hardware (e.g., cam locks and dowels). Ensure all connections are secure.
- Install Fixed Shelves: Insert any fixed shelves into their designated slots on the side panels.
- Attach Back Panel: Secure the back panel to the rear of the cabinet using small nails or screws. This adds stability and squareness to the unit.
- Install Top Panel: Attach the top panel to the side panels, mirroring the base assembly.
- Insert Adjustable Shelves: Place shelf pins into the desired holes for the adjustable shelves. Then, rest the adjustable shelves on these pins.
- Attach Hooks: Secure the two hooks to the side of the cabinet as shown in the diagrams.
- Install Anti-Tipping Kit: Follow the specific instructions for the anti-tipping kit to secure the cabinet to a wall stud. This is a critical safety step.

The 10-tier cabinet can be split into two 6-tier units for flexible placement.
Operating Instructions
The Aheaplus Tall Shoe Cabinet is designed for versatile storage.
- Adjusting Shelves: The cabinet features several adjustable shelves. To change shelf height, remove the shelf, reposition the shelf pins to the desired height, and then place the shelf back onto the pins. This allows accommodation for various shoe sizes, boots, or other items.
- Using Hooks: The integrated hooks on the side of the cabinet can be used to hang keys, umbrellas, bags, or other small accessories.
- Flexible Configuration: The 10-tier unit can be assembled as a single tall cabinet or split into two separate 6-tier units to fit different spaces or storage needs. Refer to the assembly instructions for details on splitting the unit.

Key features include adjustable shelves and integrated hooks for convenience.
Maintenance
Proper care will extend the life of your shoe cabinet.
- Cleaning: Wipe surfaces with a soft, damp cloth. Avoid harsh chemicals or abrasive cleaners, which can damage the finish. The surface is designed to be waterproof for easy cleaning.
- Dusting: Regularly dust the shelves and panels to prevent buildup.
- Inspection: Periodically check all screws and connections to ensure they remain tight. Retighten if necessary.
- Avoid Moisture: While the surface is waterproof, avoid prolonged exposure to excessive moisture.
Troubleshooting
If you encounter issues, refer to the following common solutions:
| Problem | Possible Cause | Solution |
|---|---|---|
| Cabinet is wobbly/unstable | Loose connections; uneven floor; anti-tipping kit not installed | Ensure all screws are tightened. Place on a level surface or use shims. Install the anti-tipping kit as directed. |
| Shelves do not fit properly | Incorrect shelf placement; pins not fully inserted | Verify shelf orientation. Ensure shelf pins are fully seated in the holes. |
| Missing parts | Packaging error | Contact Aheaplus customer service with your purchase details and the specific missing parts. |
Specifications
- Brand: Aheaplus
- Model: 10 Tier (17.7"W)
- Material: Engineered Wood (P2 MDF Board)
- Color: White
- Product Dimensions (D x W x H): 11.8" x 17.7" x 80"
- Mounting Type: Freestanding
- Number of Shelves: 10 (with some adjustable/removable)
- Special Feature: Space Saving, Anti-Tipping Device, Hooks
- Assembly Required: Yes
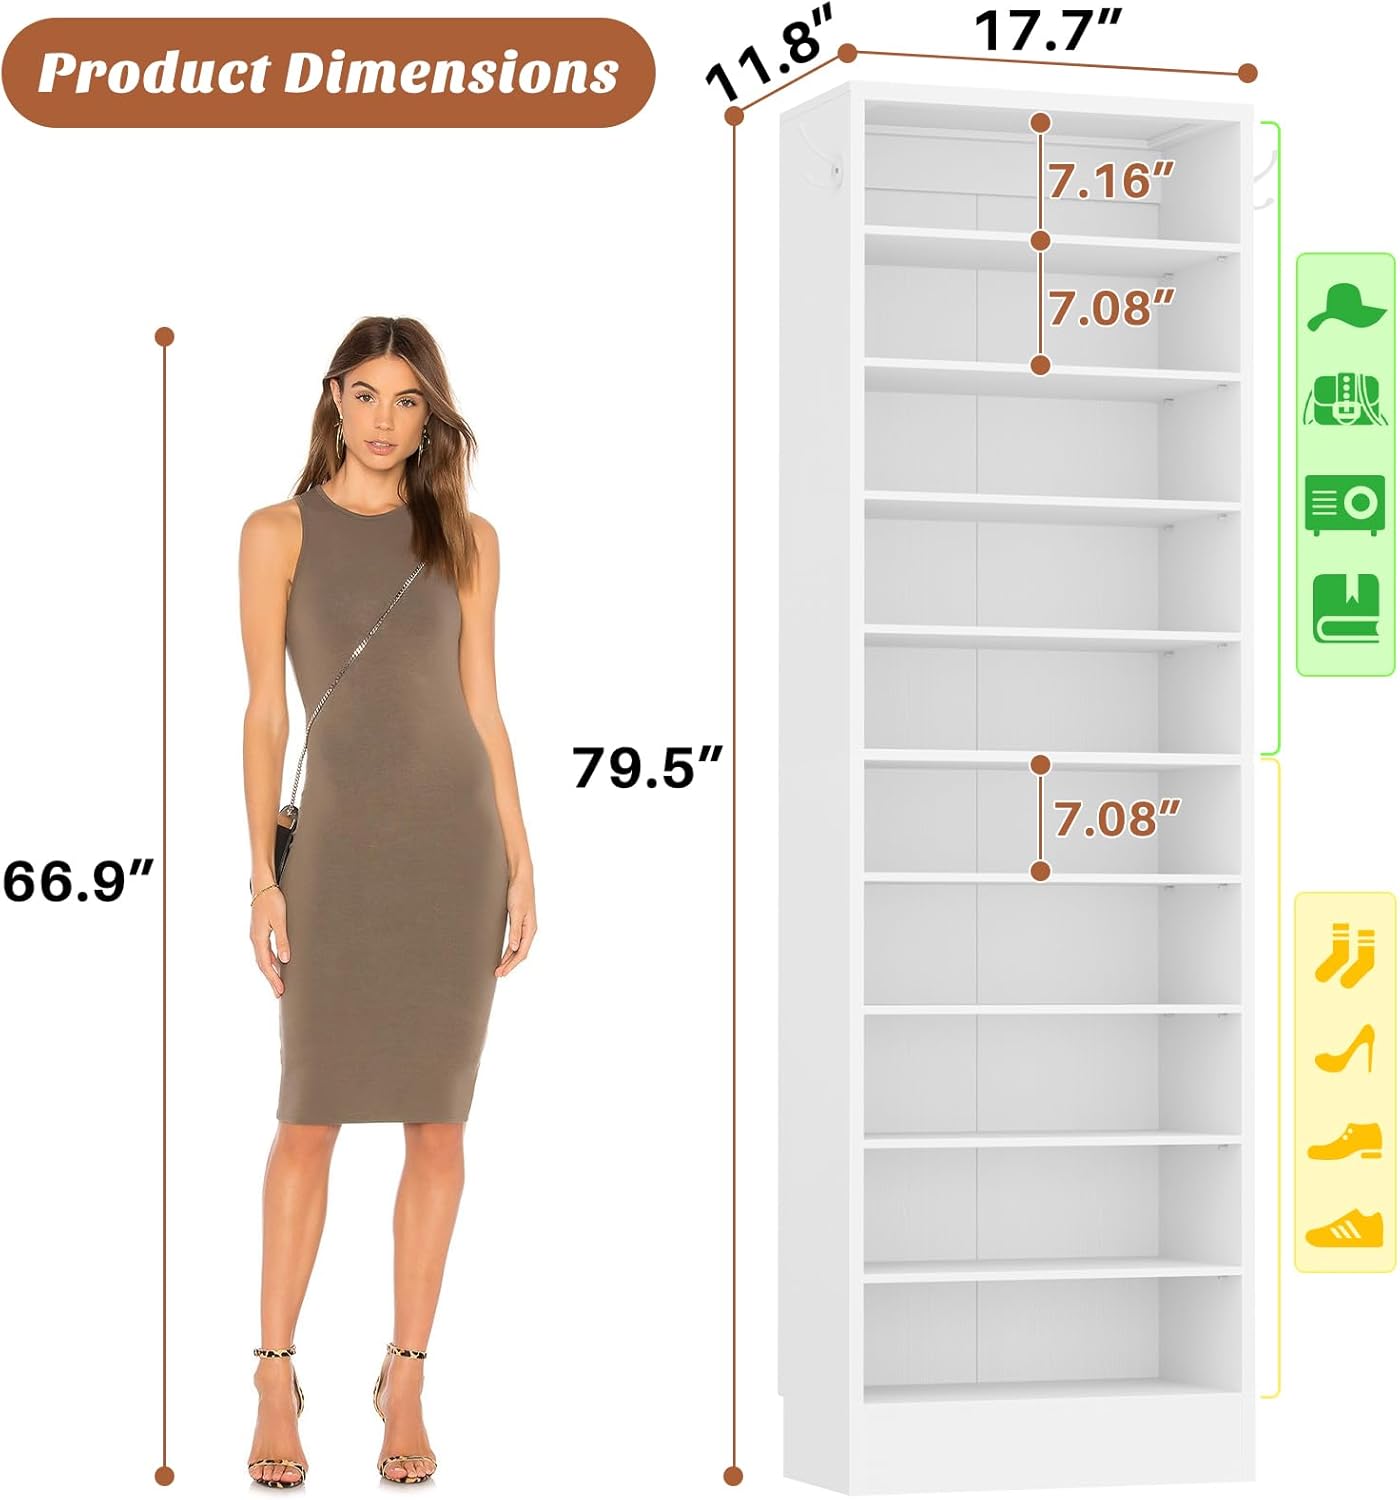
Detailed product dimensions for planning placement.
Warranty and Support
Aheaplus products are designed for quality and durability. For any issues, missing parts, or questions regarding your Tall Shoe Cabinet, please contact Aheaplus customer service. Our experienced team is available to assist you.
Please retain your proof of purchase for warranty claims.