1. Introduction
This manual provides detailed instructions for setting up, operating, and troubleshooting your CMSTEDCD SW900 Thunderbolt 4 KVM Switch Docking Station. This device allows you to connect two computers (laptops or MacBooks) to two monitors, sharing peripherals like keyboards, mice, and other USB devices, along with network access, through a single docking station.
2. Product Overview
The CMSTEDCD SW900 is a 14-in-1 USB-C KVM Switch Docking Station designed to streamline your workspace. It supports dual 4K@60Hz extended displays and offers high-speed data transfer, Ethernet connectivity, and broad system compatibility.
2.1 Package Contents
- CMSTEDCD SW900 KVM Switch Docking Station
- USB-C to USB-C Cables (for PC connection)
- Wired Remote Switch Button
- Power Adapter (DC12V)
- User Manual (this document)
2.2 Device Layout and Ports
Familiarize yourself with the ports and controls on your KVM switch docking station:

Image: Front and rear view of the CMSTEDCD SW900 KVM Switch Docking Station, highlighting all input and output ports including USB-A 3.0, USB-C 3.0 (data only), SD/Micro SD card slots, PC1/PC2 USB-C inputs, DC12V power, LAN IN, HDMI/DP outputs (OUT1, OUT2), USB-A 2.0 for mouse/keyboard, and the switch button/extend control ports.
- Front Panel:
- 3 x USB-A 3.0 Ports (5Gbps)
- 1 x USB-C 3.0 Port (5Gbps, Data Only)
- SD/Micro SD Card Slots (5Gbps)
- PC1/PC2 Select Button
- Control Port (for wired remote switch)
- Rear Panel:
- ON/OFF Power Switch
- DC12V Power Input
- LAN IN (1000Mbps Ethernet)
- PC1 IN (USB-C)
- PC2 IN (USB-C)
- OUT1 (HDMI or DP)
- OUT2 (HDMI or DP)
- 2 x USB-A 2.0 Ports (for mouse/keyboard)
3. Important Usage Notes
- Driver Installation: Before initial use, install the corresponding drivers for your operating system as instructed in this manual.
- Display Output: OUT1 and OUT2 each support only one output channel, capable of driving up to two displays in total.
- No PD Charging: The PC1/PC2 USB-C input ports do not support Power Delivery (PD) charging. The front panel USB-C port supports data transfer only; it does not support PD charging or video transmission.
- No Hotkeys: Hotkeys are not supported for switching between computers. Use the physical buttons.
- Cable Quality: For optimal 4K@60Hz performance and reliable video signal transmission, use high-quality cables compliant with DP 1.4 and HDMI 2.1 standards. Cables under 3 feet (1 meter) in length are recommended.
- DVI Monitors: Connecting a DVI monitor requires an HDMI-to-DVI cable (not included).
- Active Adapters: If an adapter is required for display connections, use an active adapter.
4. Setup Guide
4.1 Driver Installation
The KVM switch requires specific drivers for full functionality, especially for extended display modes. Follow these steps to install the necessary drivers:
- Open the DisplayLink web page: https://www.synaptics.com/
- Navigate to "Products" > "DisplayLink Graphics" and select the download button.
- Choose your operating system (macOS, Windows, Chrome OS, Linux, Android) to download the appropriate drivers.
- Click the download button to complete the installation.

Image: A visual guide showing the four steps to install DisplayLink drivers: visiting the Synaptics website, selecting DisplayLink Graphics, choosing an operating system, and downloading the driver.
4.2 Hardware Connection
Follow these steps to connect your computers and peripherals to the KVM switch:
- Power Connection: Connect the DC12V power adapter to the KVM switch and plug it into a power outlet.
- Computer Connection:
- Connect Laptop 1 (PC1) to the "PC1 IN" USB-C port on the KVM switch using a USB-C to USB-C cable.
- Connect Laptop 2 (PC2) to the "PC2 IN" USB-C port on the KVM switch using a USB-C to USB-C cable.
- Monitor Connection:
- Connect your first monitor to the "OUT1" port (HDMI or DisplayPort) on the KVM switch.
- Connect your second monitor to the "OUT2" port (HDMI or DisplayPort) on the KVM switch.
- Peripheral Connection:
- Connect your keyboard and mouse to the "USB 2.0" ports on the rear panel.
- Connect other USB devices (e.g., external hard drives, USB flash drives) to the "USB 3.0" ports or the front USB-C data port.
- Insert SD or Micro SD cards into the respective slots for data transfer.
- Network Connection: Connect an Ethernet cable from your router or modem to the "LAN IN" port on the KVM switch.
- Wired Remote Switch (Optional): Connect the wired remote switch button to the "Control" port on the front panel for convenient switching.

Image: The CMSTEDCD SW900 KVM Switch Docking Station shown with all necessary cables connected, including USB-C inputs for two laptops, HDMI/DisplayPort outputs for two monitors, USB peripherals, Ethernet, and power.
5. Operating Instructions
5.1 Switching Between Computers
The KVM switch offers two methods for switching between connected computers (PC1 and PC2):
- Method 1: Front Panel Button Switching
Press the "PC1 PC2 Select" button on the front panel of the KVM switch to toggle between PC1 and PC2. The LED indicator will show which computer is currently active.
- Method 2: Wired Remote Controller
If connected, press the button on the wired remote controller to switch between PC1 and PC2. This allows for discreet placement of the KVM unit.
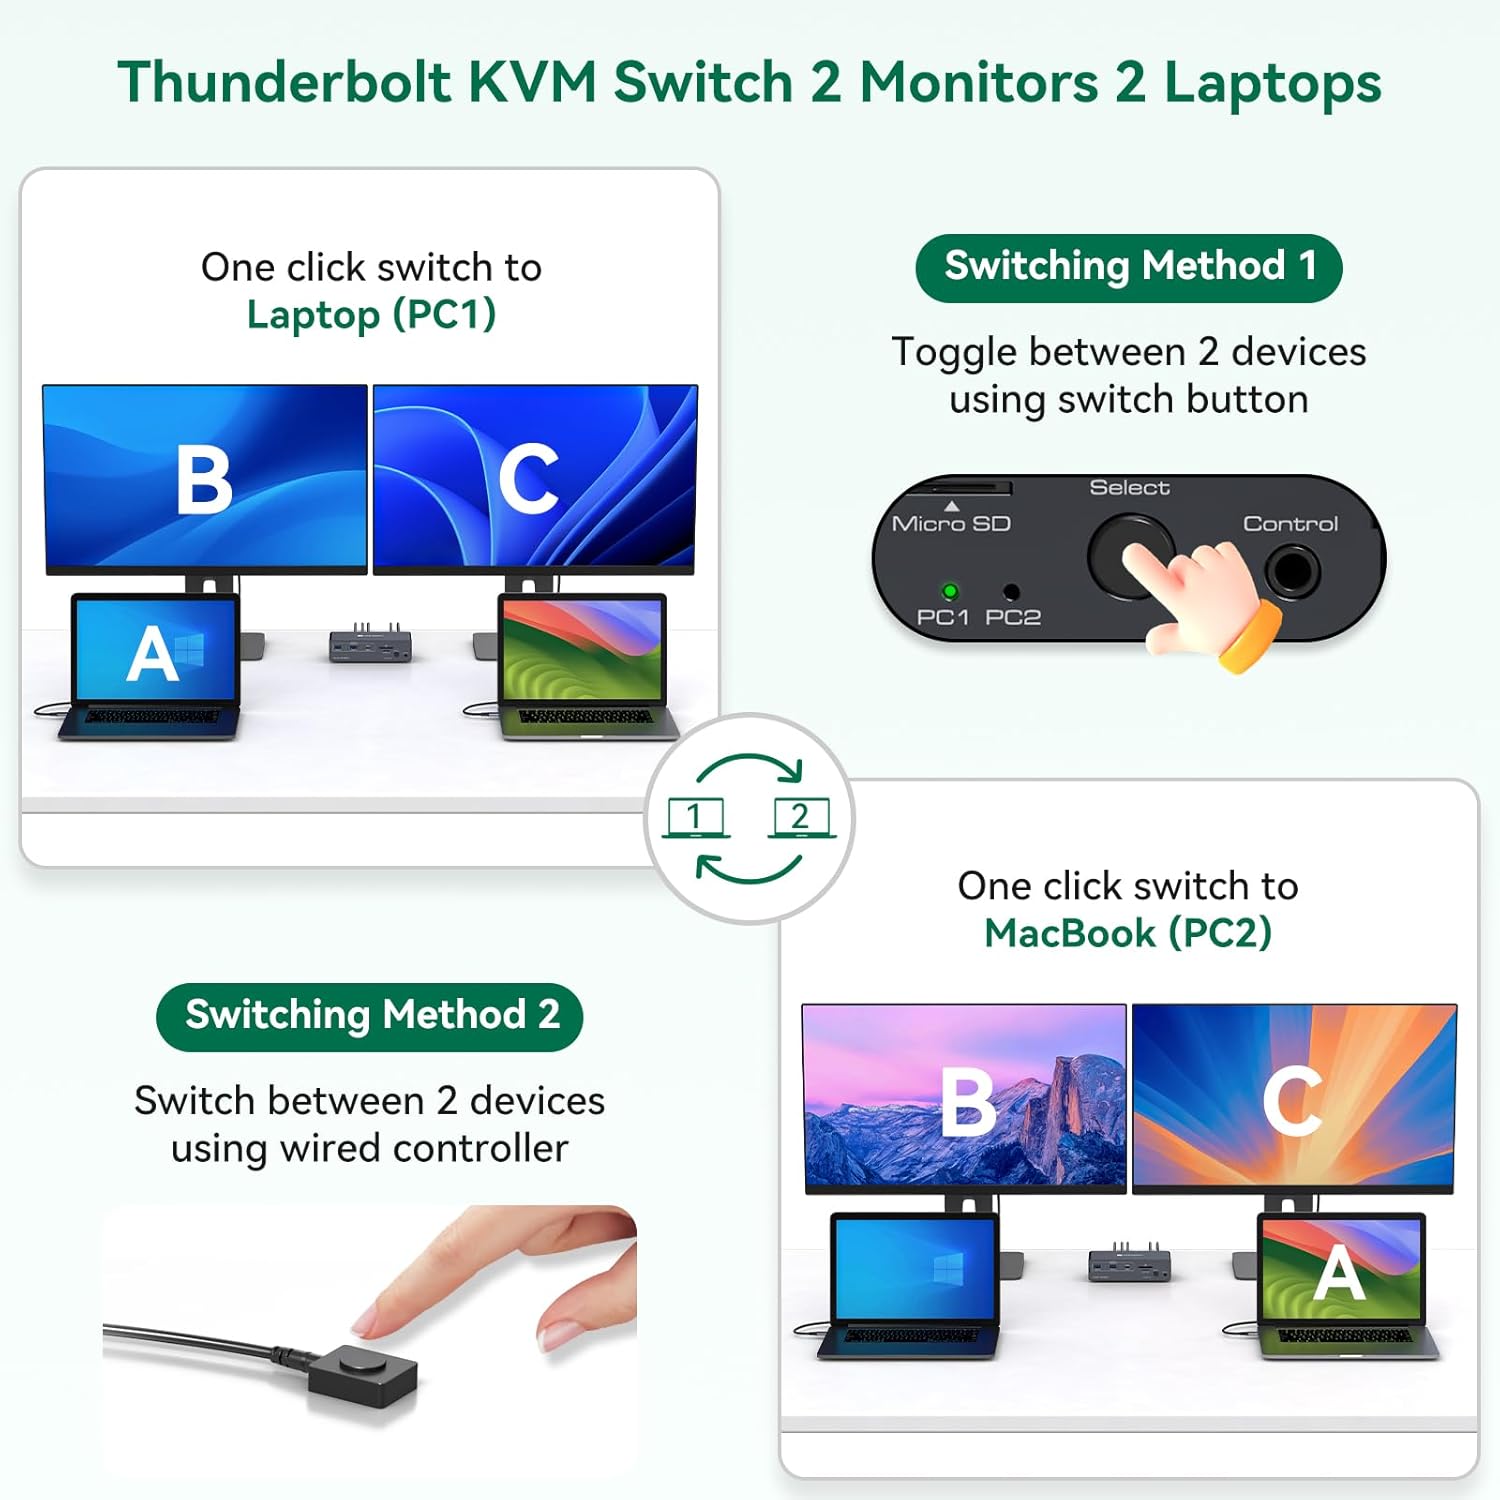
Image: A diagram illustrating two switching methods: using the physical button on the KVM unit and using the wired remote control, showing how two laptops can share two monitors.
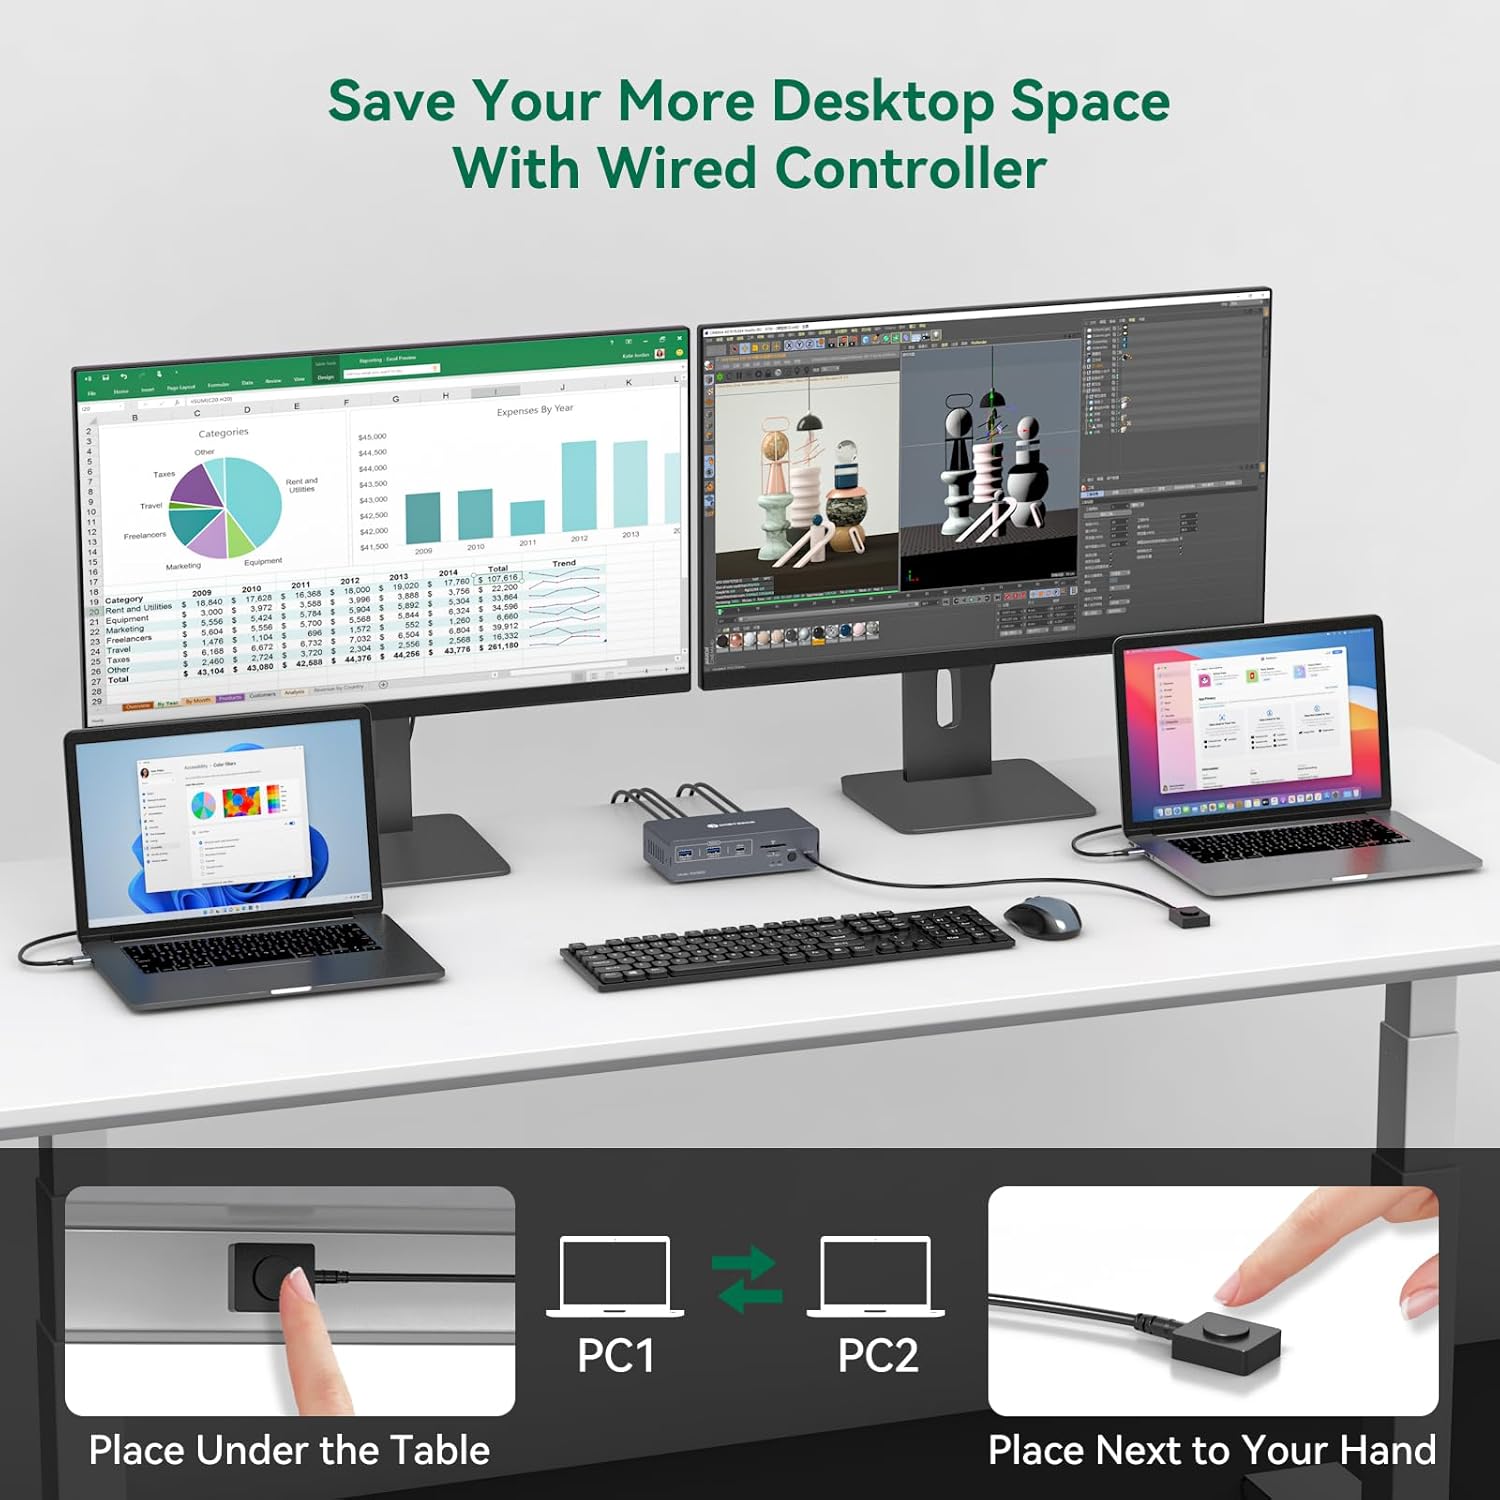
Image: An illustration demonstrating how the wired remote controller can be used to switch between computers, allowing the main KVM unit to be placed out of sight, such as under a desk.
5.2 Display Modes
The KVM switch supports both Mirror Mode and Extended Mode for dual displays on Windows and macOS systems.
- Mirror Mode: Both connected monitors will display the same content as your laptop's screen.
- Extended Mode: Each connected monitor will display different content, extending your desktop across multiple screens. This requires proper driver installation and system configuration.
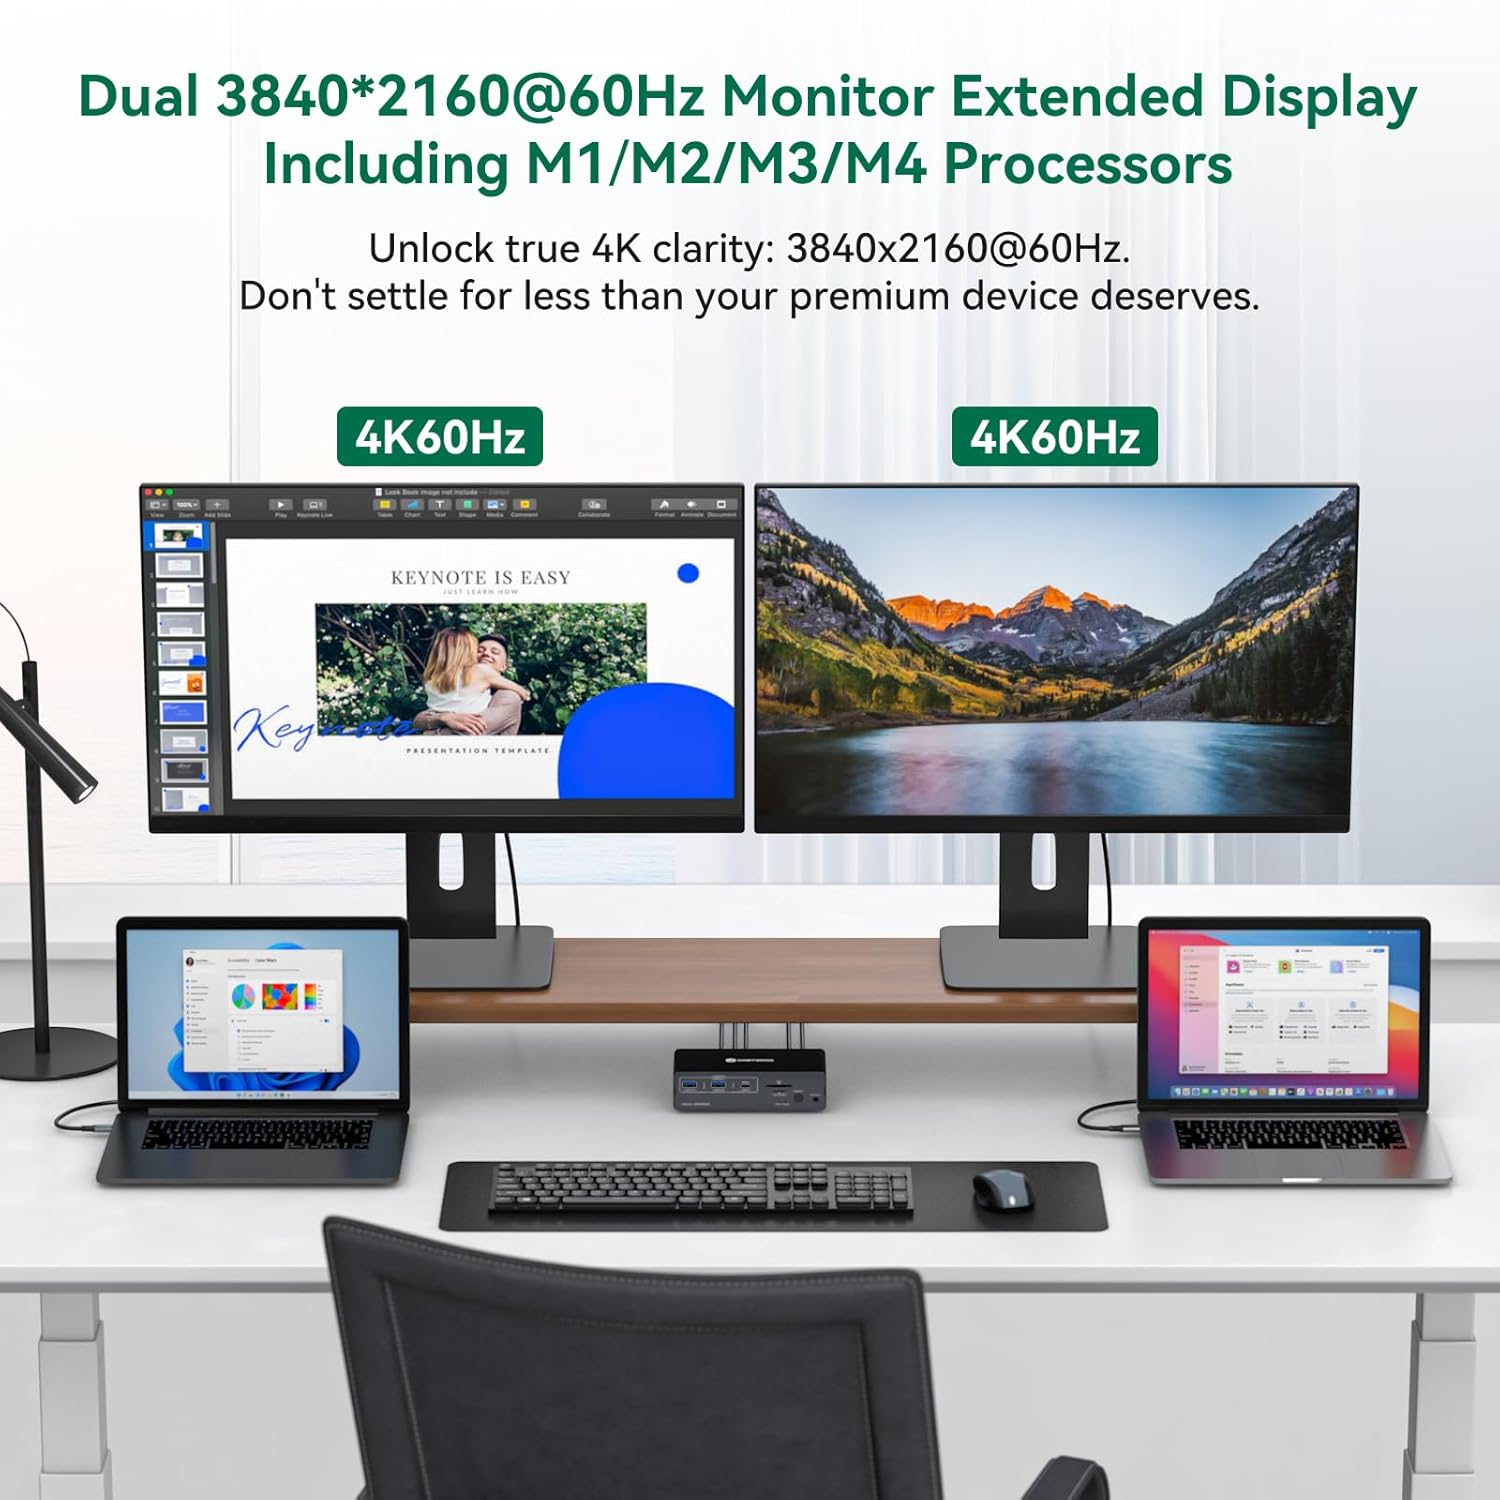
Image: A workstation setup showing two laptops connected to the KVM switch, driving two external monitors in an extended display configuration, both displaying 4K@60Hz content.
6. System Compatibility
The CMSTEDCD SW900 KVM switch is compatible with a wide range of operating systems, provided your device is equipped with a USB-C 3.2 (or higher) port.
- macOS (including M1, M2, M3, M4 chipsets)
- Windows
- Chrome OS
- Linux
- Android
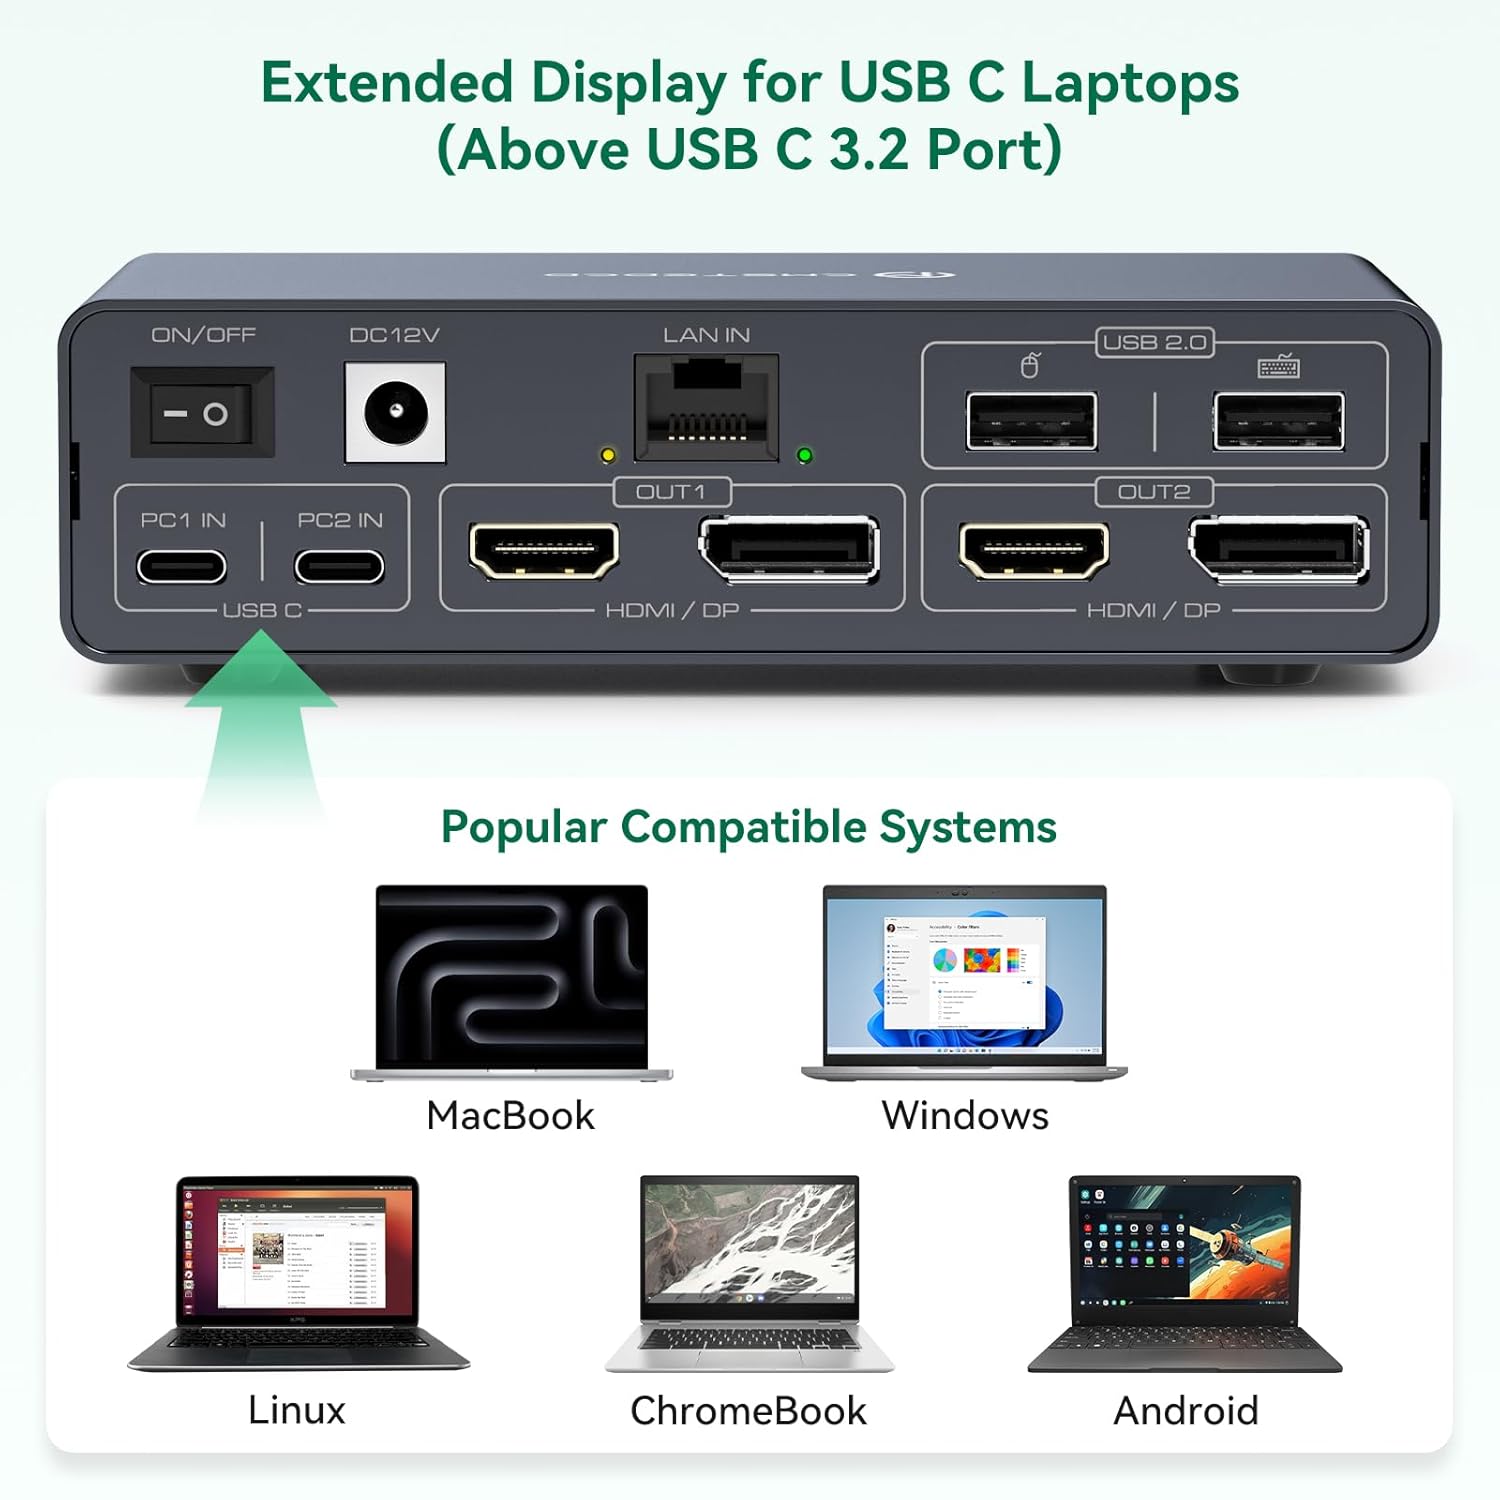
Image: An illustration depicting the broad compatibility of the KVM switch with various operating systems, including macOS, Windows, Linux, ChromeBook, and Android devices, all connecting via USB-C.
7. Troubleshooting
If you encounter issues with your KVM switch, please refer to the following common troubleshooting steps:
- USB Not Working:
- Confirm that the USB 3.0 cable is properly connected between the computer and the KVM.
- Verify that the computer's USB port is functioning correctly.
- Ensure that the latest USB driver is installed on your computer.
- Display Has No Image:
- Confirm that the KVM video ports match your monitor connections (e.g., HDMI to HDMI, DP to DP).
- Verify that PC to KVM input cables are connected correctly; Input A should correspond to OUT-A display, and Input B to OUT-B display.
- Use high-quality video cables (preferably under 3.3 feet). Conversion cables are not officially supported.
- If an adapter is required, use an active adapter.
- General Connectivity Issues:
- Ensure all cables are securely connected.
- Restart the KVM switch and your connected computers.
- Check for any firmware updates for the KVM switch (refer to the manufacturer's website).
8. Specifications
| Feature | Detail |
|---|---|
| Product Dimensions | 7.8 x 6.4 x 2.4 inches |
| Item Weight | 1.42 Pounds |
| Model Number | SW900 (Internal: SW332-1125vine-orange) |
| Manufacturer | CMSTEDCD |
| Operation Mode | ON-OFF |
| Operating Voltage | 12 Volts (DC) |
| Connector Type | Plug In (USB-C, HDMI, DisplayPort, USB-A, Ethernet) |
| Switch Type | Push Button |
| Material | Metal |
| Video Resolution | Up to Dual 4K@60Hz (3840*2160@60Hz) |
| USB Data Transfer | USB 3.0 Gen2 up to 5Gbps |
| Ethernet Speed | 1000Mbps |
9. Maintenance
To ensure the longevity and optimal performance of your CMSTEDCD SW900 KVM Switch Docking Station, follow these maintenance guidelines:
- Cleaning: Use a soft, dry cloth to clean the exterior of the device. Avoid using liquid cleaners or solvents.
- Ventilation: Ensure the device is placed in a well-ventilated area to prevent overheating. Do not block the ventilation slots.
- Cable Management: Keep cables organized and free from kinks or excessive bending to prevent damage.
- Power Off: If the device will not be used for an extended period, it is recommended to power it off.
10. Warranty and Support
CMSTEDCD is committed to providing high-quality products and comprehensive after-sales service. For warranty information, technical support, or any inquiries, please contact us:
- Manufacturer: CMSTEDCD
- Support Email: vpfetus@163.com
- Online Support: 24/7 online support is available.
Please refer to your purchase documentation for specific warranty terms and conditions.


