
1. Introduction
Thank you for purchasing the Goeco 54W Dimmable Rectangular LED Ceiling Light. This manual provides essential information for the safe installation, operation, and maintenance of your new lighting fixture. Please read this manual thoroughly before installation and keep it for future reference.
2. Safety Instructions
WARNING: To prevent electric shock, fire, or personal injury, always turn off the power at the main circuit breaker before installing, servicing, or cleaning the fixture.
- Installation must be performed by a qualified electrician in accordance with local electrical codes.
- Ensure the supply voltage is compatible with the fixture's requirements (220-240V).
- Do not modify the fixture in any way.
- Keep flammable materials away from the light fixture.
- Do not look directly into the LED light source when it is illuminated.
- This product is designed for indoor use only.
3. Package Contents
Verify that all components are present and undamaged before installation. If any parts are missing or damaged, contact your retailer.
- Goeco 54W Dimmable Rectangular LED Ceiling Light (1 unit)
- Remote Control (1 unit)
- Mounting Hardware (screws, anchors)
- User Manual (this document)
4. Specifications
| Feature | Specification |
|---|---|
| Model | B0G2V6VT13 |
| Power | 54W |
| Voltage | 220-240V |
| Luminous Flux | 6075 LM |
| Dimmable | Yes (5%-100% brightness) |
| Color Temperature | 3000K-6500K (Warm White to Cool White) |
| Material | Aluminum, Acrylic |
| Lighting Area | 10-25 m² |
| Dimensions (L x W x H) | 62 cm x 40 cm x 9.5 cm |
| Style | Modern |
| Usage | Indoor use only |
| Energy Efficiency Class | E |
For detailed energy information, refer to the EU EPREL database: https://eprel.ec.europa.eu/qr/2541348
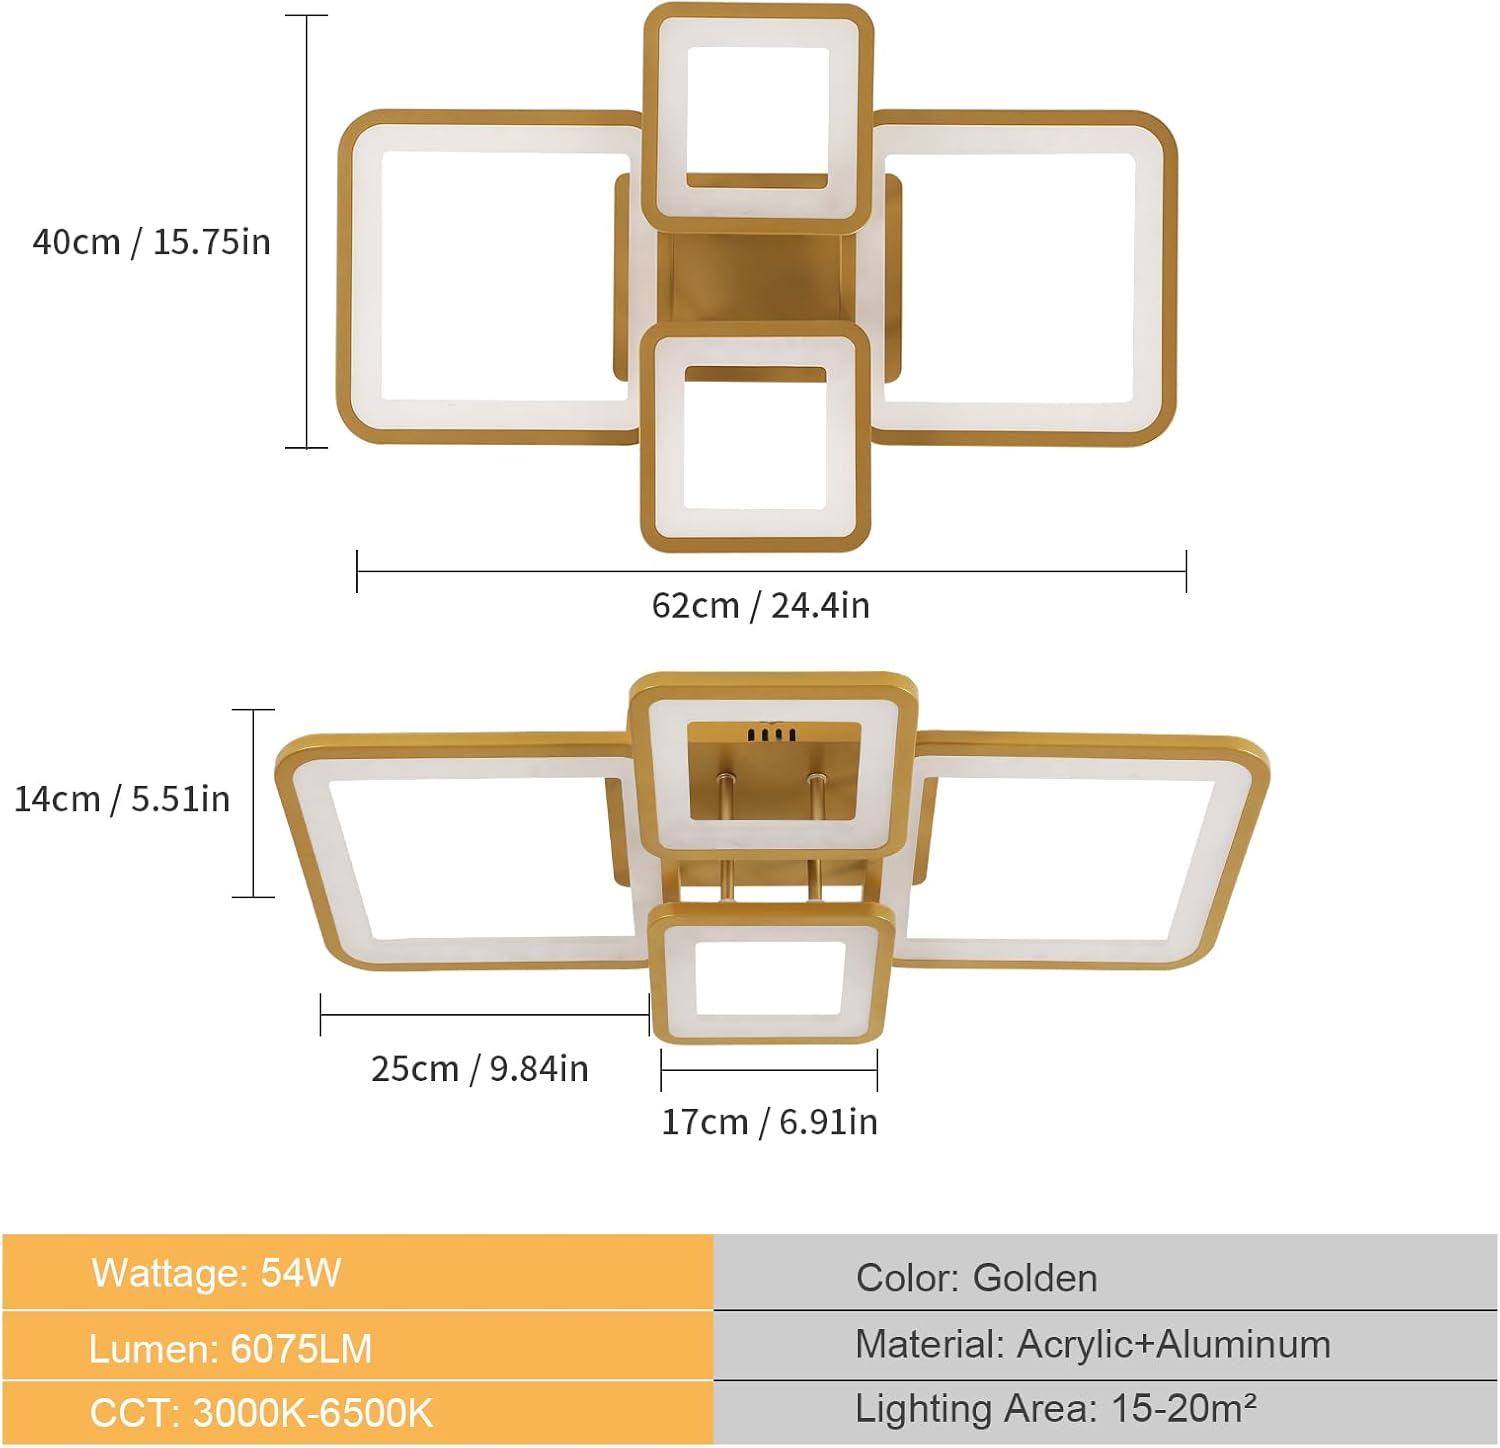
Figure 1: Product Dimensions. The light measures 62cm in length and 40cm in width.

Figure 2: Energy Efficiency Label.
5. Installation Instructions
Before You Begin: Ensure the power supply is turned off at the circuit breaker. Gather necessary tools (screwdriver, drill, wire strippers, etc.).
- Prepare the Mounting Surface: Mark the drilling points on the ceiling according to the fixture's mounting bracket.
- Install Mounting Bracket: Drill holes and insert wall anchors if necessary. Secure the mounting bracket to the ceiling using the provided screws.
- Electrical Connection: Connect the household electrical wires to the fixture's wires. Ensure proper polarity (Live to Live, Neutral to Neutral, Ground to Ground). Use appropriate wire connectors.
- Attach the Fixture: Carefully lift the light fixture and attach it to the mounting bracket, ensuring all wires are tucked safely inside the canopy. Secure the fixture with the retaining screws.
- Restore Power: Turn the power back on at the circuit breaker.

Figure 3: Product Components. The light features an aluminum body, acrylic lampshade, and integrated LED chips.
6. Operating Instructions
This ceiling light is operated using the included remote control. Ensure the remote control has working batteries installed.
- Power On/Off: Press the ON/OFF button to turn the light on or off.
- Brightness Adjustment: Use the Brightness Up (+) and Brightness Down (-) buttons to adjust the light intensity from 5% to 100%.
- Color Temperature Adjustment: Use the Warm White (WW) and Cool White (CW) buttons or the dedicated color temperature slider on the remote to change the color temperature between 3000K (warm white) and 6500K (cool white).
- Memory Function: The fixture retains the last brightness and color temperature settings when turned off and on again.

Figure 4: Remote Control and Color Temperature Adjustment. Adjust brightness and color from warm to cool white.
7. Maintenance
- Cleaning: Disconnect power before cleaning. Wipe the fixture with a soft, dry, or slightly damp cloth. Do not use abrasive cleaners or solvents.
- LEDs: The integrated LED light source is designed for long-term use and is not user-replaceable.
- Remote Control: Replace batteries as needed (typically 2x AAA, not specified but common).
8. Troubleshooting
| Problem | Possible Cause | Solution |
|---|---|---|
| Light does not turn on. | No power supply; loose wiring; remote control battery dead. | Check circuit breaker. Verify wiring connections. Replace remote control batteries. |
| Light flickers or dims unexpectedly. | Unstable power supply; loose wiring; remote control interference. | Check power supply stability. Re-check wiring. Ensure no obstructions between remote and fixture. |
| Remote control not responding. | Dead batteries; remote out of range; pairing issue. | Replace remote batteries. Ensure remote is within operating range. Refer to remote pairing instructions (if applicable, not provided). |
9. Warranty Information
Goeco products are manufactured to high-quality standards. This product comes with a standard manufacturer's warranty against defects in materials and workmanship. Please retain your proof of purchase for warranty claims. For specific warranty terms and conditions, refer to the documentation provided at the time of purchase or contact Goeco customer support.
10. Customer Support
If you encounter any issues or have questions regarding your Goeco LED Ceiling Light, please contact our customer support team. You can find contact information on the Goeco brand store page on Amazon or through your purchase documentation.
Goeco Brand Store: https://www.amazon.es/stores/Goeco/page/768D64BE-EA27-40D8-B777-DD90BF3E57F4


