1. Introduction
Thank you for choosing the Amopatio 10x8 FT Resin Storage Shed. This manual provides essential information for the safe and efficient assembly, operation, and maintenance of your new storage shed. Please read all instructions carefully before beginning assembly and retain this manual for future reference.
This durable resin shed is designed for outdoor storage of various items, including garden tools, bikes, and other equipment, offering a spacious and secure solution for your outdoor storage needs.
2. Safety Information
- Always wear appropriate safety gear, including gloves and eye protection, during assembly.
- Ensure the assembly area is clear of obstructions and level.
- Do not attempt assembly on days with strong winds or low temperatures.
- Some parts may have sharp edges; handle all components with care.
- Ensure all screws and fasteners are securely tightened as per instructions.
- Do not climb on the roof of the shed.
- Keep children and pets away from the assembly area.
3. Parts List and Identification
Before starting assembly, unpack all components and verify against the parts list provided in the packaging. For visual identification of parts and their quantities, please refer to the detailed installation video below. It is recommended to lay out all parts on a clean, flat surface.
Video: Detailed overview of all parts included in the Amopatio 10x8 FT Resin Storage Shed package, demonstrating how to identify each component before assembly.
4. Assembly Instructions
Follow these step-by-step instructions for proper assembly. It is highly recommended to have at least two people for assembly.
4.1 Site Preparation
Ensure the ground surface is level. A solid and level foundation (e.g., concrete slab, asphalt, wooden base) is crucial for the stability and longevity of your shed. Measure the ground with a tool to confirm it is level before proceeding.

Image: Illustration showing various methods for preparing a solid and level foundation for the storage shed.
4.2 Floor Assembly
Assemble the floor panels by interlocking them and securing them with the provided screws. Ensure all connections are tight and the floor is stable.

Image: A view of the fully assembled shed floor, demonstrating the interlocking panel design.
4.3 Wall Panel Installation
Begin installing the wall panels, starting from a corner. Slide each panel into the designated grooves of the floor and connect them using the vertical support beams. Secure with screws as indicated in the detailed video.

Image: Exterior view of the shed with walls and doors installed, showcasing the Grey & White color scheme.
4.4 Roof Assembly
Attach the roof panels to the top of the wall structure. Ensure proper alignment and secure all panels with screws. The roof is designed to be weather-resistant and provide protection from elements.
Image: Close-up of the shed roof demonstrating its weather-resistant features against rain and snow.
4.5 Door and Window Installation
Install the lockable doors and functional windows. Ensure doors swing freely and windows open and close properly for ventilation and natural light.
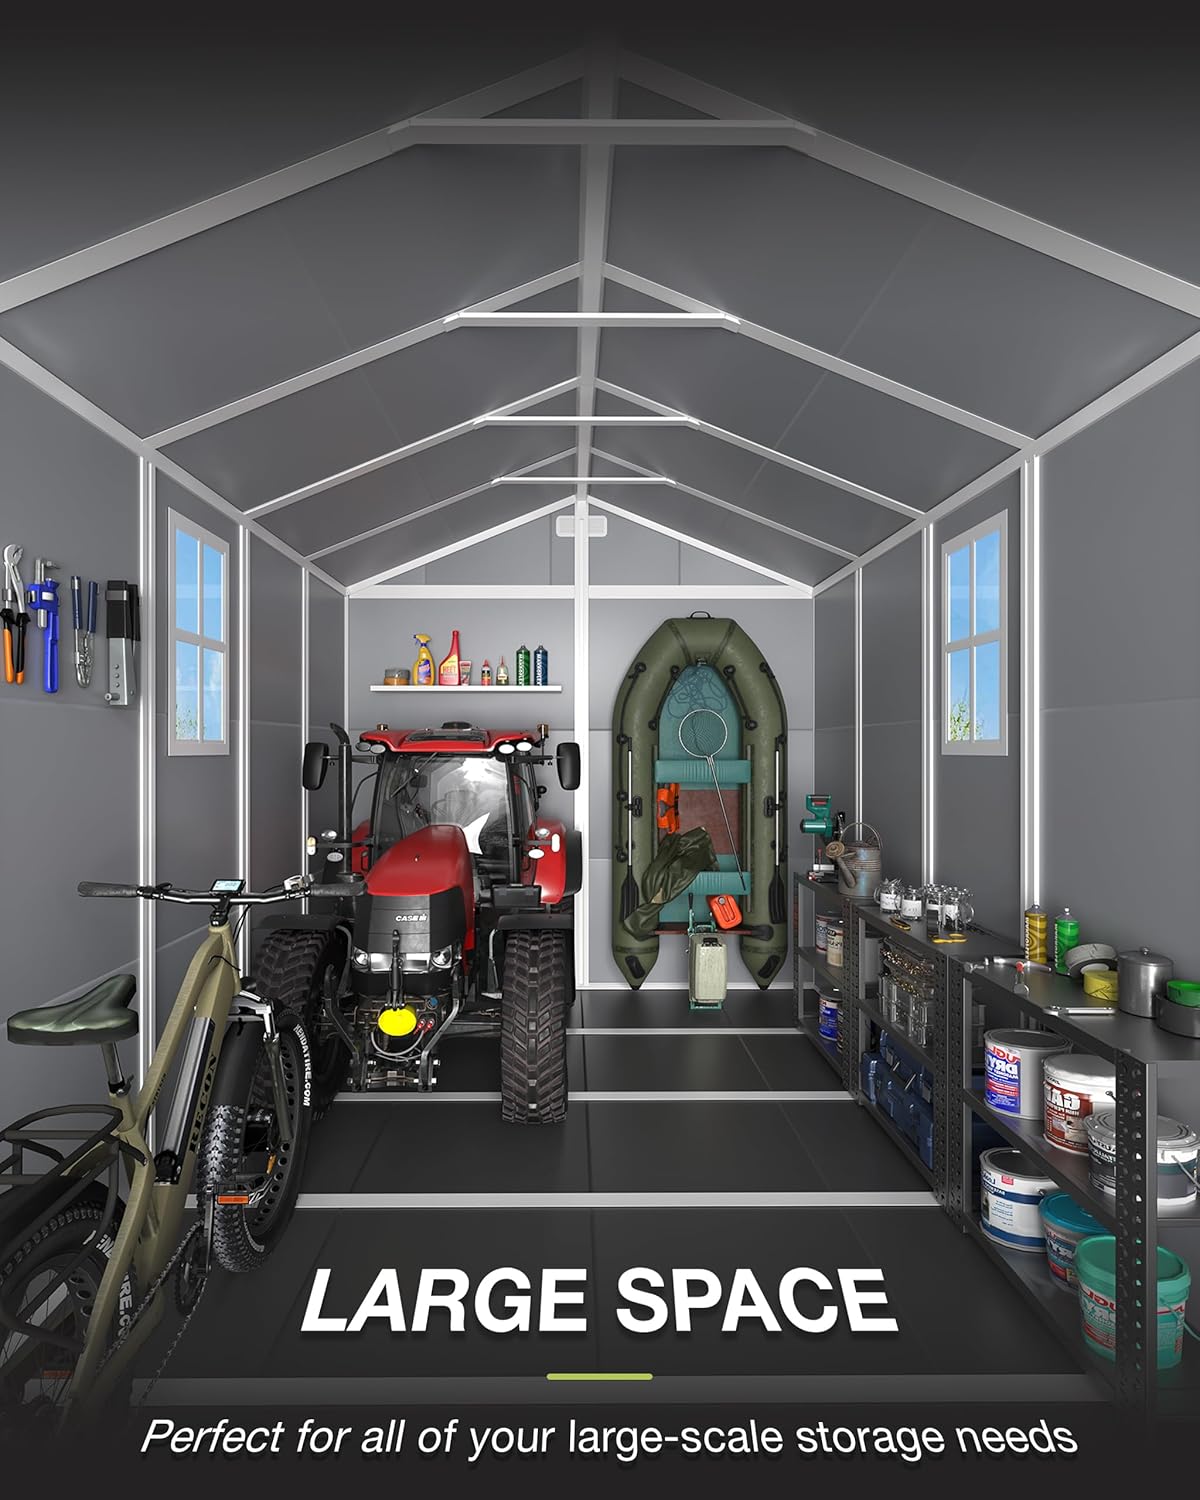
Image: Interior view of the shed showing organized tools and equipment, highlighting the spacious design.
Video: A brief overview of the Amopatio Outdoor Storage Shed, showcasing its features and design.
5. Operating Instructions
To open the shed, unlock the door latch and pull the doors outwards. To secure the shed, close both doors and engage the lockable door latch. Ensure the latch is fully engaged to prevent accidental opening. The integrated vents ensure proper air circulation, preventing mold and mildew.
6. Maintenance
- Regularly inspect the shed for any loose screws or damaged parts. Tighten or replace as necessary.
- Clean the exterior of the shed with mild soap and water. Avoid abrasive cleaners that could damage the resin material.
- Keep the ventilation openings clear of debris to ensure proper airflow.
- In snowy conditions, remove heavy snow accumulation from the roof to prevent structural stress.
7. Troubleshooting
- Doors not closing properly: Check for obstructions in the door frame or hinges. Ensure the shed is on a level surface.
- Water leakage: Verify that all roof panels are correctly installed and sealed. Check for any gaps or cracks in the walls or floor.
- Unstable structure: Re-check all screw connections and ensure the foundation is perfectly level.
8. Specifications
| Feature | Detail |
|---|---|
| Brand | Amopatio |
| Color | Grey & White |
| Material | Resin |
| Product Dimensions | 90.3"D x 128.3"W x 88.9"H |
| Style | Modern |
| Base Material | Resin |
| Top Material Type | Resin |
| Water Resistance Level | Water Resistant |
| Frame Material | Resin |
| Door Style | Single Hinged, Double Hinged |
| Assembly Required | Yes |
9. Warranty and Support
For any questions, concerns, or warranty claims regarding your Amopatio 10x8 FT Resin Storage Shed, please contact the seller directly. Refer to your purchase documentation for specific warranty details and contact information. Do not return the unit to the store without prior authorization.
Seller: Amopatio


