1. Introduction
This manual provides detailed instructions for the installation, operation, and maintenance of your Anlapus A61/C696 2K WiFi Security Camera. Please read this manual thoroughly before using the product to ensure proper functionality and safety. The Anlapus A61/C696 is a versatile 3MP 2K WiFi security camera designed for both outdoor and indoor surveillance, featuring advanced connectivity and detection capabilities.
2. What's in the Box
Please verify that all the following components are included in your package:
- 2 x Anlapus A61/C696 Camera
- 2 x Power Adapter
- 2 x Magnetic Bracket
- 2 x Mounting Plate
- 2 x Adhesive Pad
- 2 x Mounting Sticker
- 2 x Mounting Screws
- 1 x Reset Pin
- 1 x Quick Start Guide

Image: All components included in the Anlapus A61/C696 security camera package.
3. Product Features
- 2K Ultra HD with Full Color Night Vision & IP66: The camera features a 3MP resolution for clear 2K images. It offers three night vision modes: full color, black and white, and smart mode, ensuring visibility day and night. Its IP66 weatherproof design allows for reliable performance in various indoor or outdoor environments.
- AI Detection & Real-time Alerts: Advanced AI technology accurately detects human and vehicle movement, minimizing false alarms. Upon detection, sound and light alarms activate automatically to deter intruders. Instant push notifications and email alerts are sent to your mobile device. Motion detection zones can be customized.
- Two-Way Audio & Remote Access: A built-in speaker and microphone enable two-way communication, allowing you to speak with visitors or deter unwanted guests. Access and control your cameras remotely via the Vsees app on your smartphone or PC without additional fees.
- WiFi 6 & Flexible Storage: This camera utilizes the latest WiFi 6 technology and is compatible with 2.4GHz networks for faster and more stable data transmission. It supports local storage via a Memory Card (up to 256GB, not included) or cloud storage (30-day free trial available).
- Simple Installation & Magnetic Mount: The camera offers multiple mounting options: magnetic, adhesive, and wall-mounted. The powerful magnetic base allows for flexible positioning and easy adjustment of the viewing angle.
Video: Overview of Anlapus A61 3MP Security Camera features, including WiFi 6, 2K resolution, AI detection, and two-way audio.

Image: Demonstrates the camera's 2K color night vision capability with spotlights (ON) versus standard IR night vision (OFF).

Image: Illustration of AI detection for vehicles and humans, showing real-time alerts.
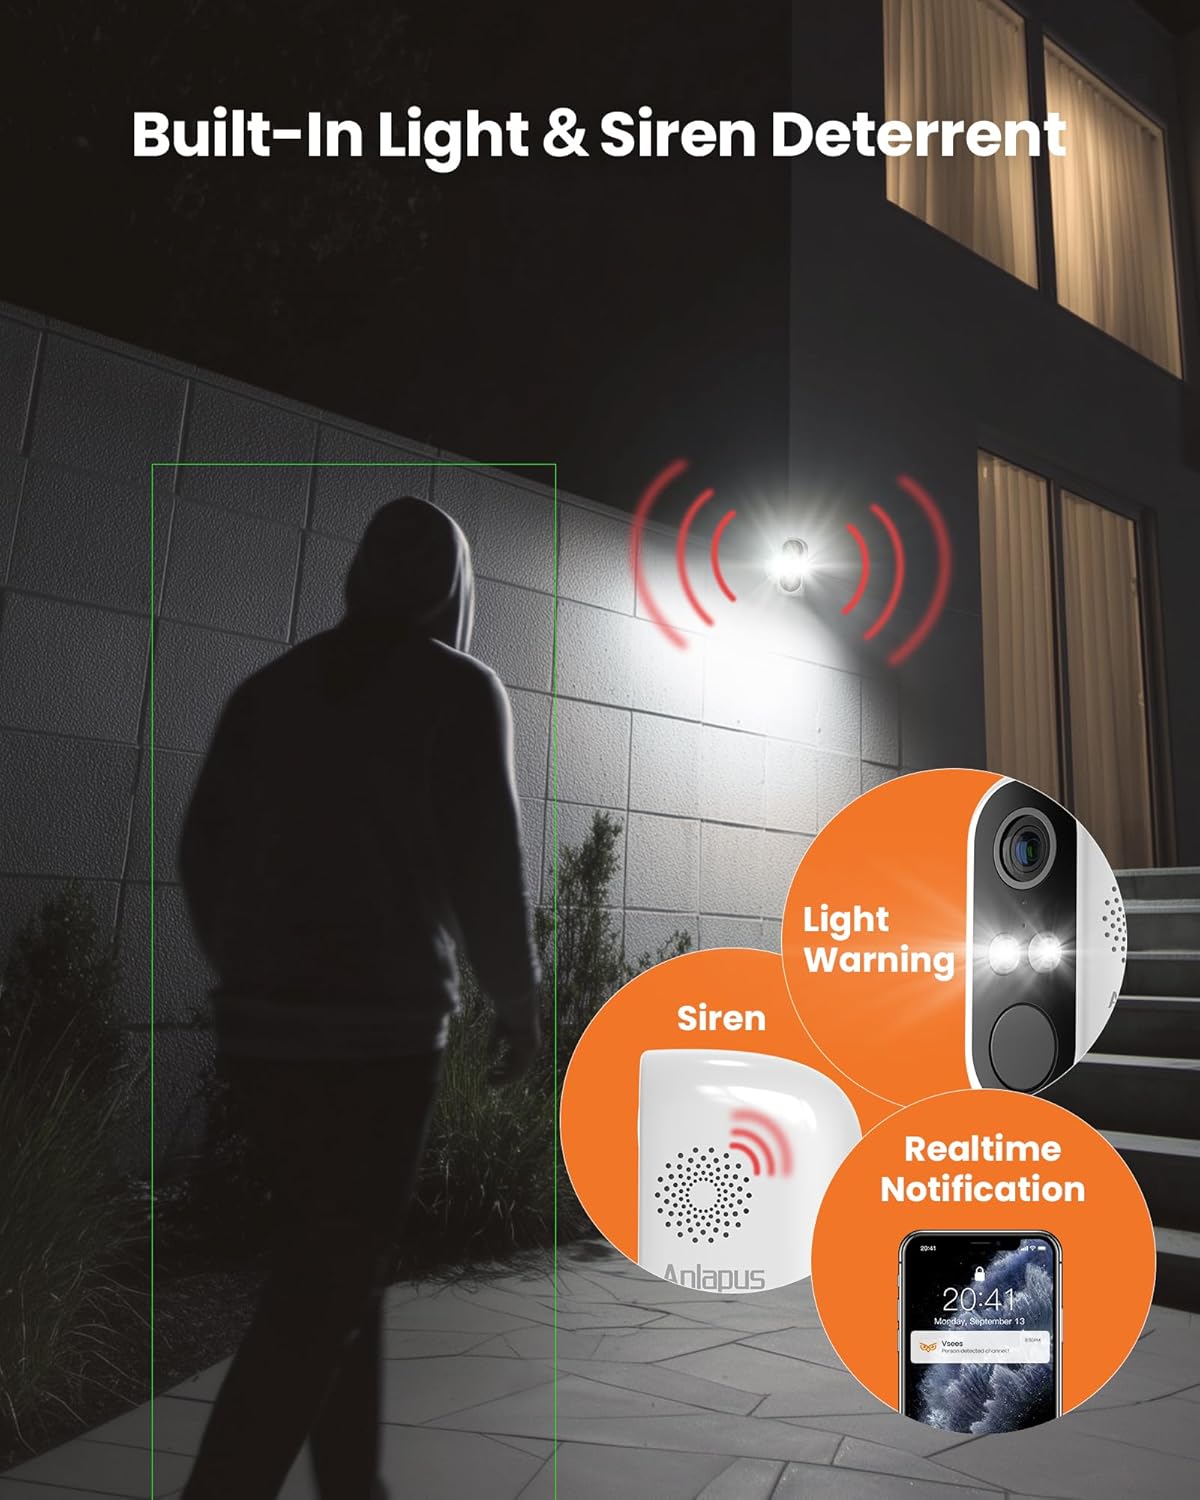
Image: The camera's built-in light and siren deterrent in action, alongside a mobile notification.

Image: The camera's IP66 weatherproof design, suitable for outdoor use in various weather conditions.
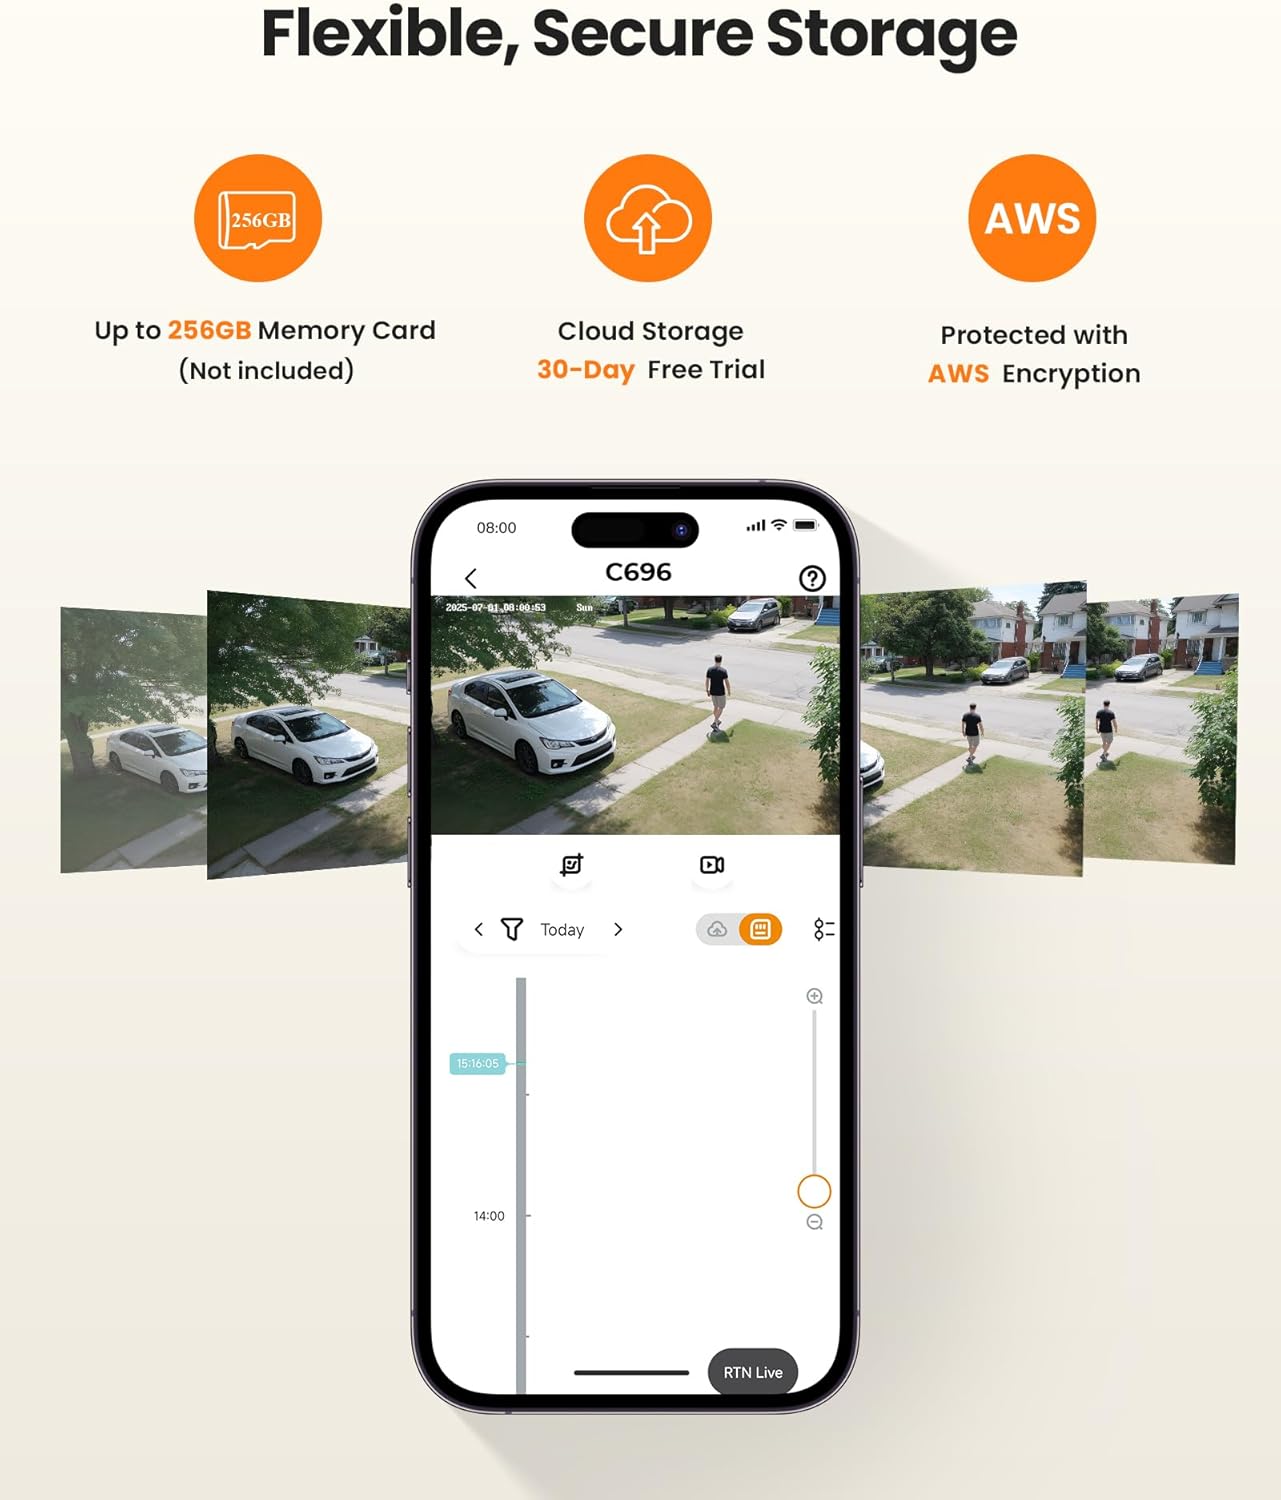
Image: Details on the camera's multiple storage options, including local microSD and secure cloud storage.
4. Setup Instructions
Follow these steps to set up your Anlapus A61/C696 camera:
- Equipment Preparation:
- Open the charging port's waterproof seal and plug in the power cable for charging.
- Open the larger waterproof rubber plug to insert a TF card (up to 256GB, not included) or perform a device reset using the provided reset pin.
- Download Vsees App:
- Scan the QR code provided in the Quick Start Guide or search for "Vsees" in your device's app store (Apple App Store or Google Play Store) to download the latest version of the app.
- Register and Log In:
- Open the Vsees app, register a new account, and log in.
- Add Device by App (Smart Connection Method):
- On the app's device page, click "+ Add device". The app should automatically discover the device model 'IPC_C696'. Click 'Add to'.
- Select the 2.4GHz Wi-Fi network you wish to connect to and input the Wi-Fi password. (Note: The device does not support 5GHz Wi-Fi).
- Confirm the Wi-Fi details. The device will connect to the network.
- Once connected, set a name for your device (e.g., "Home", "Office", "Living Room") and click "Confirm".
- Add Device by App (AP Hotspot Addition Method):
- If smart connection fails, click "+ Add device" and then the top-right icon to switch to another way to add. Choose "AP Hotspot Addition".
- Ensure the device is powered on and you hear "Device waiting to connect". Check the box "Heard 'Device waiting to connect'" and tap "Next".
- Connect your phone to the camera's Wi-Fi hotspot (usually named "IPC_AP_XXXX").
- Return to the Vsees app, select your home 2.4GHz Wi-Fi network, and enter its password.
- Confirm the details. The device will connect.
- Set a name for your device and click "Confirm".
Video: Step-by-step guide on how to set up the Anlapus A61 WiFi Security Camera using the Vsees app.

Image: Visual guide for quick setup, including powering on, app download, Wi-Fi connection, and live viewing initiation.
5. Installation
The Anlapus A61/C696 camera offers flexible installation options:
5.1 No-Drill Installation (Adhesive/Magnetic)
- Tear off the double-sided adhesive from the adhesive pad and stick it to your desired installation position.
- Place the mounting iron plate onto the adhesive pad. It is recommended to wait 12 hours for the adhesive to fully cure before attaching the camera.
- Attach the camera to the iron plate using its magnetic base and adjust the camera angle as needed.
5.2 Drilling Installation (Wall Mount)
- Use the provided mounting sticker to mark the drill holes on the wall.
- Drill holes at the marked positions and insert the rubber plugs.
- Place the mounting iron plate over the holes and tighten the screws to secure it in place.
- Attach the camera to the fixed iron plate using its magnetic base and adjust the camera angle.

Image: Various flexible installation methods for the Anlapus A61/C696 camera.
6. Operating Instructions
Once your camera is set up and installed, you can begin using its features via the Vsees app:
- Live View: Access real-time video feed from your camera anytime, anywhere.
- Two-Way Audio: Use the microphone and speaker icons in the app to communicate through the camera.
- Playback: Review recorded footage stored on your microSD card or cloud storage.
- Motion Detection & Alerts: Customize detection zones and sensitivity settings. Receive instant push notifications and email alerts when human or vehicle motion is detected.
- Light & Siren Alarm: Manually activate or set up automatic activation of the built-in light and siren to deter intruders.
- Night Vision Modes: Switch between full color, black and white, or smart night vision modes as per your preference and lighting conditions.
- Privacy Masking: Configure privacy zones within the app to exclude specific areas from recording, ensuring privacy for sensitive locations.

Image: The Vsees app interface demonstrating live view, two-way audio, and playback functionalities.
7. Maintenance
To ensure optimal performance and longevity of your Anlapus A61/C696 camera, follow these maintenance guidelines:
- Regular Cleaning: Gently wipe the camera lens and body with a soft, dry cloth to remove dust and dirt. Avoid using harsh chemicals or abrasive materials.
- Firmware Updates: Periodically check the Vsees app for available firmware updates. Keeping your camera's firmware up-to-date ensures access to the latest features, security patches, and performance improvements.
- Power Connection: Ensure the power cable is securely connected and the waterproof cover for the charging port is properly sealed, especially for outdoor installations, to prevent water ingress.
- Storage Management: Regularly review and manage your recorded footage. If using a microSD card, ensure it is not full to avoid interruption of recording. Back up important footage as needed.
- Environmental Considerations: While the camera is IP66 weatherproof, extreme weather conditions (e.g., prolonged heavy rain, snow, or direct sunlight) can still impact performance over time. Consider additional protective measures if installed in harsh environments.
8. Troubleshooting
If you encounter issues with your Anlapus A61/C696 camera, refer to the following common troubleshooting steps:
- Camera Not Connecting to Wi-Fi:
- Ensure your Wi-Fi network is 2.4GHz. The camera does not support 5GHz networks.
- Verify the Wi-Fi password is correct.
- Move the camera closer to your Wi-Fi router to improve signal strength.
- Perform a device reset using the reset pin and try the setup process again.
- No Live View or Recording:
- Check the camera's power connection and ensure it is receiving power.
- Verify your internet connection is stable.
- Ensure the microSD card is correctly inserted and not full, or that your cloud storage subscription is active.
- False Motion Alerts:
- Adjust the motion detection sensitivity settings in the Vsees app.
- Define specific motion detection zones to exclude areas with frequent irrelevant movement (e.g., trees swaying).
- Poor Night Vision Quality:
- Ensure the camera lens is clean and free from obstructions.
- Check if there are any reflective surfaces close to the camera that might be causing glare.
- Switch between different night vision modes (full color, black and white) to see which performs best in your environment.
- Two-Way Audio Issues:
- Ensure your phone's volume is up and the microphone/speaker functions are enabled in the app.
- Check for any obstructions around the camera's microphone and speaker.
If these steps do not resolve your issue, please contact Anlapus customer support for further assistance.
9. Specifications
| Feature | Detail |
|---|---|
| Model Name | C696 (A2K-A61W3-W-US) |
| Indoor/Outdoor Usage | Indoor, Outdoor |
| Video Capture Resolution | 2K (3MP, 1296p) |
| Connectivity Technology | Wi-Fi (2.4GHz, WiFi 6 compatible) |
| Power Source | Corded Electric (5 Volts DC) |
| Night Vision Range | 33 Feet |
| Number of IR LEDs | 2 |
| Special Features | 2-Way Audio, HD Resolution, Motion Sensor, Night Vision, Weather Proof |
| Control Method | App (Vsees) |
| Mounting Type | Wall Mount (Magnetic, Adhesive, Screw-in) |
| Item Dimensions (L x W x H) | 8.3 x 4.1 x 3.2 inches |
| Item Weight | 1.54 pounds |
| Color | White |
10. Warranty and Support
Anlapus is dedicated to providing high-quality, easy-to-install smart home electronics. Every product undergoes rigorous testing and quality checks. For warranty information, technical support, or any inquiries, please refer to the contact details provided in your Quick Start Guide or visit the official Anlapus website. Anlapus offers lifetime technical support and is FCC certified.