
1. Introduction
The Yahboom Rider-Pi is an advanced two-wheeled self-balancing robot designed for Python programming and AI vision recognition. Equipped with a Raspberry Pi Compute Module 5 (CM5), it offers comprehensive performance upgrades and supports various intelligent interactions. This manual provides essential information for setting up, operating, and maintaining your Rider-Pi robot.

Figure 1: Yahboom Rider-Pi CM5 Self-Balancing Robot and its packaging.
2. What's in the Box
Carefully unpack your Rider-Pi robot and ensure all components are present. The package includes:
- Rider-Pi wheel-legged robot (Assembled)
- TF card
- Type-C data cable
- Type-C USB hub
- Micro to HDMI data cable

Figure 2: Included components of the Rider-Pi package.
Video 1: Unboxing the Rider-Pi robot, showing all included accessories and the pre-assembled robot.
3. Product Overview & Features
The Rider-Pi robot is a versatile platform for AI and robotics education, featuring a unique two-wheeled legged structure that combines the mobility of wheeled robots with the obstacle-crossing ability of legged robots.
Key Features:
- Raspberry Pi CM5 Module: Built-in AI module supporting Python programming.
- AI Visual Recognition: Supports gesture control, human body movement imitation, face/color object tracking, and recognition.
- Voice Interaction: Dual MEMS digital microphones and speakers, equipped with OpenRouter for image recognition, voice recognition, and natural language processing.
- Self-Balancing: Built-in IMU sensor for real-time posture adjustment and stable omnidirectional movement across various terrains.
- Durable Construction: Made of ABS material for toughness and impact resistance, with a carbon fiber bracket for sturdiness and lightweight design. The back cover is aviation aluminum for abrasion resistance.
- Dynamic Expressions: 2.0-inch IPS display with 35 dynamic expressions and support for custom expressions.
- Cross-Platform Control: Dual APP support (WiFi with image transmission and Bluetooth) for iOS and Android devices.

Figure 3: Overview of the upgraded Raspberry Pi CM5 module integrated into the Rider-Pi.

Figure 4: Detailed product structure and components of the Rider-Pi robot.

Figure 5: The robot's 2.0-inch IPS display showing dynamic expressions.
4. Setup
The Rider-Pi robot comes pre-assembled. Follow these steps to power it on and begin operation:
- Power On: Locate the power switch on the robot and turn it on.
- Initial Boot: The robot's screen will display the 'Luwu Dynamics' logo.
- Select Mode: On the screen, you can choose between 'Remote Control Mode (RC)' or 'Try Demos'. Use the robot's physical buttons to navigate and select.
- Explore Demos: If you select 'Try Demos', you will enter an interface with various sample programs (31 in total) including ChatGPT, Q&A, Speech, and AI visual interaction functions.

Figure 6: Robot screen displaying mode selection after power-on.
5. Operation
The Rider-Pi can be controlled through its pre-installed GUI programs or via a smartphone application.
5.1. Basic Functions
The robot supports several basic functions directly from its interface:
- Audio recording and playback
- Video recording and playback
- RGB light control
- Posture angle acquisition
- Reading battery status
- Motion control

Figure 7: Visual representation of the Rider-Pi's basic functions.
5.2. App Control
The Rider-Pi supports both WiFi and Bluetooth APP control for iOS and Android devices. This allows users to control the robot's movements and execute various action groups.
- WiFi Remote Control: Offers FPV (First-Person View) control with image transmission.
- Bluetooth Remote Control: Provides direct control over robot actions.

Figure 8: Cross-platform remote control options via smartphone apps.
Video 2: Demonstrates the Rider-Pi robot's two-wheeled legged movement and self-balancing capabilities.
5.3. Movement and Stability
The unique linkage wheel-legged structure allows the Rider-Pi to achieve stable and omnidirectional movement, easily coping with various terrain obstacles.
- Self-Balancing: The robot can immediately return to a balanced status if picked up and placed back on the ground.
- Omnidirectional Movement: Capable of moving forward, backward, rotating, and adjusting altitude.
- Obstacle Crossing: Designed to navigate slopes and steps with stability.

Figure 9: The Rider-Pi robot demonstrating stable movement on an incline.
6. AI Visual Interaction & Programming
The Rider-Pi leverages its CM5 module, 5MP camera, and dual MEMS microphones to provide rich AI capabilities.
6.1. Multimodal AI Applications
The robot integrates Large Language Models, Voice Large Models, and Vision Large Models to understand environmental information and interact intelligently.
- Voice Q&A: Ask questions and receive spoken answers.
- Voice Control: Command the robot using voice (e.g., "Lulu, forward," "Lulu, lift rotate").
- Scene Understanding: Describe objects and scenarios within its field of view.
- Embodied Intelligence: Perform actions based on visual recognition (e.g., move forward if a red ball is seen).
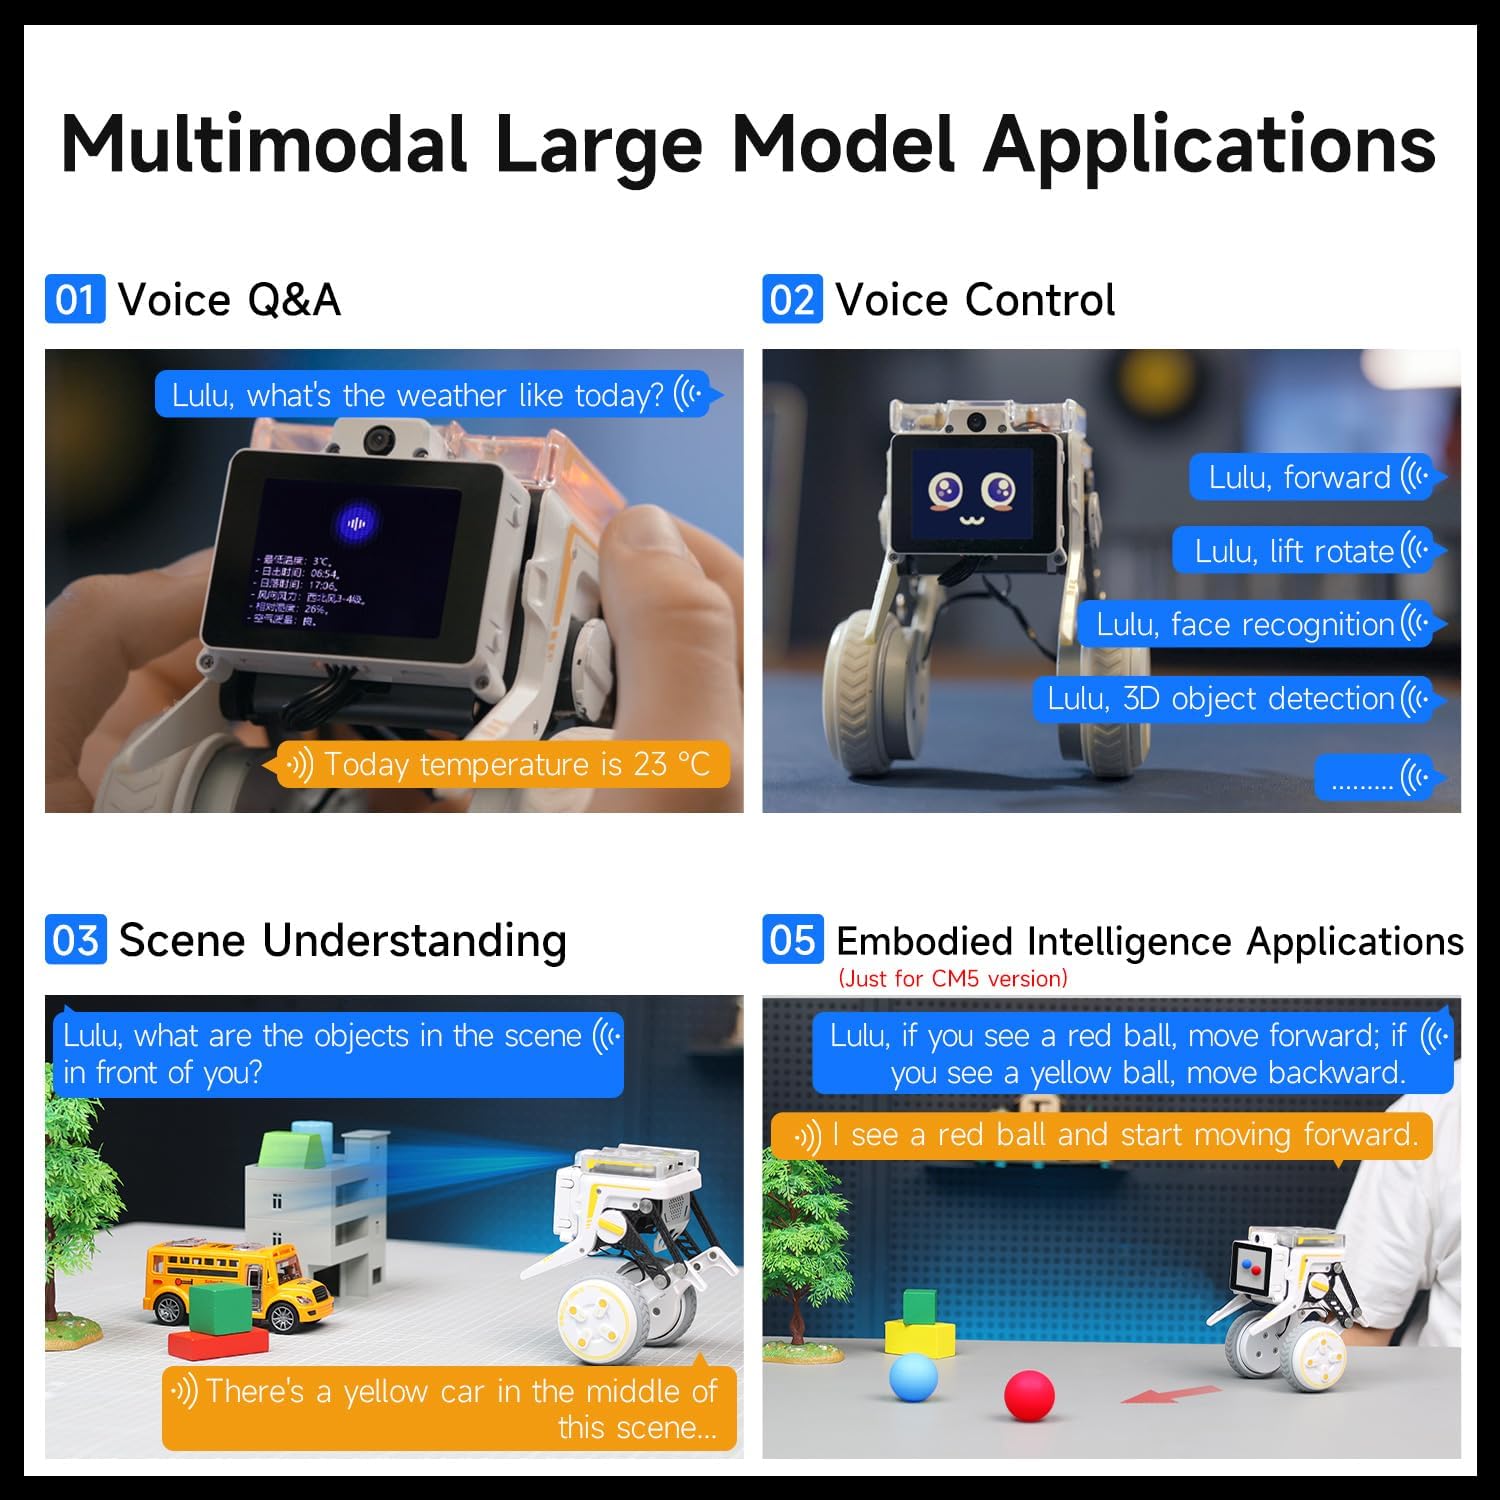
Figure 10: Examples of multimodal AI applications.
6.2. AI Visual Recognition Functions
The 5MP camera enables a wide range of visual recognition tasks:
- Palm control
- Human skeleton recognition
- Face tracking and detection
- Color tracking/following
- QR code motion control
- Face mask detection
- Gesture following and control
- 3D object recognition
- License plate recognition

Figure 11: Various AI visual interaction functions of the Rider-Pi.
6.3. Python Programming
The Rider-Pi supports Python programming and comes with pre-installed GUI programs offering over 30 functions. Sample codes, motion control protocols, and Python interfaces are provided to facilitate development for both beginners and experienced DIY developers.

Figure 12: The Rider-Pi robot being programmed via a laptop.
7. Specifications
| Feature | Detail |
|---|---|
| Product Name | Rider-Pi wheel-legged robot |
| Main Control Board | RPi CM5 (2GB RAM) + ESP32 |
| Display | 2.0-inch IPS, 320x240 |
| Programming Language | Python |
| Microphone | Dual MEMS digital microphone |
| Speaker | 8Ω 2W Speaker |
| Camera | 5MP OV5647 |
| Battery | 18500 2S 1400mAh battery |
| Battery Working Time | 1 hour |
| Hub Motor | 8.4V brushless hub motor * 2 |
| Servo | Serial bus metal servo * 2 |
| Material | Aviation aluminum back cover, ABS body, carbon fiber bracket |
| Remote Control | BT remote control, WiFi remote control [iOS/Android] |
| Communication Method | LAN TCP communication, BT communication |
| SD Card | 64GB |
| Weight | 560g |
| Dimensions (Squatting) | 115*115*125mm |
| Dimensions (Standing) | 115*115*158mm |

Figure 13: Technical specifications and dimensions of the Rider-Pi robot.
8. Maintenance
To ensure the longevity and optimal performance of your Rider-Pi robot, follow these maintenance guidelines:
- Cleaning: Use a soft, dry cloth to clean the robot's exterior. Avoid using harsh chemicals or abrasive materials.
- Battery Care: Charge the battery fully before first use. For long-term storage, charge the battery to about 50-60% and store in a cool, dry place. Avoid overcharging or completely draining the battery.
- Software Updates: Regularly check the official Yahboom website or community forums for firmware and software updates to ensure your robot has the latest features and bug fixes.
- Storage: Store the robot in a safe, dry environment away from direct sunlight, extreme temperatures, and moisture.
9. Troubleshooting
If you encounter issues with your Rider-Pi robot, refer to the following common troubleshooting steps:
- Robot Not Powering On: Ensure the battery is fully charged and correctly installed. Check the power switch is in the 'ON' position.
- Unstable Movement/Balancing Issues: Verify that the robot is on a flat, stable surface. If the issue persists, check for any physical obstructions in the wheels or linkage.
- App Connection Problems: Ensure Bluetooth or WiFi is enabled on your smartphone and the robot. Restart both the robot and the app. Make sure the app is up to date.
- AI Feature Malfunction: Check your network connection if using features that require internet access. Ensure the camera lens is clean and unobstructed. Restart the specific AI program or the robot.
- Programming Errors: Double-check your Python code for syntax errors. Refer to the official tutorials and sample codes for guidance.
For more detailed troubleshooting or persistent issues, please contact Yahboom technical support.
10. Warranty and Support
The Yahboom Rider-Pi robot comes with a 90-day warranty against manufacturer defects. Please retain your proof of purchase for warranty claims.
Additional Resources:
For comprehensive tutorials, sample codes, and further support, please visit the official Yahboom study page:
Yahboom Rider-Pi Tutorial Link
This resource includes detailed information on:
- Quick Start Guide
- Basic Control Course
- AI Visual Recognition Course
- AI Large Model Applications
- Video Practical Tutorials

Figure 14: Screenshot of the Yahboom Rider-Pi tutorial website.
If you encounter problems during use, please contact Yahboom customer service or technical support directly for assistance.