Introduction
The Portta VD20P VHS to Digital Converter is designed to easily convert your analog video and audio sources into digital MP4 files. This device features a 5-inch HD LCD screen for real-time preview and playback, customizable image settings, and flexible storage options. It is compatible with a wide range of analog devices including VHS players, VCRs, DVRs, DVD players, Hi8, Mini DV, camcorders, and retro gaming consoles, supporting PAL, NTSC, and SECAM formats.
Package Contents
Verify that all items are included in your package:
- Portta VD20P VHS to Digital Converter Unit
- Power Adapter
- USB Cable
- RCA AV Cable (Yellow, White, Red)
- S-Video Cable
- HDMI Cable
- Remote Control
- User Manual (this document)
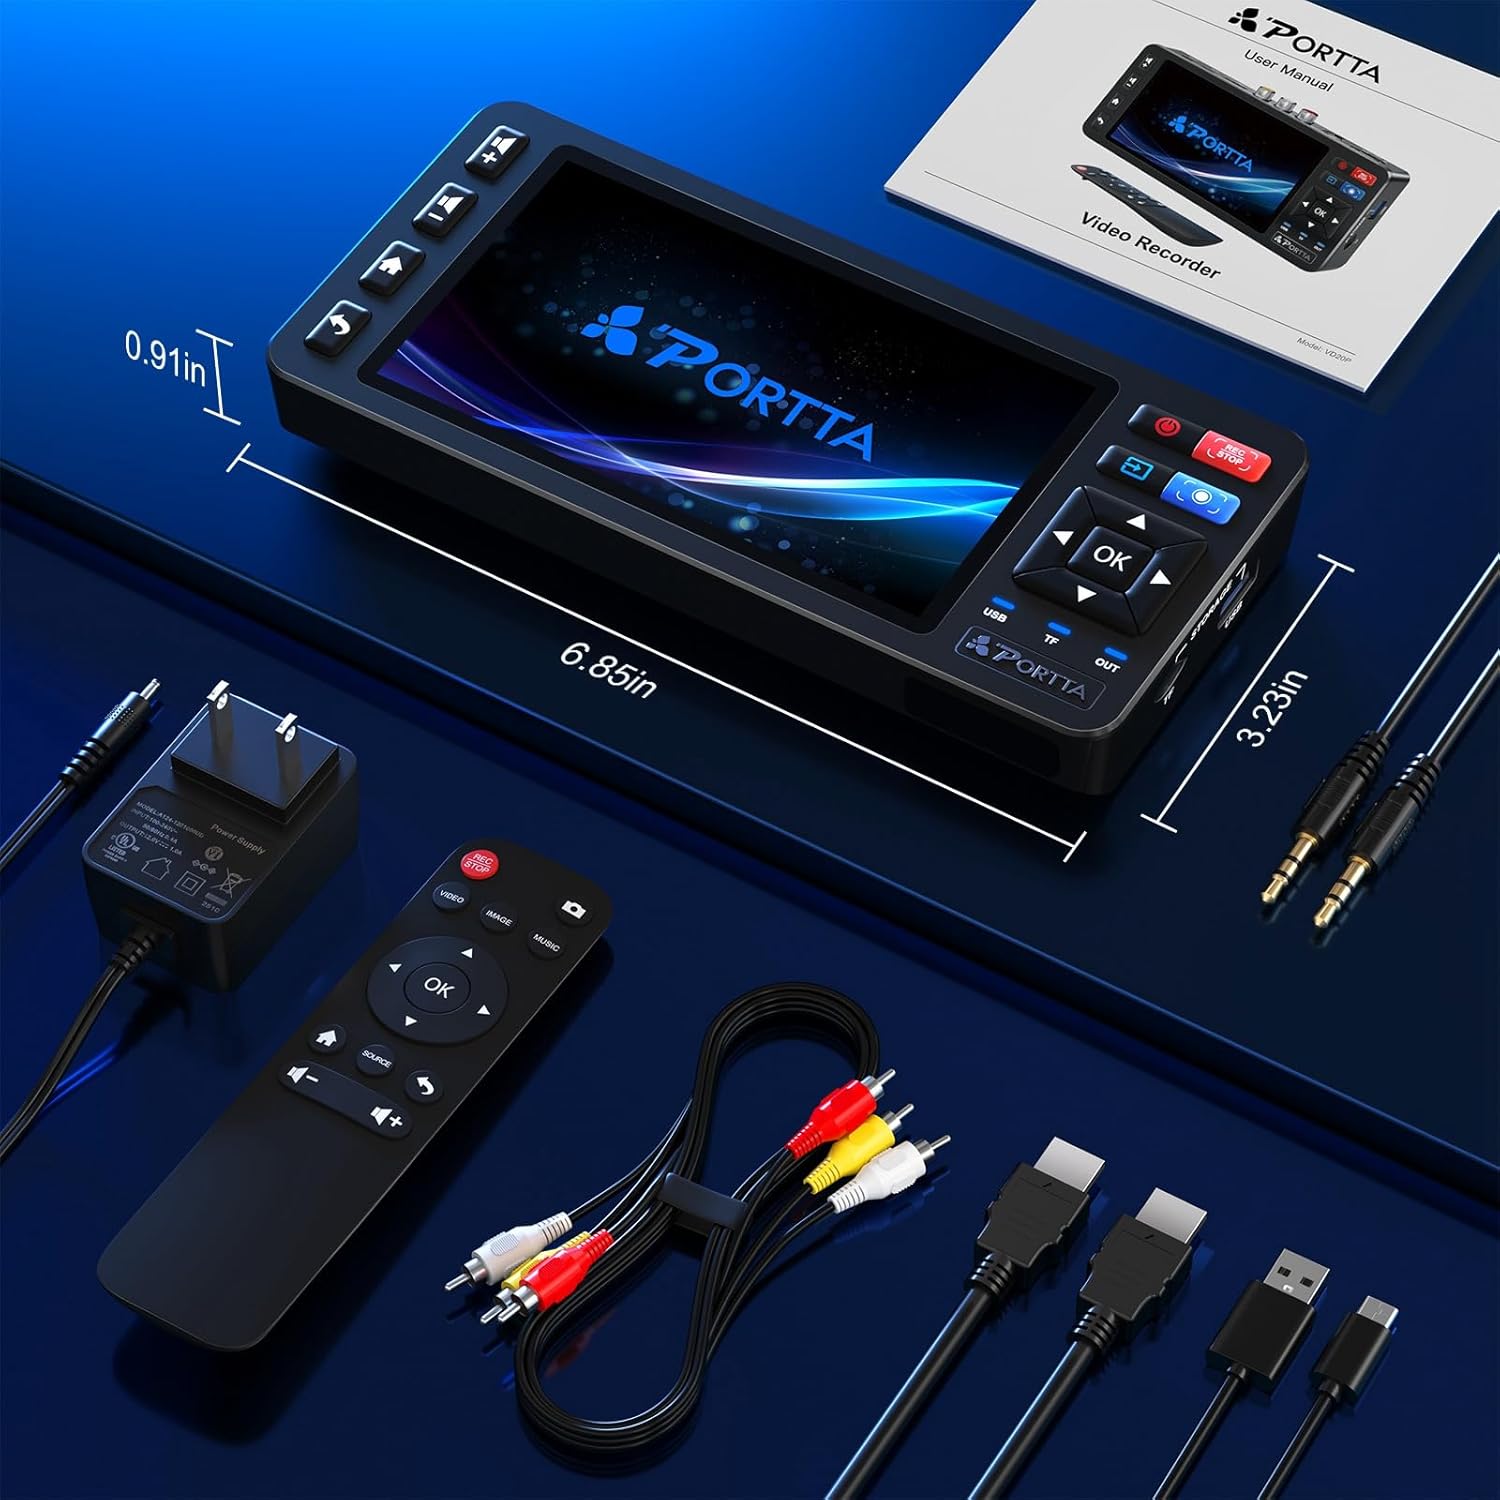
Image: Portta VD20P package contents showing the main unit, power adapter, various cables (USB, RCA, S-Video, HDMI), remote control, and user manual.
Device Overview
Familiarize yourself with the various ports and buttons on your Portta VD20P converter.

Image: Detailed diagram of the Portta VD20P converter, highlighting the 5-inch HD LCD screen, control buttons (Volume +/-, Menu/Home, Backward, OK, Input Selection, Power ON/OFF, REC Start/Stop, Snapshot), and ports (To PC, 12V/1A Power, HDTV Output, AV/CVBS Input, S-Video Input, AUX 3.5mm Input & Output, USB Slot, TF Card Slot, USB/TF/OUT Indicator, Built-in Speaker, IR).
- 5-inch HD LCD Screen: For real-time video preview and playback.
- Control Buttons: Navigate menus, adjust settings, start/stop recording, take snapshots.
- AV/CVBS Input: Connect standard analog video sources (Yellow for video, White/Red for audio).
- S-Video Input: Connect S-Video sources for improved video quality.
- AUX Input/Output: 3.5mm jack for external audio devices.
- HDMI Output: Connect to an HDTV or monitor for larger display.
- USB Slot: For USB flash drives, portable HDDs, and SSDs.
- TF Card Slot: For TF (MicroSD) cards.
- Power Port: 12V/1A DC power input.
Setup Guide
Follow these steps to set up your Portta VD20P converter for the first time.
- Power Connection: Connect the included power adapter to the converter's 12V/1A Power Port and plug it into a power outlet. The device's built-in screen will turn on.
- Storage Device Insertion: Insert a USB flash drive (formatted to NTFS for best performance) into the USB port, or a TF card into the TF card slot. The USB LED indicator will light up, confirming a proper connection.
- Connect Video Source:
- For AV (CVBS) input: Connect one end of the included AV cable to the CVBS (yellow), R (red), and L (white) input ports on the recorder. Connect the other end to the corresponding output ports on your source device (e.g., VHS player, camcorder).
- For S-Video input: Connect an S-Video cable to the S-Video IN port on the recorder and to your source device. Also connect the R (red) and L (white) audio cables.
- For AUX audio input: Connect a 3.5mm audio cable to the AUX IN port on the recorder and to your audio source.
The converter supports AV (CVBS) and S-Video video inputs with R/L stereo audio, and PAL, NTSC, and SECAM formats.
- Input Selection: Use the "Input Selection" button on the device or remote to switch between CVBS, S-Video, or AUX input sources. The built-in screen will display the input source.
- Optional: Connect to Monitor/TV: For a larger view, connect an HDMI cable from the HDMI OUT port on the converter to an HDMI input on your TV or monitor.

Image: A visual quick start guide for the Portta VD20P, illustrating the connection of the power adapter, AV cables from a camcorder to the converter, and a USB drive for storage. It also shows the preview screen and the option to connect to a PC for file transfer.
Operating Instructions
Recording Video/Audio
- Ensure your video source is playing the content you wish to record.
- On the converter's screen, verify that the video and audio are properly received and output through the built-in screen and speaker.
- Press the REC/STOP button to start recording. The recording time will appear on the screen, and the USB LED indicator will flash.
- To stop recording, press the REC/STOP button again. A "Saving..." message will appear on the built-in screen.
- If you need to use the Auto-Stop Timer function, refer to the "Advanced Settings" section.
Taking a Screenshot
- During video playback or live preview, press the Snapshot button to capture a still image.
- A "Taking Screenshot" icon will briefly appear on the screen.
Playback Recorded Files
- Press the Menu/Home button to navigate to the playback section.
- Use the up/down arrows to select the video file you wish to preview.
- Press the OK button to play the selected file.
- You can also connect the converter via HDMI OUT to a TV or monitor to view your recordings on a larger screen.
Transferring Files to a Computer
- Remove the USB flash drive or TF card from the converter after recording is complete.
- Insert the USB flash drive or TF card into your computer.
- Your computer should recognize the drive as a mass storage device. You can then access and transfer your MP4 video files.
- For optimal playback on a PC, VLC Media Player is recommended.
Video: Official demonstration of the Portta VHS to Digital Converter Recorder, showing how to connect a VHS player, start recording, preview on the device's screen, and transfer files to a computer.
Advanced Settings
Access the menu to customize various settings for optimal recording and playback.
- Image Settings: Adjust brightness, contrast, and saturation directly from the screen to fine-tune video quality.
- Aspect Ratio: Select between 4:3 (classic) or 16:9 (modern) aspect ratios for your recordings.
- Auto-Stop Timer: Set a custom duration for automatic recording stop, useful for long tapes.
- Recording Resolution: The device supports Full HD 1080p at 60fps.

Image: Screenshot of the Portta VD20P's on-screen display, illustrating the options to adjust brightness, contrast, and saturation for the video output.
Maintenance
To ensure the longevity and optimal performance of your Portta VD20P converter, follow these maintenance guidelines:
- Cleaning: Use a soft, dry cloth to clean the device. Avoid using liquid cleaners or aerosols.
- Storage: Store the device in a cool, dry place away from direct sunlight and extreme temperatures.
- Cable Care: Handle cables gently. Avoid bending or crimping them excessively to prevent damage.
- VCR/Camcorder Maintenance: If experiencing signal issues (flickering, distorted video, buzzing noise), your source device (VCR, camcorder) may need cleaning. Refer to your source device's manual for cleaning instructions. Caution: Cleaning VCR heads may cause damage if not done properly.
Troubleshooting
If you encounter issues with your Portta VD20P, refer to the following common problems and solutions:
- No Signal or Signal Loss:
- Check all cable connections between the source device and the converter. Ensure they are secure and correctly matched (Yellow to Yellow, Red to Red, White to White).
- Verify the input source selected on the converter matches your connected device (CVBS, S-Video, or AUX).
- Ensure your source device (VCR, camcorder) is powered on and playing content.
- Flickering or Distorted Video:
- This can often be caused by dust, tape residue, or oxide buildup on the VCR heads. A professional VCR cleaning kit may improve video output stability.
- Check the quality of your source tape. Severely degraded tapes may produce poor video.
- Buzzing or Humming Noise:
- Ensure audio cables are securely connected.
- Try using different audio cables to rule out faulty cables.
- Check for ground loop issues. Sometimes plugging devices into different outlets can help.
- Recording Stops After a Few Minutes:
- Check if the Auto-Stop Timer is enabled in the settings and adjust it as needed.
- Ensure your USB drive or TF card has sufficient free space.
- Verify the storage device is properly formatted (NTFS recommended for USB drives).
- Files Not Saving Correctly:
- Always stop recording using the REC/STOP button before removing the USB drive or TF card to prevent file corruption.
- Ensure the storage device is compatible and properly formatted.

Image: A detailed explanation of the information bar on the Portta VD20P screen, including icons for recording status (Not recording, Recording, Saving, Taking Screenshot), USB/TF card storage status (Full, Low), recorded resolution (AUTO, 640x480, 1080p 16:9, 1080p 4:3), and input format detection (CVBS, S-Video, AUX, NTSC, PAL, SECAM). It also provides troubleshooting tips for common video and audio issues.
Specifications
| Feature | Detail |
|---|---|
| Model Number | VD20P |
| Product Dimensions | 6.85 x 3.23 x 0.91 inches |
| Item Weight | 7.8 ounces (221.6 Grams) |
| Display Screen | 5-inch HD LCD |
| Video Input | AV (CVBS), S-Video |
| Audio Input | R/L Stereo Audio, AUX 3.5mm |
| Video Output | HDMI |
| Recording Format | MP4 |
| Recording Resolution | Full HD 1080p @ 60fps |
| Video Standards | PAL, NTSC, SECAM |
| Storage Options | USB Flash Drive, TF Card, Portable HDD, SSD (Drives over 5TB require external power) |
| Compatible Devices | VHS Player, VCR, DVR, DVD Player, Hi8, Mini DV, Camcorders, Retro Gaming Consoles |
| Manufacturer | PORTTA |
Warranty and Support
The Portta VD20P comes with a manufacturer's warranty. For specific details regarding your warranty period and coverage, please refer to the warranty card included in your package or contact Portta customer support.
For technical assistance, troubleshooting, or any product-related inquiries, please contact Portta customer support through their official website or the contact information provided in your product documentation.
Please have your model number (VD20P) and purchase details ready when contacting support.


