Introduction
The PLASMARGON MB-15AK MIG Welding Torch Gun is a professional-grade tool designed for MIG/MAG welding applications. This manual provides essential information for the safe and efficient use of your welding torch, covering setup, operation, maintenance, and troubleshooting.
Key features include a 5-meter (16-foot) flexible cable, a standard Euro connector for wide compatibility, a 180A rating with a 60% duty cycle for stable performance, a gas-cooled design for durability, and an ergonomic handle for comfortable long-term operation.
Safety Information
WARNING: Welding can be dangerous. Always follow safety precautions to prevent injury or death.
- Always wear appropriate personal protective equipment (PPE), including welding helmet, gloves, and protective clothing.
- Ensure adequate ventilation to avoid inhaling welding fumes.
- Protect bystanders from arc rays and hot metal.
- Disconnect power to the welding machine before performing any maintenance or changing parts.
- Ensure all electrical connections are secure and properly grounded.
- Do not operate welding equipment in damp or wet conditions.
Product Overview
The MB-15AK welding torch consists of several key components designed for efficient MIG/MAG welding.

Figure 1: PLASMARGON MB-15AK MIG Welding Torch Gun, showing the full assembly.
Gun Head Components
Understanding the individual components of the gun head is crucial for maintenance and part replacement.
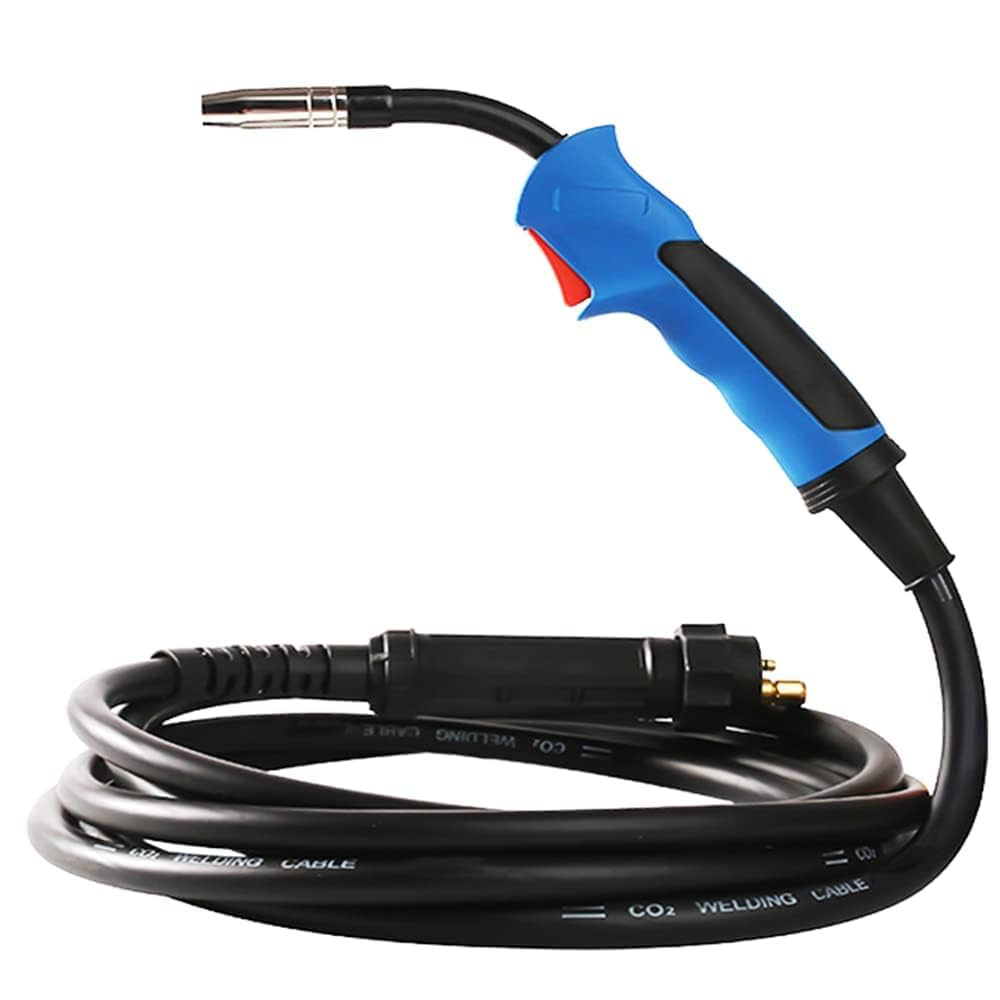
Figure 2: Exploded view of the MB-15AK gun head, showing the conical nozzle, contact tip, gas nozzle holder, and goose neck bend.
- Conical Nozzle: Directs shielding gas and protects the contact tip.
- Contact Tip: Electrically connects to the welding wire and guides it.
- Gas Nozzle Holder: Secures the gas nozzle and provides gas flow.
- Goose Neck Bend: Provides the angle for welding and houses the wire conduit.
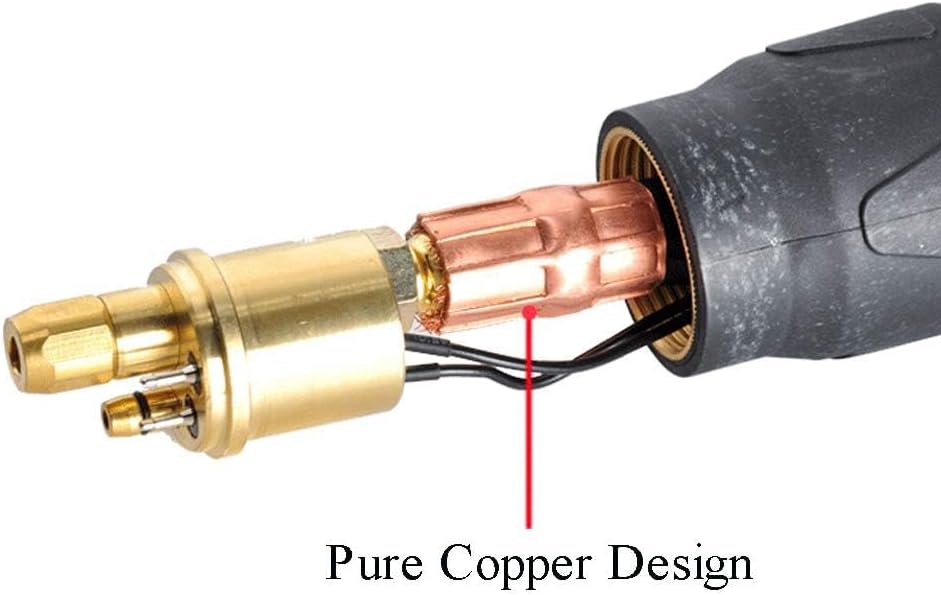
Figure 3: Close-up view highlighting the pure copper design within the torch, ensuring efficient current transfer.
Specifications
| Feature | Detail |
|---|---|
| Model Number | MB-15AK |
| Cable Length | 5 meters (16 feet) |
| Connector Type | Standard Euro Connector |
| Rated Current (CO2) | 180A |
| Rated Current (Mixed Gas) | 150A |
| Duty Cycle | 60% |
| Compatible Wire Diameter | 0.6 - 1.0 mm |
| Cooling Method | Gas-cooled (Air-cooled) |
| Handle Material | Fully insulated nylon |
| Item Weight | 1.5 Kilograms (3.3 pounds) |
| Material | Brass (internal components) |
| Maximum Temperature | 400 Degrees Celsius |
Setup Instructions
- Connect to Welder: Insert the standard Euro central connector of the MB-15AK torch into the corresponding receptacle on your MIG/MAG welding machine. Ensure the connection is tight and secure to guarantee stable current and gas transmission.

Figure 4: Close-up of the Euro connector, showing its design for wide compatibility with MIG/MAG welders.
- Install Welding Wire: Feed the appropriate welding wire (0.6 - 1.0 mm diameter) through the torch liner according to your welding machine's instructions. Ensure the wire feeds smoothly through the contact tip.
- Connect Gas Supply: Connect your CO2 or mixed gas cylinder to the welding machine's gas inlet. Ensure the gas hose is securely attached and the gas flow rate is set correctly for your welding application. The torch utilizes a gas-cooled design, meaning the protective gas also helps cool the torch body during operation.
- Check Components: Verify that the conical nozzle, contact tip, and gas nozzle holder are correctly assembled and tightened on the gun head.
Operating Instructions
- Power On: Turn on your welding machine and set the desired voltage and wire feed speed according to your material thickness and welding parameters.
- Prepare Workpiece: Ensure the workpiece is clean and properly grounded to the welding machine.
- Initiate Arc: Position the torch at the starting point of your weld. Press the sensitive push-button trigger on the ergonomic handle to initiate the arc and begin welding. The ergonomic design of the handle helps reduce hand fatigue during extended use.
- Maintain Weld: Guide the torch along the weld joint, maintaining a consistent travel speed and arc length. The 5-meter (16-foot) cable provides ample flexibility for various welding positions and large workpieces.
- Monitor Performance: The torch is designed for stable performance with a 180A rating (CO2) or 150A (mixed gas) at a 60% duty cycle, suitable for welding 0.6-1.0mm wires. Monitor the weld pool and adjust settings as needed.
- Finish Weld: Release the trigger to stop the arc. Allow the weld to cool before handling.
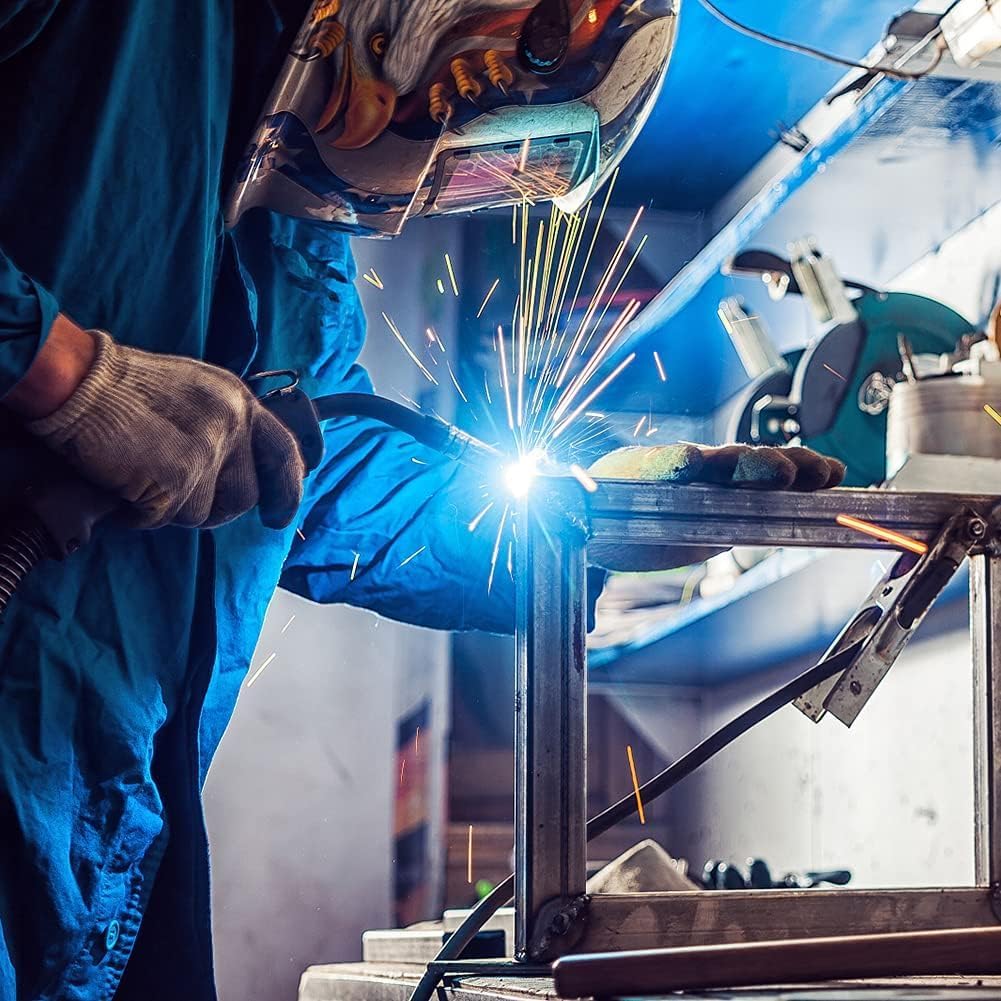
Figure 5: A welder using a MIG torch, demonstrating the application of the welding process.
Maintenance
Regular maintenance ensures the longevity and optimal performance of your welding torch.
- Contact Tip: Inspect the contact tip regularly for wear and spatter buildup. Replace if the bore is enlarged or if it shows signs of excessive wear.
- Nozzle: Clean the conical nozzle and gas nozzle holder frequently to remove spatter. Replace if damaged or if gas flow is obstructed.
- Liner: Periodically check the wire liner for kinks or blockages. A worn or dirty liner can cause wire feeding issues. Replace if necessary.
- Cable: Inspect the torch cable for cuts, abrasions, or damage to the steel spring kink protection. Ensure the cable remains flexible and free from severe bends.
- Connections: Verify that all electrical and gas connections remain tight and secure.
Troubleshooting
Refer to this section for common issues and their potential solutions.
| Problem | Possible Cause | Solution |
|---|---|---|
| Poor Arc Start / Unstable Arc |
|
|
| Wire Feeding Problems (Sticking, Kinking) |
|
|
| Excessive Spatter |
|
|
| Torch Overheating |
|
|
Warranty and Support
For warranty information or technical support regarding your PLASMARGON MB-15AK MIG Welding Torch Gun, please refer to the documentation provided with your welding machine or contact PLASMARGON customer service directly. Keep your purchase receipt as proof of purchase.
You can typically find support contact information on the manufacturer's official website or through your product retailer.


