
1. Introduction
The Hosyond 4.0 Inch ESP32 Display is a versatile resistive touchscreen module designed for various Internet of Things (IoT) and embedded projects. It features an ESP32-32E module, a 4.0-inch 320x480 resolution TFT LCD with an ILI9341 driver, and comes with a protective acrylic case. This module offers extensive connectivity options including Wi-Fi and Bluetooth, multiple expansion interfaces, and support for external power sources like lithium batteries. It is also compatible with specific firmware like NM MINER and NERDMINER for specialized applications.
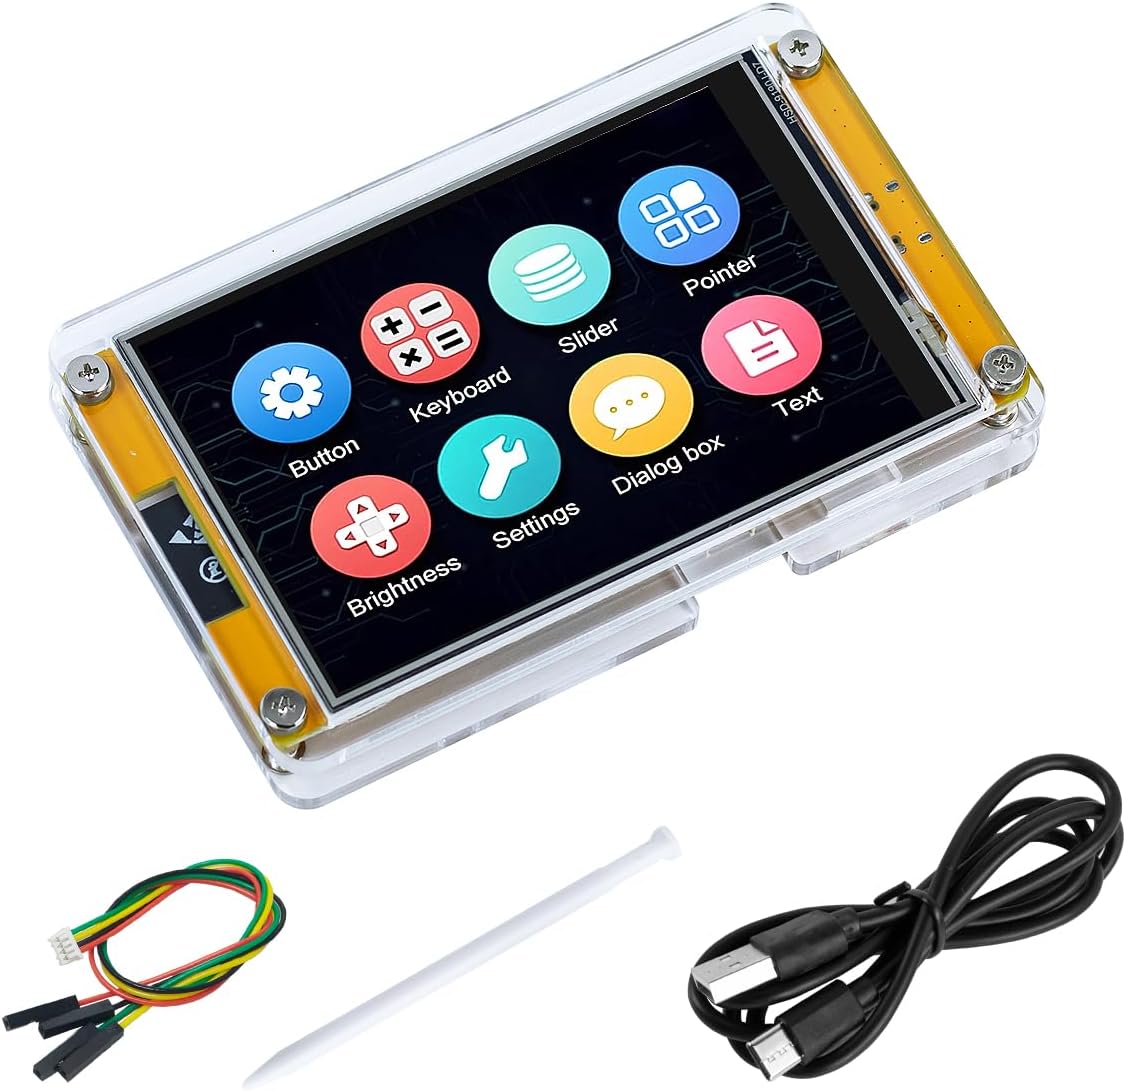
Image 1.1: Hosyond 4.0 Inch ESP32 Display with Acrylic Case.
2. What's in the Box
Please verify that all components are present upon unboxing:
- 1 x Hosyond 4.0 Inch ESP32 Display Module
- 1 x USB Cable (Type-C)
- 1 x Touch Pen
- 1 x 4Pin Connector Cable
- 1 x Acrylic Protective Case
- 1 x Packaging Box
3. Specifications
Detailed technical specifications for the Hosyond 4.0 Inch ESP32 Display:
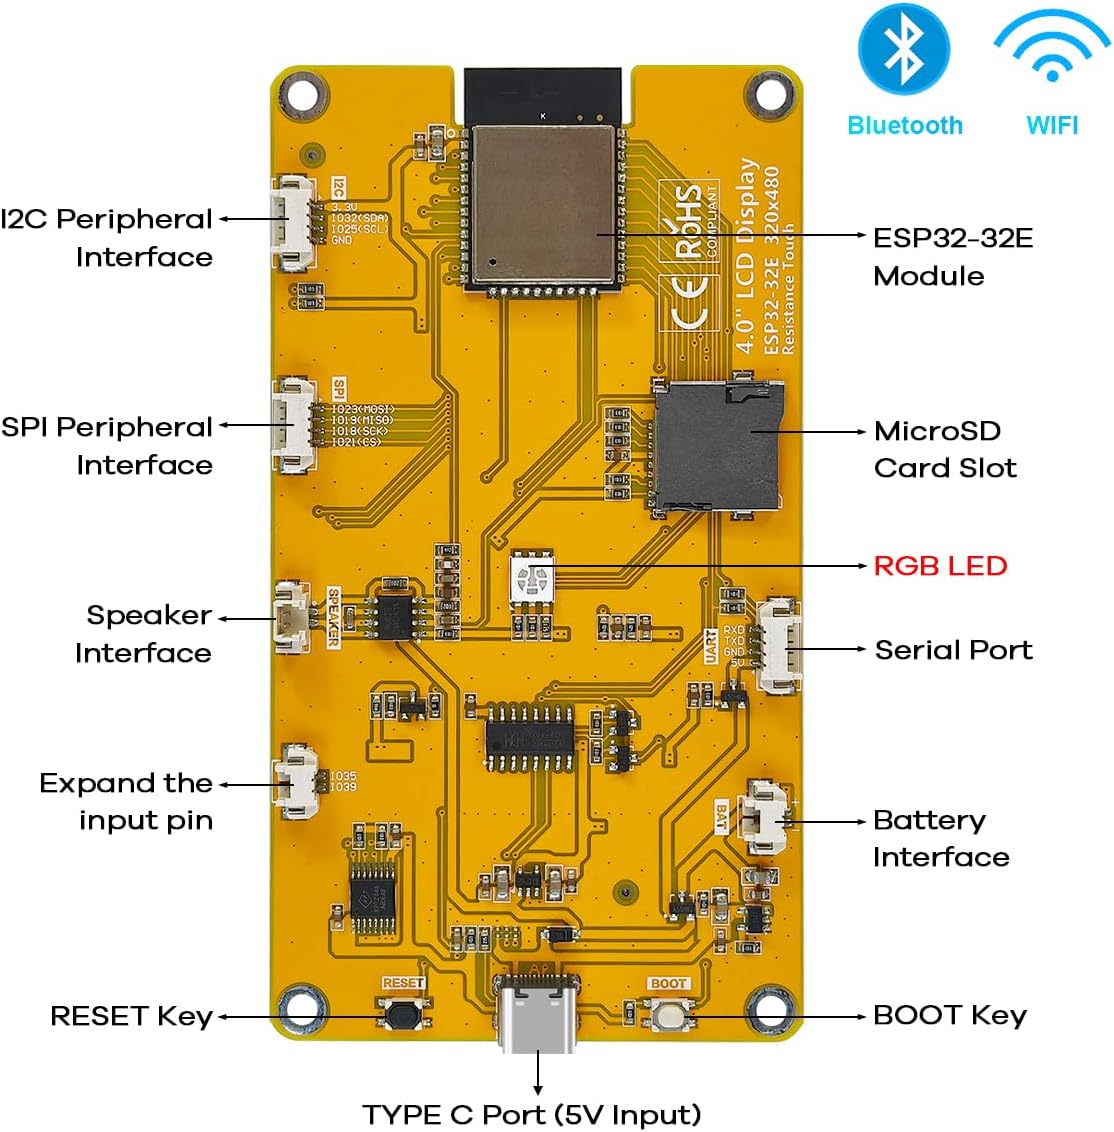
Image 3.1: Detailed specifications and physical dimensions of the display module.
| Feature | Detail |
|---|---|
| Module | ESP32-32E |
| CPU | ESP32-D0WD-V3, Xtensa dual-core 32-bit LX6 microprocessor |
| Main Frequency | 240MHz (maximum) |
| Storage | 448KB ROM + 520KB SRAM + 16KB RTC SRAM + 4MB external QSPI Flash |
| Wi-Fi | 2.4GHz, 802.11b/g/n mode |
| Bluetooth | Bluetooth V4.2 BR/EDR and Bluetooth LE standards |
| Driver IC | ST7796S |
| Display Interface | 4-Line SPI (connected to ESP32) |
| Screen Type | TN TFT |
| Screen Size | 4.0 inch |
| Resolution | 320x480 pixels |
| Touch Screen Type | Resistive |
| Dimensions | 60.88(W) x 111.11(H) x 5.65(D) mm |
| Power Supply | Standard TYPE-C interface (5V Input), supports external lithium batteries |
| Expansion Interfaces | I2C, SPI, UART, Micro TF card slot, Speaker interface, Battery interface |
4. Setup
4.1 Assembly with Acrylic Case
The display module comes with an acrylic protective case. Carefully assemble the case around the display, ensuring all components align correctly. Use the provided installation tools if necessary. The case protects the board and provides a stable enclosure.
4.2 Connecting the Module
- Power and Data Connection: Connect the module to your computer using the supplied USB Type-C cable. This port serves for both power supply and program uploading.
- Peripheral Connections: Utilize the various expansion interfaces as needed for your project. Refer to Image 4.1 for the layout of the board and its interfaces.

Image 4.1: Hosyond ESP32 Display board layout with labeled interfaces including I2C, SPI, Speaker, Serial Port, Battery Interface, MicroSD Card Slot, RGB LED, RESET Key, BOOT Key, and TYPE C Port.
4.3 Initial Firmware Upload
The module is compatible with various firmware, including NM MINER and NERDMINER. Note that the miner software is not pre-installed; you will need to upload it yourself. For NM MINER, ensure you use the firmware file version: esp32-32e-lcd-display-40inch from the official flash.nmminer.com webpage.

Image 4.2: The display module demonstrating compatibility with NerdMiner and NMMiner firmware.
Video 4.1: A demonstration of the Hosyond 4.0 Inch ESP32 Display with its protective case, showcasing its resistive touchscreen functionality and general appearance.
5. Operating Instructions
5.1 Resistive Touchscreen Interaction
The 4.0-inch display features a resistive touchscreen. Use the provided touch pen or a similar blunt, non-sharp object for interaction. Resistive touchscreens respond to pressure, allowing for precise input for menus, buttons, and basic user interfaces.

Image 5.1: Interaction with the resistive touchscreen using the included stylus.
5.2 Programming and Development
The ESP32-32E module provides a powerful platform for custom development. You can use C language to create your own Graphical User Interface (GUI). The module supports various development environments and libraries.
For GUI development, LVGL (Light and Versatile Graphics Library) is a free, open-source graphics library that can be used to create embedded GUIs with graphical elements, visual effects, and low memory requirements.

Image 5.2: Concepts for Graphical User Interface (GUI) development and human-machine interaction.
5.3 Connectivity and Expansion
The module supports Wi-Fi and Bluetooth for flexible wireless communication. It also offers multiple expansion interfaces (I2C, SPI, UART) for connecting various peripherals. A built-in micro TF card slot allows for convenient storage expansion. External speakers can be connected via the speaker interface for audio playback.

Image 5.3: Overview of the display's features including ESP32 Processor, 2.4GHz Wi-Fi, BLE, 262K Color support, and Type-C Port, along with connectivity to various devices.
5.4 Battery Operation
The module supports external lithium batteries and includes an integrated battery charging management circuit. This allows for portable applications and ensures safe charging and discharging of connected batteries.
6. Maintenance
To ensure the longevity and optimal performance of your Hosyond ESP32 Display:
- Cleaning: Use a soft, dry, anti-static cloth to clean the screen and case. Avoid using harsh chemicals or abrasive materials.
- Handling: Handle the module with care. Avoid dropping it or subjecting it to strong impacts.
- Environment: Operate and store the module in a dry environment, away from extreme temperatures, humidity, and direct sunlight.
- Connections: Ensure all cable connections are secure but do not apply excessive force when connecting or disconnecting.
7. Troubleshooting
If you encounter issues with your Hosyond ESP32 Display, refer to the following common problems and solutions:
- Display Not Powering On:
- Ensure the USB Type-C cable is securely connected to both the module and a power source.
- Verify that the power source (e.g., computer USB port, power adapter) provides sufficient power (5V). Some PC USB ports may not supply enough current, especially for initial flashing or if other peripherals are connected. Try a powered USB hub or a dedicated 5V power adapter.
- Screen Remains Blank After Power On:
- Confirm that firmware has been successfully uploaded to the ESP32 module. The display will not show anything without a program running.
- Check your code for display initialization errors or incorrect pin mappings for the ILI9341 driver.
- Touchscreen Not Responding:
- Ensure you are using the resistive touch pen or a suitable blunt object.
- Verify that the touchscreen driver is correctly initialized in your firmware.
- Check for any physical damage to the touchscreen surface.
- Programming/Firmware Upload Issues:
- Ensure the correct COM port is selected in your development environment.
- Press and hold the BOOT button, then briefly press the RESET button, and release BOOT to enter programming mode.
- Confirm you are using the correct firmware file for the ESP32-32E module and 4.0-inch display variant.
- If using a PC, ensure necessary USB drivers are installed.
- MicroSD Card Read Issues:
- Ensure the MicroSD card is inserted correctly into the slot.
- Verify the MicroSD card is formatted correctly (e.g., FAT32).
- Test with a different MicroSD card to rule out card defects.
- Wi-Fi/Bluetooth Connectivity Problems:
- Check your firmware code for correct Wi-Fi/Bluetooth initialization and credentials.
- Ensure the module is within range of the Wi-Fi network or Bluetooth device.
- Verify that the antenna is not obstructed or damaged.
8. Warranty Information
This Hosyond 4.0 Inch ESP32 Display Resistive Touchscreen is sold without an explicit warranty. Please refer to the retailer's return policy for details on returns or exchanges for defective products.
9. Support
For further assistance, technical documentation, or community support related to ESP32 development, please consult the following resources:
- Hosyond Store: Visit the official Hosyond Store on Amazon for product updates and contact information.
- ESP32 Documentation: The official Espressif Systems website provides extensive documentation and development guides for the ESP32 platform.
- Online Forums and Communities: Engage with the broader ESP32 and Arduino communities on platforms like GitHub, Stack Overflow, and dedicated electronics forums for project ideas and troubleshooting advice.