
1. Introduction
The DSV A3 L1800 DTF Printer with Oven is designed for direct-to-film printing, enabling high-quality transfers onto various fabrics. This manual provides essential information for the safe and efficient operation of your printer and oven, covering setup, usage, maintenance, and troubleshooting.
2. Safety Information
- Always connect the printer and oven to a grounded power outlet.
- Keep the equipment away from water or damp environments.
- Ensure adequate ventilation when operating the oven, as it generates heat and may produce fumes from the DTF powder.
- Do not touch heated surfaces of the oven or heat press during operation.
- Keep ink and powder out of reach of children and pets. Use protective gloves and eyewear when handling ink and powder.
- Turn off and unplug the printer and oven before performing any maintenance or cleaning.
3. What's in the Box
The DSV A3 L1800 DTF Printer with Oven package includes the following components:
- A3 DTF Printer
- DTF Oven
- DTF Film Roll
- DTF Inks (CMYK + White)
- DTF Powder
- T-shirts (for initial testing)
- Cleaning Accessories
- USB Cable
- Power Cable
- Printer Tray
- Film Roller
- 3x Syringes
- Lint-Free Cloth
- Software (V11 RIP)
- User Manual File

Figure 3.1: Included Consumables, Accessories, and Maintenance Items.
4. Setup
4.1 Initial Printer Setup
- Ink Filling: Carefully pour the provided DTF inks into their respective color-coded bottles in the printer's ink tank. Ensure the correct color ink is added to the corresponding tank (CMYK and White).
- Power On: Connect the printer to a power source and press the power button. The printer will initiate a self-checking process.
- Software Installation: Install the V11 RIP software on your computer. Connect the printer to your computer using the provided USB cable.
Video 4.1: Initial setup of the DSV A3 L1800 DTF Printer, including ink filling and power-on sequence.
4.2 Film Loading
The printer supports both roll and sheet DTF transfer film. Choose the appropriate method for your project.
- Roll Film: Mount the DTF film roll onto the designated film roller mechanism at the back of the printer. Feed the film through the printer's film path.
- Sheet Film: Place individual DTF film sheets into the sheet feeder tray.

Figure 4.2: Upgraded Film Feeder System for Roll and Sheet Film.
Video 4.2: Demonstrates the new version L1800 DTF printer, including film loading options.
5. Operating Instructions
5.1 Printing Process
- Design Preparation: Use the V11 RIP software to prepare your design. Ensure print settings such as resolution (2880x1440dpi recommended for high quality) and color mode (CMYK+WW) are correctly configured.
- Start Printing: Send the design to the printer from the software. The printer will begin printing the design onto the DTF film.

Figure 5.1: V11 RIP Software Interface.

Figure 5.2: High-Definition Printing Capability.
5.2 Powder Application and Curing
- Apply DTF Powder: Once the design is printed on the film, carefully remove the film from the printer. Evenly spread DTF powder over the wet ink on the back of the PET film. Gently shake off any excess powder.
- Oven Curing: Place the powdered film into the DTF oven. Set the oven temperature to 120°C-130°C and the curing time to approximately 120 seconds. The oven's air suction system and preheating function ensure consistent and smooth curing.

Figure 5.3: Oven Air Suction System and Preheating Function.
5.3 Heat Press Transfer
- Prepare Garment: Place the garment (e.g., T-shirt) on the heat press.
- Position Film: Carefully place the cured DTF film onto the garment with the design facing down.
- Heat Press: Apply heat and pressure using a heat press. Typical settings are 170°C for 50 seconds, but these may vary based on the film and fabric type.
- Peel Film: After pressing, allow the film to cool slightly (cold peel) or peel immediately (hot peel) as per film instructions. Gently peel off the PET film to reveal the transferred design.

Figure 5.4: DTF Printing Workflow.
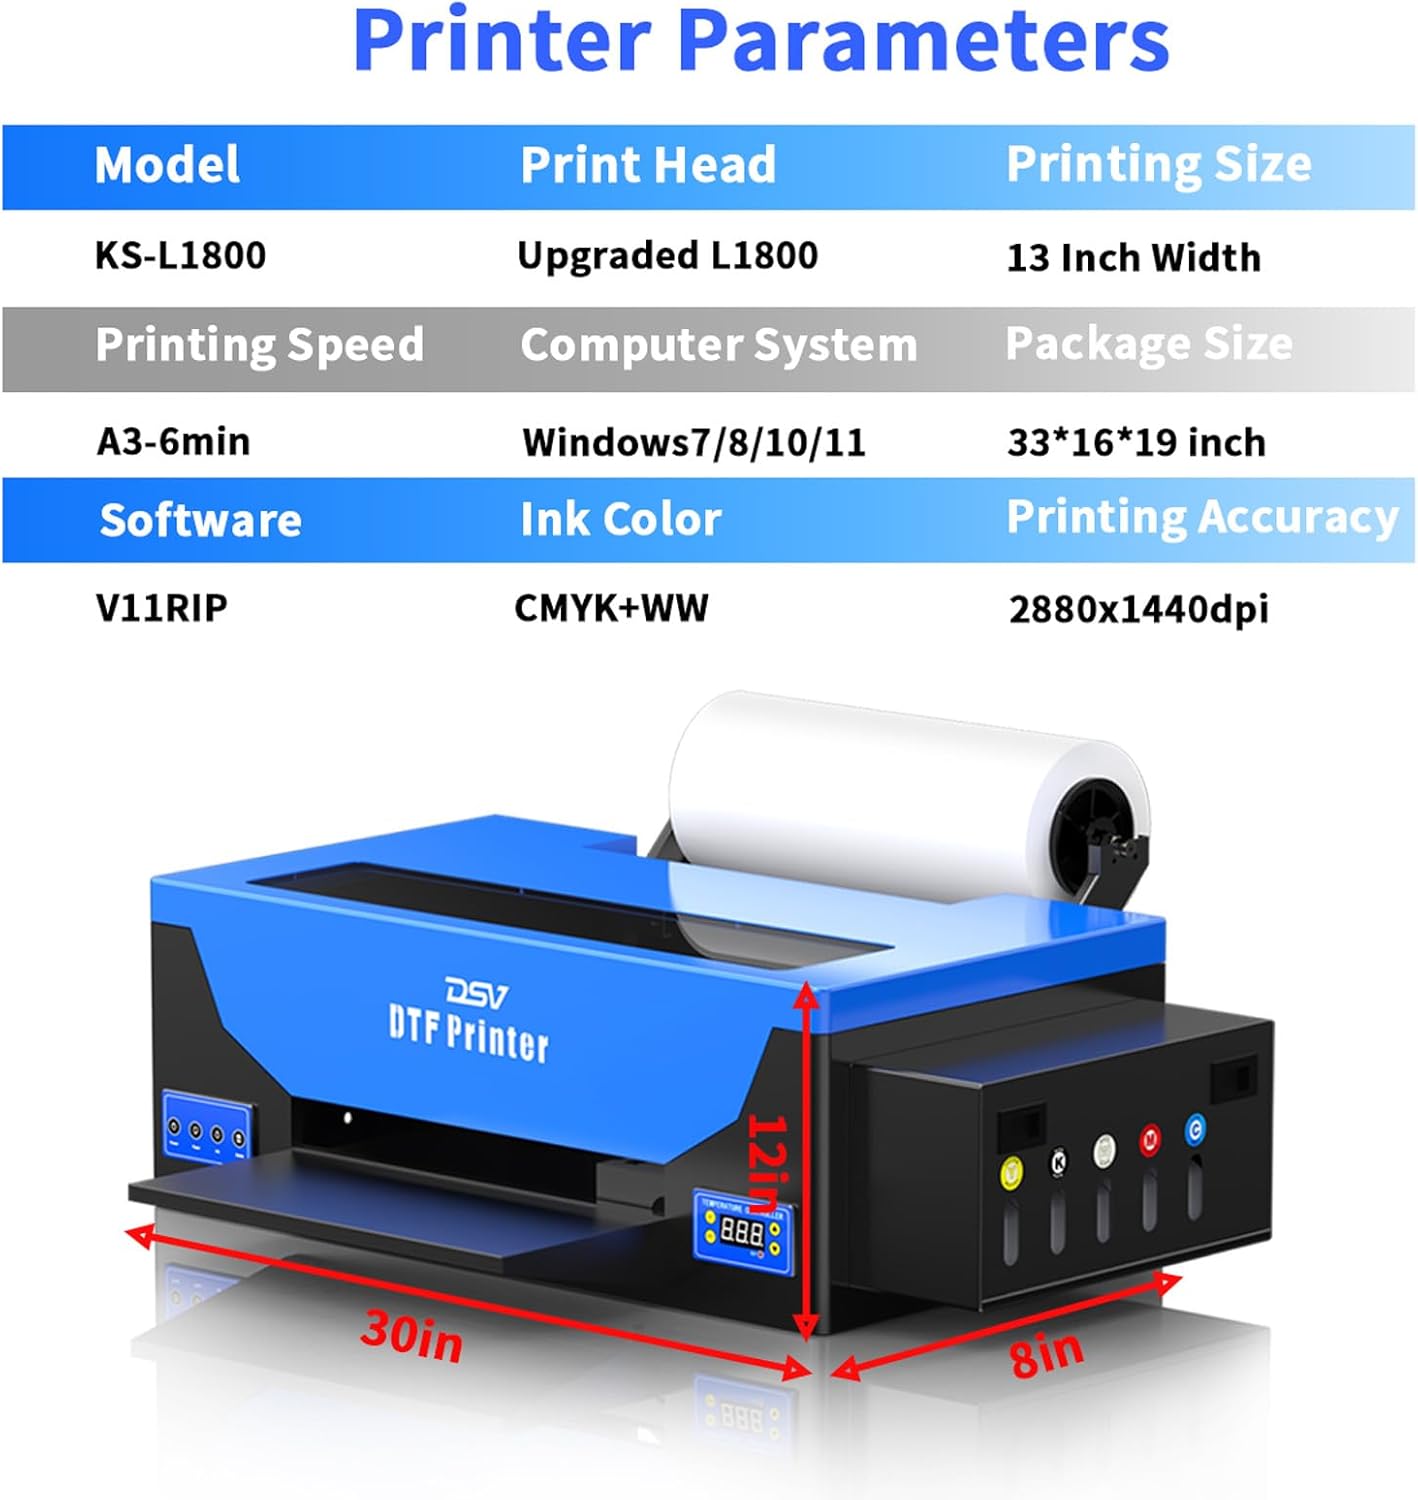
Figure 5.5: Examples of HD Prints on Apparel and Fabrics.
6. Maintenance
6.1 White Ink System
The printer features an innovative white ink system to ensure consistent performance:
- White Ink Mixer: A built-in mixer prevents white ink settling.
- Automatic Circulation: The system ensures consistent ink flow, preventing clogs and extending printhead lifespan.

Figure 6.1: 3-in-1 Ink Feeding System.
6.2 Automatic Cleaning
The advanced automatic cleaning system operates even when the printer is powered on. This reduces manual maintenance and helps prevent printhead clogs, ensuring optimal print quality.
6.3 Usage Guidelines for White Ink
To prevent white ink from printing incorrectly, follow these steps regularly:
- Shake the white ink bottles before refilling.
- Extract 5ml of ink from each white ink cartridge.
- Draw 5ml of waste ink from the waste ink tube.
- Run the printhead cleaning function on your computer.
- Perform a nozzle check and send the results to customer service if issues persist.
7. Troubleshooting
If you encounter any issues with your DSV A3 L1800 DTF Printer or Oven, please refer to the following general advice:
- Print Quality Issues: Perform a nozzle check and printhead cleaning. Ensure ink levels are sufficient and white ink is properly circulated.
- Printer Not Responding: Check all cable connections (power, USB). Restart the printer and computer.
- Oven Not Heating: Verify power connection and temperature settings.
- For persistent problems, contact customer support for assistance.
8. Specifications
| Feature | Specification |
|---|---|
| Model | A3-L1800 |
| Product Dimensions | 30.7"D x 13.4"W x 13.4"H |
| Item Weight | 160 pounds |
| Maximum Media Size | A3 (13 Inches Wide) |
| Printing Technology | A3-Automatic Clean |
| Printer Output | Color |
| Maximum Print Speed (Color) | 0.4 ppm |
| Max Printspeed Monochrome | 0.4 ppm |
| Connectivity Technology | USB |
| Compatible Devices | PC (Windows 7/8/10/11) |
| Special Features | White Ink Circulation & Auto-Cleaning System, 2880x1440dpi Resolution |

Figure 8.1: Detailed Printer Parameters.
9. Warranty Information
The DSV A3 L1800 DTF Printer with Oven comes with a comprehensive warranty policy:
- Print Head Warranty: Three (3) months from the date of purchase.
- Other Components Warranty: One (1) year from the date of purchase.
This warranty covers manufacturing defects and malfunctions under normal use. Please retain your proof of purchase for warranty claims.
10. Customer Support
For any questions, technical assistance, or warranty claims, please contact DSV customer service. Detailed contact information can typically be found on the product packaging, the official DSV website, or through your purchase platform.
When contacting support, please have your product model (A3-L1800) and purchase details ready to facilitate a quicker resolution.