1. Introduction
Thank you for choosing the EUHOMY Countertop Ice Maker Machine. This manual provides essential information for the safe and efficient operation, maintenance, and troubleshooting of your new appliance. Please read these instructions thoroughly before first use and retain them for future reference.
This portable ice maker is designed for convenience, producing bullet-shaped ice cubes quickly and quietly. Its compact design and integrated handle make it suitable for various settings, including kitchens, homes, camping trips, and RVs.
2. Important Safety Instructions
- Read all instructions before operating the appliance.
- Ensure the voltage matches the rating label on the appliance.
- Do not immerse the power cord, plug, or any part of the appliance in water or other liquids.
- Supervise children when the appliance is in use.
- Unplug the appliance when not in use or before cleaning.
- Do not operate any appliance with a damaged cord or plug, or after the appliance malfunctions or has been damaged in any manner.
- Use only manufacturer-recommended attachments.
- Do not use outdoors.
- Place the ice maker on a stable, level surface away from direct sunlight and heat sources.
- Allow at least 4 inches of space around the appliance for proper ventilation.
- Do not use the appliance for anything other than its intended purpose.
3. Product Overview
The EUHOMY Countertop Ice Maker is designed for ease of use and portability. It features a transparent lid for monitoring ice production, a simple control panel, and a sturdy handle for transport.
Components:
- Ice Maker Unit
- Ice Basket
- Ice Scoop
- User Manual

Figure 3.1: EUHOMY Ice Maker with its portable handle, showcasing its compact design.

Figure 3.2: Control panel with "Ice Full" and "Add Water" indicator lights.
4. Setup
4.1 Unboxing and Placement
- Carefully remove the ice maker from its packaging.
- Place the unit on a flat, stable, and heat-resistant surface. Ensure there is adequate ventilation (at least 4 inches) around the appliance.
- Allow the ice maker to stand upright for at least 2-4 hours before plugging it in. This allows the refrigerant to settle.
Video 4.1: Demonstrates the unboxing process and initial setup of the ice maker.
4.2 First Use
- Clean the interior of the ice maker before first use (refer to the Maintenance section).
- Open the top cover and remove the ice basket.
- Fill the water reservoir with potable water up to the "MAX" fill line. Do not overfill.
- Replace the ice basket and close the top cover.
- Plug the ice maker into a grounded electrical outlet.

Figure 4.1: Internal view showing the water reservoir and ice basket placement.
5. Operating Instructions
5.1 Making Ice
- Ensure the water reservoir is filled and the ice basket is in place.
- Press the "Ice/Clean" button to start the ice-making cycle. The "Power" indicator light will illuminate.
- The ice maker will produce 9 bullet-shaped ice cubes in approximately 6-12 minutes.
- The "ICE FULL" indicator light will turn on when the ice basket is full, and the machine will pause.
- The "ADD WATER" indicator light will flash when the water reservoir needs refilling.
- Use the provided ice scoop to remove ice from the basket.

Figure 5.1: Visual guide for the three simple steps to operate the ice maker.
Video 5.1: A demonstration of the ice maker in operation, showing ice production.
5.2 Ice Cube Characteristics
The ice maker produces bullet-shaped ice cubes that are smooth and less likely to stick together. These are ideal for cold drinks, iced coffee, and cocktails.

Figure 5.2: Close-up of the bullet-shaped ice cubes produced by the machine.
6. Maintenance
6.1 Automatic Cleaning Function
- Ensure the ice maker is empty of ice and the water reservoir is filled with clean water.
- Press and hold the "Ice/Clean" button for 3 seconds.
- The machine will enter an automatic cleaning mode for 30 minutes.
- After the cleaning cycle, drain the water from the reservoir.
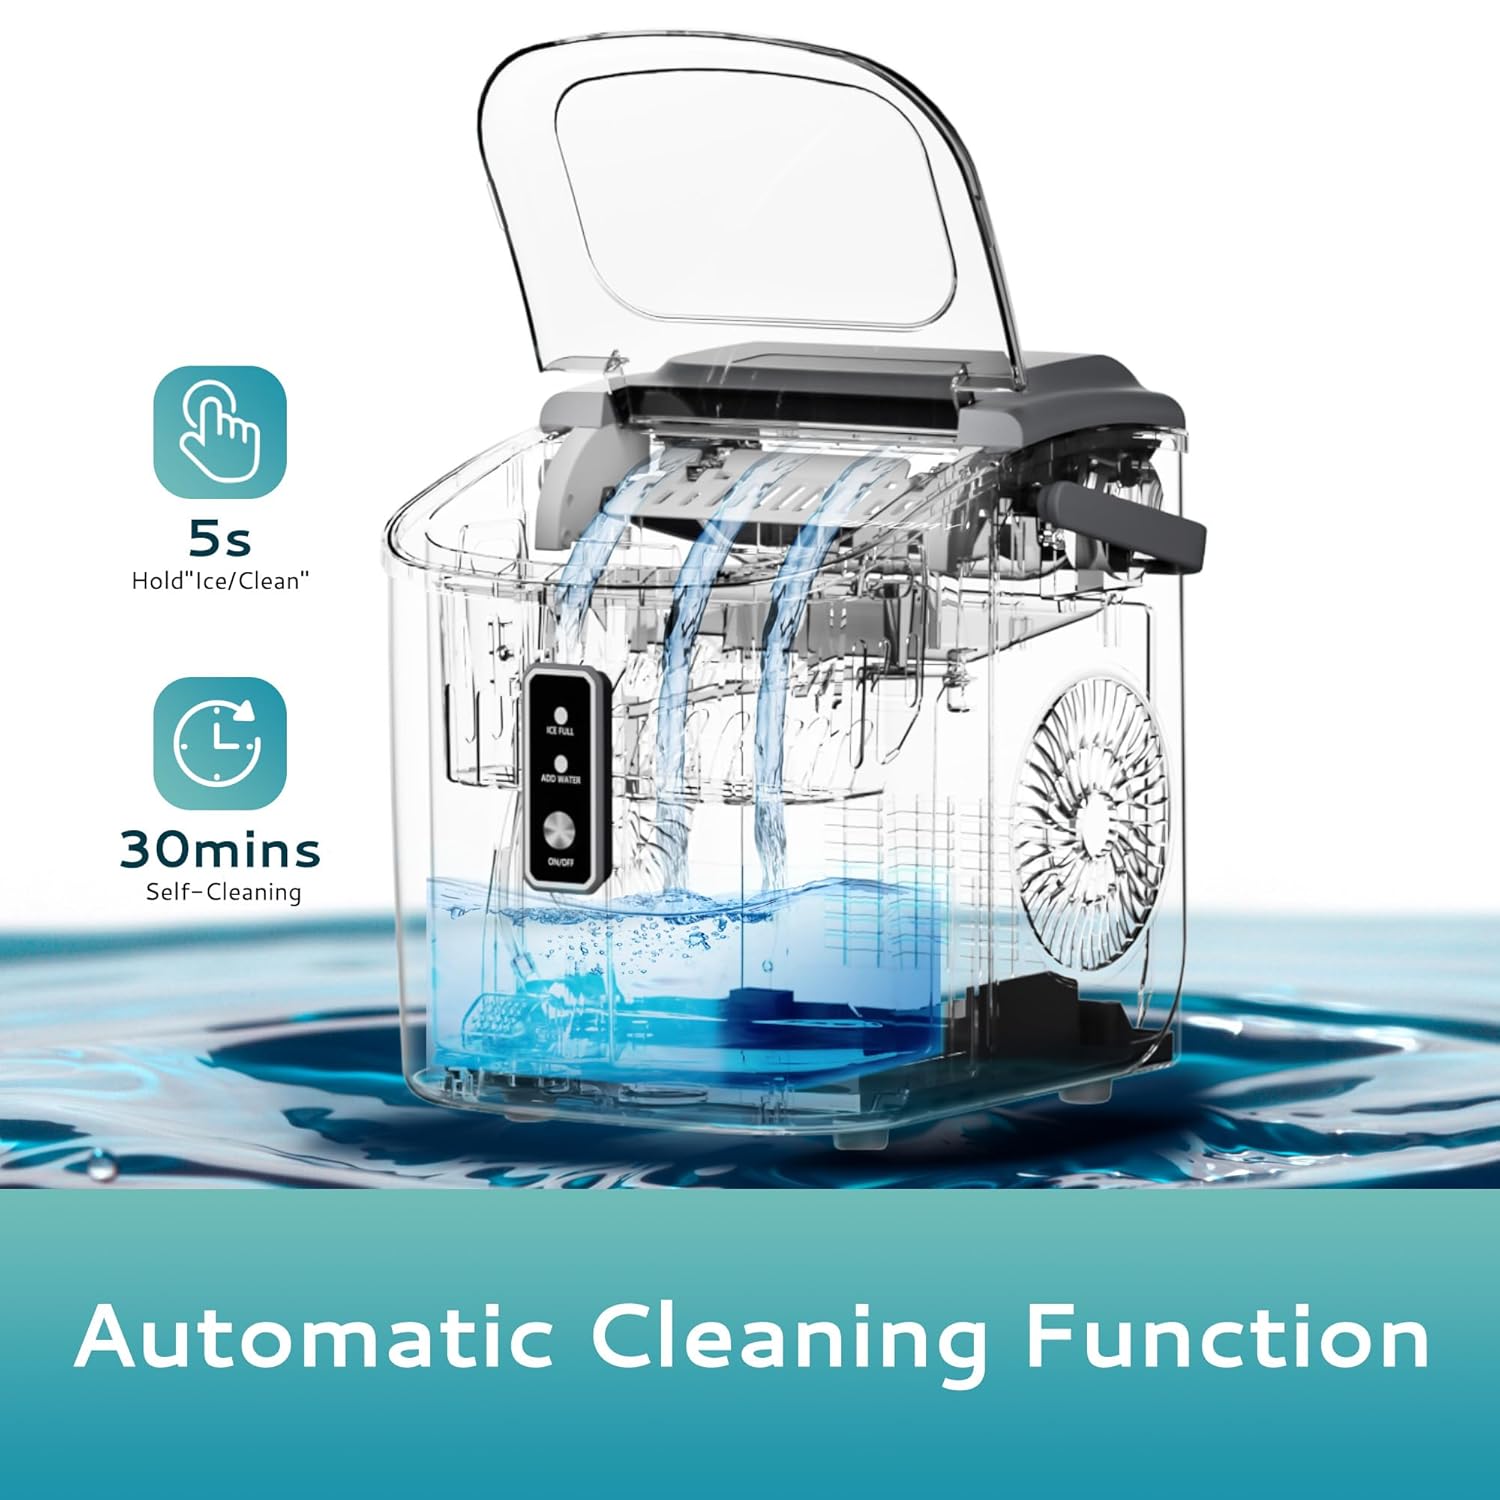
Figure 6.1: Diagram showing the automatic cleaning process.
6.2 Regular Cleaning
- Unplug the appliance before cleaning.
- Remove the ice basket and wash it with mild soap and warm water. Rinse thoroughly.
- Wipe the interior and exterior surfaces of the ice maker with a soft cloth and mild detergent.
- Ensure all parts are completely dry before reassembling and using the appliance.
- Do not use abrasive cleaners or sharp objects to clean the ice maker.
7. Troubleshooting
| Problem | Possible Cause | Solution |
|---|---|---|
| "ADD WATER" indicator flashes. | Water reservoir is empty or water level is too low. | Fill the water reservoir with potable water up to the "MAX" line. |
| "ICE FULL" indicator illuminates. | Ice basket is full. | Remove ice from the basket. The machine will resume ice production automatically. |
| Ice maker is not producing ice. | Power issue, insufficient water, or ambient temperature too high. | Check power connection. Ensure water reservoir is filled. Operate in a room temperature environment (10°C-32°C / 50°F-90°F). |
| Ice cubes are too small or soft. | Water temperature is too high or ambient temperature is too high. | Use colder water. Ensure the machine is in a cooler environment. |
8. Specifications
| Feature | Detail |
|---|---|
| Brand | EUHOMY |
| Model Name | ice maker (IM-18G) |
| Product Dimensions | 9.57"D x 12.32"W x 11.42"H |
| Capacity | 26.5 Pounds per day |
| Wattage | 170 watts |
| Voltage | 115 Volts |
| Refrigerant | R600a |
| Material | Acrylonitrile Butadiene Styrene |
| Item Weight | 14.37 pounds |
| Ice Production Time | 9 cubes in 6-12 minutes |
| Noise Level | Under 45 dB |
9. Warranty and Support
EUHOMY offers a 12-month after-sales service from the original purchase date, along with technical service support.
Should you have any questions about using your EUHOMY Ice Maker, or require assistance with troubleshooting or warranty claims, please contact our customer support team. Our team is always ready to help you.
For further assistance, please refer to the contact information provided on the EUHOMY official website or your purchase documentation.