
1. Introduction
Thank you for choosing the SWZEC Osmo Dashcam Pro 2 4K. This advanced dual dash camera system is designed to provide comprehensive road surveillance and incident recording for your vehicle. Featuring 4K front and 1080P rear cameras, enhanced night vision, integrated WiFi and GPS, and 24/7 loop recording, it offers reliable protection and peace of mind on every journey.
2. Package Contents
Please verify that all items are present in your package:
- 1 x SWZEC Osmo Dashcam Pro 2 (Main Unit)
- 1 x Rear Camera
- 1 x Power Cable (Car Charger)
- 1 x 32GB MicroSD Card
- 1 x User Manual (This document)
3. Product Features
The SWZEC Osmo Dashcam Pro 2 offers a range of features to enhance your driving safety and recording capabilities:
- Dual 4K Front & 1080P Rear Recording: Capture crystal-clear video evidence from both the front and rear of your vehicle.
- 170° Wide Angle Lens: Provides a broad view of the road, minimizing blind spots.
- Built-in WiFi: Connect to the dashcam via a smartphone app for easy video management and settings adjustment.
- Integrated GPS: Records location and speed data, providing crucial information for incident analysis.
- 24/7 Parking Monitor: Protects your vehicle even when parked, detecting impacts and recording incidents (requires hardwire kit, sold separately).
- Loop Recording: Automatically overwrites the oldest footage when the memory card is full, ensuring continuous recording.
- Enhanced Night Vision & WDR: Improves video clarity in low-light conditions and balances exposure for optimal image quality.
- G-Sensor: Automatically detects collisions and locks the current video file to prevent overwriting.
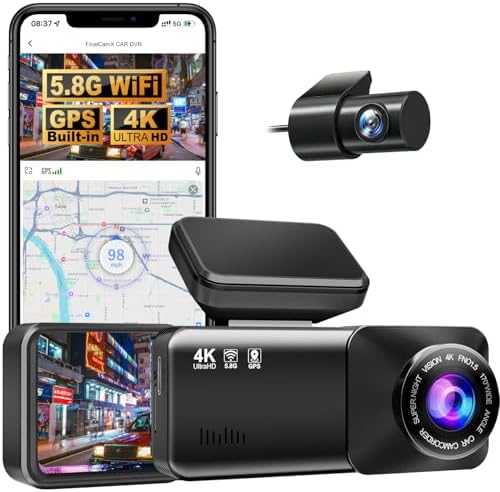
Figure 3.1: SWZEC Osmo Dashcam Pro 2 4K with highlighted features.

Figure 3.2: Front 4K and Rear 1080P recording demonstration.

Figure 3.3: Enhanced Night Vision System (HDR) in action.
4. Setup
4.1 Initial Preparation
- Insert MicroSD Card: Gently insert the provided 32GB MicroSD card into the dashcam's card slot until it clicks into place. Ensure the card is inserted correctly to avoid damage.
- Format MicroSD Card: For optimal performance, it is recommended to format the MicroSD card within the dashcam's settings menu upon first use and periodically thereafter.
4.2 Installation
Follow these steps for proper installation of your dashcam system:
- Mount the Front Camera: Attach the main dashcam unit to your vehicle's windshield, typically behind the rearview mirror, using the adhesive mount or suction cup provided. Ensure it does not obstruct your view. The bracket allows for angle adjustment.
- Install the Rear Camera: Mount the rear camera on the rear windshield, ensuring a clear view of the road behind. Route the rear camera cable discreetly along the vehicle's headliner and pillars to the main unit.
- Connect Power: Plug the car charger into your vehicle's 12V power outlet (cigarette lighter socket) and connect the other end to the dashcam's power input (Type-C port). Route the power cable neatly to avoid interference with driving controls.

Figure 4.1: Dashcam installation diagram.
5. Operating Instructions
5.1 Power On/Off
- Automatic Operation: The dashcam will automatically power on and begin recording when your vehicle's ignition is turned on (and power is supplied to the 12V outlet).
- Manual Operation: Press and hold the power button to manually turn the dashcam on or off.
5.2 Recording Modes
- Loop Recording: The dashcam continuously records video in short segments (e.g., 1, 3, or 5 minutes). When the MicroSD card is full, the oldest unlocked files are overwritten.
- G-Sensor (Emergency Recording): In the event of a sudden impact or collision, the built-in G-sensor will automatically detect the event and lock the current video file, preventing it from being overwritten by loop recording.
- Parking Monitor: With an optional hardwire kit (sold separately), the dashcam can monitor your vehicle 24/7. It will automatically start recording if it detects an impact or motion while parked. The built-in low-voltage auto power-off function protects your car battery.
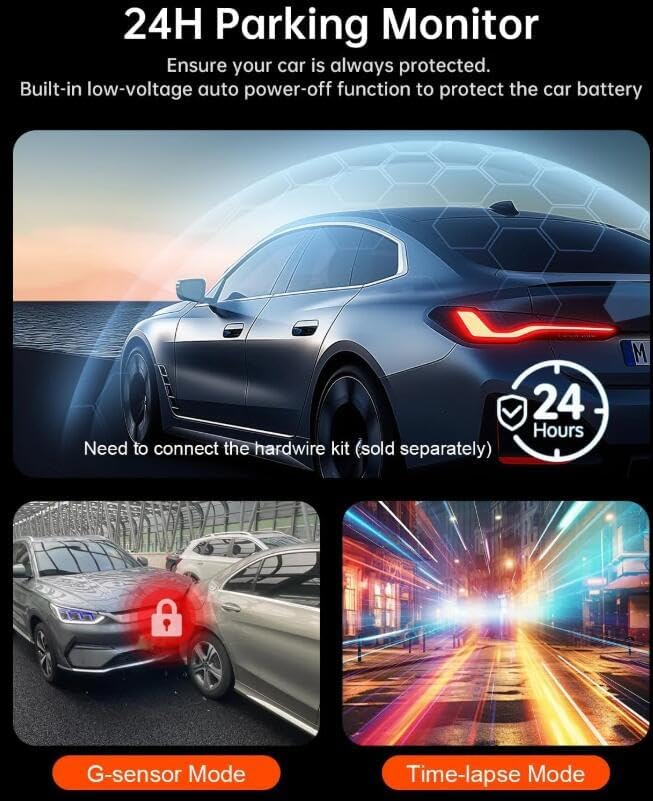
Figure 5.1: 24-Hour Parking Monitor functionality.
5.3 WiFi Connectivity & App Usage
The integrated WiFi allows you to connect your smartphone to the dashcam for convenient control and file management.
- Download the App: Search for the official SWZEC dashcam app on your smartphone's app store (iOS or Android).
- Enable WiFi: Turn on the WiFi feature on your dashcam via its menu settings.
- Connect to WiFi: On your smartphone, go to WiFi settings and connect to the dashcam's WiFi network (SSID and password will be displayed on the dashcam screen).
- Use the App: Open the app to preview live footage, playback recorded videos, download files to your phone, and adjust dashcam settings.

Figure 5.2: Built-in WiFi and GPS tracking for smartphone connectivity.
5.4 GPS Tracking
The integrated GPS module automatically records your vehicle's speed and location data, embedding it into the video files. This information can be viewed during video playback using the dedicated PC viewer software or the mobile app, providing crucial evidence in case of an incident.
6. Maintenance
- Cleaning: Use a soft, dry cloth to clean the dashcam lens and body. Avoid using abrasive cleaners or solvents.
- MicroSD Card: Regularly format the MicroSD card (at least once a month) to maintain optimal performance and prevent data corruption. Replace the MicroSD card every 6-12 months, especially if used frequently, as they have a limited lifespan.
- Firmware Updates: Check the official SWZEC website periodically for firmware updates. Keeping your dashcam's firmware up-to-date ensures the best performance and access to new features.
- Temperature: Avoid exposing the dashcam to extreme temperatures for extended periods. If your vehicle is parked in direct sunlight in hot weather, consider removing the dashcam or using a sunshade.
7. Troubleshooting
If you encounter issues with your SWZEC Osmo Dashcam Pro 2, refer to the following common problems and solutions:
| Problem | Possible Cause / Solution |
|---|---|
| Dashcam does not power on. | Check the power cable connection. Ensure the car charger is securely plugged into the 12V outlet and the vehicle's ignition is on. Test the 12V outlet with another device. |
| Recording stops or freezes. | Format the MicroSD card. Ensure you are using a high-speed (Class 10 or U3) MicroSD card. The card may be faulty or worn out; try a new one. |
| Video quality is poor. | Clean the camera lenses. Ensure the protective film has been removed from the lenses. Check video resolution settings in the menu. |
| WiFi connection issues. | Ensure WiFi is enabled on the dashcam. Restart both the dashcam and your smartphone. Make sure you are within close proximity to the dashcam. |
| GPS not working. | Ensure the dashcam has a clear view of the sky. It may take a few minutes for the GPS signal to be acquired after startup. |
| Parking monitor not working. | Verify that the parking monitor feature is enabled in the settings. Ensure a hardwire kit is correctly installed and providing continuous power. |
8. Specifications
| Feature | Detail |
|---|---|
| Brand | SWZEC |
| Model Name | Pro 2 |
| Video Recording Resolution | Front: 4K (2160p), Rear: 1080p |
| Frame Rate | 60 FPS |
| View Angle | Front: 170 degrees, Rear: 140 degrees |
| Connectivity | USB, Wi-Fi |
| Special Features | Enhanced Night Vision, 24/7 Loop Recording, Integrated GPS, Integrated WiFi, G-Sensor, WDR |
| Compatible Devices | Car, Smartphone, Tablet |
| Product Dimensions | Approx. 10 x 10 x 10 cm |
| Batteries Included | No |
| Part Number | FR-AA215 |
| Country of Origin | China |
9. Warranty and Support
9.1 Warranty Information
The SWZEC Osmo Dashcam Pro 2 4K comes with a standard 1-year limited warranty from the date of purchase. This warranty covers manufacturing defects and malfunctions under normal use. It does not cover damage caused by misuse, accidents, unauthorized modifications, or natural disasters. Please retain your proof of purchase for warranty claims.
9.2 Customer Support
For technical assistance, troubleshooting, or warranty inquiries, please contact SWZEC customer support through the retailer's platform or the official SWZEC website. Please have your product model and purchase details ready when contacting support.