1. Introduction and Overview
This manual provides essential instructions for the safe and effective operation, setup, and maintenance of your ANDELI MIG135 Multiprocess Welder. The MIG135 is a versatile 3-in-1 welding machine capable of MIG, Lift TIG, and MMA (Stick) welding processes. Designed for 110V input, it is suitable for various applications from home DIY projects to general maintenance tasks.
Please read this manual thoroughly before operating the welder to ensure proper usage and to prevent potential hazards.
2. Safety Instructions
WARNING: Welding can be dangerous. Always follow safety precautions to prevent injury or death. Read and understand all safety information before installation or operation.
- Electric Shock: Can kill. Ensure proper grounding. Do not touch live electrical parts. Wear dry welding gloves.
- Fumes and Gases: Can be hazardous to your health. Work in a well-ventilated area. Keep your head out of the fumes.
- Arc Rays: Can burn eyes and skin. Wear a welding helmet with appropriate shade filter and protective clothing.
- Fire and Explosion: Welding sparks can cause fire or explosion. Keep flammable materials away from the welding area. Have a fire extinguisher readily available.
- Hot Parts: Can cause severe burns. Allow equipment to cool before touching.
- Automatic Protection: The ANDELI MIG135 features automatic protection functions for over-current, over-voltage, and over-heating. If these protections activate, the machine will temporarily stop operation. Allow the machine to cool down or resolve the issue before resuming.
3. Product Features
The ANDELI MIG135 Multiprocess Welder is equipped with several features designed for efficiency and ease of use:
- Multi-Functionality: Supports MIG, Lift TIG, and MMA (Stick) welding modes, providing versatility for various welding tasks.
- User-Friendly Operation: Features a simple control panel and unified adjustment mode for quick setup and operation.
- Integrated Wire Feeder: Ensures smooth and consistent wire feeding for MIG welding.
- Adjustable Parameters: Allows for precise adjustment of welding voltage and current to suit different materials and thicknesses.
- Efficient Cooling System: A unique air channel design enhances heat dissipation for power devices and control circuits, minimizing dust absorption and improving the machine's longevity and reliability.
- Safety Protections: Includes automatic protection against over-current, over-voltage, and over-heating to safeguard the machine and operator.
- Gasless MIG Capability: Designed to operate with 0.030 inch (1kg) flux-cored welding wire, eliminating the need for an external gas cylinder for MIG welding.
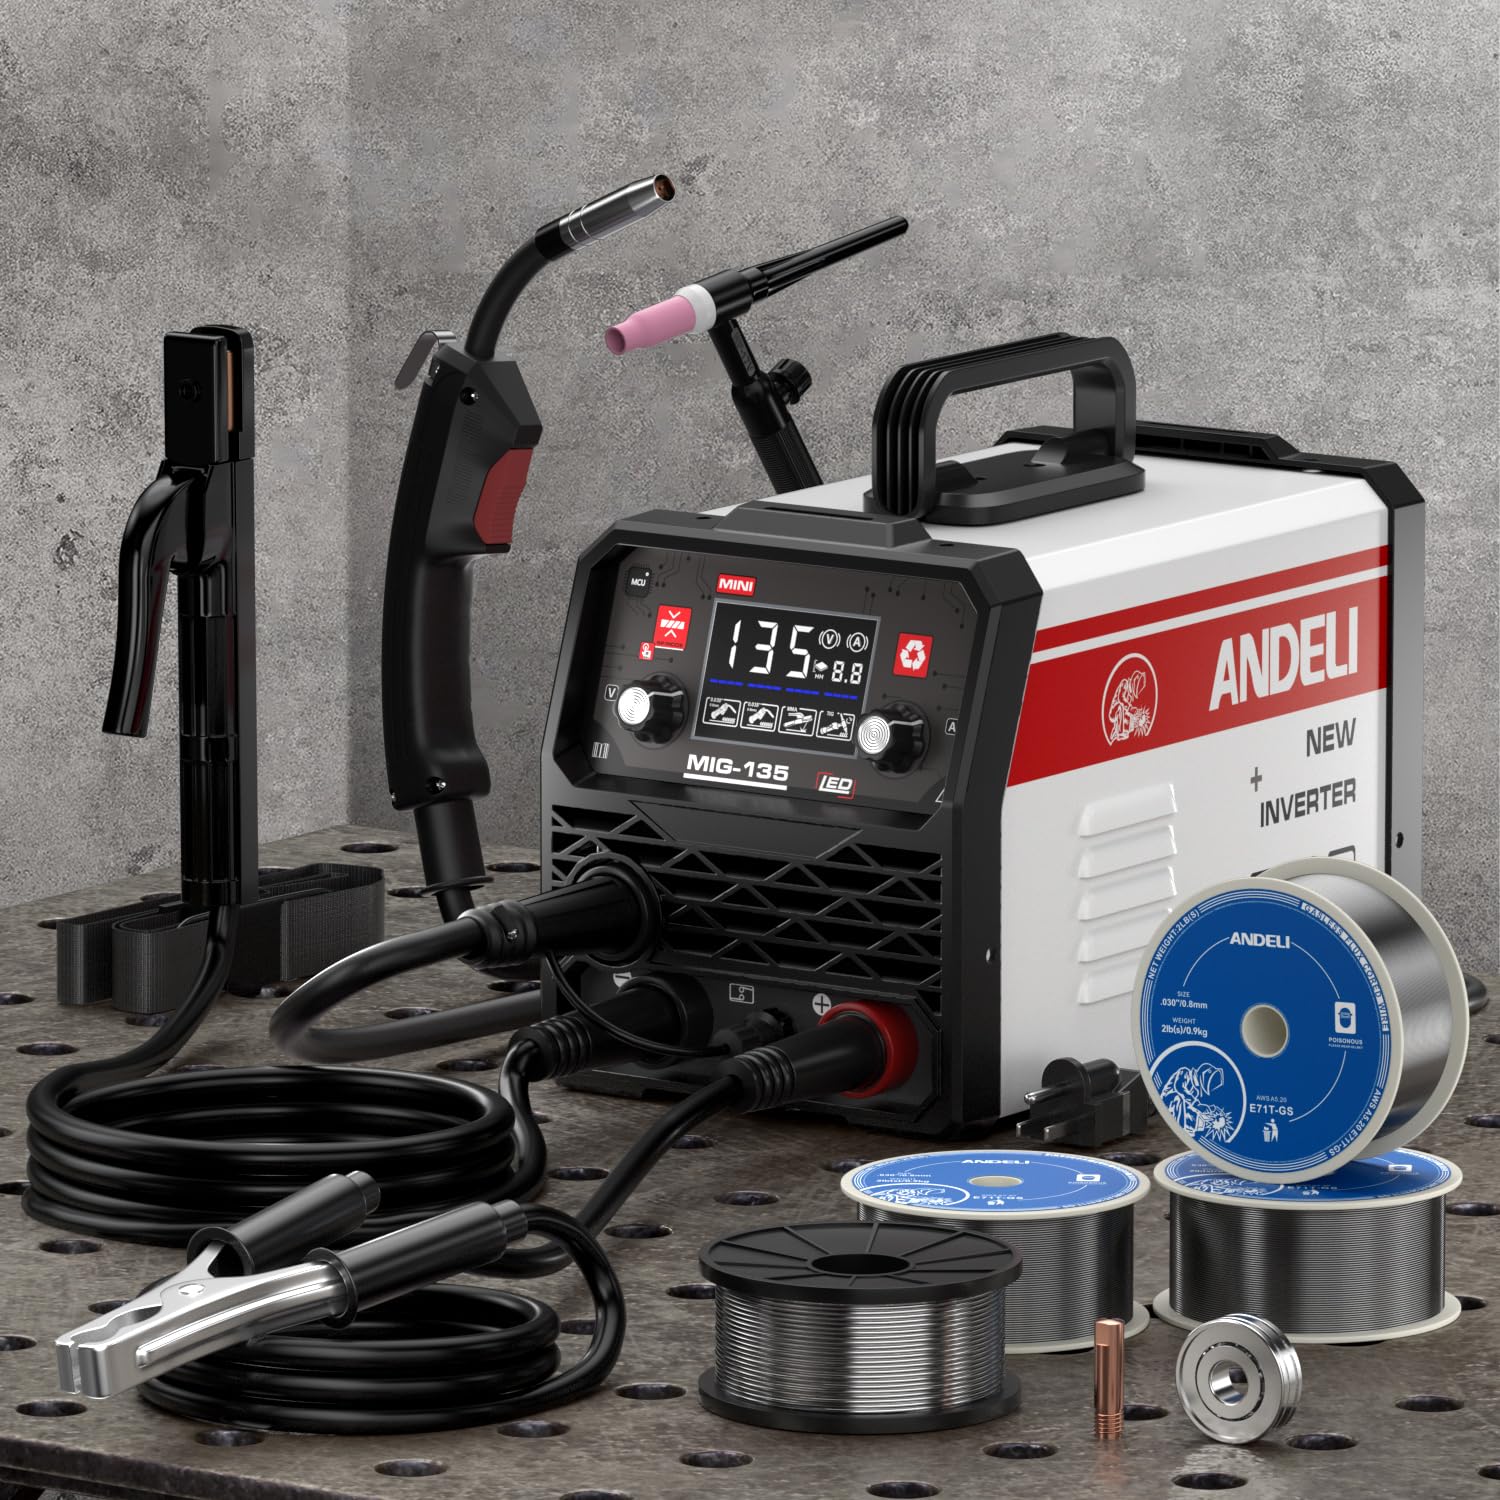
Image 1: The ANDELI MIG135 Multiprocess Welder, showcasing its compact design and control panel.
4. Setup
4.1 Unpacking and Inspection
Carefully remove the welder and all accessories from the packaging. Inspect for any shipping damage. If damage is found, contact your supplier immediately.
4.2 Power Connection
- Ensure the welder is switched off before connecting to power.
- Connect the power cord to a grounded 110V AC power outlet. Ensure the circuit can handle the welder's power requirements.
4.3 Welding Accessories Connection
- Ground Clamp: Connect the ground clamp cable to the appropriate terminal on the welder (usually marked with a ground symbol or "-"). Securely attach the ground clamp to the workpiece or welding table, ensuring good electrical contact.
- MIG Torch: Connect the MIG torch to the designated connector on the front panel. Ensure it is securely fastened.
- MMA Electrode Holder: For MMA welding, connect the electrode holder cable to the positive (+) terminal and the ground clamp to the negative (-) terminal.
- Lift TIG Torch: For Lift TIG welding, connect the TIG torch to the negative (-) terminal and the ground clamp to the positive (+) terminal. (Note: This model supports Lift TIG, which typically does not require a gas solenoid on the machine itself; gas flow is controlled manually at the torch.)
4.4 Wire Installation (MIG)
- Open the wire feeder compartment.
- Place the 0.030 inch (1kg) flux-cored welding wire spool onto the spindle, ensuring it rotates freely.
- Thread the wire through the guide tube and into the drive roller mechanism.
- Close the drive roller tension arm and adjust the tension. It should be tight enough to feed the wire without slipping, but not so tight as to deform the wire.
- With the MIG torch pointed away from yourself and others, press the trigger to feed the wire through the torch liner until it emerges from the contact tip.
5. Operating Instructions
5.1 General Operation Steps
- Ensure all safety precautions are in place (PPE, ventilation, clear area).
- Connect the welder to power and turn it on.
- Select the desired welding mode (MIG, Lift TIG, or MMA) using the mode selector switch on the control panel.
- Adjust the welding current and voltage according to the material thickness and welding process. Refer to welding charts or practice on scrap material.
- Perform a test weld on scrap material to verify settings.
- Begin welding, maintaining proper arc length and travel speed.
- After welding, turn off the machine and allow it to cool.
5.2 MIG Welding (Gasless Flux-Cored)
- Select MIG mode.
- Ensure flux-cored wire is correctly installed and tensioned.
- Set voltage and wire feed speed (often linked on this model) based on wire diameter and material.
- Position the MIG torch at the desired starting point, typically at a slight angle (push or pull technique depending on application).
- Press the trigger to initiate the arc and begin welding.
5.3 MMA (Stick) Welding
- Select MMA mode.
- Insert the appropriate electrode into the electrode holder.
- Set the current based on the electrode type and diameter, and material thickness.
- Strike the arc by lightly touching and quickly lifting the electrode from the workpiece.
- Maintain a consistent arc length and travel speed.
5.4 Lift TIG Welding
- Select TIG mode.
- Ensure a TIG torch with a tungsten electrode is connected.
- Connect a gas supply (Argon) to the TIG torch if using shielding gas.
- Set the current.
- To initiate the arc, gently touch the tungsten electrode to the workpiece and then lift it slightly. The arc will start.
- Maintain a short arc length and feed filler rod manually if required.
6. Maintenance
Regular maintenance ensures the longevity and optimal performance of your welder.
- Cleaning: Periodically clean the internal components, especially the air channels, using dry compressed air. This helps maintain efficient cooling and prevents dust buildup.
- Wire Feeder: Inspect the wire drive rollers for wear and cleanliness. Clean any debris or wire shavings.
- Cables and Connections: Regularly check all welding cables, power cords, and connections for damage, fraying, or loose contacts. Replace damaged components immediately.
- MIG Torch: Inspect the contact tip, nozzle, and diffuser for spatter buildup and wear. Clean or replace as necessary.
- Storage: Store the welder in a clean, dry environment, away from excessive dust, moisture, and extreme temperatures.
7. Troubleshooting
Refer to the following table for common issues and their potential solutions:
| Problem | Possible Cause | Solution |
|---|---|---|
| Welder does not power on. | No power from outlet; power cord damaged; internal fuse blown. | Check power outlet and circuit breaker. Inspect power cord. Contact service if fuse is suspected. |
| No arc when welding. | Poor ground connection; incorrect settings; damaged torch/electrode holder; wire feed issue (MIG). | Ensure ground clamp has good contact. Verify welding settings. Inspect torch/holder. Check wire feed path. |
| Wire feed is inconsistent (MIG). | Incorrect drive roller tension; clogged liner; wrong size contact tip; wire spool tangled. | Adjust drive roller tension. Clean or replace liner. Use correct contact tip. Untangle wire spool. |
| Welder shuts off during operation. | Over-heating, over-current, or over-voltage protection activated. | Allow the machine to cool down. Reduce duty cycle. Check for proper ventilation. Ensure stable power supply. |
| Poor weld quality. | Incorrect settings; improper technique; contaminated workpiece; wrong wire/electrode. | Adjust voltage/current/wire speed. Practice technique. Clean workpiece. Use appropriate consumables. |
If you encounter issues not listed here or if troubleshooting steps do not resolve the problem, please contact customer support.
8. Specifications
| Parameter | Value |
|---|---|
| Model Number | MIG-135MINI |
| Manufacturer | XINGYI |
| Part Number | MIG-250ME S |
| Power Source | 110V AC |
| Welding Processes | MIG, Lift TIG, MMA (Stick) |
| Item Weight | 18.85 pounds (approx. 8.55 kg) |
| Package Dimensions | 19.7 x 14.6 x 13.4 inches (approx. 50 x 37 x 34 cm) |
| Compatible MIG Wire | 0.030 inch (1kg) Flux-Cored Wire |
| ASIN | B0FZSWXZL8 |
| Date First Available | July 24, 2021 |
9. Warranty and Support
For warranty information, please refer to the documentation provided with your purchase or contact the seller directly. If you require technical assistance, have questions about operation, or need to report a defect, please reach out to the ANDELI customer support team or your authorized dealer.
Always provide your product model number (MIG-135MINI) and purchase date when contacting support to expedite assistance.


