
1. Introduction
Thank you for choosing the SUNVIVI 4-in-1 Multifunctional Stand Mixer. This appliance is designed to simplify your kitchen tasks by combining a dough mixer with fermentation, a meat grinder, a slow juicer, and a salad maker into one compact unit. Please read this manual thoroughly before first use to ensure safe and optimal operation.

Image 1.1: Overview of the 4-in-1 Multifunctional Stand Mixer's capabilities.
2. Important Safety Instructions
When using electrical appliances, basic safety precautions should always be followed to reduce the risk of fire, electric shock, and/or injury to persons, including the following:
- Read all instructions before operating the appliance.
- Do not immerse the motor unit in water or other liquids.
- Unplug from outlet when not in use, before putting on or taking off parts, and before cleaning.
- Avoid contact with moving parts. Keep hands, hair, and clothing, as well as spatulas and other utensils, away from moving parts during operation to prevent injury and/or damage to the appliance.
- Do not operate any appliance with a damaged cord or plug, or after the appliance malfunctions or has been dropped or damaged in any manner.
- The use of attachments not recommended or sold by the manufacturer may cause fire, electric shock, or injury.
- Do not use outdoors.
- Do not let cord hang over edge of table or counter.
- Do not let cord contact hot surfaces.
- Always ensure the appliance is properly assembled and secured before operation.
3. Product Overview and Components
The SUNVIVI 4-in-1 Multifunctional Stand Mixer is designed for versatility and ease of use. It features a robust motor and a range of attachments to handle various kitchen tasks.
Key Features:
- 4-in-1 Functionality: Combines dough mixing, fermentation, slow juicing, meat grinding, and salad slicing.
- Dough Mixing with Fermentation: Supports automatic fermentation for various dough types, shortening proofing time.
- Easy Control with LED Display: Intuitive rotary knob and clear LED display for mode selection and monitoring.
- Compact Design: Space-saving footprint suitable for various kitchen sizes.
- Durable Construction: SUS304 stainless steel bowl and blades, aluminum components, and food-grade plastics.
Included Components:
- Multifunctional Stand Mixer Host Unit
- 5.3 Quart Stainless Steel Bowl
- Dough Hook
- Cup Lid and Feed Lid for Dough Mixer
- Meat Grinder Accessories (Spiral cap, Cross blade, Grinding plates, Plastic sausage stuffing attachment, Cleaning brush, Push rod, Plastic tray, Meat grinder auger, Meat feed cylinder)
- Juicer Accessories (Push rod, Filter screen, Pomace outlet, Auger, Cleaning brush, Pomace collection cup, Juice collection cup, Tray, Juicing body)
- Salad Maker Accessories (Push rod, Feed tube, Fine shredder blade, Shredder blade, Slicer blade)

Image 3.1: Dough Mixer Core Components.

Image 3.2: Meat Grinder & Sausage Kit Components.

Image 3.3: Juicer Attachment Set Components.

Image 3.4: Salad Maker Attachments Components.
4. Setup
Before using your SUNVIVI Stand Mixer for the first time, please follow these setup steps:
- Unpack: Carefully remove all components from the packaging. Retain packaging for future storage or transport.
- Clean: Wash all detachable parts (bowl, dough hook, grinder parts, juicer parts, salad maker blades) in warm soapy water, rinse thoroughly, and dry. Wipe the main unit with a damp cloth.
- Placement: Place the main unit on a clean, dry, stable, and level surface. Ensure there is adequate ventilation around the appliance.
- Power Connection: Ensure the voltage of your power supply matches the rating label on the appliance (120 Volts). Plug the power cord into a grounded electrical outlet.
5. Operating Instructions
This section details how to use each function of your multifunctional stand mixer.
5.1. Dough Mixer with Fermentation
- Attach Bowl: Place the 5.3-quart stainless steel bowl onto the base and twist clockwise to lock it securely.
- Attach Dough Hook: Insert the dough hook into the attachment port and twist to secure.
- Add Ingredients: Place your ingredients into the bowl.
- Select Function: Use the rotary knob to select the desired mixing or fermentation program (e.g., "Chinese Ferment" or "Western Ferment"). The LED display will show the selected mode and time.
- Start Operation: Press the "Start/Stop" button to begin. The mixer will automatically perform the selected function.
- Monitor: The LED display will show the remaining time.
- Finish: Once the program is complete, the mixer will stop. Unplug the appliance before removing the bowl and dough hook.
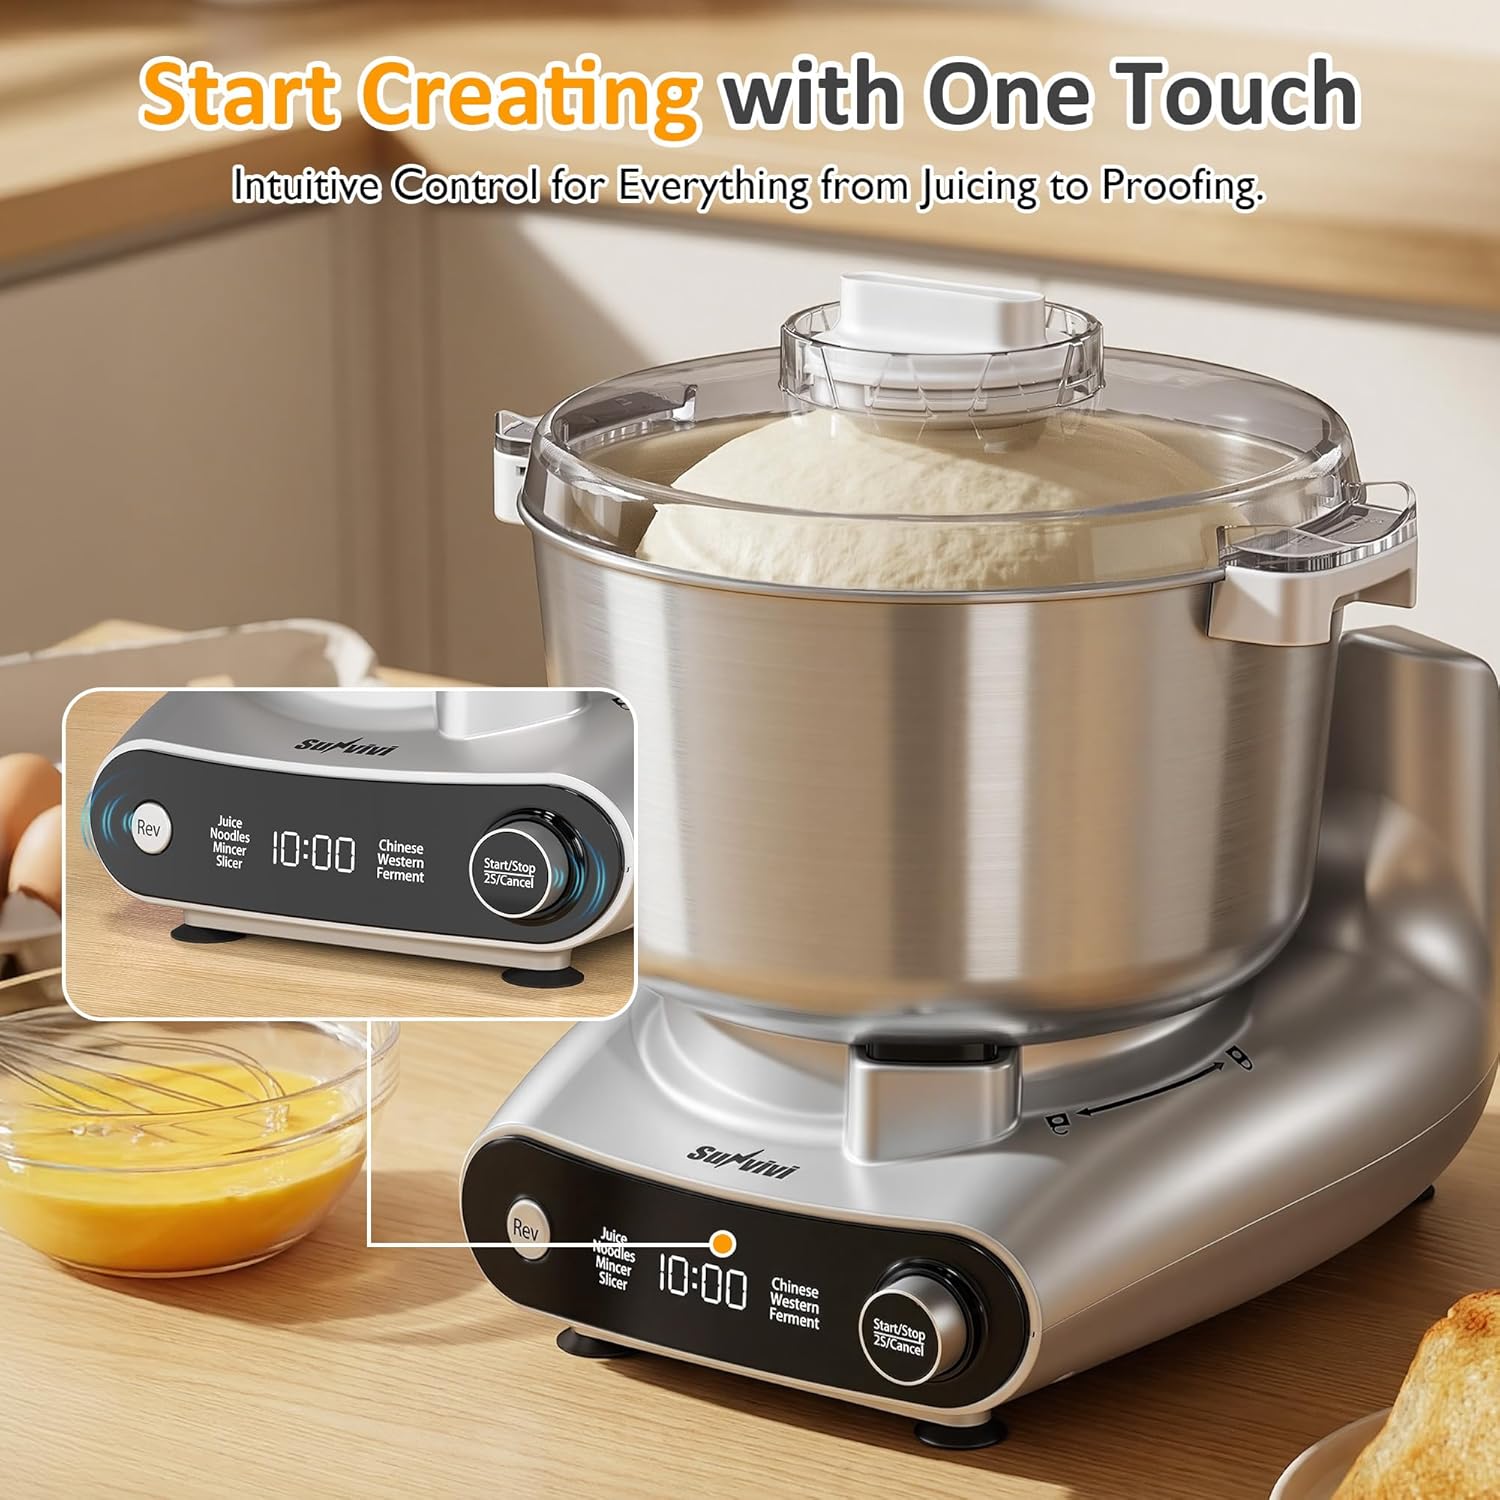
Image 5.1: Control Panel with LED Display.

Image 5.2: Dough after fermentation in the 5.3-quart bowl.
5.2. Meat Grinder
- Assemble Grinder: Attach the meat grinder assembly to the front power hub of the main unit. Ensure it is securely locked.
- Select Plate: Choose the desired grinding plate (fine, medium, or coarse) and insert it into the grinder head.
- Prepare Meat: Cut meat into small pieces that fit into the feed tube.
- Grind: Turn on the mixer. Use the push rod to gently feed meat into the grinder. Do not force meat into the grinder.
- Sausage Stuffing: To make sausages, replace the grinding plate with the sausage stuffing attachment.

Image 5.3: Meat Grinder with various grinding plates.
5.3. Slow Juicer
- Assemble Juicer: Attach the slow juicer assembly to the front power hub of the main unit. Ensure it is securely locked.
- Place Containers: Position the juice collection cup and pomace collection cup under their respective outlets.
- Prepare Produce: Wash and cut fruits and vegetables into pieces that fit the feed tube. Remove any hard seeds or pits.
- Juice: Turn on the mixer. Use the push rod to gently feed produce into the juicer.

Image 5.4: Slow Juicer in operation, highlighting internal components.
5.4. Salad Maker
- Assemble Salad Maker: Attach the salad maker assembly to the front power hub of the main unit. Ensure it is securely locked.
- Insert Blade: Choose the desired blade (slicer, shredder, or fine shredder) and insert it into the feed tube.
- Prepare Produce: Wash and cut vegetables or cheese into pieces that fit the feed tube.
- Process: Turn on the mixer. Use the push rod to gently feed produce into the salad maker.
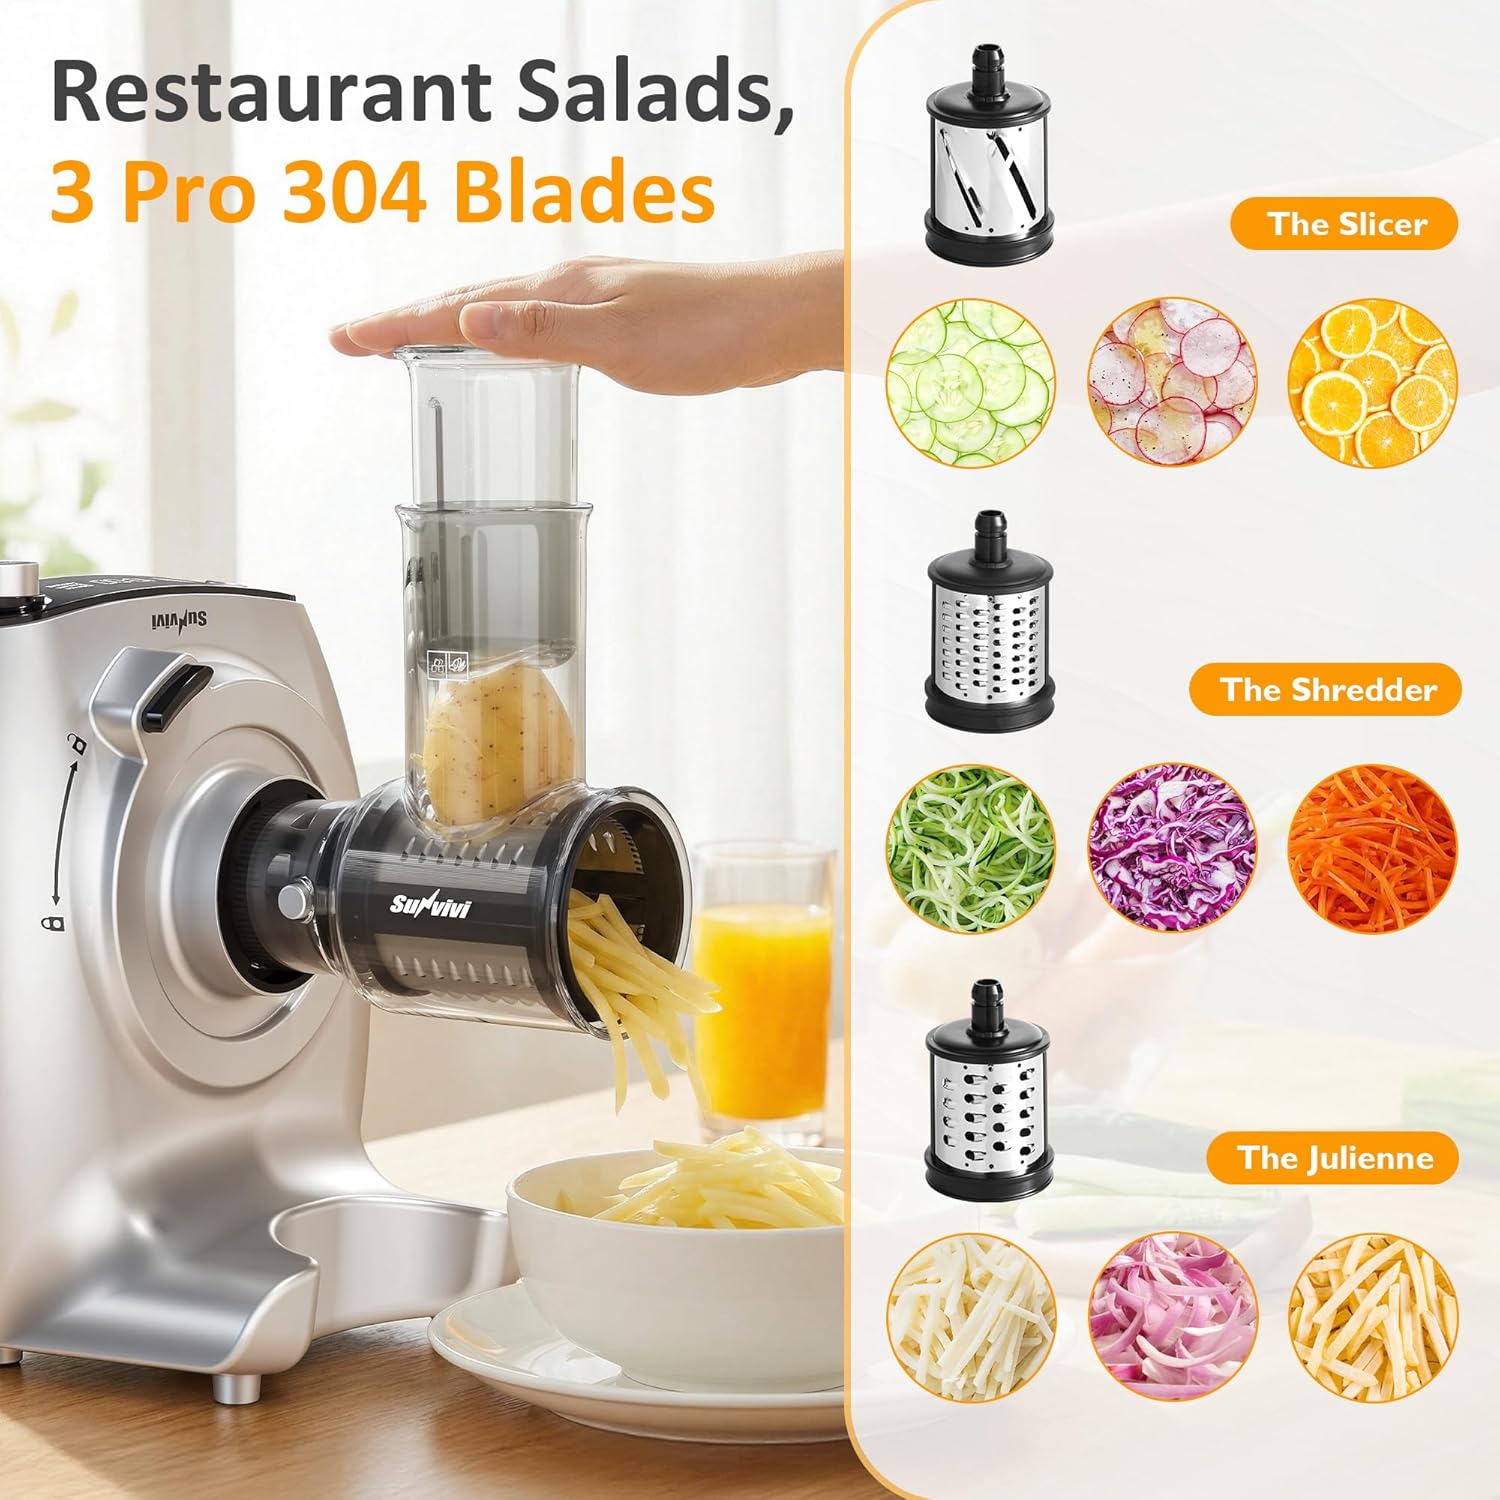
Image 5.5: Salad Maker with various blades and their results.
6. Cleaning and Maintenance
Proper cleaning and maintenance will extend the life of your appliance.
- Always unplug the appliance before cleaning.
- Motor Unit: Wipe the main motor unit with a soft, damp cloth. Do not immerse it in water.
- Detachable Parts: The stainless steel bowl, dough hook, and most accessories for the meat grinder, juicer, and salad maker are 80% dishwasher safe. For best results and longevity, hand wash with warm soapy water, rinse, and dry immediately.
- Stubborn Residue: Use the provided cleaning brushes for hard-to-reach areas in the juicer and grinder attachments.
- Storage: Store the appliance and its accessories in a dry, clean place.

Image 6.1: Detachable parts are dishwasher safe for easy cleaning.
7. Troubleshooting
If you encounter issues with your appliance, refer to the following common problems and solutions:
| Problem | Possible Cause | Solution |
|---|---|---|
| Appliance does not turn on. | Not plugged in; power outlet malfunction; appliance not assembled correctly. | Ensure power cord is securely plugged in. Check power outlet with another appliance. Verify all attachments are correctly installed and locked. |
| Motor stops during operation. | Overload protection activated; improper assembly. | Turn off and unplug the appliance. Reduce the load (e.g., less dough, smaller meat pieces). Let the motor cool down for 15-20 minutes before restarting. Reassemble attachments correctly. |
| Attachments not working properly. | Incorrect attachment installation; food too large or hard. | Ensure attachments are fully seated and locked into the power hub. Cut food into smaller, manageable pieces. |
| Unusual noise during operation. | Loose parts; foreign object; improper assembly. | Turn off and unplug immediately. Check for any loose parts or foreign objects. Reassemble all components carefully. If noise persists, contact customer support. |
If the problem persists after trying these solutions, please contact SUNVIVI customer support.
8. Specifications
| Feature | Detail |
|---|---|
| Brand | SUNVIVI |
| Model Number | ZEM005 |
| Color | Silver |
| Product Dimensions (D x W x H) | 11.89" x 11.81" x 11.26" |
| Material | Stainless Steel |
| Capacity | 5.3 Quarts |
| Voltage | 120 Volts |
| Wattage | 150 Watts |
| Controls Type | Touch / Rotary Knob |
| Item Weight | 17.6 Pounds |
| Special Features | Detachable Spindle, Digital Display, Fermentation Function, Low Noise, Removable Bowl |
| Dishwasher Safe | Yes (80% of parts) |

Image 8.1: Product Dimensions for different configurations.
9. Warranty and Support
The SUNVIVI 4-in-1 Multifunctional Stand Mixer (Model ZEM005) comes with a 1-Year Warranty from the date of purchase. This warranty covers manufacturing defects under normal household use.
For warranty claims, technical support, or any questions regarding your product, please contact SUNVIVI customer service. Please have your model number (ZEM005) and proof of purchase ready when contacting support.