
1. Introduction
Thank you for choosing the HITBOX ARC200E 3-in-1 Welding Machine. This versatile unit is designed for Stick (MMA), Lift TIG, and Flux Core MIG welding, offering robust performance for various applications. Featuring an 81V high no-load voltage for superior arc stability, synergic control for easy parameter selection, and a clear TFT-LCD display, the ARC200E is suitable for both beginners and experienced welders. Please read this manual thoroughly before operation to ensure safe and efficient use of your welding machine.
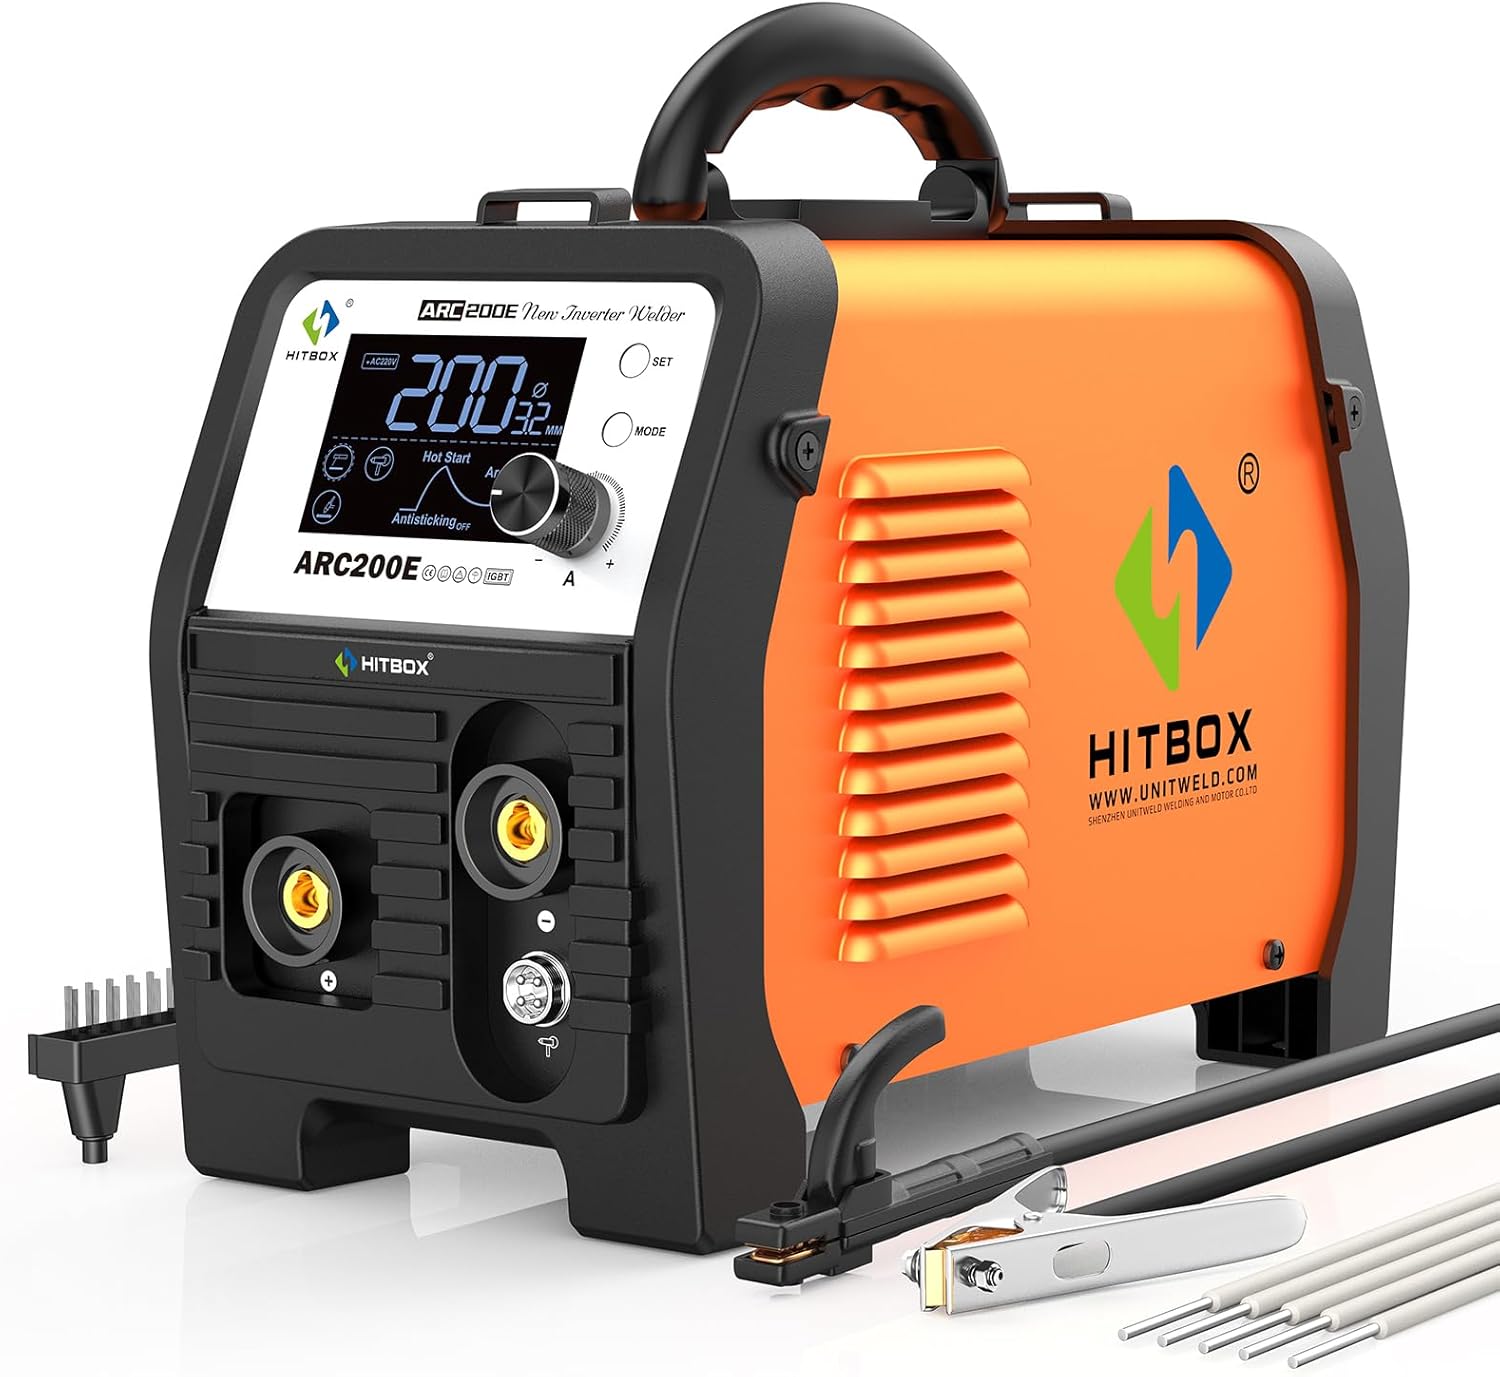
Figure 1: HITBOX ARC200E 3-in-1 Welding Machine.
2. Safety Information
Welding can be dangerous. Always follow safety precautions to prevent injury or damage. This section outlines general safety guidelines. Refer to local regulations and standards for comprehensive safety information.
- Eye and Face Protection: Always wear a welding helmet with appropriate shade lenses to protect against arc flash and sparks.
- Body Protection: Wear flame-resistant clothing, heavy-duty gloves, and protective footwear.
- Ventilation: Ensure adequate ventilation to remove welding fumes. Work in a well-ventilated area or use a fume extractor.
- Electrical Safety: Ensure the welding machine is properly grounded. Do not operate in wet conditions. Inspect cables and connections for damage before each use.
- Fire Prevention: Keep flammable materials away from the welding area. Have a fire extinguisher readily available.
- Work Area: Keep the work area clean and free of clutter. Ensure stable footing.
- Children and Bystanders: Keep children and unauthorized personnel away from the welding area.
3. Product Overview
The HITBOX ARC200E is a versatile welding machine offering three primary welding processes:
- Stick Welding (MMA): Compatible with 1.6–4.0mm electrodes, suitable for welding material thickness of 2–10mm. Excellent for basic and cellulosic electrodes (E7018, E7016, E7028, E8018, E6010, E6011) in addition to acidic electrodes like E6013.
- Flux Cored MIG: Compatible with 0.8–1.0mm flux-cored wire, suitable for welding material thickness of 1–8mm. Requires a spool gun (sold separately).
- Lift TIG: Compatible with 1.6–2.4mm tungsten rods, suitable for welding material thickness of 1–4mm. A Lift TIG torch (e.g., WP17V) is not included and must be purchased separately.
Key Features:
- 81V High No-Load Voltage: Provides stronger starting power, higher arc stability, and greater arc penetration, ideal for various electrodes and long-distance welding.
- Synergic Control: Automatically matches welding parameters to material thickness and current, simplifying setup and ensuring optimal weld quality.
- TFT-LCD Large Display: Offers an intuitive, informative, and user-friendly interface with better visibility compared to traditional LED displays.
- Adjustable Hot Start & Arc Force: Improves arc initiation and stability, enhancing weld quality.
- Anti-stick & VRD: Provides operational flexibility and enhanced safety.

Figure 2: The ARC200E supports Stick, Lift TIG, and Flux Core MIG welding modes.
4. Setup
4.1 Included Components
Before starting, ensure all components are present:
- 1 x ARC200E Welding Machine
- 1 x American adapter: 30A plug to 15A socket (for 110V connection)
- 1 x Electrode Holder (4.9FT)
- 1 x Ground Clamp (4.9FT)
- 1 x User Manual
- 1 x Brush

Figure 3: Standard accessories included with the ARC200E.
4.2 Power Connection
The ARC200E supports both 110V and 220V power inputs. Use the provided adapter for 110V connections. Ensure the power source matches the machine's requirements and is properly grounded.

Figure 4: The ARC200E supports both 110V and 220V power inputs.
4.3 Stick Welding (MMA) Setup
- Connect the electrode holder cable to the appropriate terminal (positive or negative depending on electrode type).
- Connect the ground clamp cable to the remaining terminal.
- Securely attach the ground clamp to a clean, bare metal section of the workpiece.
- Insert the welding electrode into the electrode holder.
4.4 Flux Cored MIG Setup (Spool Gun - Sold Separately)
- Connect the spool gun to the designated spool gun terminal on the machine.
- Install the flux-cored welding wire into the spool gun, ensuring it is properly fed through the roller guide track.
- Connect the ground clamp to the workpiece.
4.5 Lift TIG Setup (TIG Torch - Sold Separately)
- Assemble the TIG torch by installing the collet, collet body, tungsten electrode, and ceramic cup.
- Connect the TIG torch cable to the appropriate terminal on the machine.
- Connect the ground clamp to the workpiece.
- Connect the argon gas cylinder to the TIG torch via a regulator and hose. Ensure all gas connections are secure and leak-free.
5. Operating Instructions
5.1 Control Panel Overview
The ARC200E features a TFT-LCD display and intuitive controls:
- TFT-LCD Display: Shows welding mode, current (amperage), voltage, material thickness correlation, and status of features like Hot Start, Arc Force, Anti-stick, and VRD.
- SET Button: Used to enter settings menus or confirm selections.
- MODE Button: Used to cycle through welding modes (Stick, Flux Core MIG, Lift TIG) and other adjustable parameters.
- Value Knob: Adjusts welding current (amperage) and other selected parameter values.
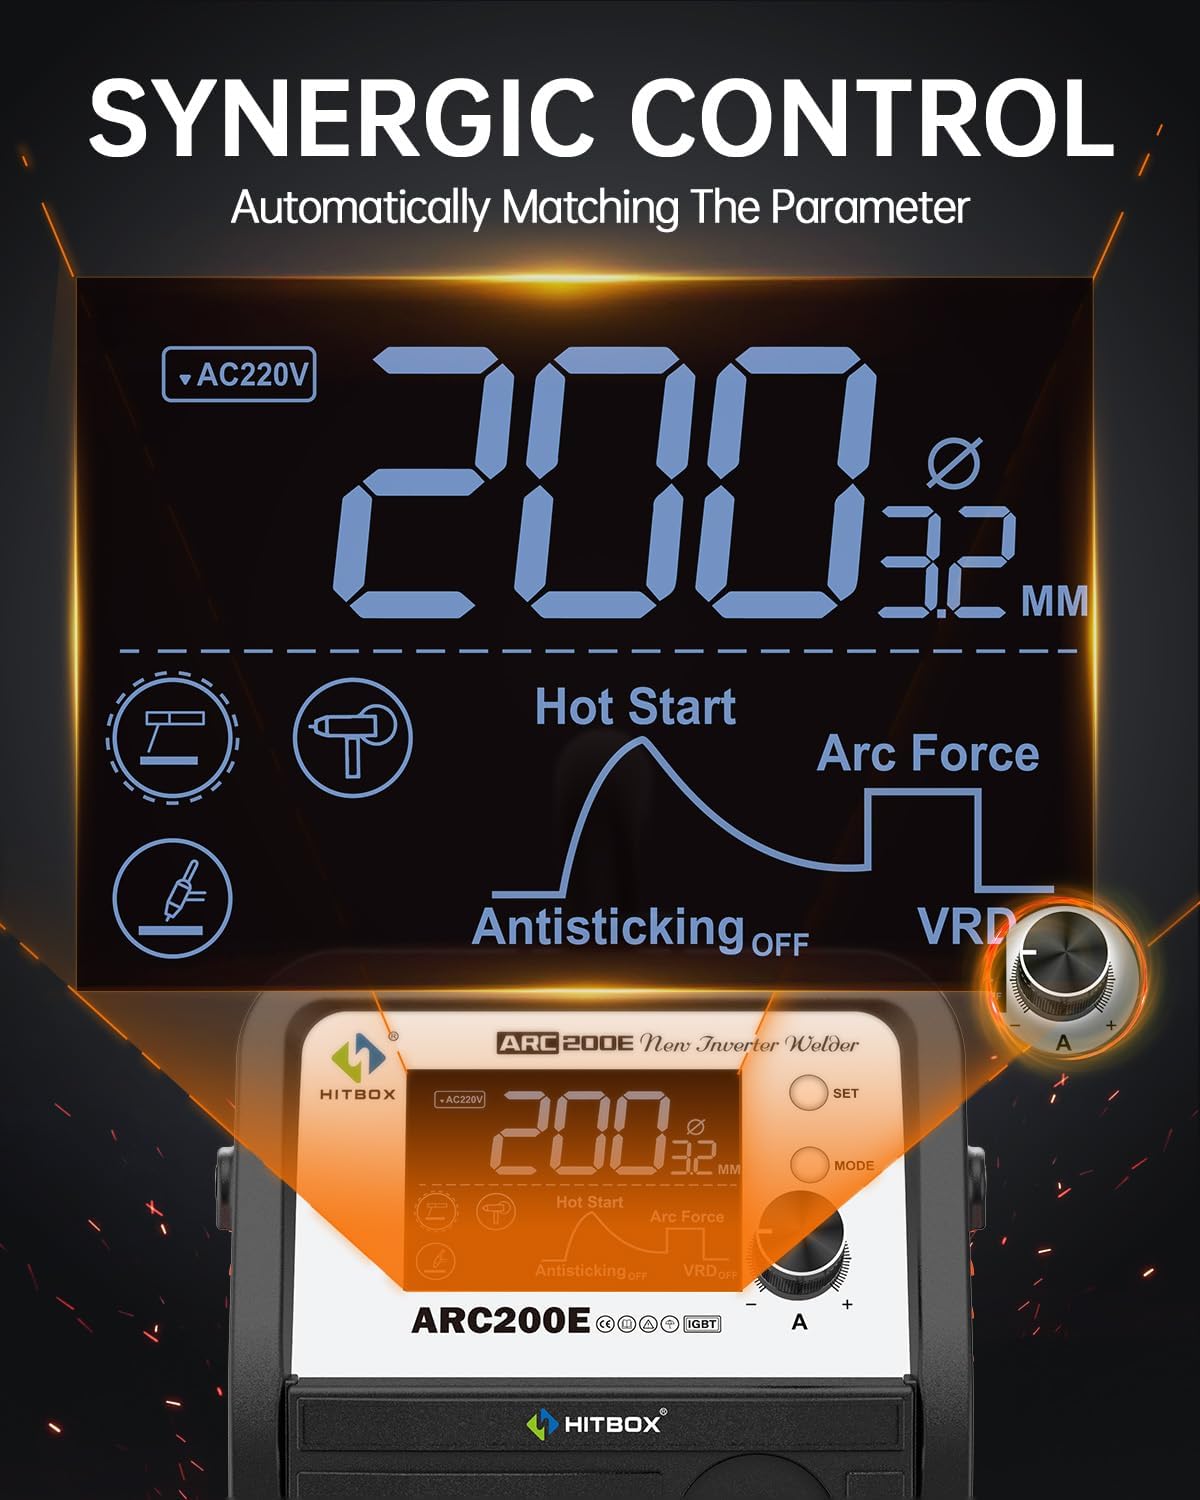
Figure 5: The TFT-LCD display provides clear information and synergic control.
5.2 Synergic Control
The synergic control feature simplifies parameter setting. As you adjust the welding current with the Value Knob, the display will show the correlated material thickness, helping you quickly select appropriate settings for optimal welding performance.
5.3 Welding Modes and Features
Use the MODE button to select your desired welding process. Adjust parameters using the Value Knob and SET button.
- Hot Start: Provides an initial surge of current to help ignite the arc easily, especially with difficult electrodes. Adjustable from 0-10.
- Arc Force: Prevents the electrode from sticking to the workpiece by temporarily increasing current when the arc length shortens. Adjustable from 0-10.
- Anti-stick: Automatically reduces the current if the electrode sticks, preventing overheating and making it easier to detach. Can be toggled ON/OFF.
- VRD (Voltage Reduction Device): Reduces the open-circuit voltage to a safe level when not welding, enhancing operator safety. Can be toggled ON/OFF.

Figure 6: Example of Stick welding with the ARC200E.

Figure 7: Example of Flux Core MIG welding with the ARC200E and an optional spool gun.
5.4 Official User Guide Video
Video 1: Official HITBOX ARC200E User Guide. This video provides a visual demonstration of the machine's features and basic operation.
6. Maintenance
Regular maintenance ensures the longevity and safe operation of your HITBOX ARC200E welding machine.
- Cleaning: Regularly clean the machine's exterior with a dry cloth. Use compressed air to clear dust from ventilation openings.
- Cable Inspection: Periodically inspect all welding cables, connections, and the power cord for cuts, abrasions, or loose connections. Replace damaged components immediately.
- Electrode Holder/Ground Clamp: Ensure the electrode holder and ground clamp are clean and free of spatter to maintain good electrical contact.
- Storage: Store the machine in a dry, dust-free environment when not in use.
7. Troubleshooting
This section addresses common issues you might encounter with your ARC200E welding machine.
| Problem | Possible Cause | Solution |
|---|---|---|
| No power to machine | Power switch off, loose power cable, tripped circuit breaker | Turn on power switch, check power cable connections, reset circuit breaker |
| No arc / Weak arc | Poor ground connection, incorrect amperage setting, wet electrode, damaged cable | Ensure clean ground connection, adjust amperage, use dry electrodes, inspect cables |
| Electrode sticks frequently | Low amperage, Anti-stick feature off, improper technique | Increase amperage, activate Anti-stick, improve welding technique |
| Overheat indicator on | Exceeded duty cycle, poor ventilation | Allow machine to cool down, ensure adequate ventilation, reduce welding time |
8. Specifications
Detailed technical specifications for the HITBOX ARC200E welding machine:
| Feature | Specification |
|---|---|
| Manufacturer | HITBOX |
| Part Number | ARC200E-HB |
| Item Weight | 13.77 pounds |
| Product Dimensions | 17.8 x 13.8 x 7.8 inches |
| Item Model Number | ARC200E-HB |
| Material | Metal |
| Power Source | AC |
| Voltage | 110 Volts, 220 Volts |
| Stick Electrode Compatibility | 1.6–4.0mm (2–10mm material thickness) |
| Flux Cored Wire Compatibility | 0.8–1.0mm (1–8mm material thickness) |
| Lift TIG Tungsten Rod Compatibility | 1.6–2.4mm (1–4mm material thickness) |

Figure 8: Physical dimensions and weight of the ARC200E.
9. Warranty & Support
The HITBOX ARC200E welding machine comes with a 2-year quality support warranty. For any technical assistance, warranty claims, or product inquiries, please contact HITBOX customer support through the official channels provided at the time of purchase or on the manufacturer's website. Please retain your proof of purchase for warranty validation.


