
1. Important Safety Instructions
Please read all instructions carefully before using the appliance. Keep this manual for future reference.
- Ensure the voltage rating on the appliance matches your local power supply.
- Do not immerse the appliance, power cord, or plug in water or other liquids.
- Unplug from the outlet when not in use and before cleaning. Allow to cool before adding or removing parts.
- Do not operate any appliance with a damaged cord or plug, or after the appliance malfunctions or has been damaged in any manner.
- The use of accessory attachments not recommended by the appliance manufacturer may result in fire, electric shock, or injury to persons.
- Do not use outdoors.
- Do not let the cord hang over the edge of a table or counter, or touch hot surfaces.
- Do not place on or near a hot gas or electric burner, or in a heated oven.
- Always attach the plug to the appliance first, then plug the cord into the wall outlet. To disconnect, turn any control to "off", then remove the plug from the wall outlet.
- This appliance is for household use only.
- Exercise extreme caution when using hot steam.
- The appliance features an automatic energy-saving mode, shutting off after 9 minutes of inactivity.
- Built-in overheating and anti-dry burning protection are included for safety.
2. Product Overview
Familiarize yourself with the components of your SUNVIVI Espresso Pod Machine.

This diagram illustrates the main components: the machine body, operating lever, capsule container, coffee buttons, coffee extraction nozzle, espresso coffee cup tray, lungo coffee cup tray, drip tray with removable cover, used capsule container, removable water tank & lid, and power cord.
The machine is designed for compact spaces, measuring approximately 13.5"D x 3.8"W x 9.5"H.
The machine's narrow design (3.8 inches wide) makes it suitable for various locations such as kitchens, offices, or during travel.
3. Setup
3.1 Unpacking
Carefully remove all packaging materials and ensure all components are present. Retain packaging for future transport or storage.
3.2 Water Tank Installation and Filling
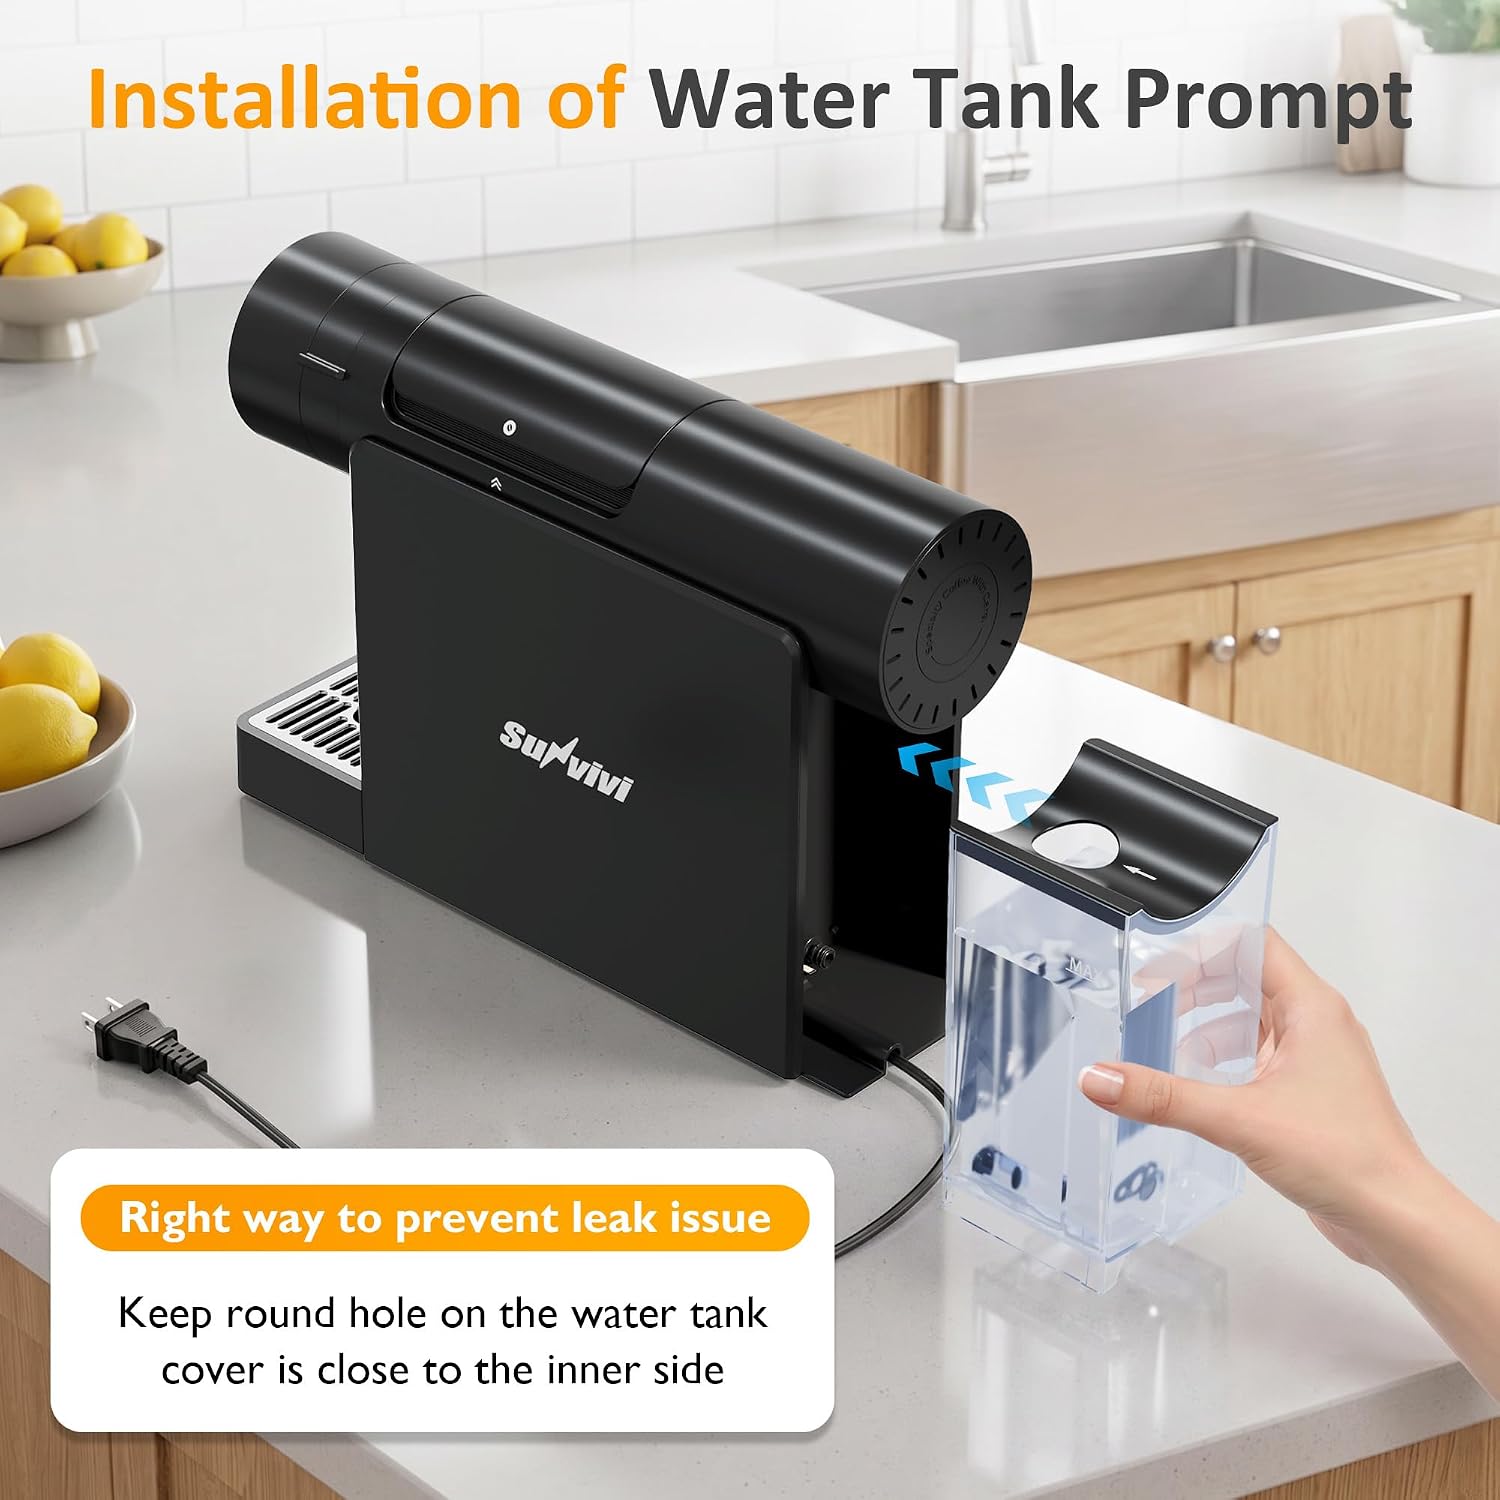
The machine features a 22oz (650ml) removable water tank. Ensure it is correctly installed to prevent leaks.
- Remove the water tank from the back of the machine.
- Fill the tank with fresh, clean drinking water up to the MAX line.
- Insert the water tank back into the machine, ensuring it is seated tightly and aligned with the upside part. The round hole on the water tank cover should be close to the inner side to prevent leaks.

This image highlights the large capacity, removability, washability, and visual water level indicator of the water tank.

This image shows the proper way to insert the water tank, emphasizing the alignment of the round hole on the cover with the inner side.
3.3 Initial Rinse
Before first use or after a long period of inactivity, perform an initial rinse:
- Ensure the water tank is filled.
- Place an empty cup under the coffee extraction nozzle.
- Power on the machine.
- Press the Lungo (80ml) button without inserting a capsule. The machine will dispense hot water, cleaning the internal system.
- Repeat this process 2-3 times.
4. Operating Instructions
Your SUNVIVI Espresso Pod Machine is compatible with Nespresso OriginalLine capsules.
4.1 Basic Operation Steps

The steps are: 1. Add Water, 2. Place Capsule, 3. Select the Mode, 4. Enjoy Your Coffee.
4.2 Adding a Capsule
- Lift the operating lever to open the capsule compartment.
- Insert a Nespresso OriginalLine capsule into the compartment.
- Close the operating lever firmly.

The machine is designed for easy and effortless loading of compatible capsules.
4.3 Brewing Coffee (Espresso & Lungo)
The machine offers two pre-set programmable modes for different cup sizes:
- Espresso (40ml / 1.35 oz): For a concentrated shot of coffee.
- Lungo (80ml / 2.7 oz): For a longer coffee.
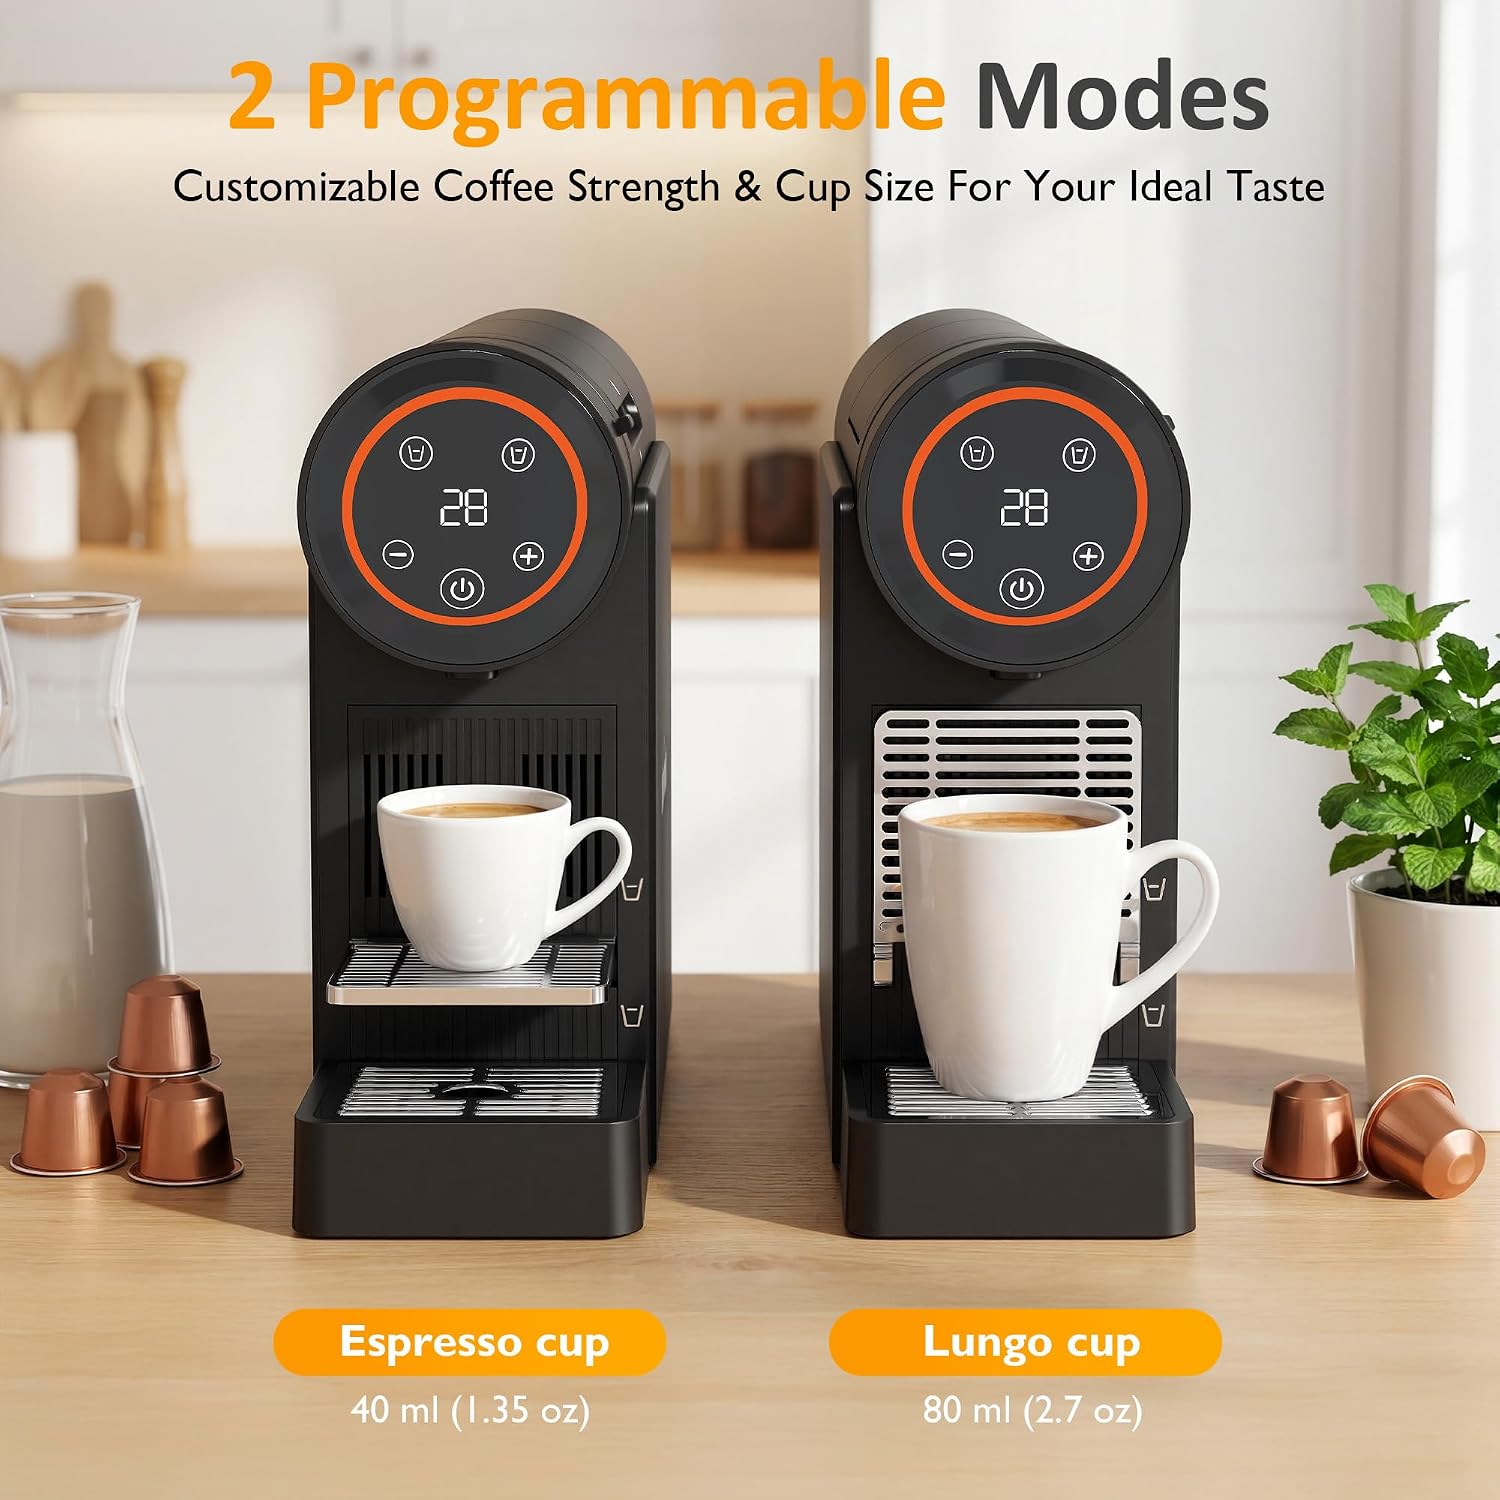
This image displays the machine preparing both an Espresso cup and a Lungo cup, indicating the respective volumes.
To brew:
- Ensure the water tank is filled and a capsule is inserted.
- Place your desired cup on the adjustable cup tray.
- Press either the Espresso (small cup icon) or Lungo (large cup icon) button on the control panel. The machine will begin brewing.
- The machine will automatically stop when the pre-set volume is reached.
Video 4.1: Demonstration of the SUNVIVI Espresso Pod Machine in operation, showing the brewing process.
4.4 Customizing Brew Volume
You can adjust the brew volume for both Espresso and Lungo settings to match your preference.
- Insert a capsule and place a cup.
- Press and hold the desired coffee button (Espresso or Lungo).
- Release the button when the desired volume of coffee has been dispensed into your cup. The machine will remember this setting for future brews of that type.
- To reset to factory default, refer to the troubleshooting section or contact customer support.

The 20 bar professional pump ensures effective extraction for rich coffee aroma and thick, velvety golden crema.
5. Maintenance
Regular cleaning and maintenance ensure optimal performance and longevity of your espresso machine. All removable parts are designed for easy cleaning.
5.1 Cleaning the Water Tank
- Remove the water tank from the machine.
- Wash with mild detergent and rinse thoroughly with clean water.
- Do not wash in a dishwasher.
- Dry completely before reattaching.
5.2 Cleaning the Drip Tray and Used Capsule Container
The drip tray and used capsule container are removable for easy cleaning.
- Carefully pull out the drip tray and the integrated used capsule container.
- Empty any liquid from the drip tray and discard used capsules from the container. The container holds 7-10 capsules.
- Wash both parts with mild detergent and rinse thoroughly.
- Dry completely before reassembling and placing back into the machine.

This image provides a view of the used capsule container, highlighting its capacity and dimensions.
5.3 Descaling
Over time, mineral deposits can build up in your machine, affecting performance. Descaling is recommended every 3-6 months, depending on water hardness and usage.
- Empty the water tank and fill it with a descaling solution (follow the descaling solution manufacturer's instructions for dilution).
- Place a large container (at least 1 liter) under the coffee extraction nozzle.
- Power on the machine.
- Run the entire descaling solution through the machine by repeatedly pressing the Lungo button until the tank is empty. Do not insert any capsules during this process.
- Rinse the water tank thoroughly and fill it with fresh water.
- Repeat the rinsing process by running several full tanks of fresh water through the machine to ensure all descaling solution is removed.
6. Troubleshooting
Refer to the table below for common issues and their solutions.
| Problem | Possible Cause | Solution |
|---|---|---|
| No coffee dispenses / Machine not brewing. | Water tank empty; Machine not powered on; Capsule not inserted correctly; Air bubble in system. | Fill water tank; Ensure machine is plugged in and powered on; Reinsert capsule correctly; Run a Lungo cycle without a capsule to clear air. |
| Coffee is cold or not hot enough. | Machine not preheated; Cold cup. | Allow machine to preheat fully (approx. 30 seconds); Preheat cup with hot water. |
| Water leaking from machine. | Water tank not installed correctly; Drip tray overflowing. | Ensure water tank is tightly seated and aligned (refer to Figure 3.2); Empty and clean drip tray. |
| Coffee flow is slow or inconsistent. | Machine needs descaling; Clogged nozzle. | Perform descaling procedure (Section 5.3); Clean the coffee extraction nozzle. |
| Machine automatically shuts off. | Energy-saving mode activated. | This is normal operation. The machine enters energy-saving mode after 9 minutes of inactivity. Press any button to reactivate. |
7. Specifications
| Feature | Detail |
|---|---|
| Brand | SUNVIVI |
| Model Name/Number | ZEC008 |
| Product Dimensions (D x W x H) | 13.5" x 3.8" x 9.5" |
| Item Weight | 6.23 Pounds (approx. 2.8 kg) |
| Water Tank Capacity | 22 oz (approx. 650 ml) |
| Pressure | 20 Bar |
| Wattage | 1200 Watts |
| Voltage | 120 Volts |
| Coffee Input Type | Nespresso OriginalLine Capsules |
| Special Features | Adjustable Brew Strength, Removable Water Tank, Auto Energy-Saving Mode, Overheating & Anti-Dry Burning Protection |
| Dishwasher Safe Parts | No |
8. Warranty and Support
For warranty information and customer support, please refer to the product packaging or contact SUNVIVI customer service directly. Keep your purchase receipt as proof of purchase.
For further assistance, visit the official SUNVIVI website or contact their support team through the contact information provided with your product.