
1. Introduction
This manual provides detailed instructions for the assembly, operation, and maintenance of your TomCare Volleyball Rebounder Net and Garage Ball Storage Rack. Please read this manual thoroughly before assembly and use to ensure proper function and safety. This product is designed for sports training and equipment organization.

Image 1.1: The TomCare Ball Storage Rack, shown filled with various sports balls, demonstrating its capacity and organizational utility.
2. Components List
Before beginning assembly, verify that all parts are present and undamaged. If any parts are missing or damaged, please contact customer support.
2.1. Volleyball Rebounder Net Components
- Main Frame Tubes (various lengths and bends)
- Rebounder Net (PE netting)
- Bungee Cords (approx. 30 pieces)
- Ground Stakes (6 pieces)
- Non-Slip Foot Gaskets (4 pieces)
- Support Bars (2 pieces)
- Sandbags (2 pieces, sand not included)
- Carry Bag for Rebounder
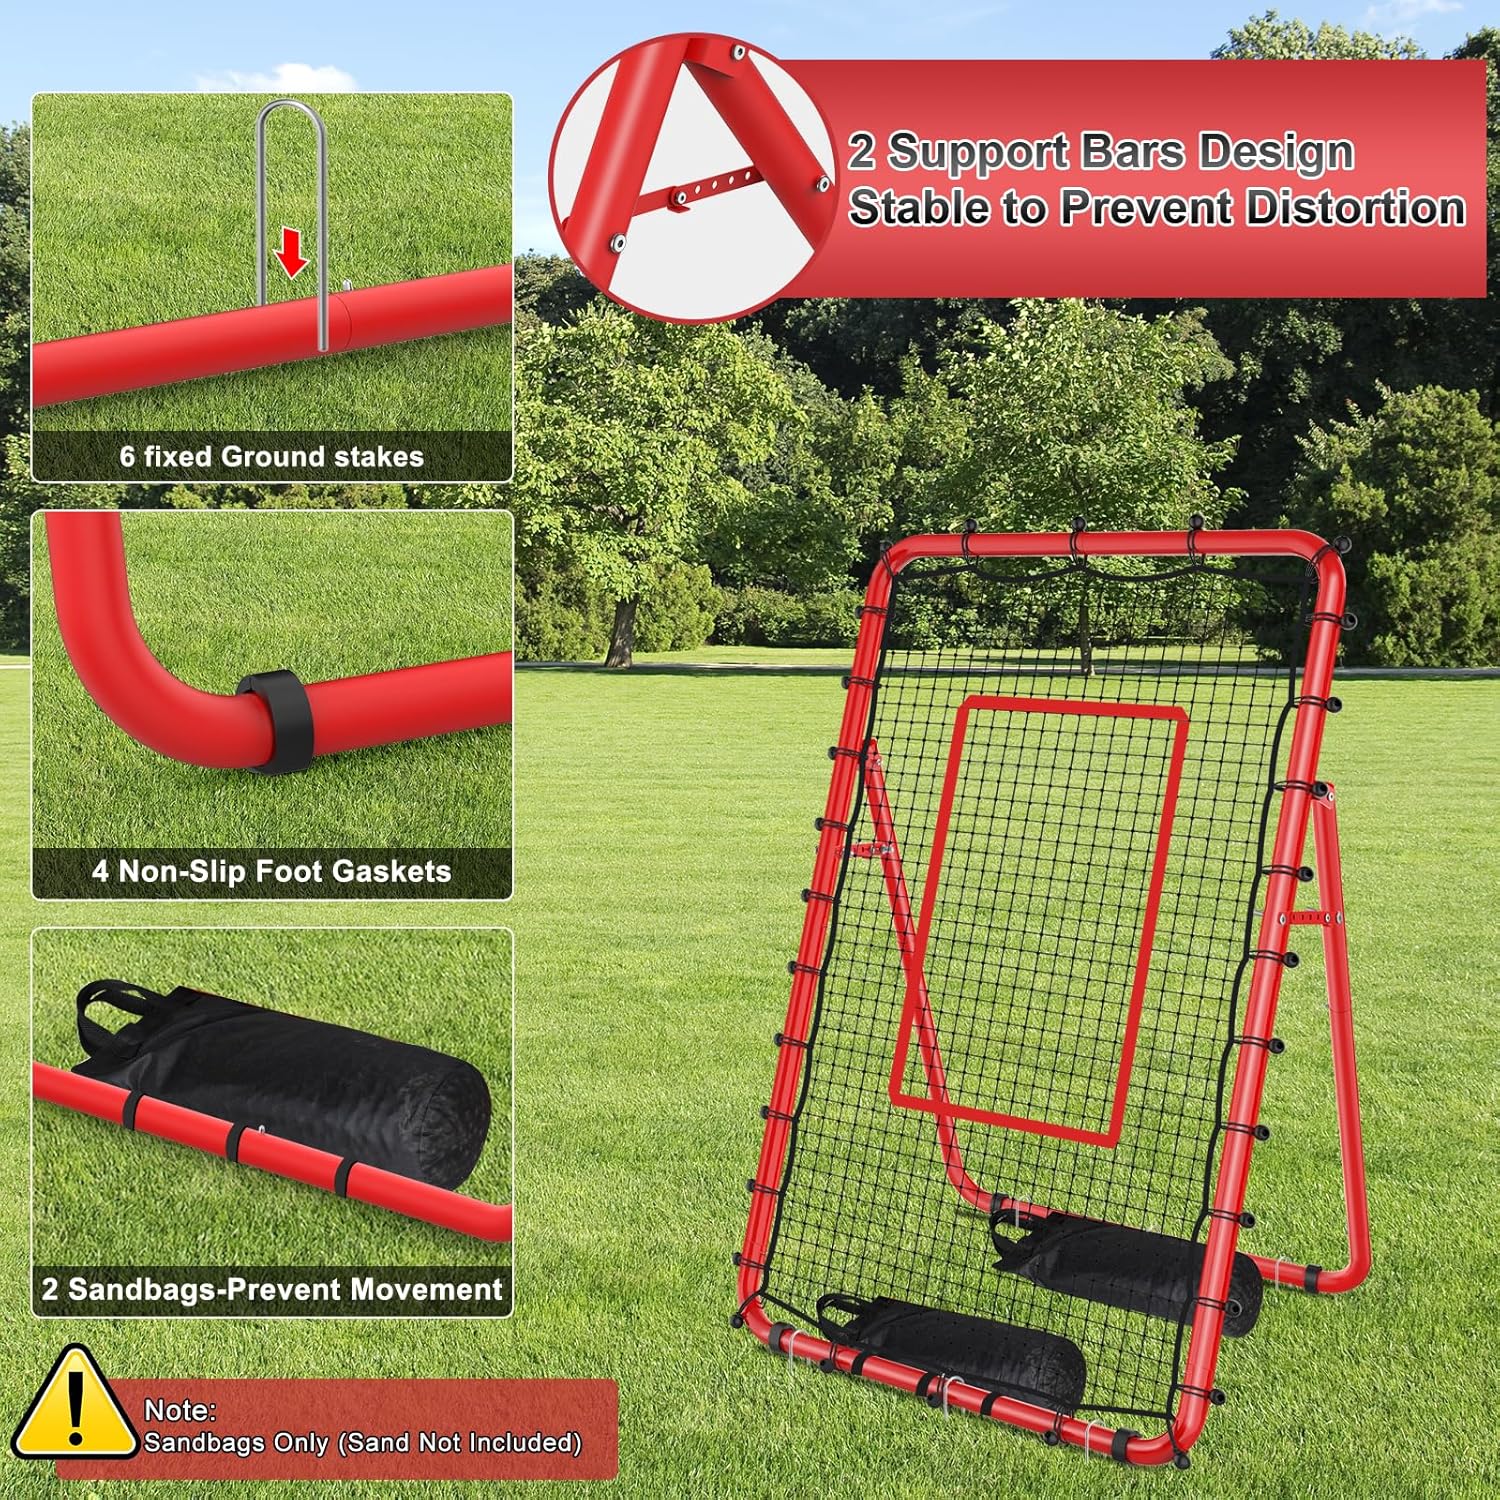
Image 2.1: Key components of the Volleyball Rebounder Net, including ground stakes for stability, non-slip foot gaskets, and sandbags for added weight (sand not included).
2.2. Garage Ball Storage Rack Components
- Metal Frame Panels (sides, bottom, top)
- Multi-directional Wheels (4 pieces, 2 lockable)
- Adjustable Elastic Cords
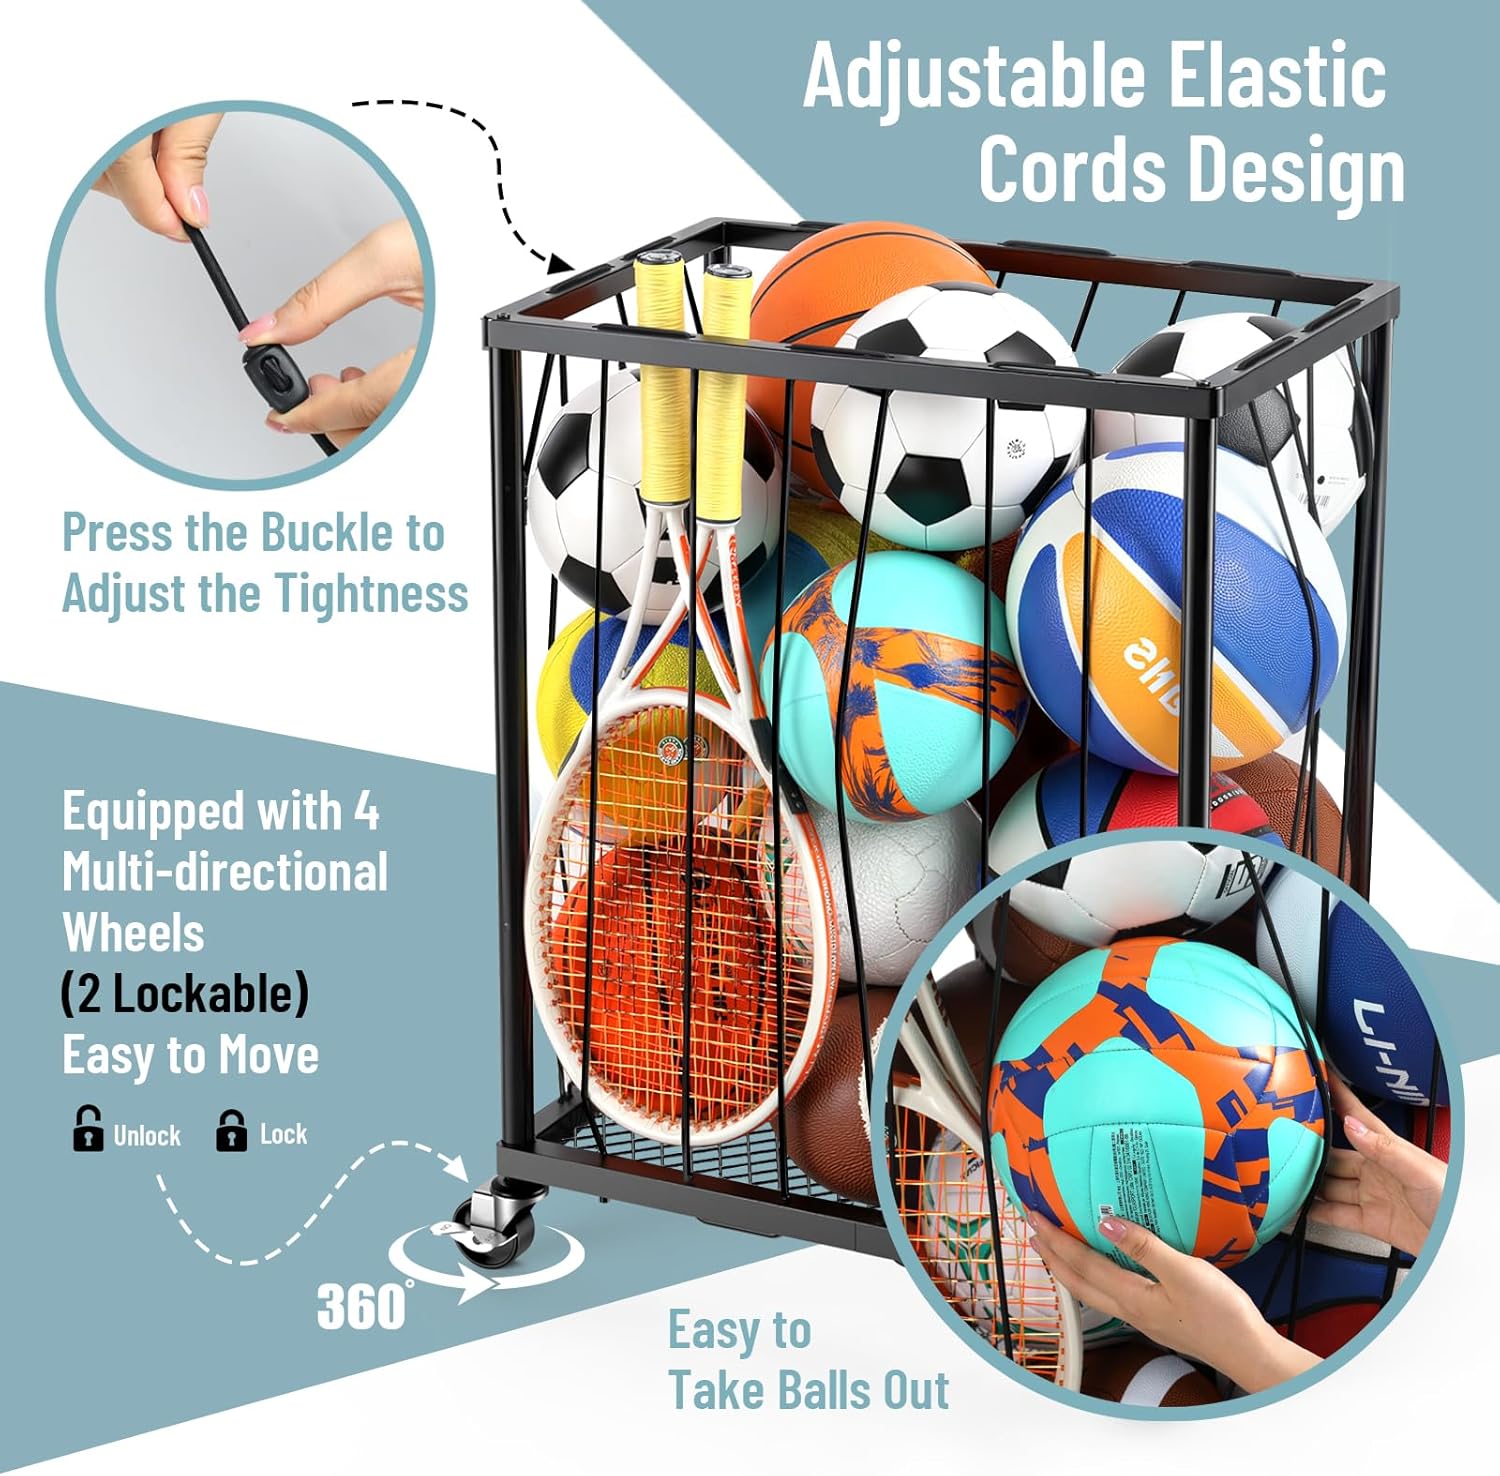
Image 2.2: Features of the Ball Storage Rack, highlighting the adjustable elastic cords for secure storage and the multi-directional wheels, including two with locking mechanisms for stability.
3. Setup Instructions
Follow these steps carefully for proper assembly of both the Volleyball Rebounder Net and the Ball Storage Rack.
3.1. Ball Storage Rack Assembly
- Unpack all components for the ball storage rack.
- Connect the metal frame panels to form the base and sides of the rack. Ensure all connections are secure.
- Attach the four multi-directional wheels to the bottom of the rack. Position the two lockable wheels on the same side for easier access to the locking mechanism.
- Install the adjustable elastic cords around the top perimeter of the rack. These cords help secure items and prevent them from falling out. Adjust tightness by pressing the buckle.
- Verify the rack is stable and wheels move freely, and locks engage properly.
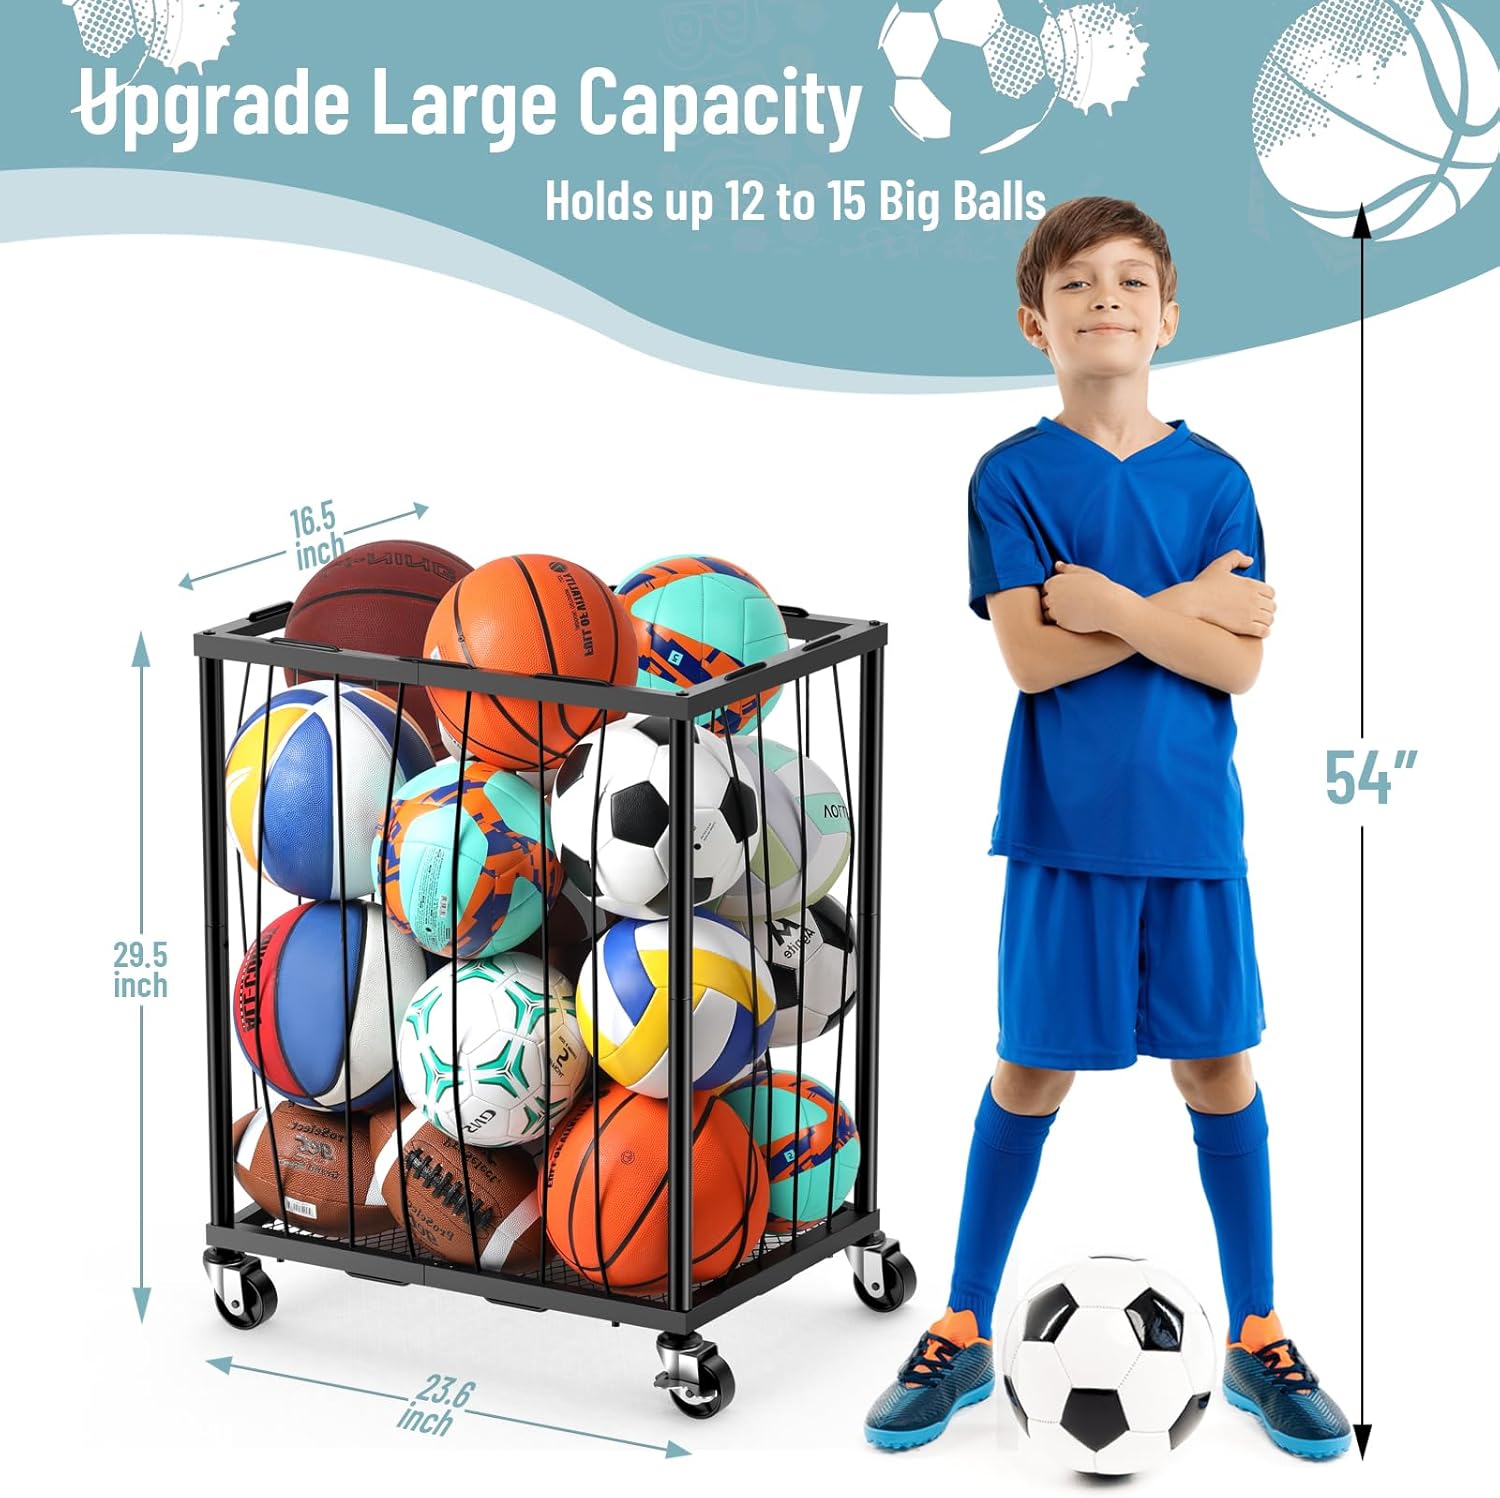
Image 3.1: The assembled Ball Storage Rack, illustrating its dimensions (23.6" L x 16.5" W x 29.5" H) and large capacity, capable of holding 12 to 15 large balls.
3.2. Volleyball Rebounder Net Assembly
- Unpack all components for the rebounder net.
- Assemble the main frame tubes according to the diagram provided in the packaging. Ensure all connections are firmly secured.
- Attach the rebounder net to the assembled frame using the bungee cords. Start from one corner and work your way around, ensuring even tension across the net.
- Insert the non-slip foot gaskets onto the bottom ends of the frame legs.
- For outdoor use, secure the rebounder to the ground using the 6 fixed ground stakes.
- Fill the two sandbags with sand (sand not included) and place them on the lower frame bars to prevent movement, especially during strong impacts.
- Ensure the two support bars are correctly positioned to prevent frame distortion.

Image 3.2: The Volleyball Rebounder Net, highlighting its large training area (7 feet high, 4 feet wide) and durable PE netting designed to resist tearing. It also shows the included sandbags for stability.
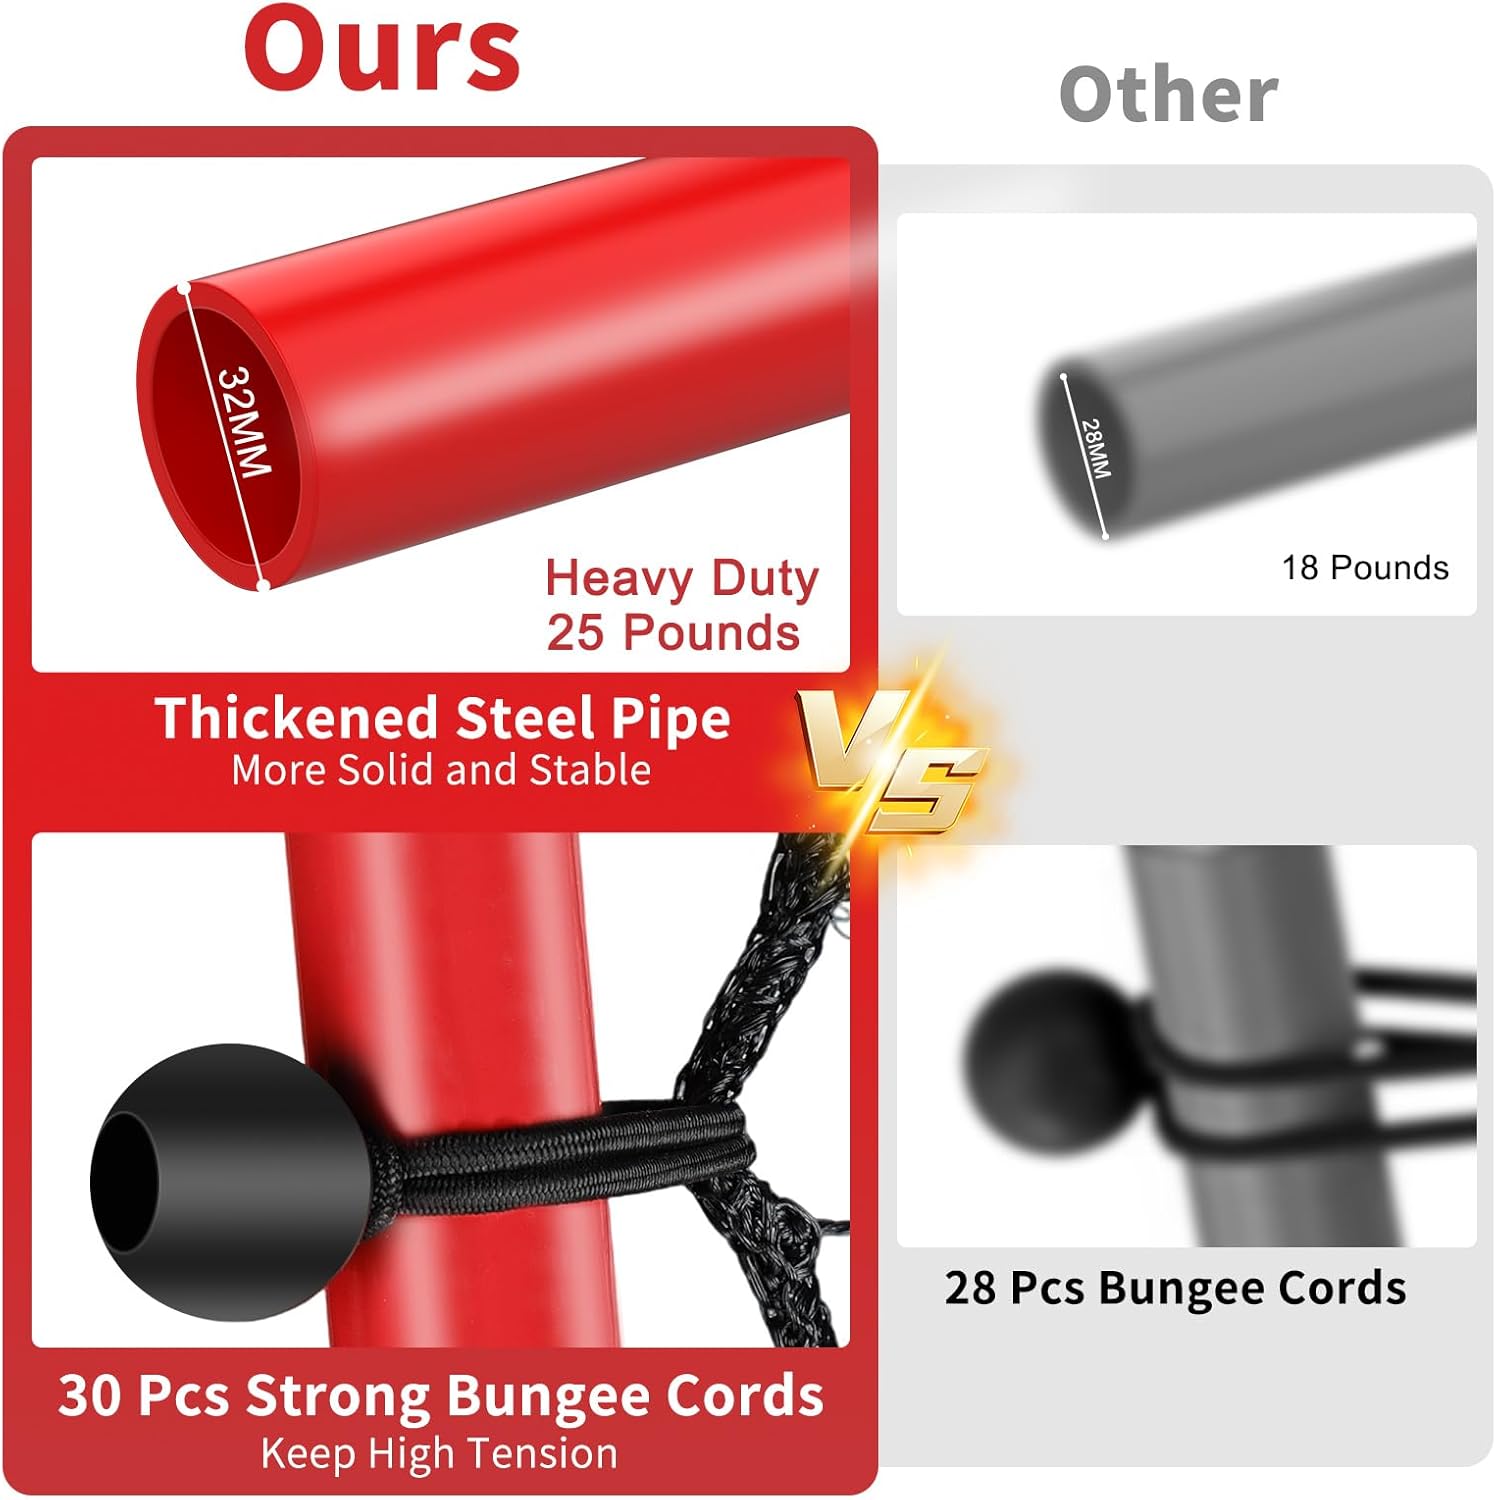
Image 3.3: A comparison illustrating the robust construction of the rebounder net, featuring thickened 32mm steel pipes (25 pounds) and 30 strong bungee cords for high tension and stability.
4. Operating Instructions
4.1. Using the Volleyball Rebounder Net
- Placement: Position the rebounder net on a flat, stable surface. For outdoor use, ensure ground stakes are firmly in place and sandbags are filled and positioned.
- Training: The net is designed to return volleyballs for continuous practice. Practice passing, setting, and spiking by hitting the ball into the net.
- Angle Adjustment: The rebounder's angle can be adjusted to change the trajectory and speed of the ball return, simulating different game scenarios. Adjust the rear support legs to achieve the desired angle.
- Safety: Always maintain a safe distance from the net during use. Ensure no obstructions are behind or around the net.
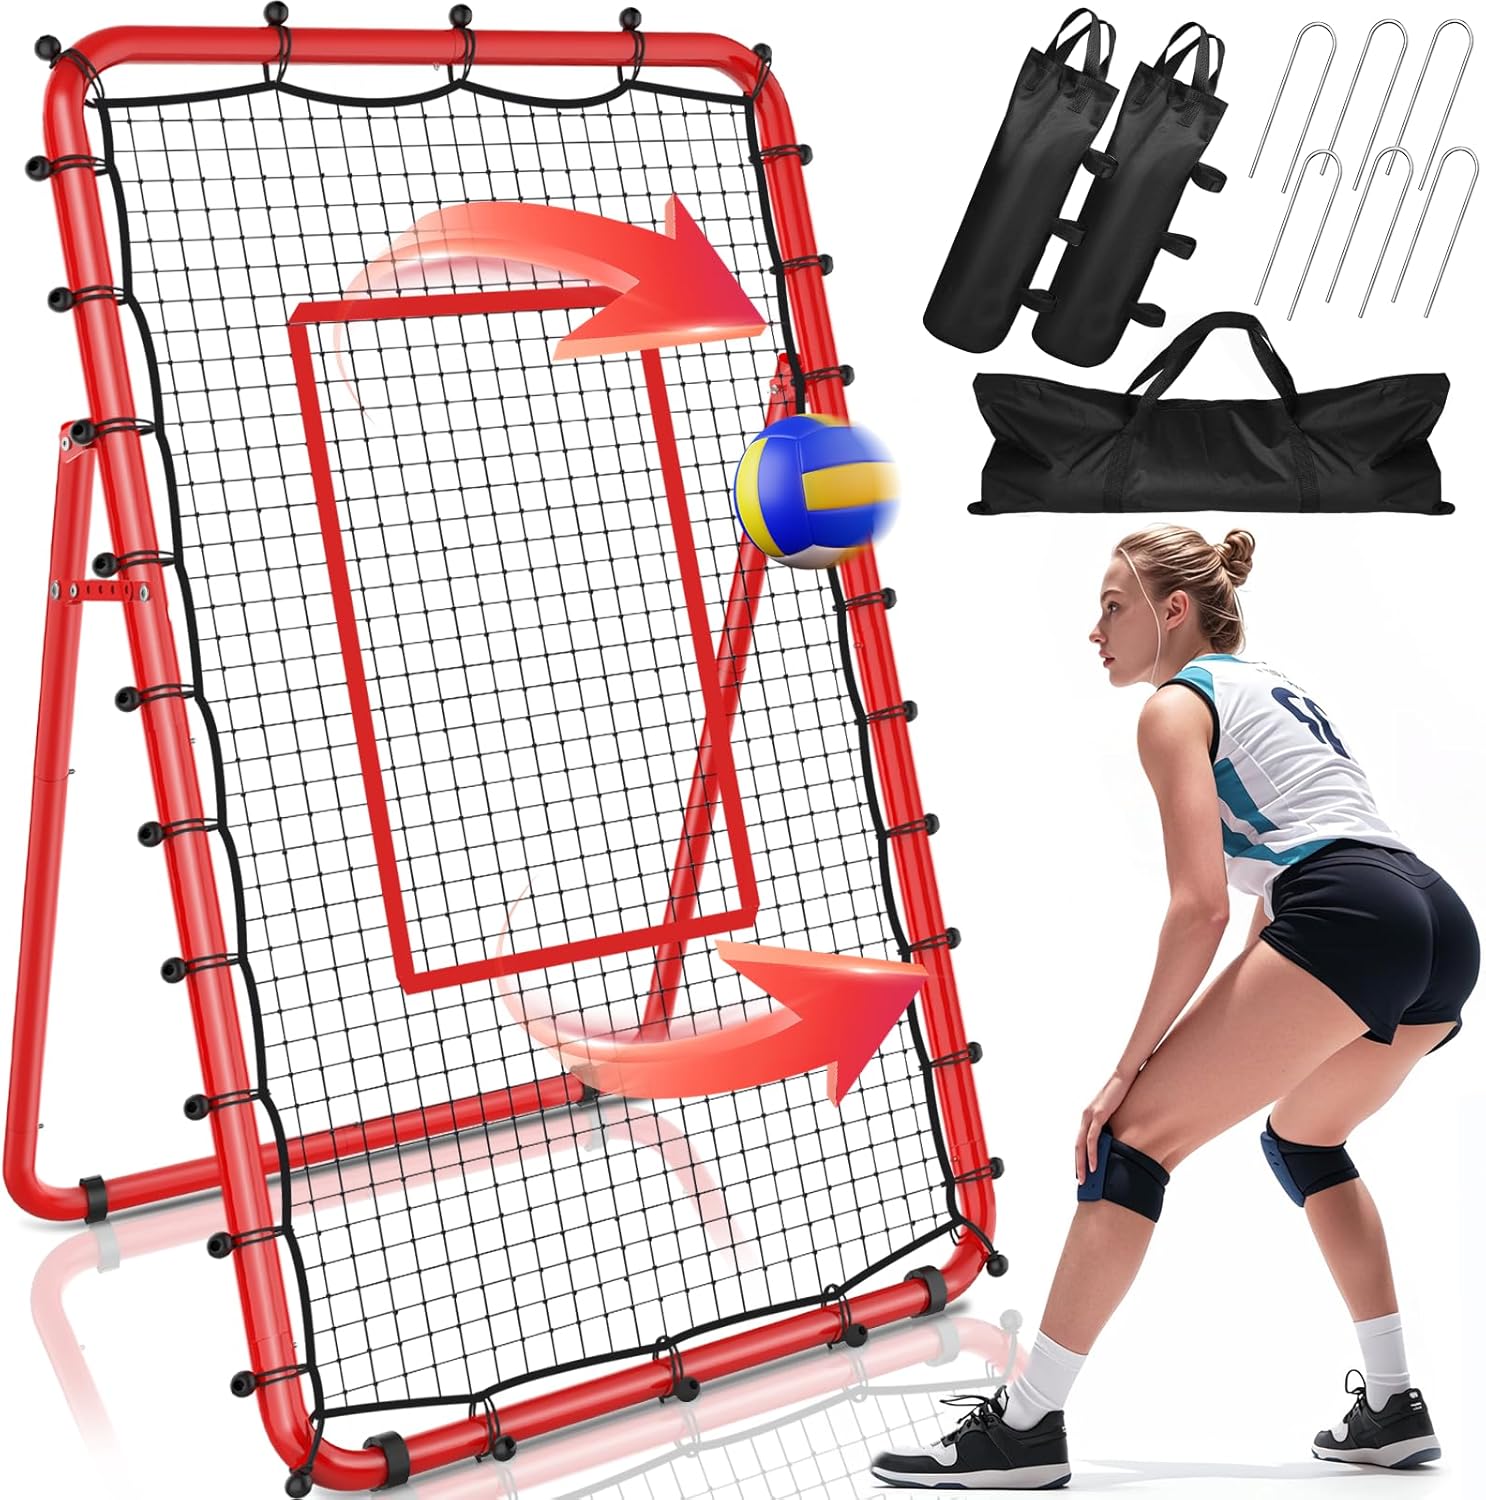
Image 4.1: A user demonstrating volleyball practice with the rebounder net, illustrating its function in returning the ball for continuous training.
4.2. Using the Garage Ball Storage Rack
- Storage: Place sports balls (volleyballs, basketballs, soccer balls, footballs) into the rack. The large capacity can hold 12-15 big balls.
- Versatility: The rack can also store other sports equipment or household items such as tennis rackets, yoga mats, toy dolls, skateboards, and pool toys.
- Mobility: Use the multi-directional wheels to easily move the rack around your garage, sports court, or home.
- Stability: Engage the locks on the two lockable wheels when the rack is in its desired position to prevent unwanted movement.
- Access: The adjustable elastic cords allow for easy retrieval of balls and other items while keeping them securely contained.

Image 4.2: The Sports Equipment Organizer Roll Cart demonstrating its versatility by storing various items beyond just balls, including tennis rackets, yoga mats, and other recreational gear.
5. Maintenance
- Cleaning: Wipe down the metal frames of both the rebounder and the storage rack with a damp cloth as needed. Avoid abrasive cleaners.
- Net Care: Inspect the rebounder net and bungee cords regularly for any signs of wear or damage. Replace worn bungee cords to maintain optimal net tension.
- Frame Inspection: Periodically check all frame connections and bolts to ensure they remain tight and secure.
- Wheel Maintenance: Keep the wheels of the storage rack free of debris to ensure smooth movement. Lubricate if necessary.
- Storage: When not in use, especially for extended periods, store the rebounder net in a dry, sheltered area to prolong its lifespan. The storage rack can be kept indoors or outdoors due to its anti-rust coating.
6. Troubleshooting
- Problem: Rebounder net tension is loose.
- Solution: Check all bungee cords. Ensure they are properly attached and not stretched or broken. Replace any damaged cords. Verify the frame connections are tight.
- Problem: Rebounder net moves or tips over during use.
- Solution: For outdoor use, ensure all 6 ground stakes are fully inserted into the ground. Fill the sandbags with sand and place them on the lower frame bars. Verify the non-slip foot gaskets are correctly installed.
- Problem: Ball storage rack wheels do not roll smoothly or lock.
- Solution: Check wheels for any trapped debris (hair, lint, etc.) and clean them. Ensure the locking mechanism is fully engaged or disengaged. If a wheel is damaged, contact customer support for replacement.
- Problem: Items fall out of the ball storage rack.
- Solution: Adjust the elastic cords to be tighter. Ensure the buckle is pressed to secure the desired tension. Avoid overfilling the rack beyond its recommended capacity.
7. Specifications
| Product Name | TomCare Volleyball Rebounder Net and Garage Ball Storage Rack |
| Brand | TomCare |
| Model | Volleyball Rebounder Net and Ball Storage Rack |
| Rebounder Dimensions | Approx. 7 feet (Height) x 4 feet (Width) |
| Storage Rack Dimensions | Approx. 23.6 inches (Length) x 16.5 inches (Width) x 29.5 inches (Height) |
| Storage Rack Capacity | Holds up to 12-15 big balls |
| Materials | Rebounder: Thickened Steel Pipe (32mm), Durable PE Netting. Storage Rack: High-quality Metal Tubes with Anti-rust Coating. |
| Wheels (Storage Rack) | 4 Multi-directional (2 Lockable) |
8. Warranty & Support
TomCare products are designed for durability and performance. For specific warranty information, please refer to the documentation included with your purchase or visit the official TomCare website. If you encounter any issues or have questions regarding your Volleyball Rebounder Net or Garage Ball Storage Rack, please contact TomCare customer support.
Customer Support:
- Visit the TomCare Store on Amazon for product information and contact options.
- Refer to your purchase receipt for direct seller contact details.
Please have your product model and purchase date available when contacting support.