
Bikevee BKV100AB
Bikevee BKV100AB Wireless GPS Bike Computer User Manual
Model: BKV100AB
Brand: Bikevee
1. Introduction
This manual provides essential information for the proper setup, operation, and maintenance of your Bikevee BKV100AB Wireless GPS Bike Computer. This device is designed to track your cycling performance with precision, offering features such as speed, distance, cadence, and GPS tracking. Please read this manual thoroughly before first use to ensure optimal performance and longevity of your device.
2. Package Contents
Verify that all items are present in your package:
- 1x Bike Computer (Main Unit)
- 1x Charging Cable (USB-C)
- 1x Standard Bike Mount
- 1x Out Front Extended Mount
- 1x Rubber Pad
- 2x Rubber Rings (for mounting)
- 1x User Manual

3. Setup
3.1 Mounting the Bike Computer
The Bikevee BKV100AB comes with two mounting options: a standard bike mount and an out-front extended mount. Both use rubber rings to secure the mount to your handlebar or stem.
- Place the chosen mount horizontally on your handlebar or stem.
- Secure the mount using the provided rubber rings, ensuring a tight fit.
- Align the bike computer with the mount and twist it clockwise by 90 degrees until it clicks securely into place.

3.2 App Download and Pairing
To fully utilize your Bikevee BKV100AB, download the 'Link-S' app from your smartphone's app store (Google Play Store or Apple App Store).
- Turn on your Bikevee BKV100AB bike computer.
- Open the Link-S app on your smartphone.
- Navigate to the 'Device' section and select 'Add Device'.
- The app will search for nearby bike computers. Once your BKV100AB is detected, click on it.
- The bike computer's screen will display a pairing code. Enter this code into the Link-S app.
- Confirm pairing. Your device is now connected to the app.

3.3 Firmware Update
It is crucial to keep your device's firmware updated for optimal performance and to resolve any known issues. After pairing with the Link-S app:
- In the Link-S app, go to the 'Device' page.
- Look for 'Check for new version'. If a red dot is present, a new firmware version is available.
- Click on 'Check for new version', then 'Firmware detection', and finally 'Upgrade'.
- Allow the update process to complete. This may take approximately one minute.

Video: This official Bikevee video demonstrates the firmware update process to unlock auto backlight and other features.
Video: An official Bikevee video detailing Firmware Update V1.1.7 and its enhanced user experience.
4. Operating Instructions
4.1 Button Functions
The Bikevee BKV100AB features three buttons for navigation and control:
- Left Button (Power/Play/Pause):
- Short press: Pause/Continue recording.
- Long press (2 seconds): Stop recording and save the exercise.
- Short press in setting mode: Switch setting options.
- Right Button (Settings/Page Turn):
- Short press: Turn page in riding mode.
- Long press (2 seconds): Enter/Exit setting mode.
- Short press in setting mode: Select the number of digits.
- Side Button (Backlight/Power):
- Short press: Turn on/off backlight while cycling.
- Long press (2 seconds): Power on/off the device.

4.2 Display and Backlight
The device features a clear 2.6" LCD screen. It supports both manual and automatic backlight functions.
- Manual Backlight: Short press the side button to toggle the backlight on or off.
- Automatic Backlight: After a software upgrade, the device can automatically adjust backlight intensity based on ambient light conditions.

4.3 Auto Stop Function
The Bikevee BKV100AB includes an automatic stop function that pauses recording when you stop moving and resumes when you start again. This feature helps conserve battery life and ensures accurate ride data by excluding stationary time.
4.4 Time Zone Setting
To ensure accurate time display, set the correct time zone for your location:
- Long press the Right button (settings icon) to enter setting mode.
- Use the Left button (play/pause icon) to navigate through the settings until you find 'Time Zone'.
- Use the Right button (settings icon) to adjust the time zone value (e.g., -6 for Central Time).
- Long press the Right button again to save and exit the setting mode.
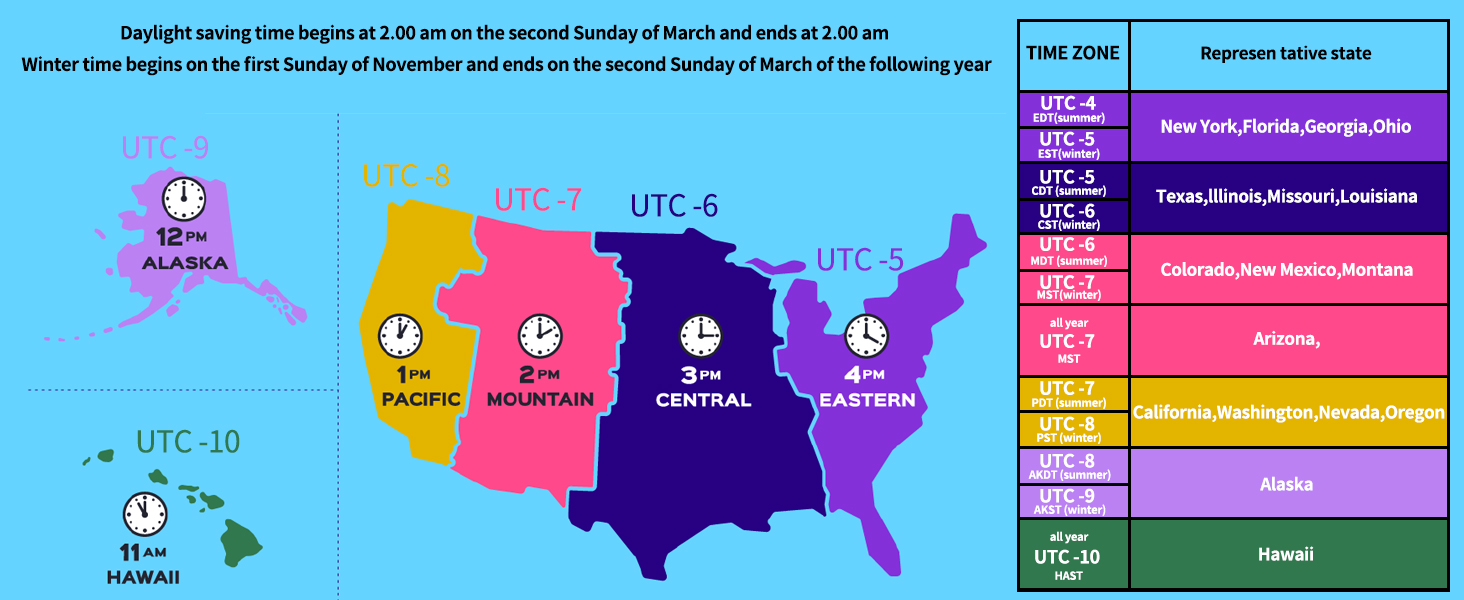
Video: An official Bikevee video demonstrating how to set the GPS Bike Computer's time zone.
Video: An official Bikevee video providing instructions on how to set your time zone for precise location tracking.
5. Sensor Compatibility
The Bikevee BKV100AB supports ANT+ connectivity, allowing you to pair with various external sensors for enhanced data collection:
- Speed/Cadence Sensors: For precise real-time speed and cadence data.
- Heart Rate Monitors: To track your heart rate during rides.
- Power Meters: For advanced power output measurements.
To connect an ANT+ sensor:
- Ensure your sensor is in wake-up mode (e.g., by moving it).
- Long press the Right button on the bike computer to enter setting mode.
- Navigate to 'Sensor Management' or 'ANT+ Sensor Pairing'.
- The bike computer will automatically search for compatible ANT+ accessories.
- Once detected, select the sensor to pair.

6. App Integration (Link-S & Strava)
The Link-S app allows you to view detailed ride data and seamlessly integrate with Strava.
- After each ride, long press the Left button on the bike computer to stop recording data. This ensures the data is ready for upload.
- Open the Link-S app. Your ride data will automatically synchronize.
- Within the Link-S app, you can view various data points from your ride, including speed, distance, altitude, and more.
- The app supports exporting rides as .GPX files, which can then be uploaded to Strava to share your progress and connect with other cyclists.

Video: An official Bikevee video demonstrating how to sync ride data to the Link-S app and share it on Strava.
7. Maintenance
7.1 Waterproofing (IPX7)
The Bikevee BKV100AB is rated IPX7 waterproof, meaning it can withstand immersion in water up to 1 meter for 30 minutes. This makes it suitable for riding in rainy conditions. However, it is recommended to avoid prolonged immersion in water.

7.2 Battery Life
The device features a 1200 mAh Lithium Ion battery, providing up to 50 hours of operation on a single full charge. Charge the device using the provided USB-C cable.
8. Troubleshooting
8.1 Trip Distance and Temperature Display Issues
If you experience issues where Trip Distance does not display or temperature is locked in Celsius, this may be due to an incomplete software update.
- Solution: Update your device to firmware version v1.4.7 or later via the Link-S app. Refer to section 3.3 Firmware Update for detailed instructions.
- If problems persist after updating, please contact customer support.
9. Specifications
| Feature | Detail |
|---|---|
| Brand | Bikevee |
| Model Name | BKV100AB |
| Color | Black |
| Product Dimensions | 1.97"L x 0.63"W x 3.15"H |
| Item Weight | 70 Grams |
| Screen Size | 2.6 Inches |
| Display Type | LCD |
| Battery Life | 50 Hours |
| Sensor Type | Speed/Cadence Sensor; GPS Sensor |
| Battery Cell Composition | Lithium Ion |
| Connectivity Technology | Bluetooth 5.4, ANT+ |
| International Protection Rating | IPX7 |
| Mounting Type | Handlebar Mount |
| Human Interface Input | Buttons |
| Material | Plastic |
10. Warranty and Support
10.1 Warranty Information
The Bikevee BKV100AB Wireless GPS Bike Computer comes with a two-year warranty from the date of purchase. This warranty covers manufacturing defects and malfunctions under normal use. Please retain your proof of purchase for warranty claims.
10.2 Customer Support
For any questions, technical assistance, or warranty claims, please contact Bikevee customer support. Refer to the contact information provided on the product packaging or the official Bikevee website.
Related documentsBKV100AB


Ask a question about this manual
Ask about setup, troubleshooting, compatibility, parts, safety, or missing instructions. Manuals+ will review the question and use this page’s manual context to help answer it.