
1. Introduction
Thank you for choosing the LUXOAK Full Size Lift Up Storage Platform Bed Frame with 2 Drawers Farmhouse Nightstand Set. This manual provides detailed instructions for the assembly, operation, and maintenance of your new bedroom furniture. Please read all instructions carefully before beginning assembly and retain this manual for future reference.
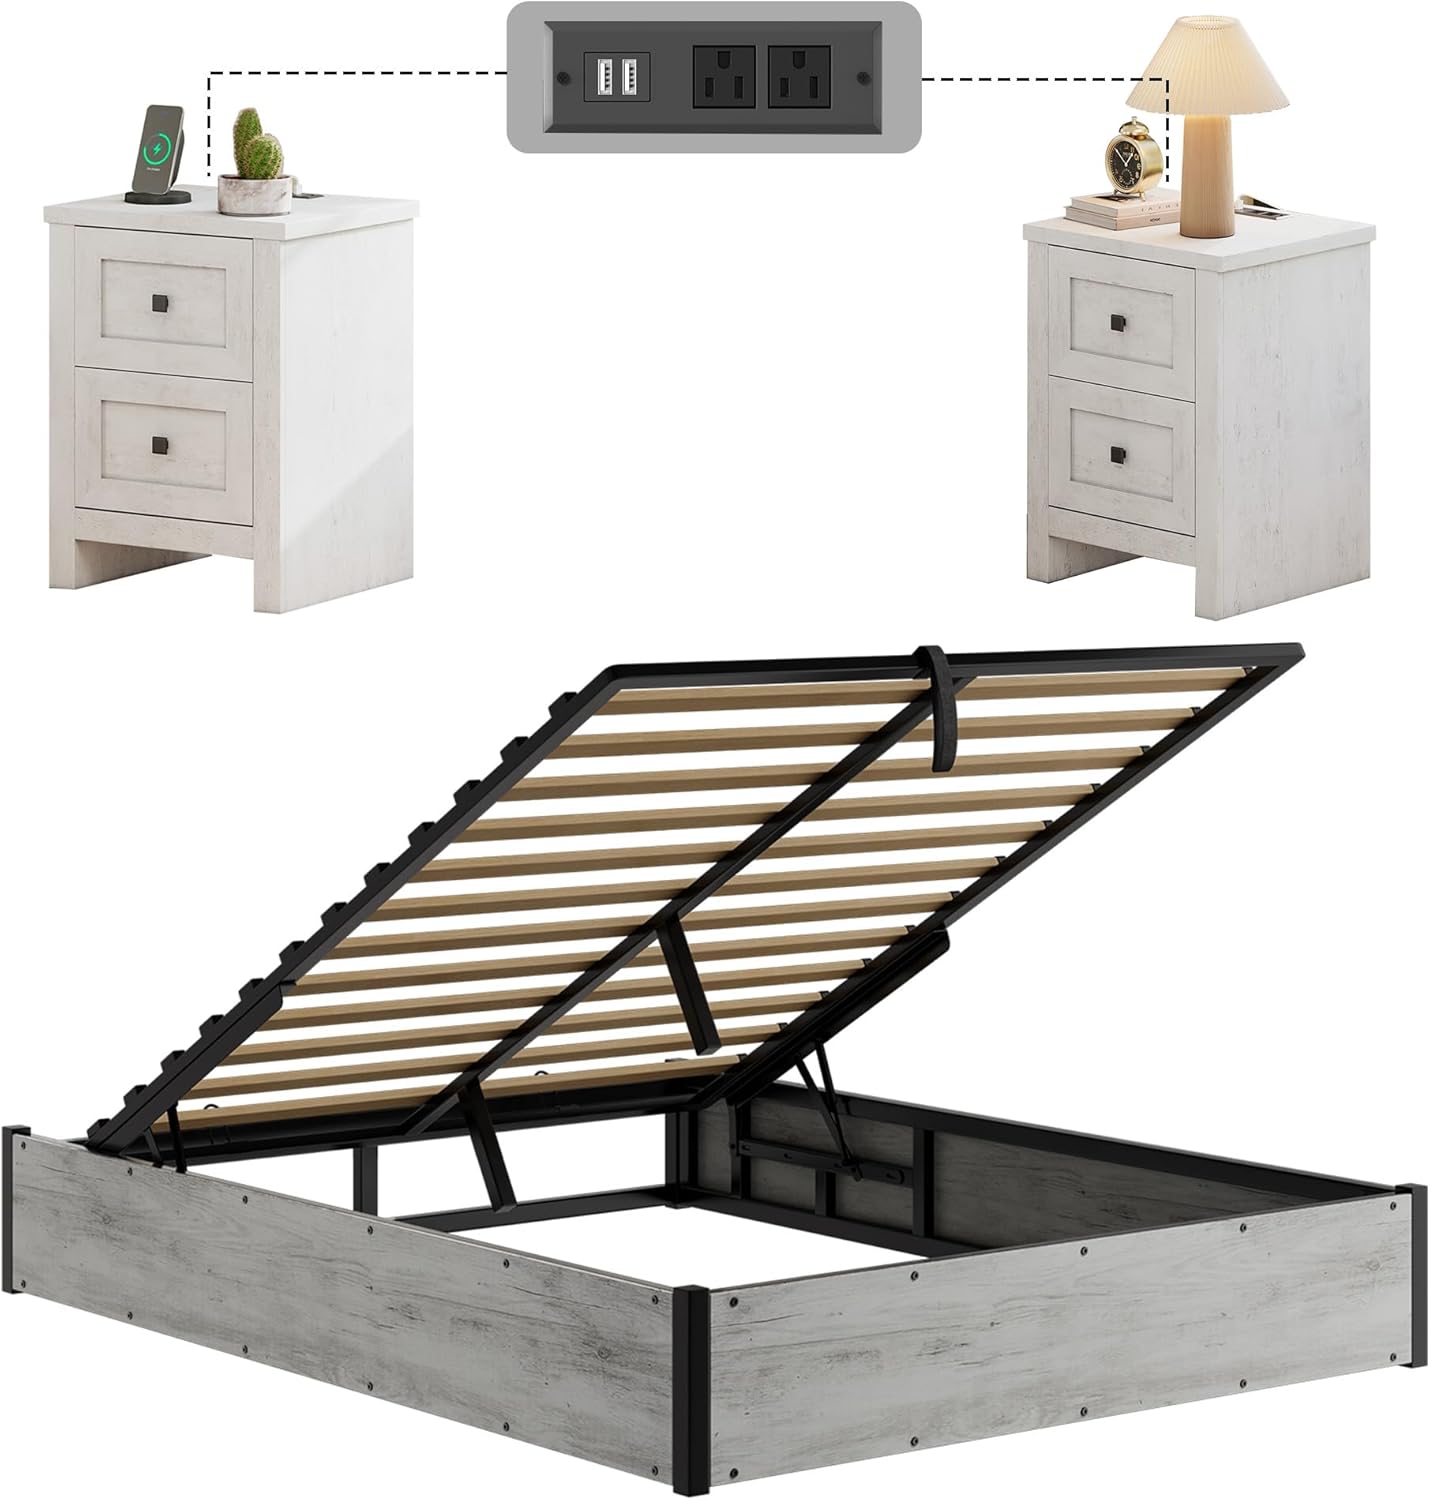
Image 1.1: Overview of the LUXOAK Full Size Lift Up Storage Platform Bed Frame and two Farmhouse Nightstands.
2. Safety Information
To ensure safe assembly and use of this product, please adhere to the following guidelines:
- Read all instructions thoroughly before assembly.
- Assembly should be performed by two adults to prevent injury and ensure proper construction.
- Keep all small parts and packaging materials away from children.
- Ensure all fasteners are securely tightened before use. Periodically check and re-tighten as necessary.
- Do not exceed the recommended weight capacity for the bed frame (1000 lbs).
- When operating the gas lift mechanism, ensure no objects or body parts are in the path of the lifting frame.
- For the charging station, use only in dry indoor locations. Do not overload the outlets.
- Do not stand or jump on the bed frame.
3. Package Contents
Before beginning assembly, verify that all components listed below are present. If any parts are missing or damaged, please contact customer support.
3.1. Bed Frame Components
- Bed Frame Panels
- Slats
- Gas Lift Mechanism
- Hardware Pack (screws, bolts, nuts, tools)
3.2. Nightstand Components (x2)
- Nightstand Panels
- Drawer Components
- Charging Station Unit
- Hardware Pack (screws, drawer slides, handles)

Image 3.1: Illustration of bed frame construction details, highlighting the sturdy metal structure and anti-noise design for the slats.
4. Assembly Instructions
It is recommended to assemble the bed frame and nightstands in the room where they will be used. Clear a spacious area and lay out all parts before starting.
4.1. Bed Frame Assembly
- Unpack and Identify: Carefully unpack all bed frame components and hardware. Refer to the parts list to identify each piece.
- Assemble Side Rails: Attach the side rails to the headboard and footboard panels using the provided bolts and nuts. Ensure all connections are secure.
- Install Center Support: Secure the center support beam(s) to the frame.
- Attach Gas Lift Mechanism: Follow the specific instructions provided with the gas lift mechanism to attach it to the bed frame. This typically involves securing the lift arms to the side rails and the platform frame.
- Install Slats: Place the wooden slats onto the bed frame. For snap-fit designs, ensure each slat clicks securely into place.

Image 4.1: Close-up view of the bed frame's gas-lift design, sturdy metal structure, and the convenient lift-up handle for accessing storage.
4.2. Nightstand Assembly (for each nightstand)
- Unpack and Identify: Unpack nightstand components and hardware.
- Assemble Frame: Connect the side panels, top, and bottom panels using the provided fasteners.
- Install Drawer Slides: Attach the drawer slides to the inner sides of the nightstand frame.
- Assemble Drawers: Construct the drawer boxes and attach the drawer slides to the sides of the drawers.
- Insert Drawers: Carefully slide the assembled drawers into the nightstand frame.
- Attach Handles: Secure the metal handles to the front of each drawer.
- Install Charging Station: Insert the charging station unit into the designated cutout on the nightstand top or back panel. Secure it with screws if necessary.

Image 4.2: Features of the farmhouse rustic nightstand, including metal handles and a sturdy 2-inch wide wooden base.
5. Operating Instructions
5.1. Using the Gas Lift Storage Bed
The bed frame features a gas lift mechanism for easy access to under-bed storage.
- To Lift: Grasp the lift-up handle located at the foot of the bed. With a firm and steady motion, lift the mattress platform upwards. The gas pistons will assist in lifting and holding the platform in the open position.
- To Lower: Gently pull the mattress platform downwards. Apply slight pressure to overcome the gas piston resistance until the platform fully lowers into place.
Caution: Ensure no items are obstructing the lifting mechanism or the path of the bed frame when raising or lowering. Keep hands and fingers clear of pinch points.

Image 5.1: Illustration of the ample under-bed storage space, suitable for items such as quilts, boxes, baggage, and clothing.
5.2. Using the Nightstand Charging Station
Each nightstand is equipped with a charging station for convenient power access.
- Connect to Power: Plug the 4.9-foot power cord from the charging station into a standard 125V/12A wall outlet.
- Use AC Outlets: The charging station includes two standard AC outlets (125V/12A) for powering devices like lamps or laptops.
- Use USB Ports: Two USB ports (5V/2.1A) are available for charging smartphones, tablets, and other USB-powered devices.
Note: Use the cable holes on the back of the nightstand to organize cords and maintain a tidy appearance.

Image 5.2: Detailed view of the nightstand's convenient charging station, featuring two AC outlets, two USB ports, and a 4.9-foot power cord.
5.3. Using Nightstand Drawers
The nightstands feature two smooth-gliding drawers for organized storage of personal items.
- Gently pull the metal handles to open the drawers.
- Push the drawers firmly to close them completely.
- Avoid placing excessively heavy items in the drawers to ensure smooth operation and prevent damage to the slides.

Image 5.3: The nightstand's drawers are designed for classified storage, allowing for organized placement of various items.
6. Maintenance and Care
Proper care will extend the life and appearance of your LUXOAK bedroom set.
- Cleaning: Wipe surfaces with a soft, damp cloth. Avoid using harsh chemicals, abrasive cleaners, or polishes that may damage the finish.
- Fasteners: Periodically check all bolts, screws, and connections to ensure they remain tight. Re-tighten as needed.
- Spills: Immediately wipe up any spills to prevent staining or damage to the engineered wood.
- Gas Lift: Do not apply oil or lubricants to the gas lift mechanism unless specifically instructed by the manufacturer.
- Charging Station: Keep the charging station free from dust and debris. Do not expose to liquids.
7. Troubleshooting
If you encounter any issues, refer to the following troubleshooting guide:
- Missing Parts: If any hardware or components are missing upon arrival, please review the package contents list carefully. Note that a headboard is not included with this set. Contact customer support with a detailed list of missing items.
- Gas Lift Not Operating Smoothly: Ensure the bed frame is properly assembled and all connections are secure. Verify that no objects are obstructing the mechanism. If the issue persists, contact customer support.
- Charging Station Not Working: Check if the power cord is securely plugged into both the nightstand unit and a functioning wall outlet. Test the outlet with another device. If still not working, avoid attempting repairs and contact customer support.
- Drawers Sticking: Ensure the drawer slides are properly aligned and free of debris. Avoid overloading the drawers.
8. Specifications
8.1. Bed Frame Specifications
| Feature | Detail |
|---|---|
| Size | Full |
| Product Dimensions | 77"L x 56"W x 12"H |
| Material | Engineered Wood, Metal |
| Weight Capacity | 1000 lbs |
| Recommended Mattress | 8"-12" |
| Box Spring Needed | No |
| Special Feature | Gas Lift Storage, Space Saving |
| Assembly Required | Yes |
| Item Weight | 130 Pounds (approximate for entire set) |
| Color | White Oak |
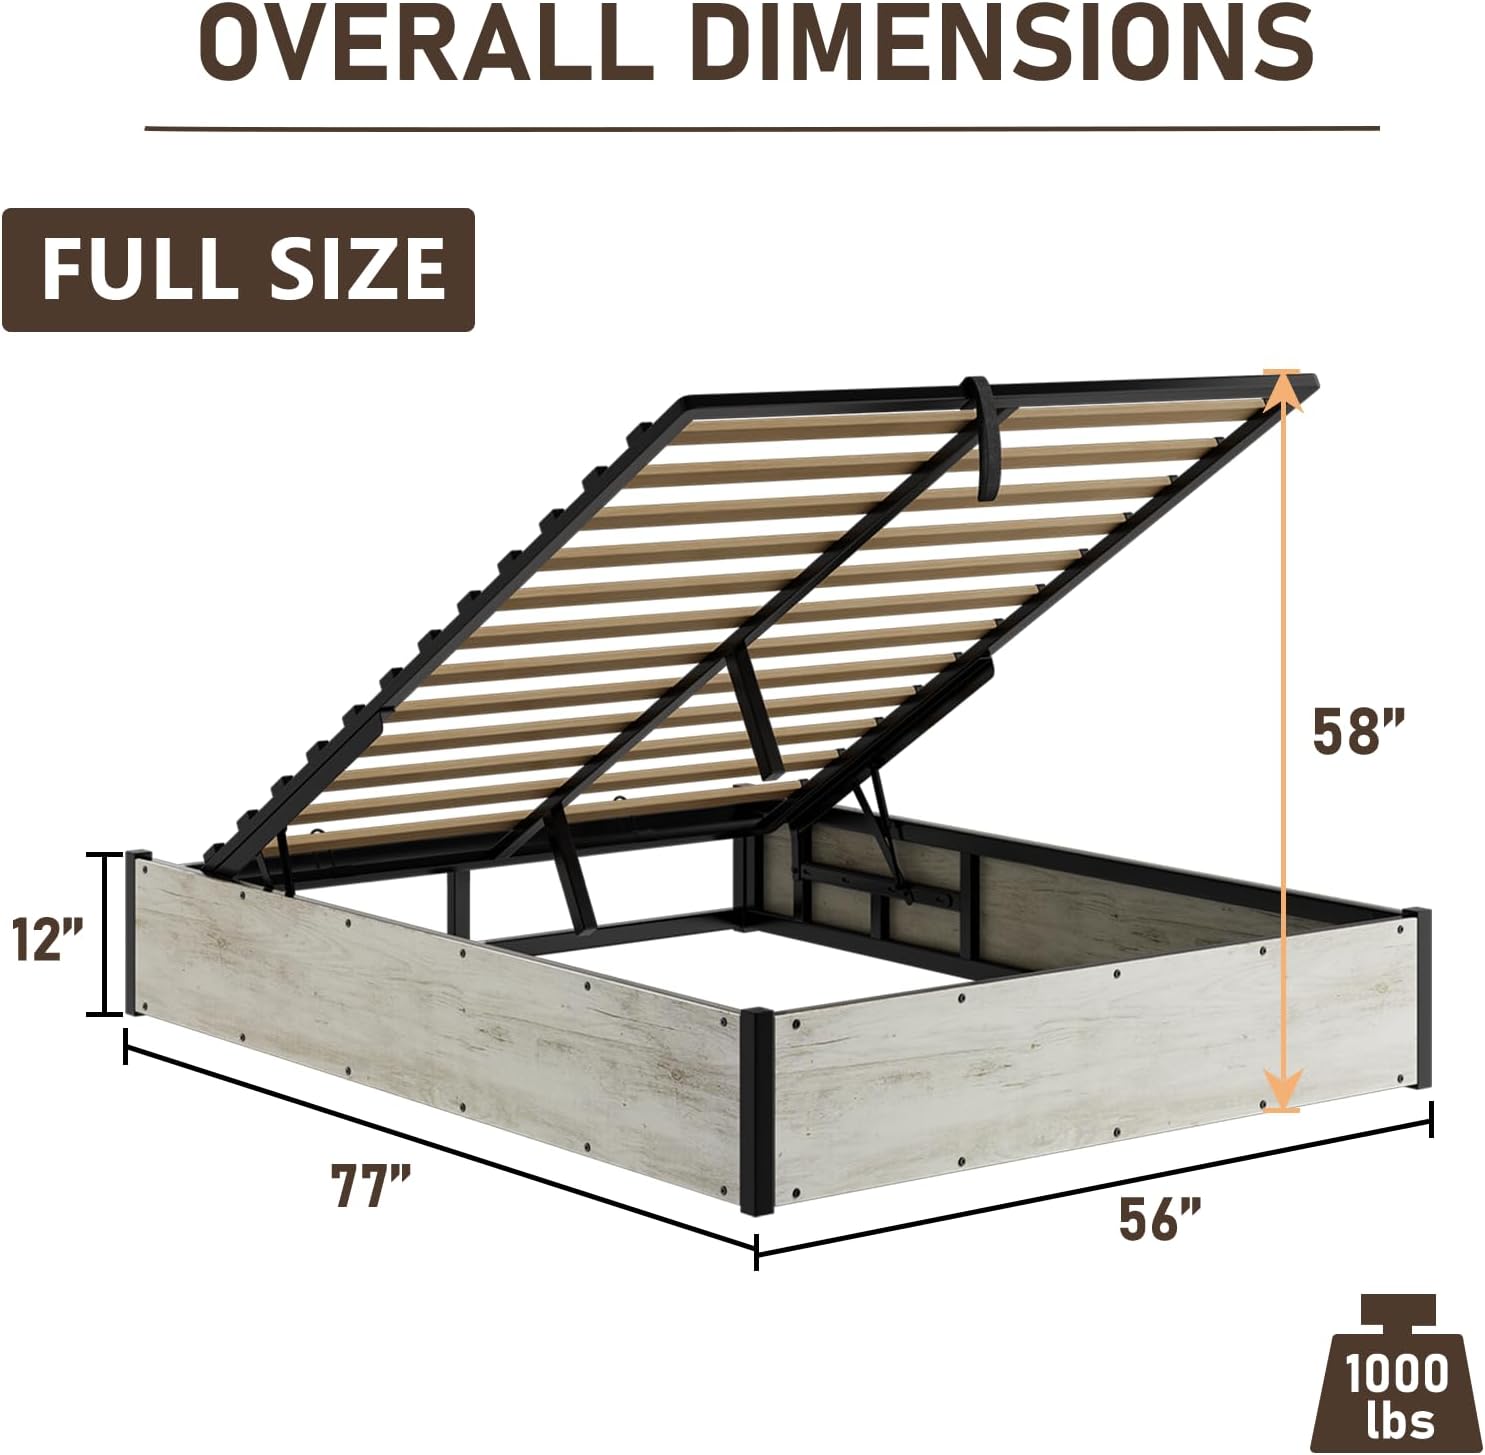
Image 8.1: Overall dimensions of the Full Size bed frame.

Image 8.2: Detailed specifications for the bed frame.
8.2. Nightstand Specifications (per unit)
| Feature | Detail |
|---|---|
| Color | White Rustic Oak |
| Style | Farmhouse |
| Material | Engineered Wood |
| Product Dimensions | 17.7"W x 15.75"D x 24"H |
| Special Feature | Charging Station, Storage Drawer |
| Assembly Required | Yes |

Image 8.3: Detailed specifications for the nightstands.
9. Warranty and Support
LUXOAK is committed to providing quality products. While specific warranty details are not included in this manual, please retain your proof of purchase. For any questions, missing parts, or concerns regarding your product, please contact LUXOAK customer support through the retailer where the product was purchased. Our team is available to assist you with any issues.