1. Introduction
The Proster PST290 Pocket Wood Moisture Meter is a versatile and portable device designed for accurately measuring moisture content in various materials. It features detachable pins, 7 pre-calibrated material settings, a temperature gauge, and a clear color-coded LCD display. This manual provides detailed instructions for the proper use and maintenance of your moisture meter.
2. What's in the Box

This image displays all items included in the Proster PST290 package. You will find the moisture meter itself, two AAA batteries, a small screwdriver for the battery compartment, and two replacement pins for extended use.
- 1x Proster PST290 Moisture Meter
- 2x AAA Batteries
- 1x Screwdriver
- 2x Replacement Pins
- 1x User Manual (this document)
3. Product Features

This diagram highlights the user-friendly design and key functionalities of the Proster PST290 moisture meter, including temperature measurement, data hold, compact design, auto-off, and low battery indicator.
- Pocket-Sized & Portable: Compact, pen-shaped design for easy carrying.
- Detachable Probes: Allows for easy replacement of pins, extending tool lifespan. A spare set is included.
- 7 Pre-Calibrated Modes: Provides accurate measurements for various woods (Oak, Pine, Maple, Beech, Spruce, Larch, Birch, Cherry, Walnut, Douglas Fir, Lauan) and building materials (cement mortar, anhydrous gypsum mortar, lime mortar, gypsum, brick).
- Color-Coded LCD: Large, easy-to-read LCD screen with a 3-color warning system (Green/Dry, Blue/Moderate, Red/Wet) for instant interpretation.
- Data Hold Function: Locks the current reading on the screen.
- MAX/MIN Function: Tracks the highest and lowest moisture levels.
- Built-In Temperature Sensor: Measures ambient temperature in Celsius (℃) or Fahrenheit (℉).
- Auto-Off: Automatically powers off after 15 minutes of inactivity to conserve battery life.
- Low Battery Warning: Clear indicator for low battery status.
4. Setup
4.1 Battery Installation
The device requires two AAA batteries. Use the provided screwdriver to open the battery compartment cover located on the back of the meter. Insert the batteries according to the polarity markings inside the compartment, then securely close the cover.
4.2 Attaching/Replacing Pins
The moisture meter comes with detachable pins. To attach or replace pins, carefully screw them into the designated ports at the bottom of the device. Ensure they are firmly seated for accurate readings. A spare set of pins is included for future replacement.
5. Operating Instructions
5.1 Power On/Off
Press the Power button (usually the top-most button) to turn the device on or off.
5.2 Selecting Material Modes

This image illustrates the 7 distinct calibration scales available on the meter, categorized for various wood types and building materials such as cement mortar, anhydrous gypsum mortar, lime mortar, gypsum, and brick. Each mode has a specific measurement range.
The PST290 offers 7 pre-calibrated modes for different materials. Press the MODE button to cycle through these settings. Select the mode that corresponds to the material you are testing for accurate results.
- Modes 1-2 (Wood Measurement): Covers various wood types with ranges from 7.0-54.8% by weight.
- Modes 3-7 (Building Materials Measurement): Covers materials like cement mortar, gypsum, and brick with ranges from 0.0-22.1% by weight.
5.3 Taking Measurements
This video demonstrates the process of taking a moisture measurement with the Proster PST290. Observe how the pins are inserted into the material and the reading is displayed on the screen.
After selecting the appropriate material mode, firmly insert the two pins into the material you wish to measure. Ensure both pins penetrate the surface adequately to get a stable reading. The moisture content will be displayed on the LCD screen.
5.4 Interpreting Readings (Color-Coded LCD)
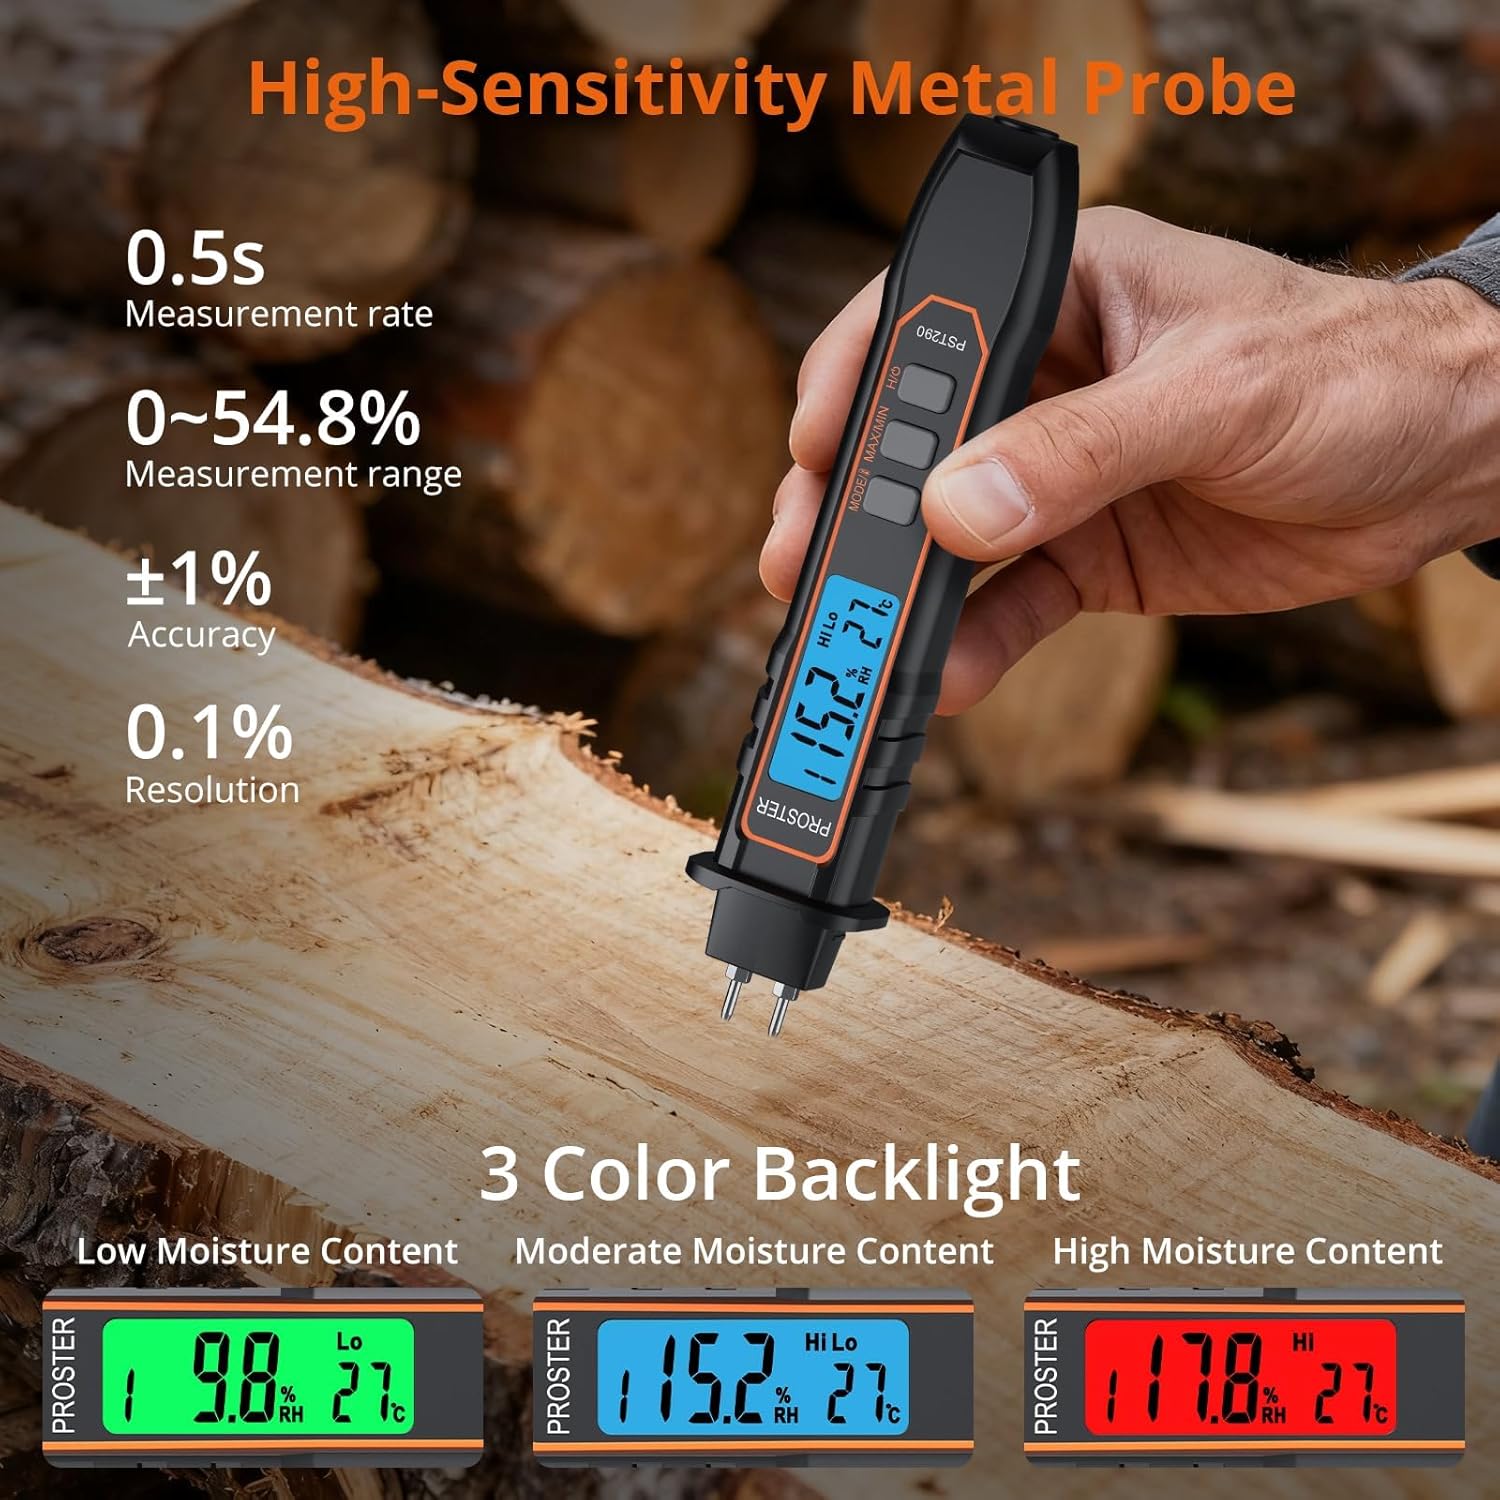
This image illustrates the meter's intuitive 3-color backlight system. A green screen indicates low moisture, blue indicates moderate moisture, and red signifies high moisture content, providing quick visual alerts.
The LCD backlight changes color to provide a quick visual indication of moisture levels:
- Green: Indicates low moisture content (Dry).
- Blue: Indicates moderate moisture content.
- Red: Indicates high moisture content (Wet).
5.5 Data Hold Function
Press the HOLD button (often combined with Power) to freeze the current reading on the display. Press it again to release the hold and resume live measurements.
5.6 MAX/MIN Function
Press the MAX/MIN button to view the highest (MAX) or lowest (MIN) moisture reading recorded during a measurement session. This is useful for identifying moisture spread or variations.
5.7 Temperature Measurement & Unit Switch

This image demonstrates the meter's ability to measure and display ambient temperature, with the option to switch between Celsius and Fahrenheit units.
The meter displays ambient temperature. To switch between Celsius (℃) and Fahrenheit (℉), press and hold the MODE/UNIT button (or the dedicated ℃/℉ button if present) for a few seconds until the unit changes.
5.8 Auto-Off
The device will automatically power off after approximately 15 minutes of inactivity to conserve battery life. This feature helps prevent accidental battery drain.
5.9 Low Battery Warning
When the battery level is low, a low battery icon will appear on the display. Replace the AAA batteries promptly to ensure continued accurate operation.
6. Maintenance
6.1 Pin Replacement
If the measurement pins become dull or damaged, they can be replaced using the spare set provided. Unscrew the old pins and carefully screw in the new ones. Always ensure the device is off before replacing pins.
6.2 Cleaning
Wipe the meter with a soft, dry cloth. Do not use abrasive cleaners or immerse the device in water. Keep the pins clean and free of debris for optimal performance.
6.3 Storage
When not in use, store the moisture meter in a dry, cool place, away from direct sunlight and extreme temperatures. If storing for an extended period, it is recommended to remove the batteries to prevent leakage.
7. Troubleshooting
7.1 No Display or Faint Display
- Check if the batteries are installed correctly with the correct polarity.
- Replace the batteries with new AAA batteries.
- Ensure the device is powered on.
7.2 Inaccurate Readings
- Ensure the correct material mode is selected for the item being tested.
- Make sure the pins are fully inserted into the material and making good contact.
- Clean the pins if they appear dirty or corroded.
- Replace the pins if they are dull or bent.
- Ensure the ambient temperature is within the operating range of the device.
7.3 Device Not Responding
- Remove and reinsert the batteries.
- If the issue persists, contact customer support.
8. Specifications
| Brand | Proster |
| Model Number | PST290 |
| Color | Black |
| Recommended Uses | Woodworking, Water Damage Restoration, Construction, Home Renovation |
| Special Features | Auto Off, Data Lock, Color-Coded LCD, Multiple Modes, Temperature Sensor |
| Display Type | LCD |
| Form Factor | Handheld |
| Readout Accuracy (Moisture) | 0.1% |
| Readout Accuracy (Temperature) | 1°C |
| Item Weight | 128 Grams (4.5 ounces) |
| Power Source | 2 AAA batteries (included) |
| Package Dimensions | 8.11 x 2.05 x 1.3 inches |
9. Warranty and Support
Proster products are designed for reliability and performance. For warranty information, technical support, or service inquiries, please refer to the contact details provided on the product packaging or visit the official Proster website. Keep your purchase receipt as proof of purchase for warranty claims.


