1. Safety Information
Before operating your PASELEC TX29 Electric Bike, please read this manual thoroughly. Adhere to all local traffic laws and regulations. Always wear a helmet and appropriate safety gear. Regular maintenance is crucial for safe operation.
- Always wear a certified helmet and protective gear.
- Perform a pre-ride safety check before each use.
- Familiarize yourself with the controls and features before riding in traffic.
- Do not ride under the influence of alcohol or drugs.
- Be aware of your surroundings and ride defensively.
2. Product Overview
The PASELEC TX29 is an all-terrain electric bike designed for adults, featuring dual motors, a high-capacity battery, and full suspension for a versatile riding experience.

Figure 2.1: PASELEC TX29 Electric Bike
Key Features:
- 3000W Peak Dual Motors: Provides powerful acceleration and assists with inclines.
- 48V 19.2Ah Removable Battery: Offers extended range and convenient charging.
- 27.5" x 3.0" Fat Tires: Enhances stability and traction on various terrains.
- Dual Suspension System: Absorbs shocks for a smoother ride.
- 7-Speed Gearing System: Allows for adaptable riding across different conditions.
- High-Definition LCD Display: Shows essential ride information.
3. Assembly Instructions
The PASELEC TX29 Electric Bike arrives approximately 90% pre-assembled. The remaining assembly typically involves installing the handlebars, front wheel, lights, and pedals. This process usually takes about 15 minutes.
Required Tools:
A basic tool kit is included with your electric bike.
Assembly Steps:
- Unpacking: Carefully remove all components from the packaging.
- Handlebar Installation: Attach the handlebars to the stem, ensuring they are centered and tightened securely.
- Front Wheel Installation: Mount the front wheel, ensuring the quick-release skewer or axle nuts are properly secured.
- Pedal Installation: Attach the pedals. Note that pedals are typically marked 'L' for left and 'R' for right. The left pedal tightens counter-clockwise, and the right pedal tightens clockwise.
- Light Installation: Securely attach the front headlight and rear taillight.
- Final Checks: Inspect all bolts and connections to ensure they are tight. Check tire pressure.
For a visual guide, please refer to the official assembly video:
Video 3.1: PASELEC Fat Tire Full Suspension Electric Bike Assembly Guide. This video demonstrates the assembly process for the PASELEC electric bike, including attaching the front wheel, handlebars, and pedals, and highlights key features.
4. Operating Instructions
4.1 Battery Charging and Installation
The 48V 19.2Ah lithium-ion battery provides a range of up to 65 miles in pedal assist mode and up to 35 miles in pure electric mode. Charging time is approximately 5-6 hours. The removable design allows for convenient charging.

Figure 4.1: High-capacity removable battery integrated into the bike frame.
- To charge, remove the battery from the frame or plug the charger directly into the bike's charging port.
- Connect the charger to a standard power outlet.
- The charger indicator light will show charging status (e.g., red for charging, green for fully charged).
- Ensure the battery is securely locked into the frame before riding.
4.2 Powering On/Off and Display
The high-definition LCD display provides real-time information such as speed, battery level, pedal assist level, and mileage.

Figure 4.2: LCD display and handlebar controls.
- Power On: Press and hold the power button on the display unit.
- Power Off: Press and hold the power button again.
- Display Information: Use the mode button to cycle through different display metrics.
4.3 Riding Modes and Gear Shifting
The TX29 offers 5 riding modes and a 7-speed gearing system for adaptable performance.

Figure 4.3: Illustration of the 5 riding modes.
- Pure Electric Mode: Engages the motor without pedal input.
- Pedal Assist Mode: The motor provides assistance as you pedal. Adjust the assist level via the display controls.
- Classic Bike Mode: No motor assistance; operates as a traditional bicycle.
- 6km/h Walk Assist Mode: Provides low-speed motor assistance for walking alongside the bike.
- Cruise Control: Maintains a set speed without continuous throttle input.
- 7-Speed Gears: Use the thumb shifter to change gears according to terrain and desired speed. Shift smoothly to avoid strain on the drivetrain.
4.4 Braking System
The bike is equipped with hydraulic disc brakes for reliable stopping power.
- Apply both front and rear brakes simultaneously for optimal stopping and control.
- Avoid sudden, hard braking, especially on loose or wet surfaces.
5. Maintenance
Regular maintenance ensures the longevity and safe operation of your electric bike.
5.1 Daily Checks:
- Check tire pressure before each ride.
- Inspect brakes for proper function and wear.
- Ensure all quick releases and bolts are tight.
- Verify lights are working.
5.2 Weekly/Monthly Checks:
- Clean the bike frame and components.
- Lubricate the chain.
- Check for any loose spokes or wheel wobbles.
- Inspect brake pads for wear and replace if necessary.
- Check suspension components for proper function.
5.3 Battery Care:
- Store the battery in a cool, dry place.
- Avoid fully discharging the battery frequently.
- Charge the battery regularly, even if not in use, to maintain its health.
6. Troubleshooting
This section addresses common issues you might encounter. For more complex problems, please contact customer support.
| Problem | Possible Cause | Solution |
|---|---|---|
| Bike does not power on | Battery not charged or improperly installed | Ensure battery is fully charged and securely seated. Check connections. |
| Motor not assisting | Pedal assist level too low, or sensor issue | Increase pedal assist level on the display. Check for any loose sensor cables. |
| Brakes feel weak | Worn brake pads or hydraulic fluid issue | Inspect and replace brake pads if worn. Consult a bike mechanic for hydraulic system issues. |
| Unusual noises | Loose components, dry chain, or debris | Check all bolts, lubricate the chain, and inspect for foreign objects. |
7. Specifications
Detailed technical specifications for the PASELEC TX29 Electric Bike.
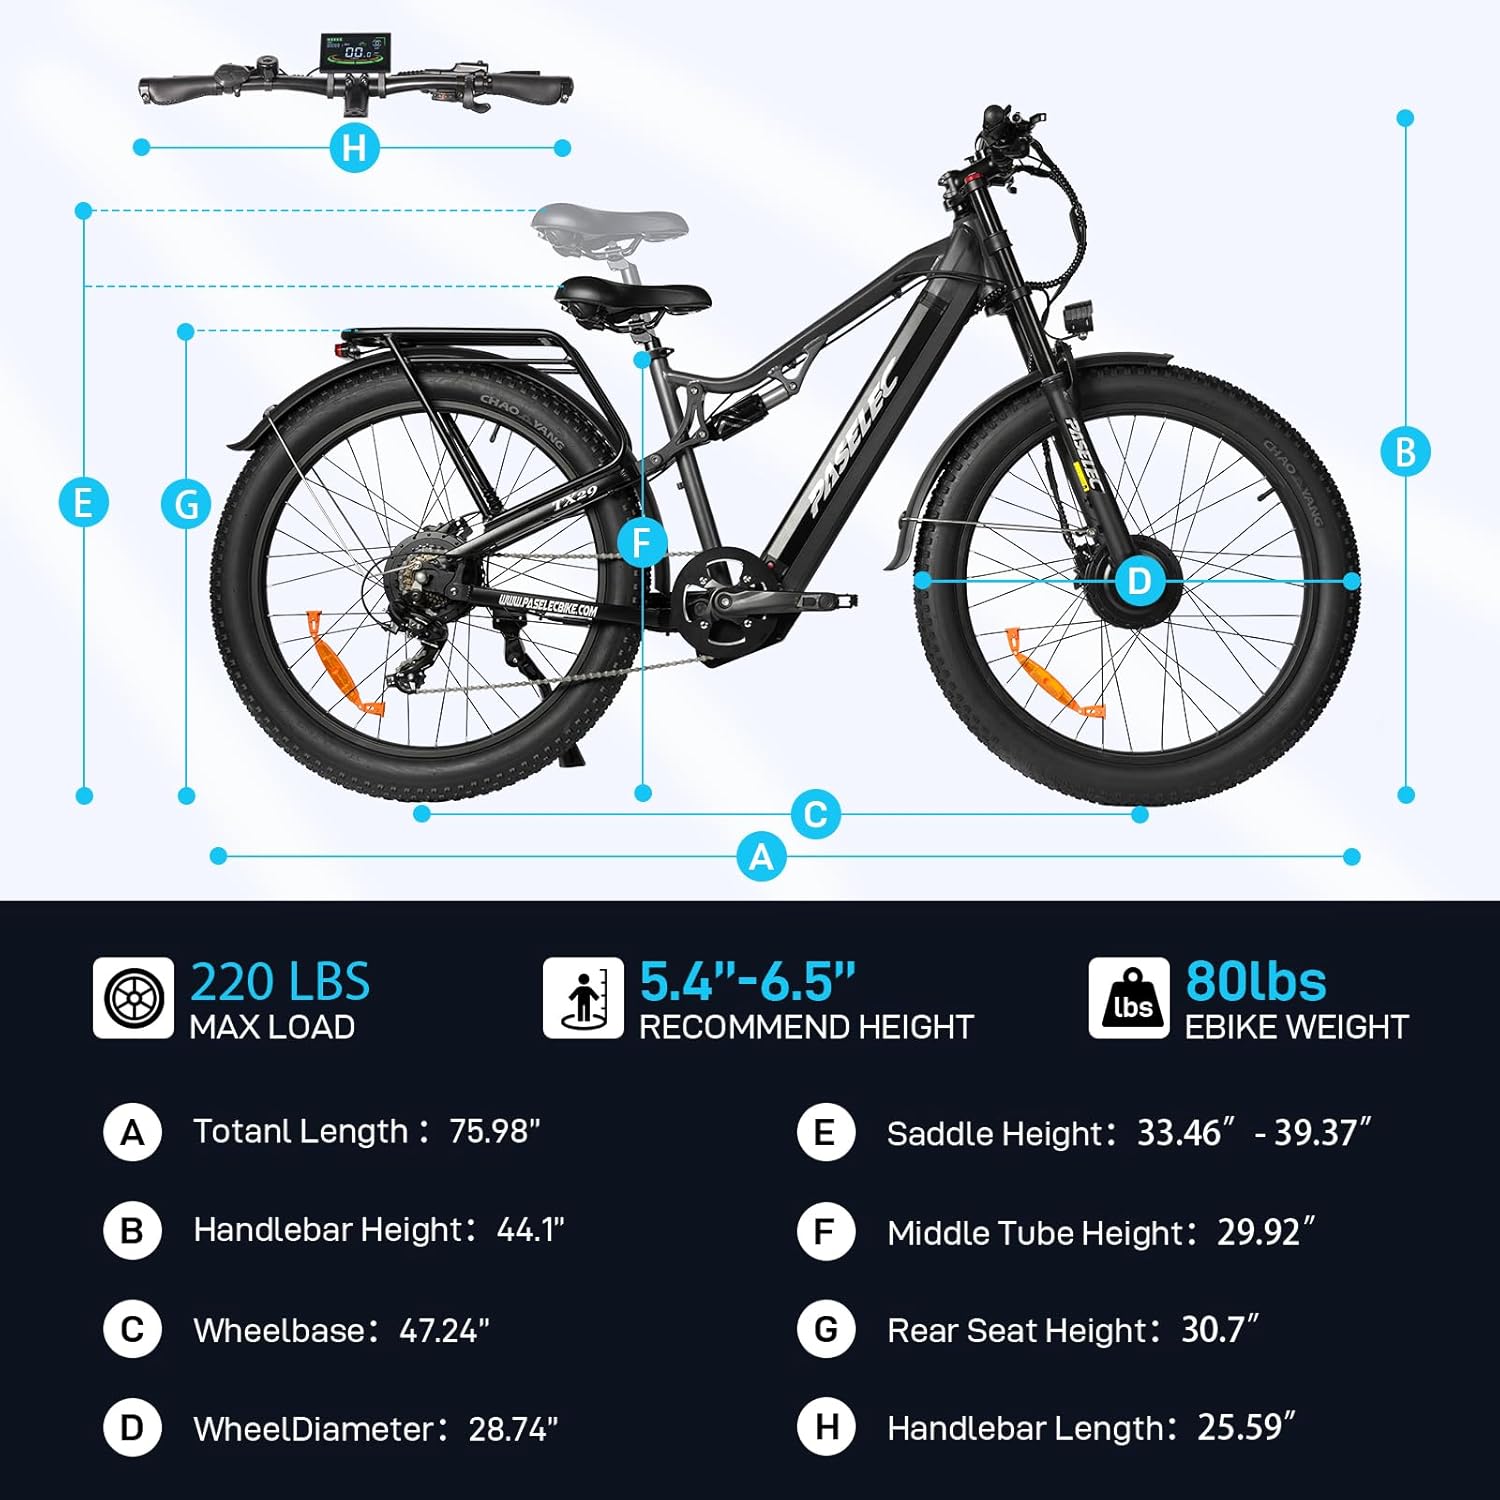
Figure 7.1: PASELEC TX29 Electric Bike dimensions and weight capacity.
| Feature | Detail |
|---|---|
| Model Name | TX29 Electric Bike |
| Bike Type | Electric Mountain Bike, Fat Tire Electric Bike |
| Motor | 3000W Peak Dual Brushless Motors |
| Battery | 48V 19.2Ah Lithium-ion (940Wh) |
| Max Speed | Up to 35 MPH |
| Max Range | Up to 65 miles (pedal assist), 35 miles (pure electric) |
| Charging Time | 5-6 hours |
| Tires | 27.5" x 3.0" Fat Tires |
| Suspension | Dual Suspension (Front and Rear) |
| Gears | 7-Speed Shifter |
| Brakes | Hydraulic Disc Brakes |
| Frame Material | Aluminum |
| Item Weight | 80 Pounds |
| Max Load Capacity | 300 Pounds |
| Recommended User Height | 5.4 - 6.5 Feet |
| UPC | 755502213549 |
8. Warranty and Support
PASELEC is committed to providing quality products and customer service.
8.1 Warranty Information:
- Frame: 1-year limited warranty.
- Electric Motor, Battery, and Charger: 6-month limited warranty.
- This warranty covers manufacturing defects and does not cover damage due to misuse, accidents, or normal wear and tear.
8.2 Customer Support:
PASELEC offers 24-hour online after-sales service and 12-month repair service. If you have any questions, require assistance, or need to claim warranty service, please contact our dedicated support team.
Contact information can typically be found on the PASELEC official website or through your purchase platform.


