Introduction
The Hoestr Body Camera Hoestr03 is a compact, high-definition camcorder designed for various recording needs, including home security, patrol, travel, delivery, and outdoor activities. Featuring 1296P video recording, IR night vision, and a 180° rotatable lens, this device offers versatile functionality. Its long-lasting 3000mAh battery ensures extended recording times, and the included 64GB TF card provides ample storage. This manual provides detailed instructions for setup, operation, and maintenance to ensure optimal performance of your device.
Package Contents
Please verify that all items listed below are included in your package:
- 1 x Hoestr Body Camera Hoestr03
- 1 x 64GB TF Card
- 2 x Back Clips (for clothes and bicycle mounting)
- 1 x USB-C Cable
- 1 x User Manual
Product Overview
The Hoestr Body Camera Hoestr03 is designed for ease of use and durability. Familiarize yourself with its components and controls.

Figure 1: Hoestr Body Camera Hoestr03, showing its compact size when held in hand.
Key Features:
- Compact Design: Palm-sized (3.5 x 1.6 x 0.6 inches) and lightweight (2.75 ounces) for discreet and portable use.
- 180° Rotatable Lens: Manually adjust the lens to capture footage from various angles (front, top, back, or anything in between).
- 1.54-inch LCD Screen: For live view, menu navigation, and playback.
- Integrated Clips: Includes sturdy clips for attaching to clothing, backpacks, or bicycles.
- USB-C Port: For charging and data transfer.
- Micro SD Card Slot: Supports up to 256GB (64GB card included).
Controls and Indicators:

Figure 2: Quick Operation Help diagram illustrating the location and function of buttons and ports.
- TF Card Slot: Insert/remove Micro SD card (FAT32, 256GB MAX).
- Power On/Off Button: Long press to power on/off.
- Menu/OK Button: Long press 'M' key to enter menu, set language, date, formatting. Press 'OK' to confirm selections.
- Record Video Slider: Slide up to start recording video, slide down to save.
- Night Vision Key (Volume +): Short press during recording to activate/deactivate night vision.
- Image Rotation Key (Volume -): Press before recording to rotate upside-down image.
- Record Audio Slider: Slide up to start recording audio, slide down to save.
- USB-C Port: Connect to computer for file management or charging.
Setup
1. Inserting the TF Card
Ensure the device is powered off. Gently insert the provided 64GB TF card into the TF card slot until it clicks into place. The camera supports FAT32 format and up to 256GB capacity.
2. Charging the Device
Connect the USB-C cable to the camera's USB-C port and the other end to a USB power adapter (not included) or a computer. The device takes approximately 4 hours to fully charge. A full charge provides up to 10 hours of 1080P video recording (under default settings).
Basic Operation
1. Power On/Off
Long press the Power On/Off button located on the side of the device until the screen lights up. To power off, long press the same button until the screen shuts down.
2. Video Recording
With the device powered on, slide the Record Video slider up to begin 1080P video recording. The screen will display recording indicators. To stop recording and save the file, slide the slider down.
3. Audio Recording
To record audio only, slide the Record Audio slider up. The device will begin recording audio. To stop recording and save the audio file, slide the slider down.
4. Taking Photos
While in standby mode, press the Photo button (often integrated with the Menu/OK button or a dedicated button) to capture a still image.
Advanced Features
1. 180° Rotatable Lens
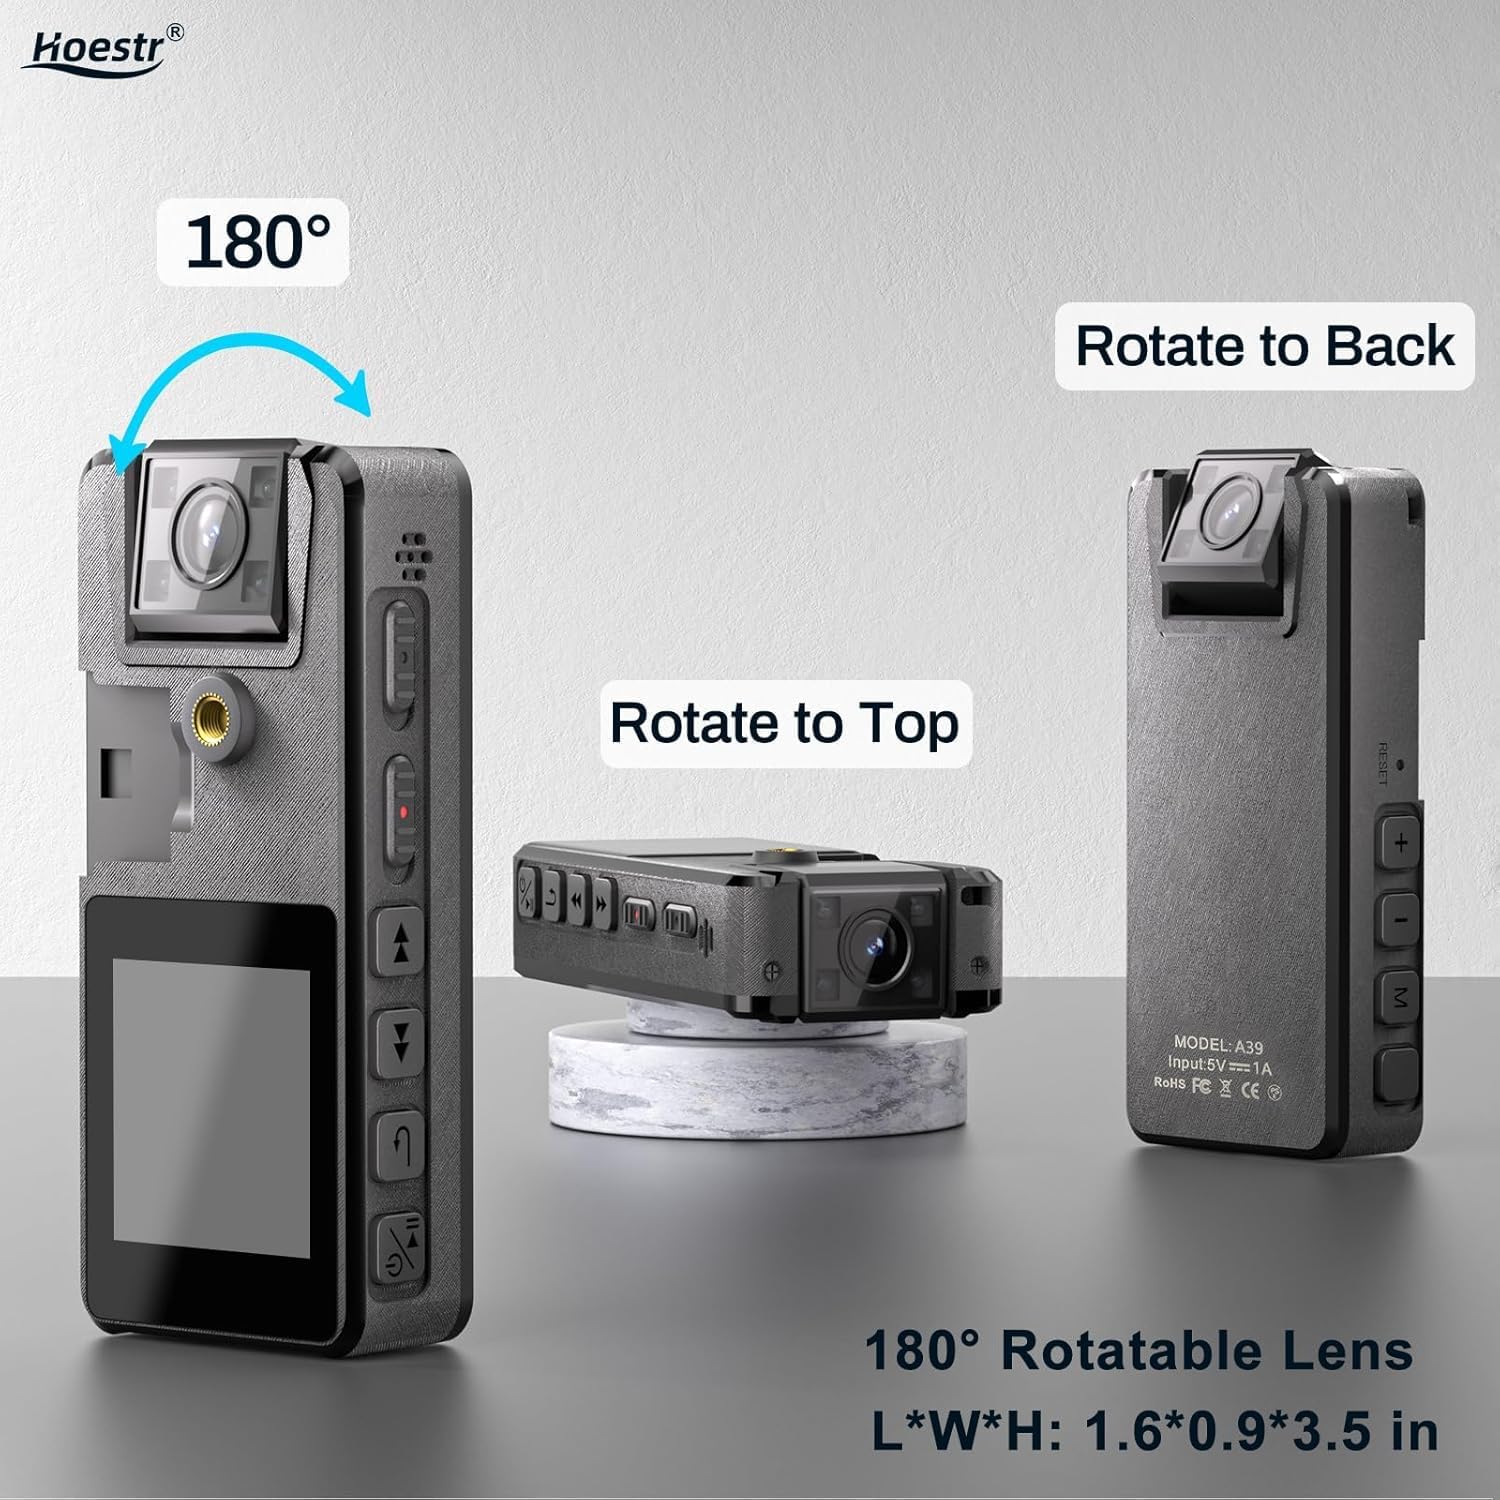
Figure 3: The 180° rotatable lens allows for flexible recording angles, shown in various positions.
The camera's lens can be manually rotated 180 degrees. This allows you to adjust the viewing angle to suit your recording needs, whether it's forward-facing, upward, or backward.
2. IR Night Vision

Figure 4: IR Night Vision in action, providing clear visuals in low-light conditions.
To activate night vision, short press the 'Volume +' button during recording. This feature enables the camera to record visual images even in dimly lit environments.
3. Motion Detection
Enable motion detection through the device's menu. When activated, the camera will automatically start recording when it detects movement and stop when the scene becomes static. This helps conserve battery life and storage space.
4. Image Rotation
If your image appears upside down due to the lens orientation, press the 'Volume -' button before recording to rotate the image 180 degrees. This eliminates the need for post-processing.
5. Auto Save & Time Stamp
Videos are automatically saved every 10 minutes to prevent data loss. All recordings come with a default time stamp for easy organization and verification.
Connecting to Computer
To manage your recorded files, connect the Hoestr Body Camera Hoestr03 to your computer using the provided USB-C cable. The device will appear as a removable storage drive. You can then access, transfer, or delete your video and audio files.
Video 1: A seller-provided video demonstrating the use experience of a mini body camera, including connecting to a computer.
Maintenance
- Keep the camera clean by wiping it with a soft, dry cloth.
- Avoid exposing the device to extreme temperatures, direct sunlight, or moisture.
- Do not attempt to disassemble or repair the camera yourself, as this will void the warranty.
- Regularly back up your recorded files to prevent data loss.
Troubleshooting
If you encounter any issues with your Hoestr Body Camera Hoestr03, please refer to the following common solutions:
- Device not powering on: Ensure the battery is charged. Connect to a power source and try again.
- Cannot record: Check if the TF card is inserted correctly and has sufficient free space. Format the TF card if necessary (this will erase all data).
- Poor video quality: Ensure the lens is clean. Check lighting conditions and activate night vision if needed.
- Image is upside down: Use the 'Volume -' button to rotate the image before recording.
- Device unresponsive: Try resetting the device by gently pressing the reset button (if available, refer to the physical device for location) or by powering it off and on again.
Specifications
| Feature | Specification |
|---|---|
| Brand | Hoestr |
| Model Number | Hoestr03 |
| Item Weight | 2.82 ounces |
| Product Dimensions | 3.5 x 0.9 x 1.6 inches |
| Battery | 3000mAh Lithium Ion (included) |
| Video Capture Resolution | 1296P, 1080P, 720P |
| Video Capture Format | MOV |
| Supported Audio Format | AAC |
| Photo Sensor Technology | CMOS |
| Flash Memory Type | Micro SD (up to 256GB) |
| Screen Size | 1.54 Inches |
| Connectivity Technology | USB |
| Special Features | IR Night Vision, Motion Detection, 180° Rotatable Lens |
Warranty and Support
Hoestr offers a comprehensive 12-month warranty for the Body Camera Hoestr03. Additionally, lifetime customer assistance is available to address any inquiries or issues you may encounter. Please do not hesitate to reach out to us anytime, and we guarantee a response within 24 hours.
Video 2: A seller-provided video showcasing the use experience and features of mini body cameras.


