1. Introduction
This manual provides detailed instructions for the safe and effective operation, setup, and maintenance of your AZZUNO MF-160PRO-3 5-in-1 Plasma Cutter Welder Combo. This versatile machine supports Plasma Cutting, HF TIG, Flux MIG, Gas MIG, and Stick welding, making it suitable for a wide range of metalworking tasks.

Image 1.1: The AZZUNO MF-160PRO-3 5-in-1 Plasma Cutter Welder Combo with included accessories.
2. Safety Information
Always prioritize safety when operating welding and cutting equipment. Failure to follow safety guidelines can result in serious injury or death. Read and understand all safety warnings before use.
- Eye and Face Protection: Always wear a welding helmet with appropriate shade lenses and safety glasses underneath.
- Body Protection: Wear flame-resistant clothing, heavy-duty gloves, and protective footwear.
- Ventilation: Ensure adequate ventilation to remove fumes and gases. Work in a well-ventilated area or use a fume extractor.
- Fire Prevention: Keep a fire extinguisher nearby. Remove all flammable materials from the work area.
- Electrical Safety: Ensure the machine is properly grounded. Do not operate in wet conditions. Inspect cables and connections for damage before each use.
- Gas Cylinder Safety: Secure gas cylinders to prevent tipping. Handle cylinders with care and ensure proper regulators are used.
- Overheat and Over-current Protection: The machine is equipped with built-in protection features. Allow the machine to cool down if an overheat warning occurs.

Image 2.1: The AZZUNO MF-160PRO-3 features safety protections such as rapid fan cooling, low noise operation, overheat protection, and over-current protection.
3. Product Overview and Features
The AZZUNO MF-160PRO-3 is a versatile 5-in-1 welding and cutting machine designed for various applications. Its key features include:
- 5-in-1 Multifunctionality: Supports Plasma Cutting, HF TIG, Flux MIG, Gas MIG, and Stick welding.
- Dual Voltage Capability: Operates on both 110V and 220V power supplies.
- Synergic MIG Welding: Advanced digital control automatically adjusts current and wire feeding speed based on selected wire diameter and gas type.
- High-Frequency TIG: Non-contact arc starting for improved precision and reduced contamination.
- Efficient Plasma Cutting: Up to 40A output, capable of clean cuts up to 10mm and maximum cuts up to 14mm at 220V.

Image 3.1: The five primary functions of the AZZUNO MF-160PRO-3 welding machine.
4. Packing List
Verify that all items listed below are included in your package:
- Multi-function Welder Machine (1)
- 15AK MIG Torch (1)
- Plasma Cutting Torch with Consumables (1)
- TIG Torch with Consumables (1)
- Air Filter Regulator (1)
- Hammer (1)
- Gas hose (2)
- Ground Clamp (1)
- Electrode Holder (1)
- 110V~220V Adapter (1)
- V Knurl groove drive roller: .030"/.035" (1)

Image 4.1: Included accessories with the AZZUNO MF-160PRO-3.
5. Setup
5.1 Panel Introduction
Familiarize yourself with the control panel and connection points:

Image 5.1: Front panel and connection points of the AZZUNO MF-160PRO-3.
5.2 Power Connection
Connect the machine to a suitable power outlet (110V or 220V) using the provided adapter if necessary. Ensure the power source matches the machine's requirements.
5.3 Welding Connections
Refer to the diagram below for correct torch and ground clamp connections for each welding/cutting mode:

Image 5.2: Connection diagrams for various welding and cutting modes.
- Plasma Cut: Connect the plasma torch and ground clamp as shown. Connect the air filter regulator to a compressed air source and then to the machine.
- Flux MIG: Connect the MIG torch and ground clamp. No external gas cylinder is required for flux-cored wire.
- Gas MIG: Connect the MIG torch, ground clamp, and gas hose to the appropriate gas cylinder (e.g., CO2 or Argon/CO2 mix).
- HF TIG: Connect the TIG torch, ground clamp, and gas hose to an Argon gas cylinder.
- Stick (MMA): Connect the electrode holder and ground clamp.
6. Operating Instructions
6.1 General Operation
The machine features a user-friendly interface with one button and two knobs for operation:

Image 6.1: Easy-to-operate control panel with mode button and adjustment knobs.
- Mode Selection: Use the 'CHOOSE' button to cycle through Plasma Cut, HF TIG, Flux MIG, Gas MIG, and Stick welding modes.
- Adjustment Knobs: The two knobs adjust parameters such as voltage, amperage, and wire feed speed depending on the selected mode.
6.2 Plasma Cutting
The plasma cutting function offers precise and efficient cutting across various materials.
- Capacity: Achieves a clean cut of 10mm and a maximum cut of 14mm at 220V. For 110V, clean cut is 6mm and max cut is 8mm.
- Materials: Suitable for stainless steel, alloy steel, mild steel, copper, and aluminum.
- Operation: Ensure proper air pressure is set via the air filter regulator. Adjust cutting current using the appropriate knob.

Image 6.2: Plasma cutting capabilities and specifications.
6.3 MIG Welding (Gas/Flux)
The synergic MIG welding feature simplifies setup and operation.
- Synergic Control: The system automatically adjusts recommended current and wire feeding speed based on selected wire diameter (e.g., 0.035" Flux, 0.030" CO2, 0.030" Mix) and gas type.
- Wire Installation: Install the appropriate wire spool and feed the wire through the MIG torch.
- Gas Connection (Gas MIG): Connect the gas hose to the machine and a suitable gas cylinder (e.g., CO2 or Argon/CO2 mix).

Image 6.3: Gas/Gasless MIG welding features.
6.4 HF TIG Welding
High-Frequency TIG mode is ideal for precise welding.
- Non-Contact Arc Starting: Improves precision and reduces contamination.
- Materials: Best suited for welding mild steel and stainless steel with high accuracy.
- Gas: Requires Argon gas. Ensure the gas flow rate is correctly set.
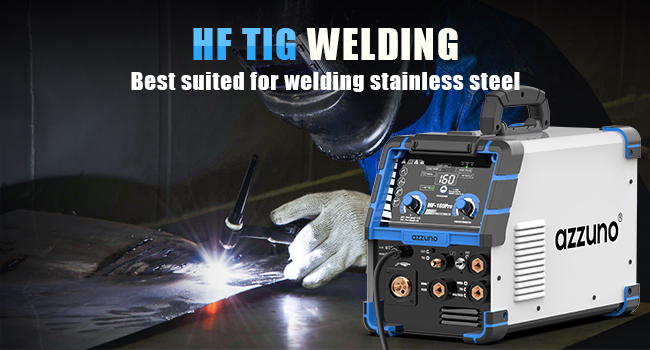
Image 6.4: HF TIG welding in action.
6.5 Stick Welding (MMA)
For general-purpose welding with coated electrodes.
- Electrode Selection: Choose appropriate electrodes for your material and application.
- Current Adjustment: Adjust the amperage knob to match the electrode and material thickness.
7. Maintenance
Regular maintenance ensures optimal performance and extends the lifespan of your machine.
- Cleaning: Keep the machine clean and free from dust and debris. Use compressed air to clean internal components periodically.
- Consumables: Regularly inspect and replace worn-out consumables for plasma torches, TIG torches, and MIG guns (nozzles, tips, electrodes, collets).
- Cable Inspection: Check all cables and connections for cuts, fraying, or loose connections. Replace damaged cables immediately.
- Air Filter Regulator: Periodically drain any accumulated moisture from the air filter regulator and clean or replace the filter element as needed.
8. Troubleshooting
This section addresses common issues you might encounter. For problems not listed here, contact customer support.
- No Power: Check power connections, circuit breaker, and ensure the machine's power switch is on.
- No Arc/Poor Arc: Verify ground clamp connection, check consumables for wear, ensure correct settings (voltage, amperage, wire feed speed, gas flow), and inspect cables for damage.
- Error Codes: If an error code (e.g., E1) appears on the display, consult the specific error code section in the full manual or contact customer support for detailed interpretation and solutions.
- Overheat Protection Activated: If the machine stops operating and an overheat indicator lights up, allow the machine to cool down for several minutes before resuming operation. Ensure proper ventilation.
9. Specifications
Key technical specifications for the AZZUNO MF-160PRO-3:
| Feature | Specification |
|---|---|
| Manufacturer | AZZUNO |
| Part Number | MF-160PRO-3 |
| Item Weight | 22 pounds |
| Package Dimensions | 23 x 17.3 x 16.2 inches |
| Style | Plasma Cutter Welder Combo |
| Input Voltage | 110V/220V |
| Plasma Cut Output | 40A (Max) |
| Clean Cut (220V) | 10mm |
| Max Cut (220V) | 14mm |
| Clean Cut (110V) | 6mm |
| Max Cut (110V) | 8mm |

Image 9.1: Comprehensive technical specifications for the AZZUNO MF-160PRO-3.

Image 9.2: Physical dimensions and weight of the AZZUNO MF-160PRO-3.
10. Product Video
Watch this video for a demonstration of the AZZUNO Plasma Cutter Welder Combo 5 in 1 160A in use.
Video 10.1: Demonstration of the AZZUNO Plasma Cutter Welder Combo 5 in 1 160A.
11. Warranty and Support
The AZZUNO MF-160PRO-3 typically comes with a 1-year warranty. For warranty claims, technical support, or any questions regarding your product, please contact AZZUNO customer service through their official channels or the retailer where the product was purchased.
Keep your purchase receipt and product serial number handy when contacting support.


