
1. Introduction
Thank you for choosing the JmGO N5-Ultra-Max 4K Laser Projector. This manual provides essential information for the safe and efficient operation of your device. Please read it thoroughly before use and retain it for future reference.
The JmGO N5-Ultra-Max is a high-performance 4K laser projector designed for home cinema environments. It features Qualas 32 Triple Color Laser technology, delivering 6000 ISO Lumens of brightness, native 4K Ultra HD resolution, and a wide color gamut. Equipped with a powerful MT9681 CPU, 8GB RAM, and 128GB storage, it offers advanced image processing and a smooth user experience. The integrated 2x12.5W DYNAUDIO stereo speakers provide immersive audio. This projector operates on an Android Chinese OS and includes a KD3 Google TV Stick for access to global Android TV services.

Figure 1.1: Front view of the JmGO N5-Ultra-Max Projector.
2. Safety Information
2.1 Laser Safety
This product contains a laser module. It is classified as a Class 1 laser product in compliance with IEC 60825-1:2014. The maximum output of laser radiation is 0.39mW. The emission wavelengths are Blue: 455~475nm, Red: 635~655nm, and Green: 515~535nm.
WARNING: Do not disassemble or modify this module in a manner not specified in this manual without authorization. Failure to follow this guideline may result in personal injury. As with any bright light source, do not stare directly into the projector's beam. This product is rated RG2 according to IEC 62471-5:2015.
2.2 General Safety Precautions
- Ensure proper ventilation around the projector to prevent overheating. Do not block ventilation openings.
- Do not expose the projector to rain, moisture, or extreme temperatures.
- Use only the power adapter supplied with the projector.
- Avoid placing the projector on unstable surfaces.
- Keep the projector away from water and other liquids.
- Unplug the projector during lightning storms or when unused for extended periods.
3. Package Contents
Verify that all items are present in the package:
- JmGO N5-Ultra-Max 4K Laser Projector
- Power Adapter
- Remote Control
- KD3 Google TV Stick (for global version functionality)
- User Manual (this document)
4. Setup Guide
4.1 Placement
Place the projector on a stable, flat surface. Ensure there is adequate space around the projector for ventilation. The optimal projection distance will vary based on desired screen size and the projector's throw ratio (0.88~1.7:1).
4.2 Power Connection
- Connect the power adapter to the projector's power input port.
- Plug the power adapter into a suitable electrical outlet.
4.3 Connecting External Devices
The projector features various ports for connecting external devices:

Figure 4.1: Rear view of the projector with connectivity ports.
- HDMI 2.1 (eARC) x1: Connect to Blu-ray players, gaming consoles, or other HDMI output devices. The eARC port supports enhanced audio return channel for high-quality audio to compatible sound systems.
- HDMI 2.1 x1: Additional HDMI input for other devices.
- USB 3.0 x1: Connect USB storage devices for media playback or other peripherals.
- Dual-Bands WIFI 6: For wireless network connectivity.
- Bluetooth 5.2/BLE: For connecting wireless audio devices or the remote control.
4.4 Initial Power On and Basic Settings
After connecting power, press the power button on the projector or remote control to turn it on. The projector will typically perform an automatic focus and keystone correction. Follow the on-screen prompts for initial setup, including language selection and network connection.
4.5 KD3 Google TV Stick Setup
If you intend to use the global Android TV OS, connect the KD3 Google TV Stick to an available HDMI port and a USB power source (e.g., the projector's USB port or a separate adapter). Switch the projector's input source to the HDMI port where the KD3 stick is connected and follow the on-screen instructions to set up the Google TV Stick.
5. Operation
5.1 Power On/Off
- Power On: Press the power button on the projector or the remote control.
- Power Off: Press the power button on the remote control once to enter standby mode. Press and hold the power button on the remote or projector for a few seconds to fully power off.
5.2 Remote Control Functions
The Bluetooth remote control allows navigation, input selection, volume control, and access to settings. Refer to the remote control's specific button layout for detailed functions.
5.3 Input Source Selection
Use the remote control to access the input source menu and select the desired input (e.g., HDMI 1, HDMI 2, USB, or the internal Android OS).
5.4 Image Adjustment
- Auto Focus: The projector features automatic focus. If the image appears blurry, you can often trigger auto-focus from the settings menu or by slightly moving the projector.
- Auto Keystone Correction: The projector automatically corrects trapezoidal distortion. If manual adjustment is needed, access the keystone correction settings in the menu.
- Lens Shift: The N5-Ultra-Max supports ±130% vertical shift and ±53% horizontal shift, allowing for flexible placement without distorting the image. Access these settings in the projector's image menu.
- Optical Zoom: The 0.88~1.7:1 ultra-wide lossless zoom allows for adjusting the image size without moving the projector. This can be controlled via the projector's settings.
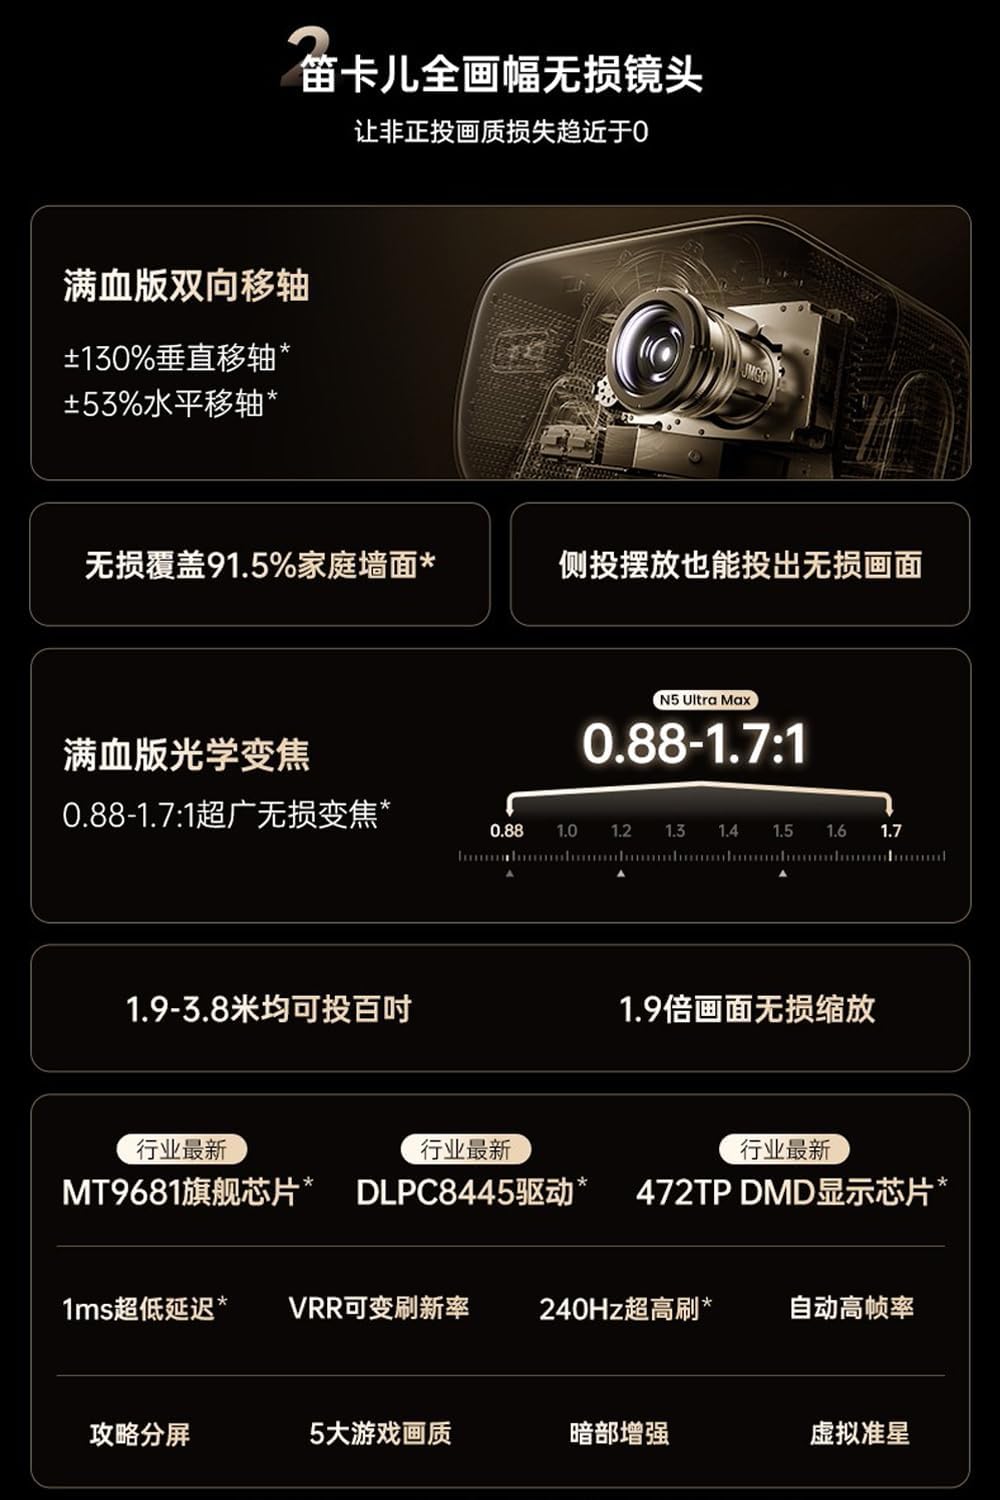
Figure 5.1: Illustration of lens shift and optical zoom features.
5.5 Navigating the Android OS
The projector's built-in Android Chinese OS provides access to various applications and settings. Use the remote control's directional buttons and 'OK' button to navigate the interface. For global content and services, the KD3 Google TV Stick is recommended.
5.6 Using the KD3 Google TV Stick
Once the KD3 Google TV Stick is set up and selected as the input source, you can access Google Play Store, streaming apps like Netflix, and other Google services. Use the KD3 remote (if separate) or the projector's remote (if paired) to navigate the Google TV interface.
6. Maintenance
6.1 Lens Cleaning
Gently wipe the projector lens with a soft, lint-free cloth specifically designed for optical lenses. Do not use abrasive cleaners or excessive force, as this can scratch the lens.
6.2 Ventilation
Regularly check that the projector's ventilation openings are clear of dust and obstructions. Use a soft brush or compressed air to clean the vents if necessary. Proper airflow is crucial for preventing overheating and ensuring the longevity of the projector.
6.3 Storage
When not in use for extended periods, store the projector in a cool, dry, and dust-free environment. Use the original packaging or a protective cover to shield it from dust and potential damage.
7. Troubleshooting
If you encounter issues with your JmGO N5-Ultra-Max projector, refer to the following common problems and solutions:
- No Power:
- Ensure the power adapter is securely connected to both the projector and a working electrical outlet.
- Check if the power indicator light on the projector is on.
- Try a different power outlet.
- No Image:
- Verify that the correct input source is selected (e.g., HDMI 1, HDMI 2).
- Check the connection cable between the projector and the source device.
- Ensure the source device is powered on and outputting a signal.
- Blurry Image:
- Allow the projector to perform auto-focus. If it doesn't, manually trigger it from the settings.
- Ensure the projector lens is clean.
- Check the projection distance and adjust if necessary.
- No Sound:
- Increase the volume on both the projector and the source device.
- Check audio settings on the source device and the projector.
- If using external speakers, ensure they are properly connected and powered on.
- Remote Control Not Responding:
- Replace the batteries in the remote control.
- Ensure there are no obstructions between the remote and the projector.
- Re-pair the Bluetooth remote control with the projector if necessary (refer to the projector's settings menu).
8. Specifications
Detailed technical specifications for the JmGO N5-Ultra-Max 4K Laser Projector:
| Feature | Specification |
|---|---|
| Brand | JmGO |
| Model Number | N5-Ultra-Max |
| Display Technology | Qualas 32 Lossless Eye Protection Triple Color Laser, 472TP DMD DLP Chips |
| Native Resolution | 4K Ultra HD (3840 x 2160) |
| Brightness | 6000 ISO Lumens (5000 CVIA Lumen) |
| Throw Ratio | 0.88~1.7:1 Ultra-Wide Lossless Zoom |
| Contrast Ratio | FOFO 11000:1 |
| Color Space | 110% BT.2020 |
| Color Accuracy | Delta E < 0.7 |
| HDR Support | Dolby Vision & HDR Vivid |
| Lens Shift | ±130% Vertical, ±53% Horizontal |
| CPU | MT9681 Flagship CPU |
| RAM | 8GB |
| Internal Storage | 128GB eMMC |
| Operating System | Android Bonfire Chinese Version OS (with KD3 Google TV Stick for Global Version) |
| Audio | 2x12.5W Dolby Audio HiFi Speaker, Subwoofer low to 35Hz |
| Connectivity | HDMI 2.1 (eARC) x1, HDMI 2.1 x1, USB 3.0 x1, Dual-Bands WIFI 6, Bluetooth 5.2/BLE |
| Refresh Rate | VBR 240Hz Ultra-High Refresh Rate |
| Latency | 1ms Ultra-Low Latency |
| Laser Safety Standard | Class 1 (IEC 60825-1:2014), RG2 (IEC 62471-5:2015) |
| Dimensions (L x W x H) | 12.17 x 9.13 x 10.83 inches |
| Weight | 15.18 pounds |

Figure 8.1: Internal MT9681 processor and memory components.
9. Warranty and Support
For warranty information and customer support, please refer to the warranty card included with your product or visit the official JmGO website. Keep your purchase receipt as proof of purchase for warranty claims.
If you require technical assistance or have questions not covered in this manual, please contact JmGO customer service through their official channels.


