Introduction
Thank you for choosing the Ortizan D1 Dynamic XLR/USB Microphone. This manual provides essential information for the proper setup, operation, and maintenance of your microphone. Please read it thoroughly before use to ensure optimal performance and longevity of the product.
What's Included
The Ortizan D1 Dynamic XLR/USB Microphone package includes the following components:
- 1 × USB/XLR Dynamic Microphone
- 1 × Microphone Pop Filter
- 1 × XLR Cable
- 1 × USB-A to USB-C Cable
- 1 × Boom Arm Clamp
- 1 × Boom Arm Stand
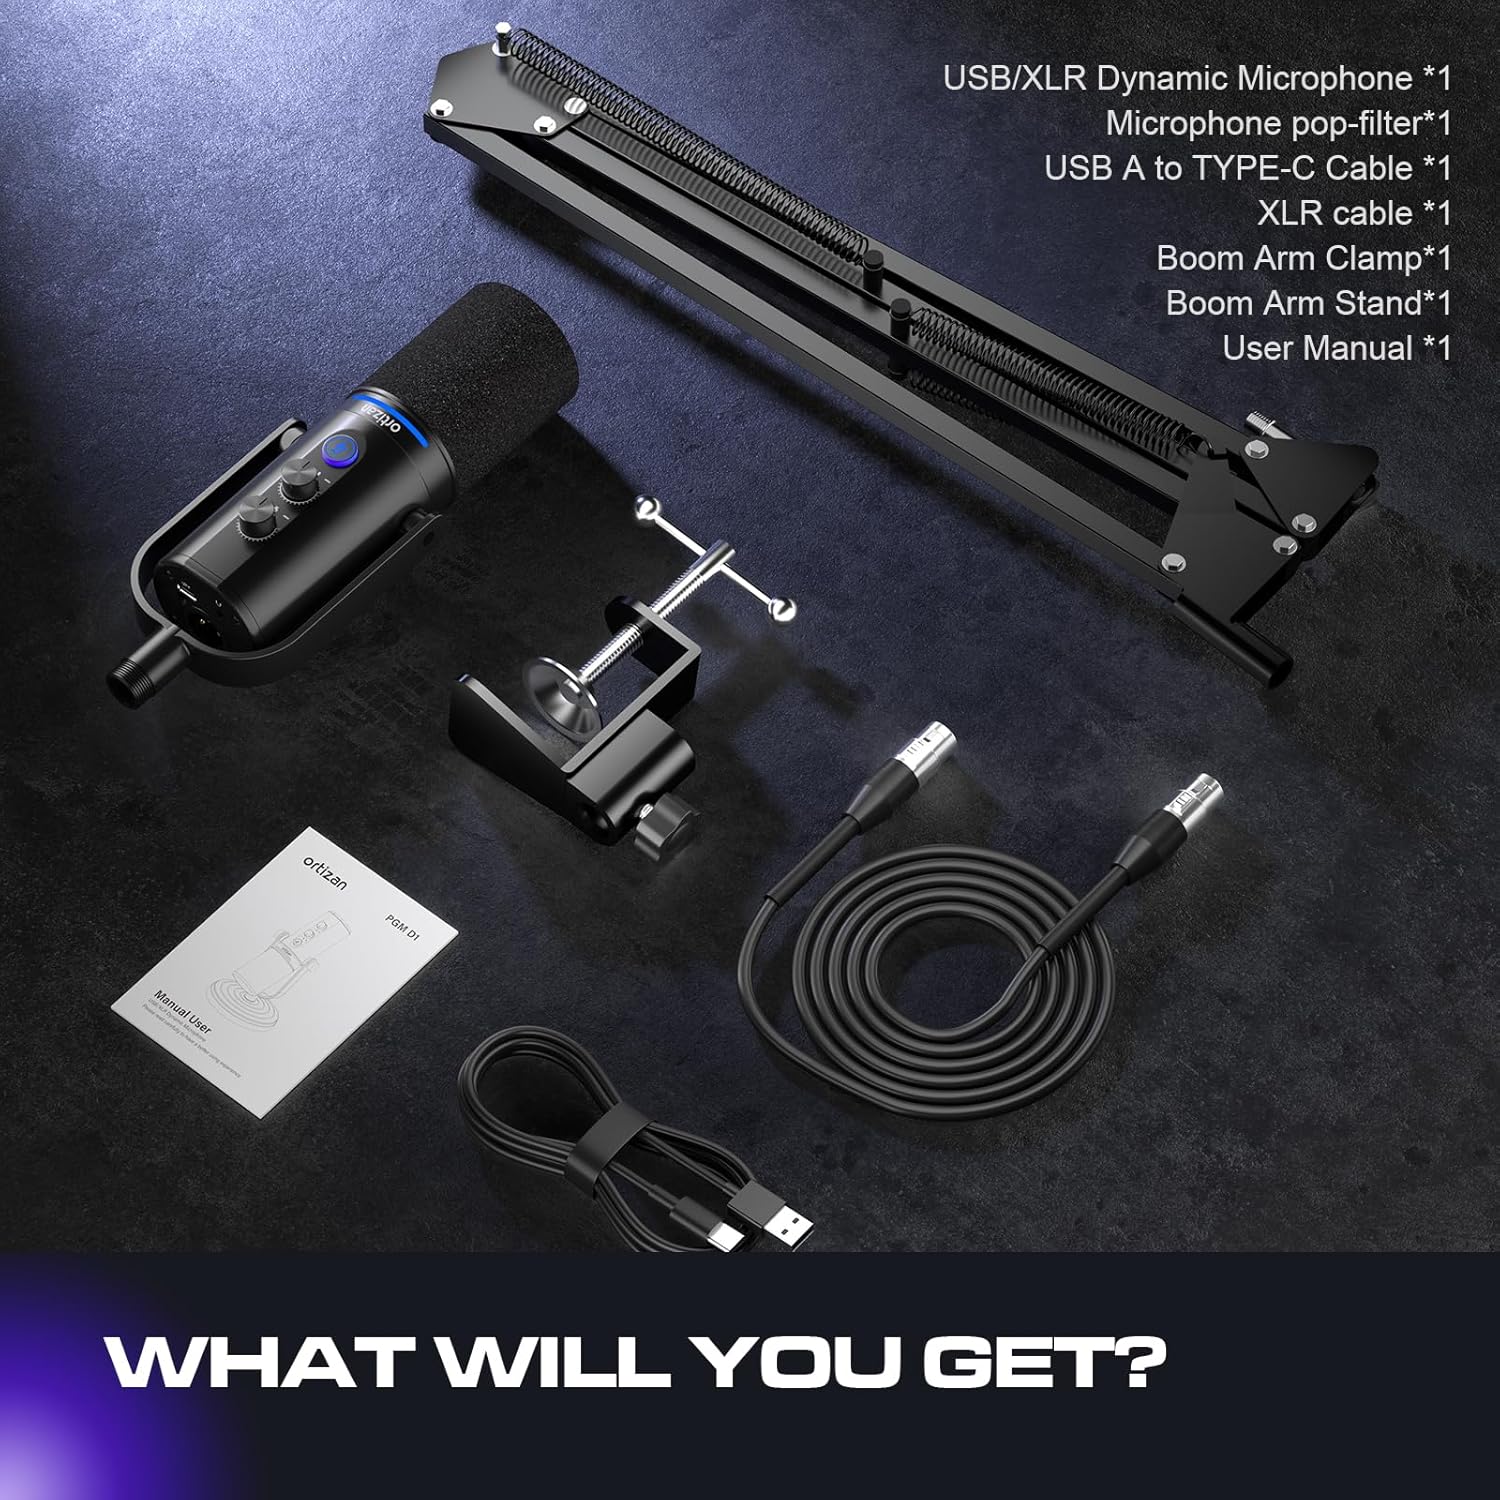
Image: All components included in the Ortizan D1 microphone package.
Product Overview
The Ortizan D1 microphone is designed for high-quality audio capture in various applications, including podcasting, streaming, gaming, and recording. It features dual USB and XLR connectivity for versatile use.
Key Features:
- Clean Sound Quality: Offers a frequency response of 40Hz to 16kHz, providing a balanced and detailed sound. The super-cardioid pickup pattern effectively minimizes ambient noise from sources like hard drives or computer fans, ensuring your voice remains clear and prominent.
- Flexible Connectivity: Equipped with both USB and XLR connections, making it suitable for various audio setups. The XLR interface enhances sound space for immersive podcasting and professional audio transfer, while the USB connection is convenient for daily recording needs and portability.
- Mute Button & Noise Reduction: Features a dedicated mute button for instant silencing, useful for privacy during live streams or avoiding unnecessary noise during recording. Pressing and holding the mute button activates noise reduction (available only for USB connection), ensuring audio authenticity and clarity.
- Real-time Monitoring & Volume Control: Includes a 3.5mm headphone jack for real-time audio monitoring and a headphone volume control knob. This allows you to monitor your output sound and adjust monitoring levels directly on the microphone.
- Sturdy & Flexible Arm Stand: Comes with an adjustable boom arm stand. The clamp fits most desktops up to 2 inches thick. Both the boom arm and microphone are adjustable, allowing you to position the microphone at the ideal angle and height.
- RGB Lighting Modes: Features 7 RGB lighting modes to enhance your streaming or gaming environment.

Image: Extreme Noise Reduction capabilities of the Ortizan D1 microphone.

Image: Simple and comprehensive functions on the microphone body.

Image: Supercardioid Dynamic Mic with recommended best range for use.
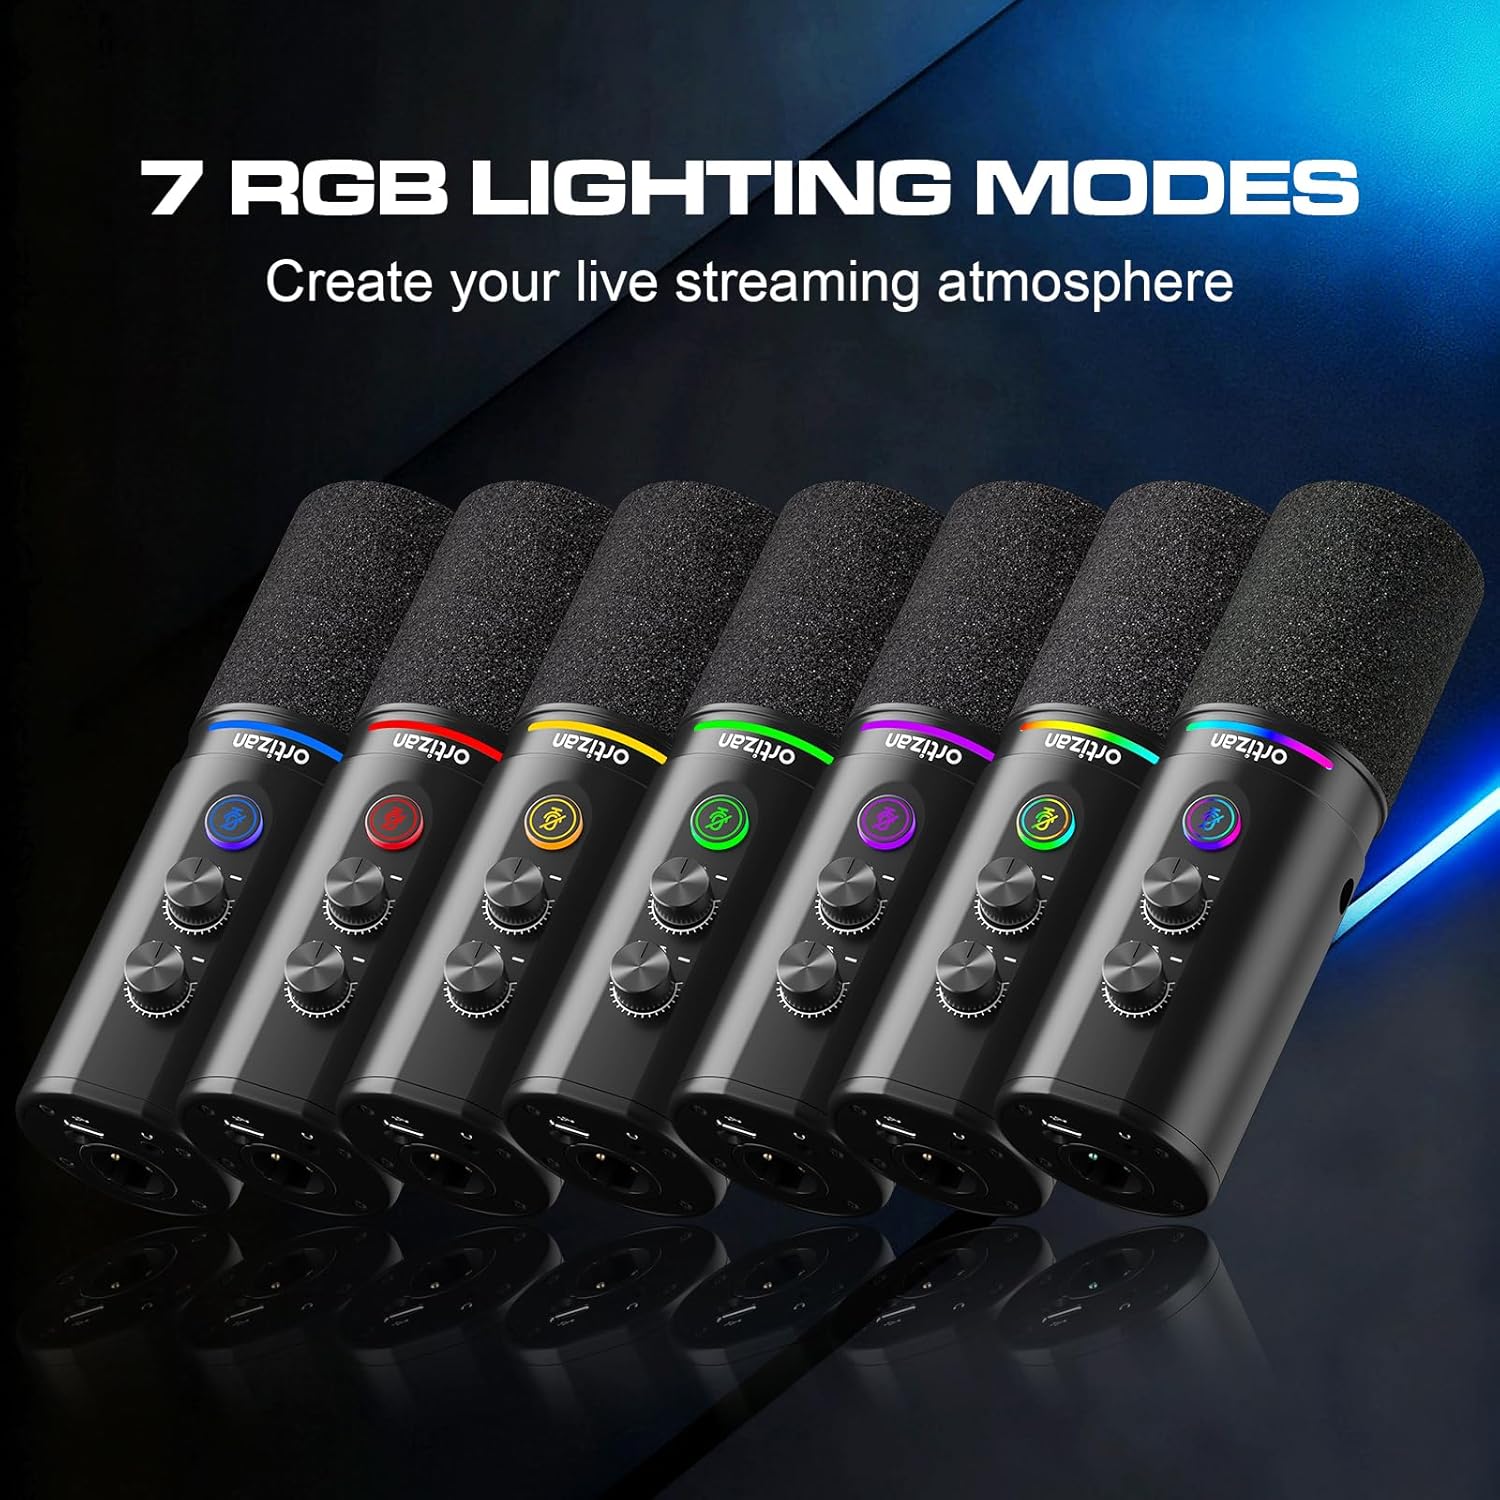
Image: The 7 RGB Lighting Modes available on the microphone.

Image: USB-C and XLR Connectivity options and compatibility.
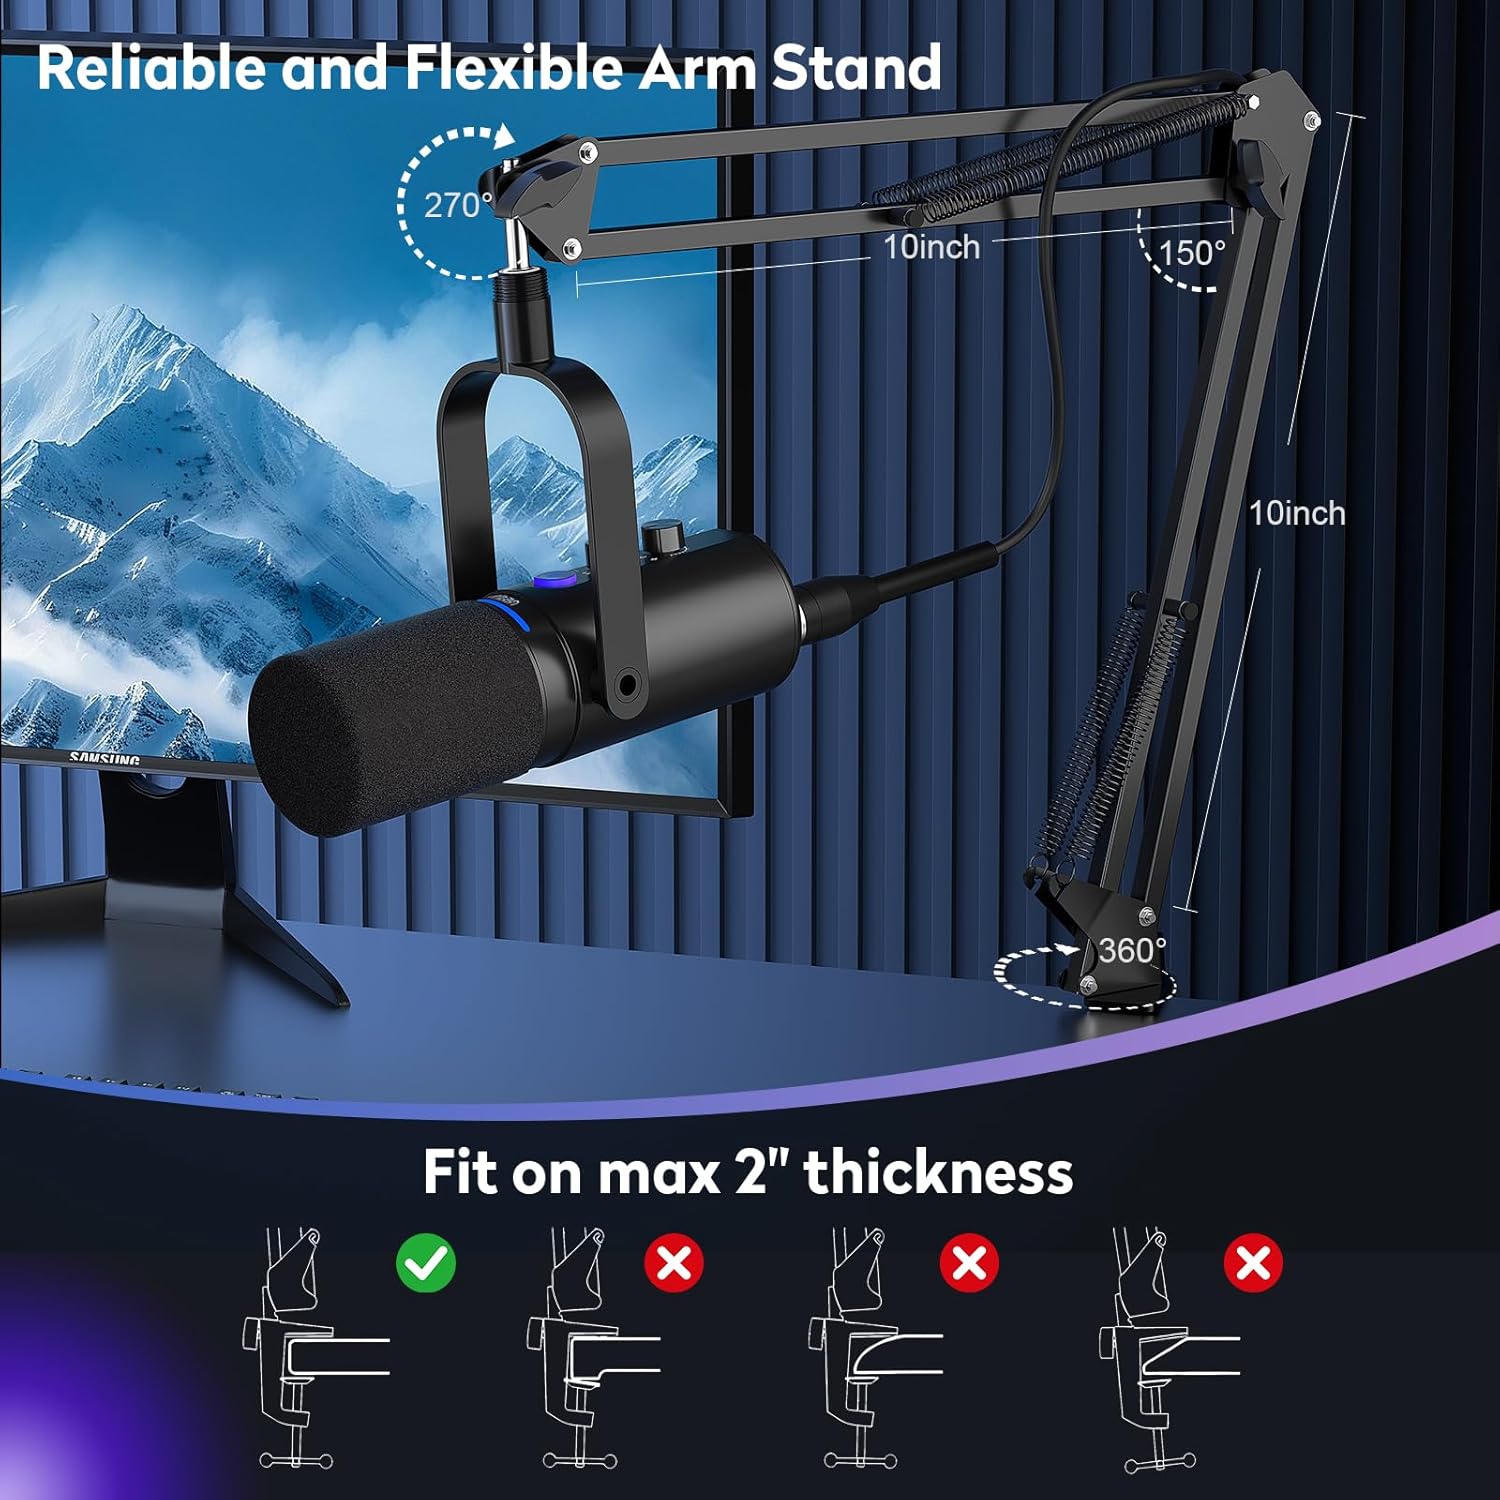
Image: Reliable and Flexible Arm Stand setup.
Setup Instructions
- Assemble the Boom Arm Stand: Attach the boom arm clamp to your desktop. Ensure the desktop thickness does not exceed 2 inches for a secure fit. Insert the boom arm into the clamp and tighten it.
- Attach the Microphone: Screw the Ortizan D1 microphone onto the boom arm stand. Adjust the angle and height of the microphone for optimal positioning.
- Attach the Pop Filter: Secure the pop filter to the boom arm or microphone stand, positioning it directly in front of the microphone capsule.
- Connect via USB (Plug and Play):
- Connect the USB-C end of the provided cable to the microphone.
- Connect the USB-A end to an available USB port on your computer (Windows/Mac OS), PS4/PS5, or other compatible device.
- The microphone should be automatically recognized by your operating system. Select it as your input device in your system's sound settings and your recording/streaming software.
- Connect via XLR (Professional Audio Interface):
- Connect one end of the provided XLR cable to the XLR port on the microphone.
- Connect the other end of the XLR cable to an XLR input on your mixer or audio interface.
- Ensure your mixer/audio interface is properly configured and connected to your computer.
- Connect Headphones for Monitoring: Plug your 3.5mm headphones into the headphone jack located on the microphone for real-time audio monitoring.
Operating Instructions
Microphone Controls:
- Microphone Gain Knob: Rotate this knob to adjust the input sensitivity (gain) of the microphone. Adjust it to achieve a strong signal without clipping.
- Headphone Volume Knob: Rotate this knob to control the volume of the audio output to your connected headphones.
- Mute Button: Press the button once to instantly mute or unmute the microphone. The indicator light will change to show the mute status.
- Noise Reduction (USB Mode Only): Press and hold the mute button for a few seconds to activate or deactivate the noise reduction feature. This helps to filter out background ambient sounds.
- RGB Lighting Modes: The microphone features customizable RGB lighting. Refer to the specific product documentation or experiment with button combinations (if any) to cycle through the 7 available lighting modes.
Optimal Usage:
- For best sound quality and to minimize background noise, position the microphone between 2 to 6 inches (5 to 15 cm) from your mouth.
- Ensure the pop filter is correctly placed to reduce plosive sounds (P's and B's).
- Regularly monitor your audio through headphones to ensure desired sound levels and clarity.
Maintenance
- Cleaning: Use a soft, dry cloth to clean the microphone body. Do not use harsh chemicals or abrasive cleaners.
- Storage: When not in use, store the microphone in a clean, dry place, away from extreme temperatures and humidity.
- Handling: Handle the microphone with care. Avoid dropping it or subjecting it to strong impacts, as this can damage internal components.
Troubleshooting
| Problem | Possible Cause | Solution |
|---|---|---|
| No sound output from microphone. |
|
|
| Excessive background noise. |
|
|
| No sound in headphones. |
|
|
| Microphone not recognized by computer. |
|
|
Specifications
| Feature | Specification |
|---|---|
| Microphone Form Factor | Studio Condenser (Dynamic) |
| Connectivity Technology | USB, XLR |
| Connector Type | USB Type-C |
| Polar Pattern | Super Cardioid |
| Frequency Response | 40Hz - 16kHz |
| Signal-to-Noise Ratio (SNR) | 85 dB |
| Material | Metal |
| Power Source | Corded Electric (USB/XLR) |
| Compatible Devices | Windows, Mac OS, PlayStation 4, PlayStation 5, Mixer, Audio Interface |
| Special Features | Monitoring Jack, Mute Function, Volume Control, Controllable RGB Lighting, Plug & Play |
| Item Dimensions (LxWxH) | 7 x 20 x 20 cm |
| Item Weight | 950 g |
Warranty and Support
For warranty information and technical support, please refer to the warranty card included with your product or contact the retailer from whom you purchased the Ortizan D1 microphone. You may also visit the official Ortizan website for further assistance and updated support resources.


