1. Introduction
The Jancane 4K HDMI USB KVM Switch (Model V806-A1) allows you to control two computers using a single set of peripherals: one monitor, one keyboard, and one mouse. This device is designed to streamline your workspace by eliminating the need for multiple monitors and input devices, enhancing efficiency for various applications including office work, multimedia teaching, gaming, and home theater setups. It supports Ultra HD 4K@60Hz resolution, ensuring a high-quality visual experience.
2. Package Contents
Please verify that all items are present in your package:
- 1 x Jancane 4K HDMI USB KVM Switch (Model V806-A1)
- 2 x HDMI Cables (1.2m)
- 2 x USB 2.0 Cables (1.2m)
- 1 x User Manual

Image: Package contents of the Jancane KVM Switch, showing the main unit, two HDMI cables, two USB cables, and the user manual.
3. Product Overview
Familiarize yourself with the ports and indicators on your KVM switch:

Image: Detailed diagram illustrating the various input and output ports on the Jancane KVM Switch. The front features two USB-A ports for peripherals and one HDMI port for the monitor. The rear includes dedicated USB and HDMI inputs for PC1 and PC2. A central button is used for switching.
- Front Panel:
- USB-A Output (x2): Connect your keyboard, mouse, or other USB peripherals.
- HDMI Output (Monitor): Connect to your display monitor.
- Signal Switch Button: Press to switch between connected computers. The LED indicator around the button changes color (Blue for PC1, Green for PC2) to show the active computer.
- Rear Panel:
- PC1-USB Input: Connect to the USB port of your first computer.
- PC1-HDMI Input: Connect to the HDMI output of your first computer.
- PC2-USB Input: Connect to the USB port of your second computer.
- PC2-HDMI Input: Connect to the HDMI output of your second computer.
4. Setup Instructions
Follow these steps to set up your Jancane KVM Switch:
- Connect Your Monitor: Connect your HDMI display monitor to the HDMI Output (Monitor) port on the front panel of the KVM switch using one of the provided HDMI cables.
- Connect Peripherals: Connect your USB keyboard and USB mouse to the USB-A Output ports on the front panel of the KVM switch.
- Connect Computer 1 (PC1):
- Connect the PC1-HDMI Input port on the rear of the KVM switch to the HDMI output of your first computer using a provided HDMI cable.
- Connect the PC1-USB Input port on the rear of the KVM switch to a USB port on your first computer using a provided USB cable.
- Connect Computer 2 (PC2):
- Connect the PC2-HDMI Input port on the rear of the KVM switch to the HDMI output of your second computer using a provided HDMI cable.
- Connect the PC2-USB Input port on the rear of the KVM switch to a USB port on your second computer using a provided USB cable.
- Power On: Ensure both computers and the monitor are powered on. The KVM switch is typically powered via the USB connections from the computers, requiring no external power adapter.

Image: Visual guide for connecting two computers to the KVM switch, which then shares a single monitor, keyboard, and mouse. It highlights the necessary HDMI and USB connections for each PC.
Video: An official Jancane video demonstrating the setup and functionality of the 4K KVM Switch, showing how to connect two computers to one monitor, keyboard, and mouse.
5. Operating Instructions
Operating the Jancane KVM Switch is straightforward:
- Switching Computers: To switch between PC1 and PC2, simply press the Signal Switch Button located on the top of the KVM switch.
- LED Indicators: The LED indicator around the switch button will illuminate blue when PC1 is active and green when PC2 is active, providing a clear visual cue of the currently selected computer.
- Peripheral Sharing: Once switched, your connected monitor, keyboard, and mouse will automatically control the selected computer.

Image: A user's hand pressing the central button on the KVM switch, illustrating the simple one-button switching mechanism between the two connected computers, indicated by blue and green LED lights.
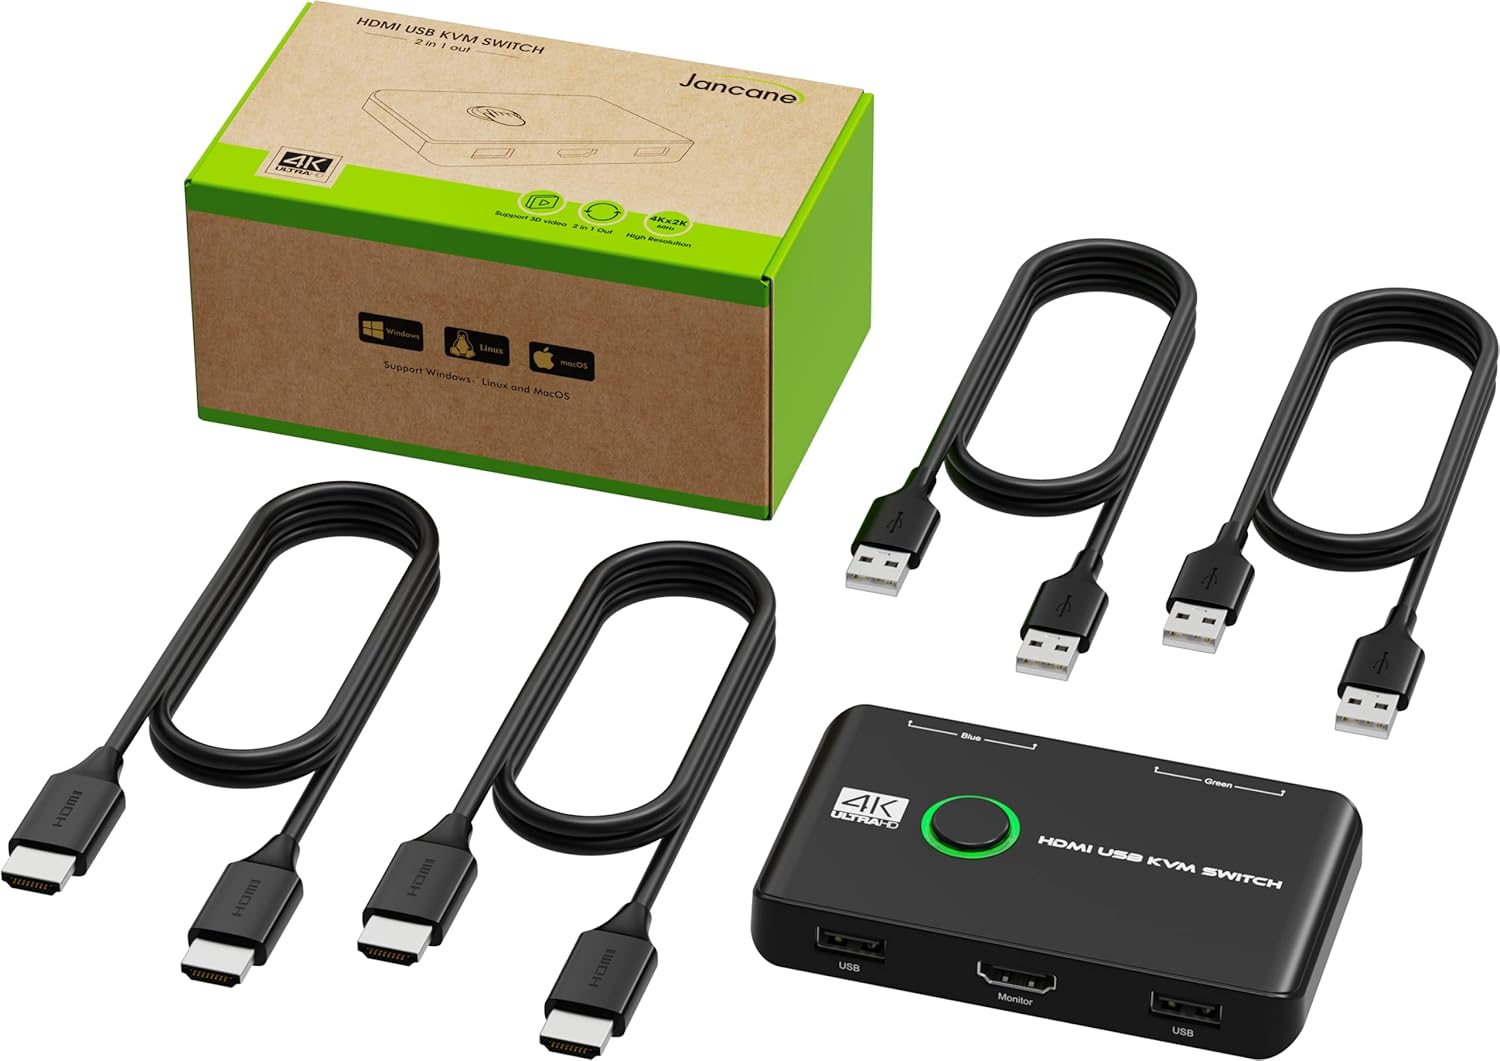
Image: A complete desk setup demonstrating the KVM switch in action, with two computers sharing one monitor and input devices. This image emphasizes the convenience of one-button switching to control different signal sources.
6. Maintenance
To ensure the longevity and optimal performance of your Jancane KVM Switch, follow these simple maintenance guidelines:
- Cleaning: Use a soft, dry cloth to clean the exterior of the device. Avoid using liquid cleaners or aerosols, as they may damage the unit.
- Ventilation: Ensure the KVM switch is placed in a well-ventilated area to prevent overheating. Do not block any ventilation openings.
- Cable Management: Keep cables organized and free from kinks or excessive tension to prevent damage to the cables and ports.
- Storage: When not in use for extended periods, store the device in a cool, dry place away from direct sunlight and extreme temperatures.
7. Troubleshooting
If you encounter issues with your Jancane KVM Switch, please refer to the following common solutions:
- No Display on Monitor:
- Ensure all HDMI cables are securely connected to both the KVM switch and your computers/monitor.
- Verify that the correct input source is selected on your monitor.
- Check if the active computer is correctly selected on the KVM switch (indicated by the LED color).
- Try restarting the computers and the monitor.
- Ensure your monitor supports the output resolution (e.g., 4K@60Hz) from your computers.
- Keyboard/Mouse Not Responding:
- Ensure all USB cables are securely connected between the KVM switch and your computers/peripherals.
- Verify that both the HDMI and USB cables are connected from each computer to the KVM switch. The USB connection is essential for keyboard and mouse functionality.
- Try connecting the keyboard/mouse directly to the computer to confirm they are working.
- Some specialized keyboards/mice with extra features or high power requirements may not function optimally through a KVM switch. Try a standard keyboard/mouse to test.
- Slow Switching Time:
- A switching time of 3-5 seconds is normal for this type of KVM switch as it re-establishes connections. This is not an indication of a fault.
- Intermittent Connection:
- Check for loose cable connections.
- Ensure cables are not excessively long or of poor quality, which can lead to signal degradation. Use the provided cables or high-quality replacements.
- Avoid placing the KVM switch near strong electromagnetic interference sources.
8. Specifications
Detailed technical specifications for the Jancane 4K HDMI USB KVM Switch (Model V806-A1):
| Feature | Specification |
|---|---|
| Model Number | V806-A1 |
| Brand | Jancane |
| Connector Type | HDMI, USB |
| Maximum Resolution | 4K@60Hz (also supports 4K@30Hz, 3D, 1080P and lower) |
| Operation Mode | ON-ON |
| Operating Voltage | 5 Volts |
| Current Rating | 1 Amps |
| Control Type | Switch between two computers (Push Button) |
| Compatible Devices | PS4, PS4 Pro, PS3, Xbox One, TV Box, PC, laptop, Nintendo Switch, and most HDMI-capable devices |
| Product Dimensions (L x W x H) | 7.87 x 4.72 x 1.18 inches |
| Item Weight | 10.8 ounces |
| Color | Black |
| Material | Plastic |
| International Protection Rating | IP67 |

Image: The KVM switch highlighting its universal compatibility with various operating systems including Windows, Mac OS, Vista, Linux, and Chrome OS.
9. Warranty and Support
Jancane provides lifetime technical support for this KVM switcher. If you encounter any problems or have questions regarding the product, please contact Jancane customer support for assistance. Refer to the contact information provided in your product packaging or on the official Jancane website.


