1. Introduction
This manual provides essential information for the safe and efficient installation, operation, and maintenance of your Zuomeng ZM-155 Outdoor Surface Mount Power Meter. This device is designed for precise energy consumption measurement in various applications, supporting both single 240V and dual 120V circuits.
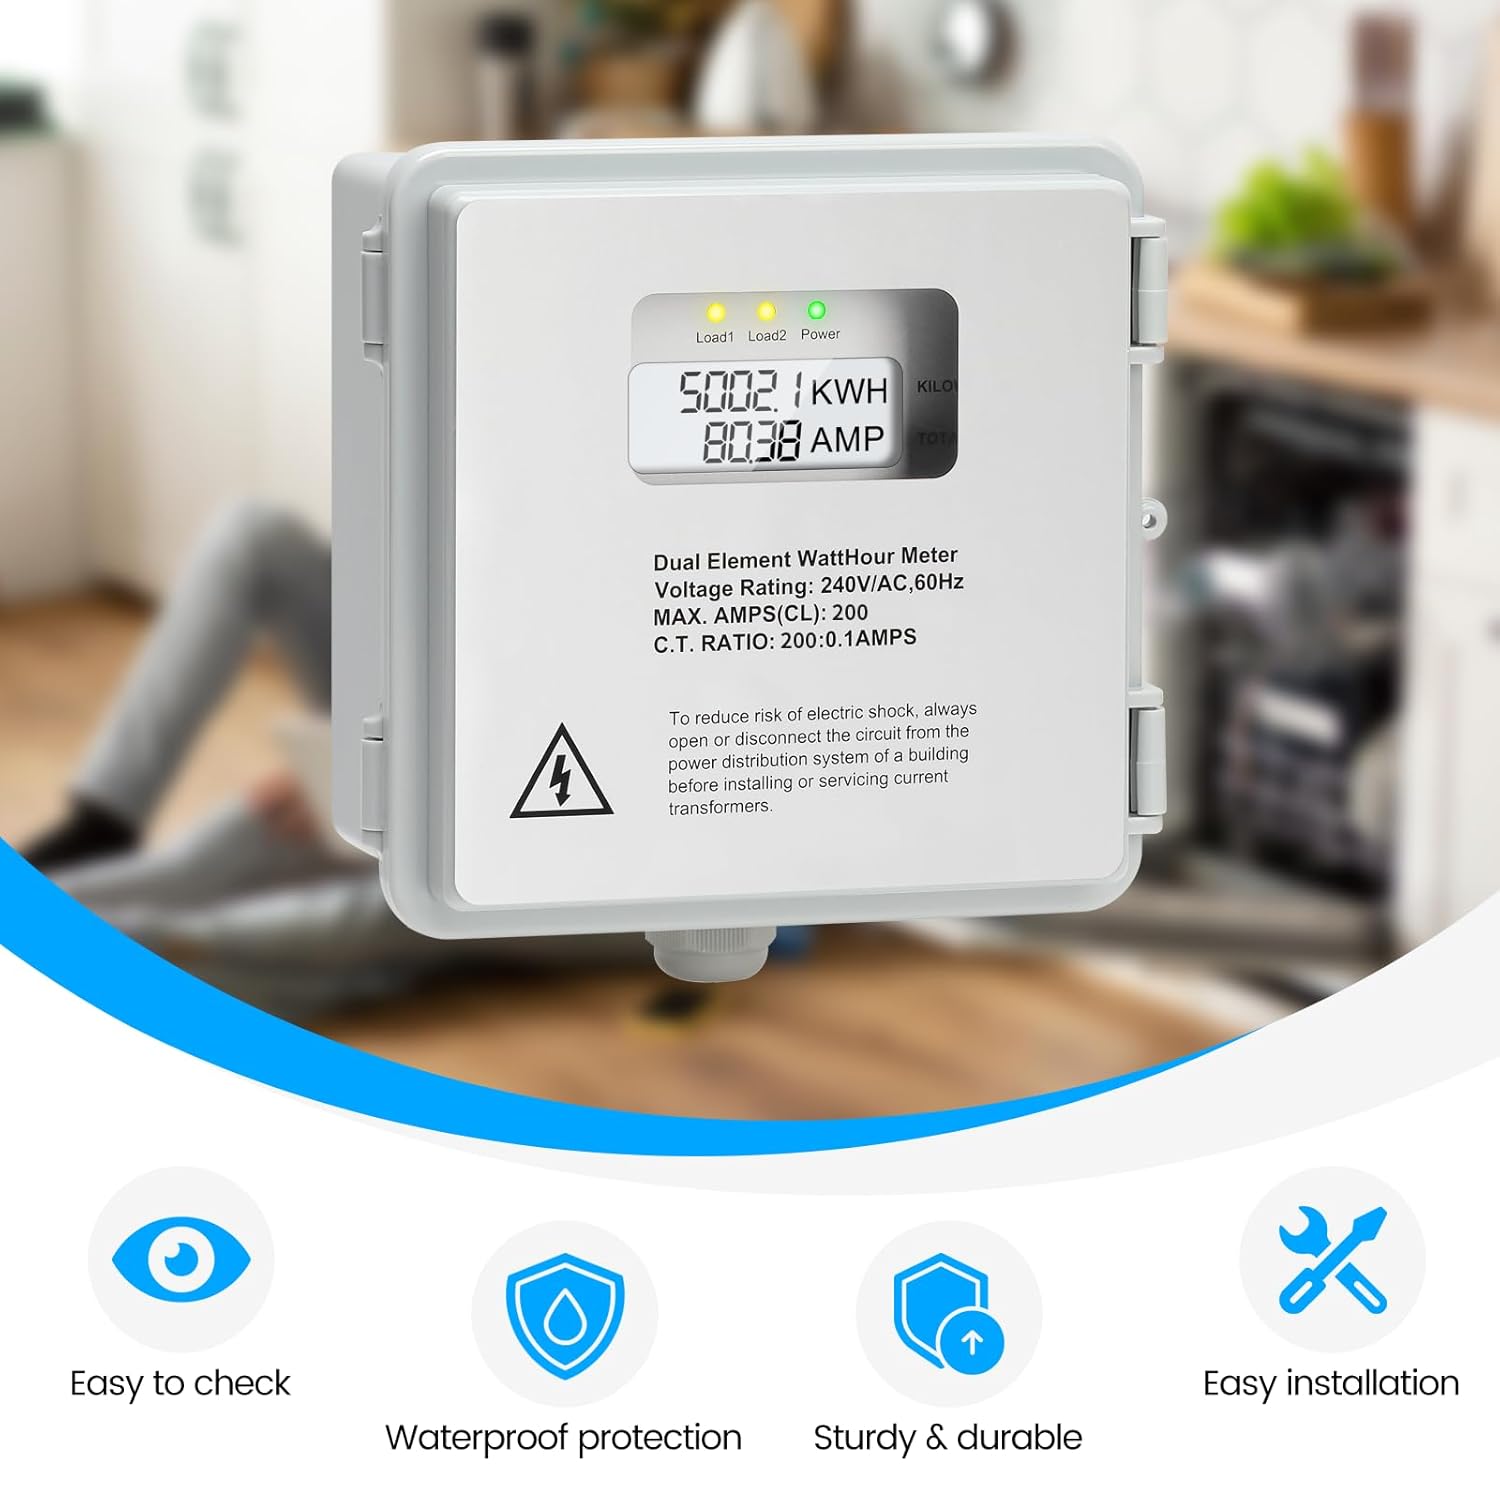
Figure 1.1: Front view of the Zuomeng ZM-155 Power Meter, displaying kWh and amperage readings.
2. Safety Information
WARNING: Electrical shock hazard. Installation and servicing should only be performed by qualified personnel. Always disconnect power from the main distribution system before installing or servicing this device.
- Ensure all local and national electrical codes are followed during installation.
- Do not operate the device if it appears damaged.
- Wear appropriate personal protective equipment (PPE) when working with electrical systems.
- Verify correct wiring connections before applying power.
3. Package Contents
Verify that all items are present in the package:
- Zuomeng ZM-155 Power Meter Kit
- 2 Solid Core Current Transformers (CTs)
- Mounting Screws
4. Product Overview
The Zuomeng ZM-155 is an outdoor-rated power meter designed for accurate energy monitoring. Key features include:
- Precision Dual-Circuit Measurement: Monitors single 240V or two 120V circuits.
- Ultra-High Precision Current Transformers: 0.1A rated CTs for accurate current recording.
- Easy Installation & Operation: 2P3W configuration with a clear white backlit LCD display.
- Robust IP65 Weatherproof Enclosure: Provides protection against water, sunlight, and extreme temperatures.
- High Current Load Adaptability: Supports loads up to 200A for various applications.

Figure 4.1: Internal components of the power meter, highlighting the display, wiring terminals, and current transformers.
Key Components and Indicators:

High-Precision Current Transformer: Ensures accurate measurement of current changes down to 0.1A.

White Backlit LCD Display: Provides clear and easy-to-read data in various lighting conditions.

LED Indicator Lights: Clearly show the current operating status (Load1, Load2, Power).

IP65 Waterproof Protection: Ensures durability and stable performance in outdoor environments.
5. Specifications
| Model Number | ZM-155 |
| Voltage Rating | 120/240V AC, 60Hz |
| Configuration | 2P3W (2-Phase, 3-Wire) |
| Max. Amperage | 200A |
| CT Ratio | 200:0.1 Amps |
| Ingress Protection (IP) Rating | IP65 |
| Product Dimensions | 5.9 x 3.5 x 5.9 inches |
| Item Weight | 8 ounces |
| Date First Available | October 21, 2025 |
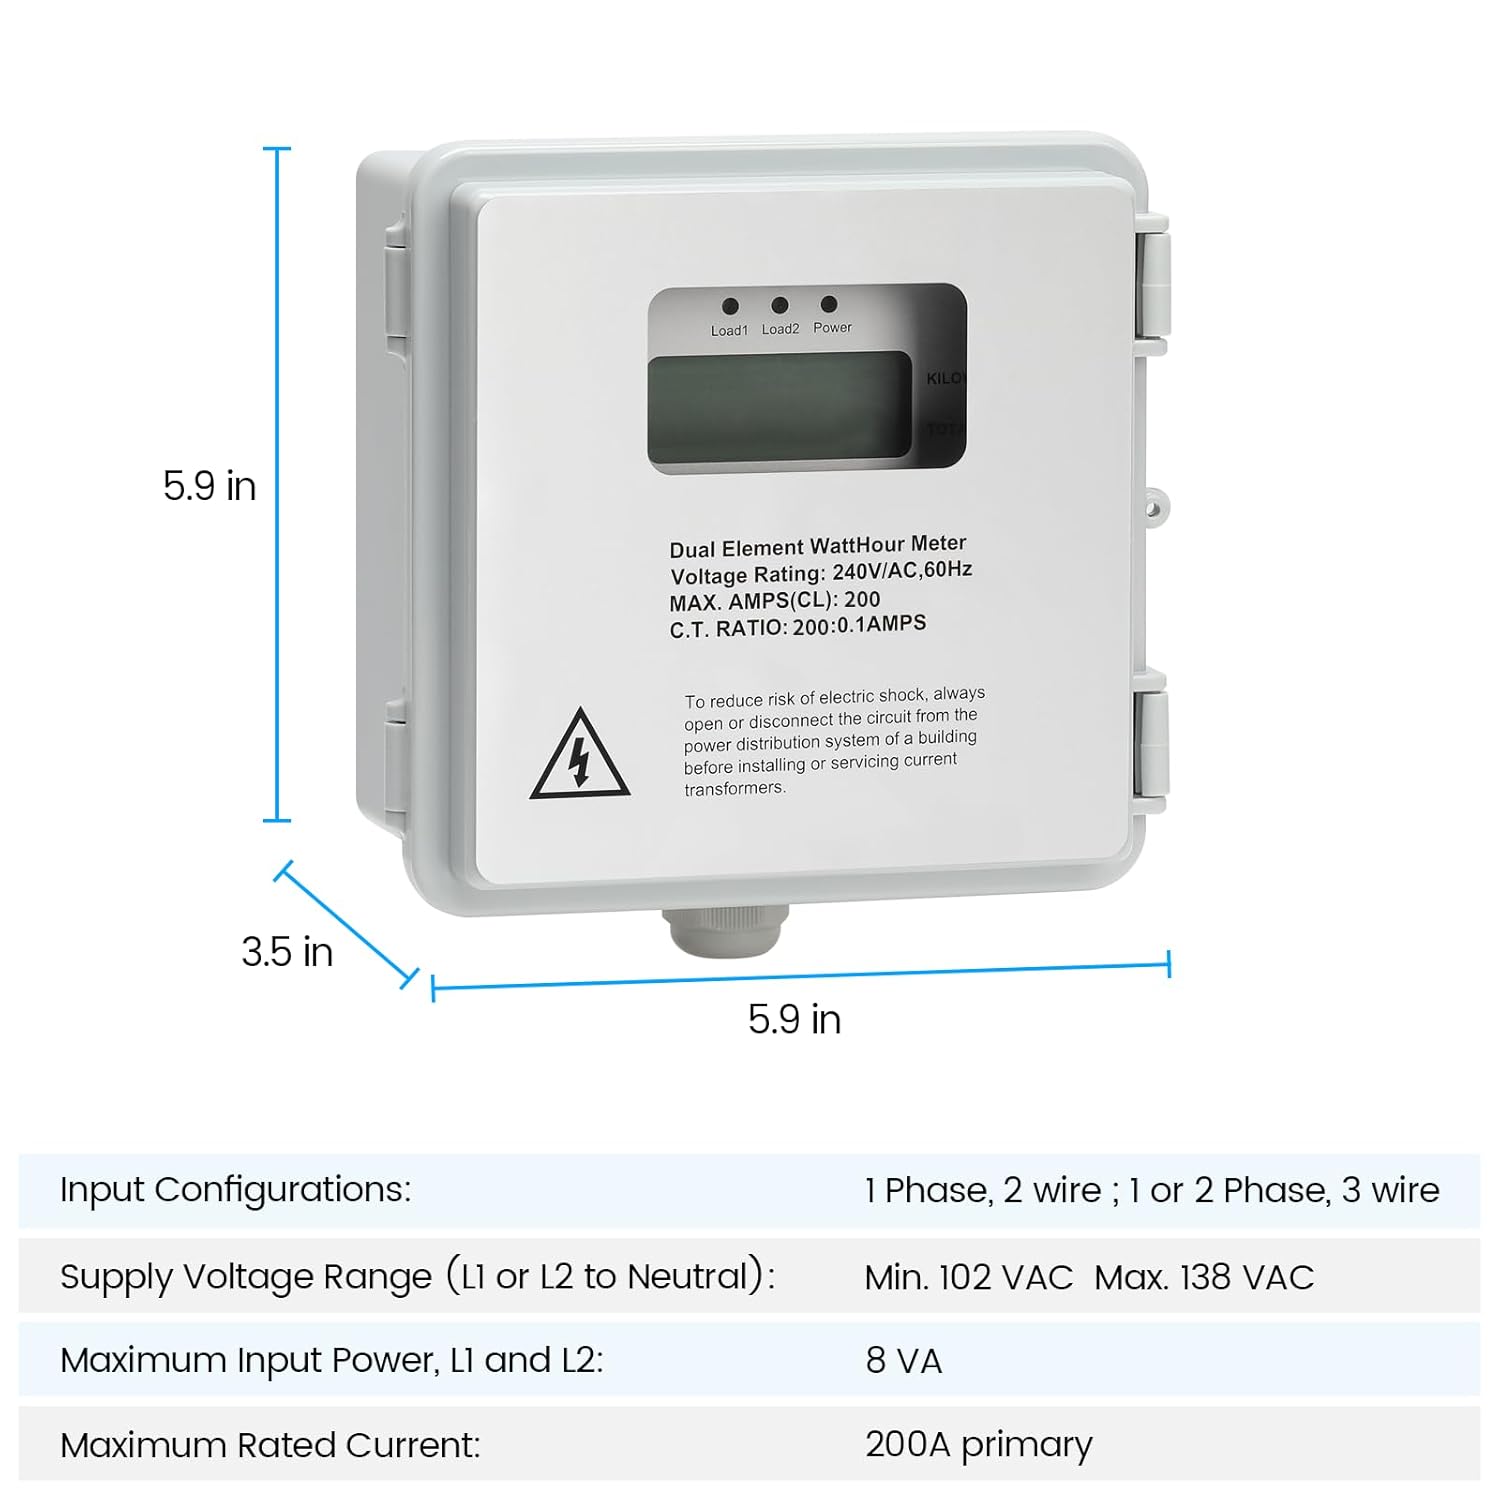
Figure 5.1: Physical dimensions of the power meter.
6. Setup and Installation
Before beginning installation, ensure the main power supply is disconnected. This device is designed for outdoor surface mounting.
6.1 Mounting the Enclosure
- Select a suitable outdoor location for mounting, ensuring it is easily accessible for reading but protected from direct physical impact.
- Use the provided mounting screws to securely attach the enclosure to a flat, stable surface.
- Ensure the enclosure is level to prevent water accumulation.

Figure 6.1: The power meter's IP65 enclosure provides protection in outdoor conditions.
6.2 Wiring Connections
The ZM-155 supports both dual element (240V) and single element (120V) hookup configurations. Refer to the diagrams below for correct wiring.
IMPORTANT: Incorrect wiring can cause damage to the device, electrical system, or personal injury. Consult a qualified electrician if you are unsure about any wiring steps.

Figure 6.2: Wiring diagrams for dual and single element configurations.
Dual Element Hookup (240V Circuit)
- Connect Line 1 (L1) and Line 2 (L2) from your power source to the corresponding L1 and L2 terminals on the meter.
- Connect the Neutral (N) wire to the N terminal.
- Pass the Line 1 conductor through CT1 and the Line 2 conductor through CT2. Ensure the CTs are oriented correctly according to their markings.
- Connect the CT1 wires to the CT1 terminals (X1, X2) and CT2 wires to the CT2 terminals (X1, X2).
- Connect the load wires from the meter's output terminals to your electrical load.
Single Element Hookup (120V Circuit)
- Connect Line 1 (L1) from your power source to the L1 terminal on the meter.
- Connect the Neutral (N) wire to the N terminal.
- Pass the Line 1 conductor through CT1. Ensure the CT is oriented correctly.
- Connect the CT1 wires to the CT1 terminals (X1, X2). CT2 terminals will not be used in this configuration.
- Connect the load wires from the meter's output terminals to your electrical load.
6.3 Power On
Once all connections are secure and verified, restore power to the circuit. The meter's LCD display should illuminate, and indicator lights will show operational status.
7. Operating Instructions
The ZM-155 power meter provides real-time readings of energy consumption (kWh) and current (Amps) via its backlit LCD display.
7.1 Reading the Display
- The large numerical display shows the total accumulated Kilowatt-hours (kWh).
- The smaller numerical display shows the instantaneous current in Amperes (AMP).
7.2 Indicator Lights
- Load1: Indicates activity on the first load circuit.
- Load2: Indicates activity on the second load circuit (for dual element configurations).
- Power: Indicates that the meter is receiving power and operating correctly.
8. Maintenance
The Zuomeng ZM-155 is designed for minimal maintenance. However, periodic checks can ensure optimal performance and longevity.
- Cleaning: Gently wipe the exterior of the enclosure with a damp cloth. Do not use abrasive cleaners or solvents.
- Inspection: Periodically inspect the enclosure for any signs of damage, cracks, or loose seals that could compromise its IP65 rating.
- Wiring Check: Annually, or as needed, have a qualified electrician inspect the wiring connections to ensure they remain tight and free from corrosion.
- Environmental Factors: Ensure that vegetation or other obstructions do not block the meter or create excessive moisture around it.
9. Troubleshooting
| Problem | Possible Cause | Solution |
|---|---|---|
| Meter display is blank | No power supply to the meter. | Check main power supply and wiring connections to the meter. Ensure circuit breaker is ON. |
| Incorrect kWh or Amp readings | Incorrect CT installation or wiring. | Verify CT orientation and connections. Ensure CTs are correctly placed around the load conductors. |
| Load indicator lights not illuminating | No load connected or very low current draw. | Ensure a load is connected and drawing sufficient current. Check load circuit wiring. |
| Enclosure shows signs of water ingress | Damaged seal or improper installation. | Inspect seals and mounting for damage. Ensure all cable glands are tightened. Replace if necessary. |
10. Warranty and Support
The Zuomeng ZM-155 Power Meter is covered by a manufacturer's warranty against defects in materials and workmanship. For specific warranty terms and conditions, please refer to the documentation provided at the time of purchase or contact Zuomeng customer support.
For technical assistance, troubleshooting, or to report issues, please contact Zuomeng customer support through the retailer's platform or the official Zuomeng website. Please have your model number (ZM-155) and purchase information ready when contacting support.
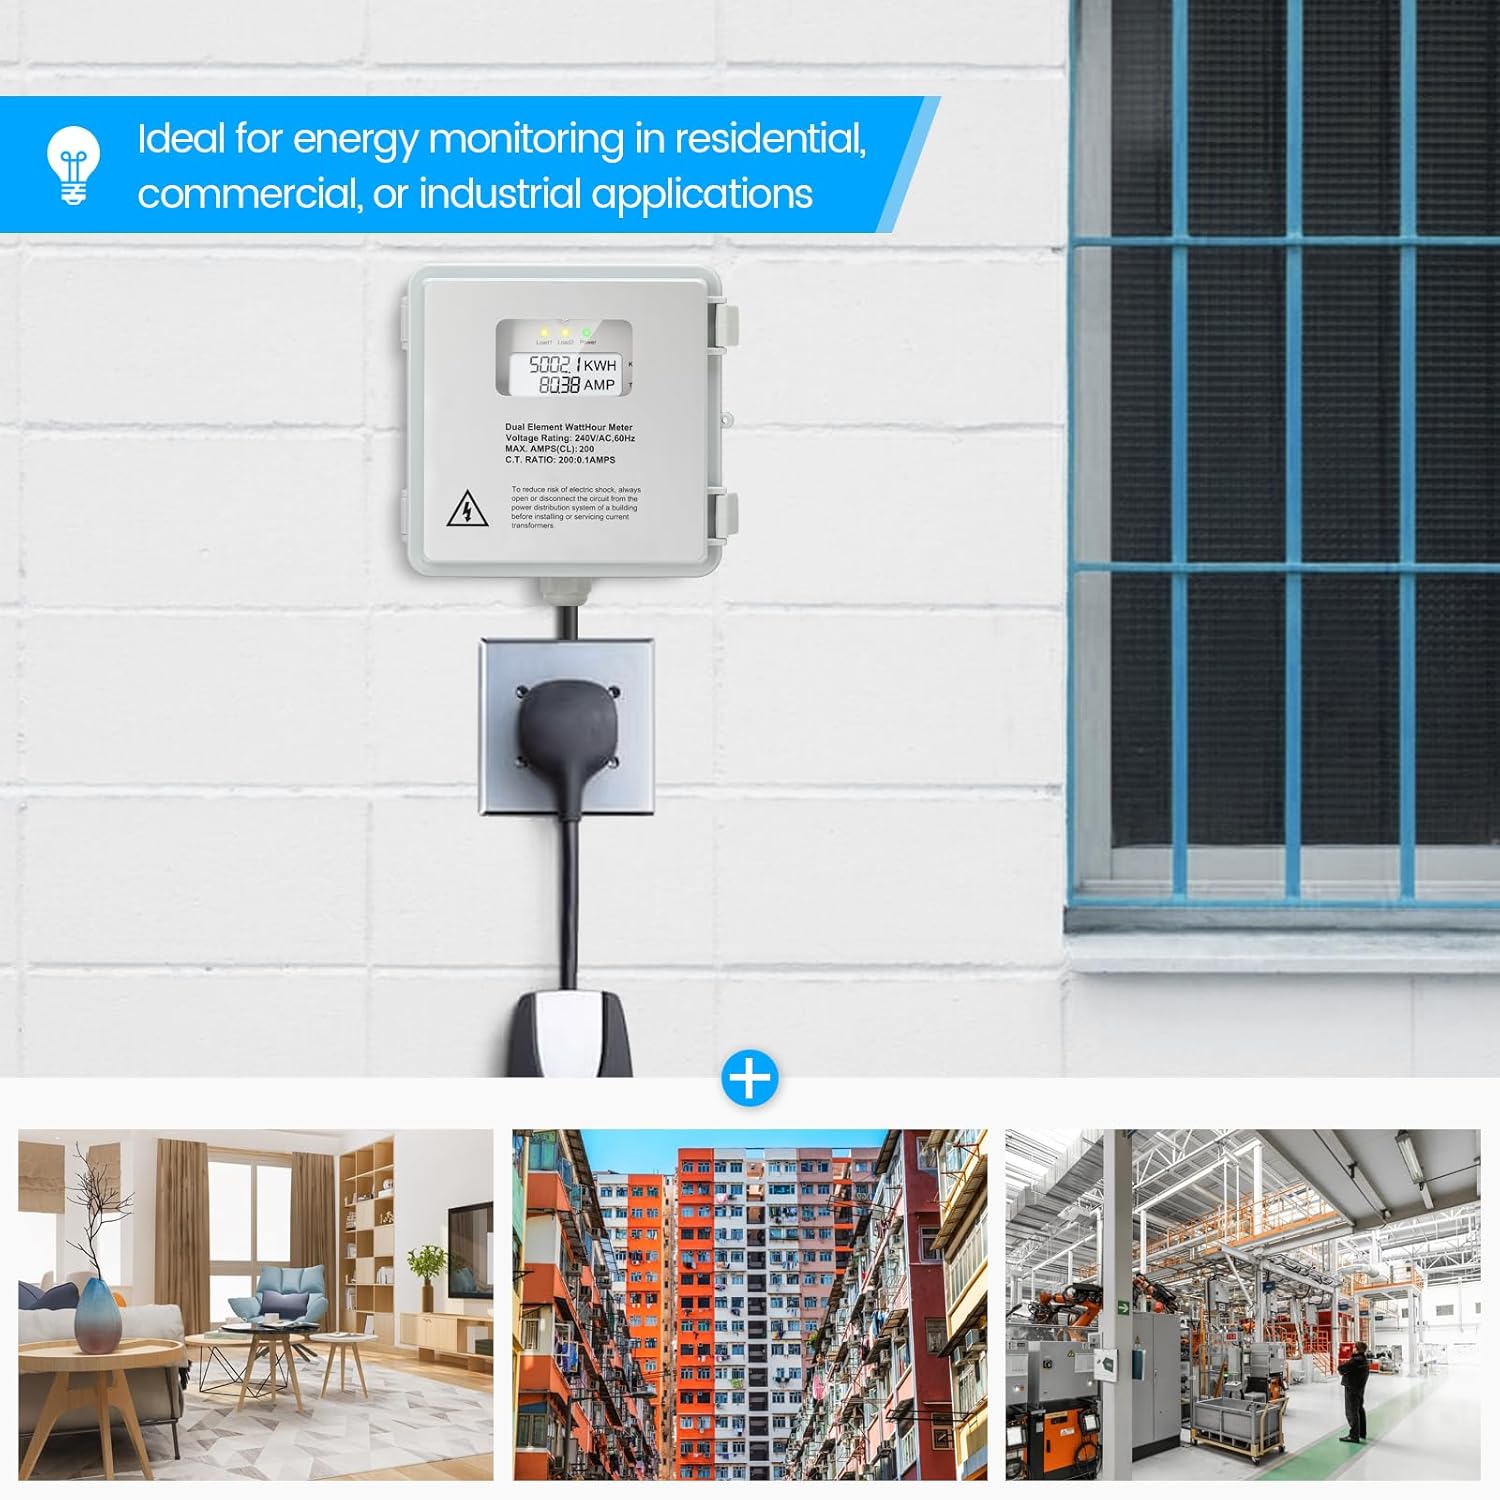
Figure 10.1: The ZM-155 is suitable for various energy monitoring applications.


