
Introduction
This manual provides essential instructions for the safe and efficient operation, maintenance, and troubleshooting of your AEROPRO 8629 Airless Paint Sprayer. Please read this manual thoroughly before operating the equipment to ensure proper use and to prevent injury or damage.
The AEROPRO 8629 is designed for various painting projects, offering a high-pressure, thinning-free solution for applying paint quickly and evenly. Its lightweight design and integrated storage make it suitable for DIY enthusiasts and small to medium-sized tasks.

Image: A user operating the AEROPRO 8629 Airless Paint Sprayer for an indoor painting project, demonstrating its ease of use and efficiency for DIY tasks.
Safety Information
WARNING: Failure to follow these safety instructions could result in serious injury or property damage.
- Read All Instructions: Understand all warnings and operating procedures before use.
- Wear Personal Protective Equipment (PPE): Always wear safety glasses, gloves, and a respirator or mask to protect against paint fumes and overspray.
- Ensure Adequate Ventilation: Use the sprayer in a well-ventilated area to prevent the buildup of flammable vapors.
- Flammable Materials: Do not spray flammable materials near open flames, pilot lights, or other ignition sources.
- High Pressure Hazard: The paint sprayer operates at high pressure. Never point the spray gun at yourself or others. Do not place hands or other body parts in front of the spray tip.
- Depressurize Before Servicing: Always relieve pressure from the system before cleaning, checking, or servicing any part of the sprayer.
- Electrical Safety: Ensure the power cord is in good condition and connected to a grounded outlet. Do not operate in wet conditions.
- Children and Pets: Keep children and pets away from the work area and the equipment.
Package Contents
Verify that all components are present before beginning assembly or operation.
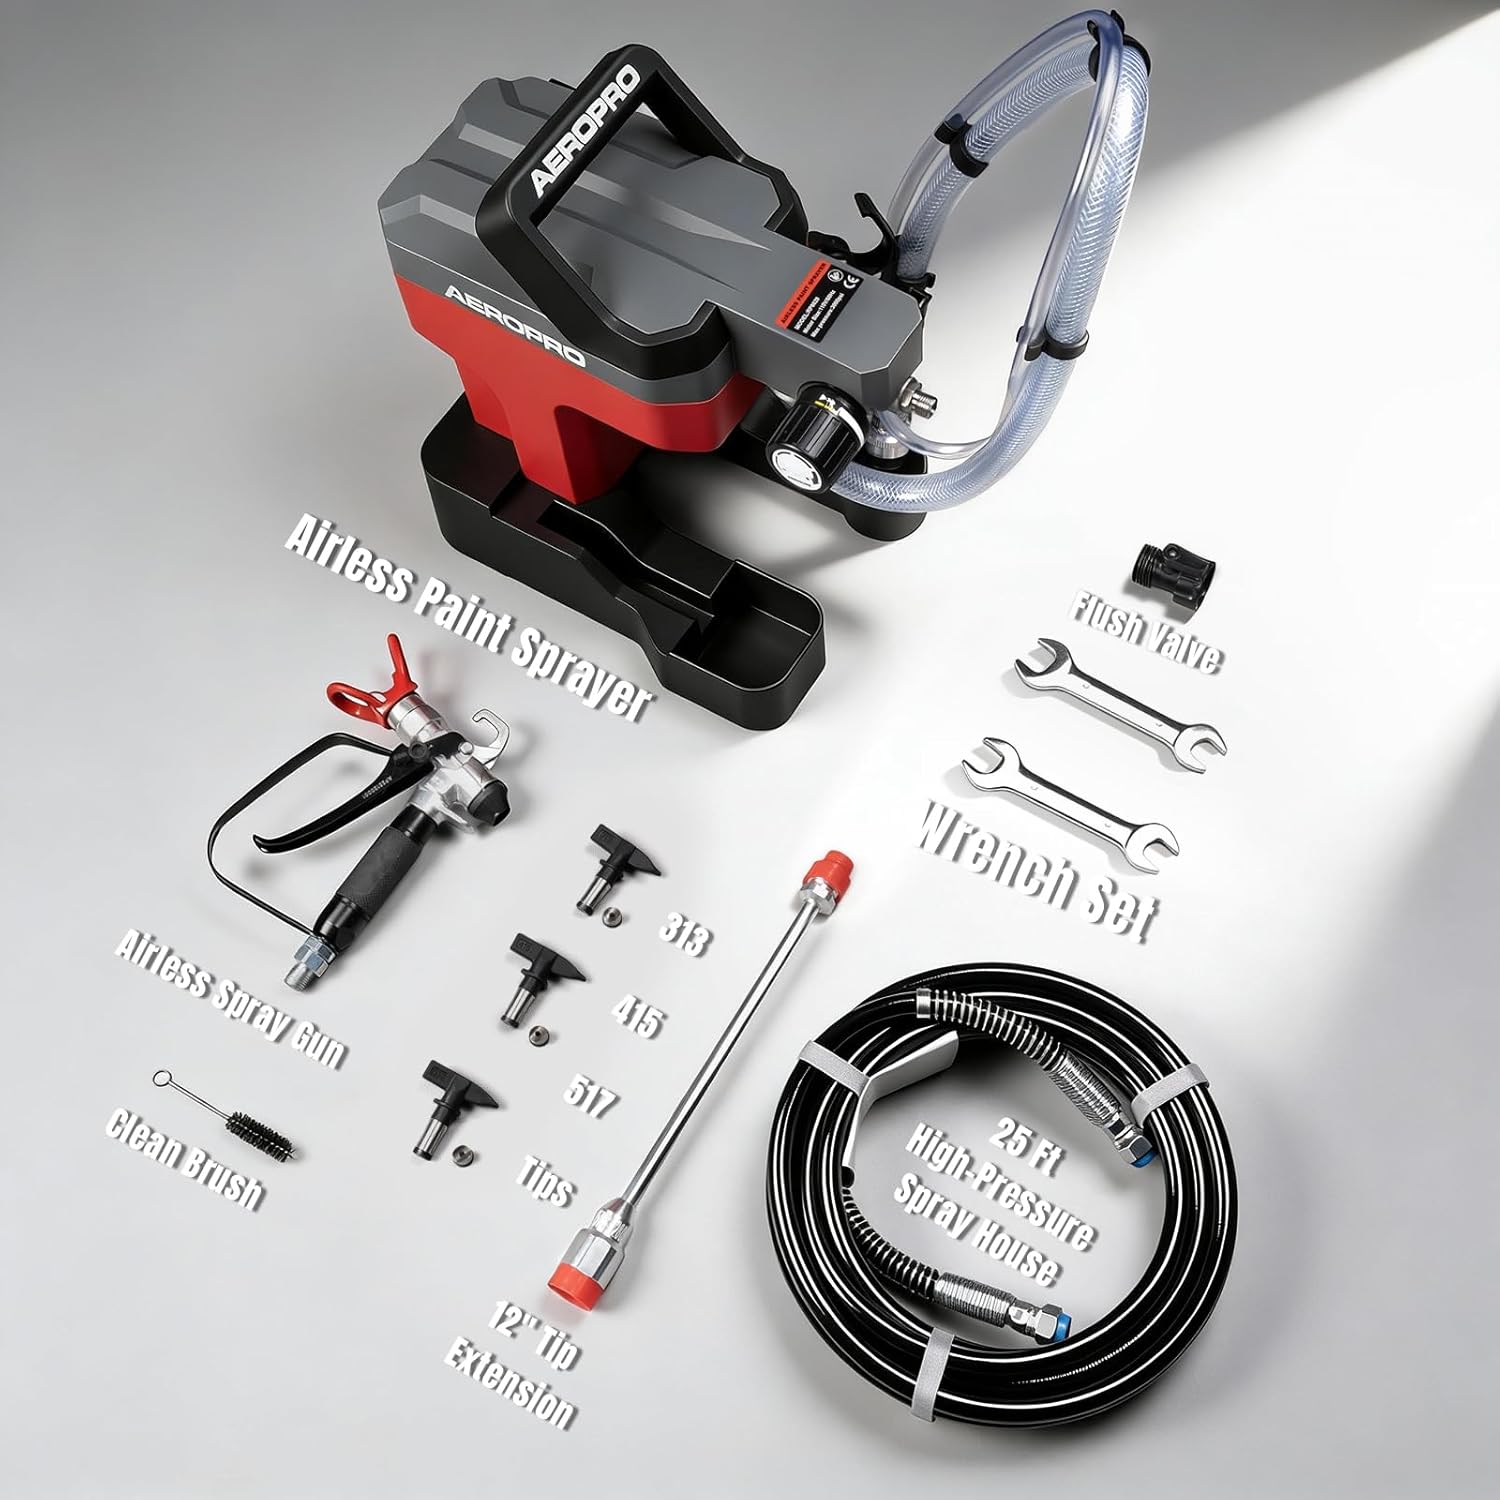
Image: Overview of the AEROPRO 8629 Airless Paint Sprayer and its included accessories, such as the spray gun, high-pressure hose, various tips, tip extension, clean brush, flush valve, and wrench set.
- AEROPRO 8629 Airless Paint Sprayer Unit
- Airless Spray Gun
- High-Pressure Spray Hose (25 ft)
- Spray Tips (e.g., 313, 415, 517)
- 12-inch Tip Extension
- Clean Brush
- Flush Valve
- Wrench Set
Setup
- Unpack and Inspect: Carefully remove all components from the packaging. Inspect for any damage.
- Connect High-Pressure Hose: Securely attach one end of the high-pressure spray hose to the sprayer unit's outlet and the other end to the airless spray gun. Ensure all connections are tight to prevent leaks.
- Install Spray Tip: Choose the appropriate spray tip for your project and install it onto the spray gun or the 12-inch tip extension if needed. Ensure the tip guard is in place.
- Prepare Paint: Place the intake hose directly into your paint container (up to 5 gallons). No thinning is typically required for most latex and oil-based paints with this sprayer.
- Prime the Sprayer:
- Turn the prime/spray valve to the "Prime" position.
- Turn on the sprayer. Allow the pump to run until paint flows smoothly from the prime hose into a waste bucket.
- Once primed, turn off the sprayer.
- Integrated Storage: Utilize the built-in storage compartments on the unit for the power cord, wrench set, spray gun, tips, and filter for organized transport and storage.

Image: The AEROPRO 8629 Airless Paint Sprayer showcasing its lightweight design and integrated storage for the power cord, wrench set, spray gun, tips, and filter.
Operating Instructions
- Adjust Pressure: Turn the prime/spray valve to the "Spray" position. Turn on the sprayer and adjust the pressure knob to the desired setting. Start with a lower pressure and increase gradually until you achieve a consistent spray pattern.
- Spraying Technique:
- Maintain a consistent distance (approximately 10-12 inches) from the surface.
- Move the spray gun in smooth, even passes, overlapping each pass by about 50%.
- Release the trigger at the end of each pass to avoid paint buildup.
- The tungsten steel nozzle is designed to deliver a smooth, even coat with minimal overspray.

Image: A visual representation of the reversible spray tip mechanism for clearing clogs and a close-up of the tungsten steel nozzle designed for a smooth finish.
- Using the 12-inch Tip Extension: Attach the 12-inch tip extension to the spray gun for reaching high walls, ceilings, or other difficult-to-access areas.
- Clearing Clogs: If the spray tip clogs during operation, rotate the reversible tip 180 degrees to the "Clear" position, trigger the gun to clear the obstruction, then rotate it back to the "Spray" position.

Image: Demonstrations of the 360° swivel joint on the spray gun for flexible positioning, the method for clearing clogs using the 180° reversible tip, and the use of the tip extension for reaching high areas.
- Versatile Application: The sprayer is suitable for interior walls, doors, fences, furniture, and various small to medium-sized painting projects.

Image: Visual examples illustrating the wide range of applications for the AEROPRO 8629 airless paint sprayer, including interior walls, doors, fences, furniture, and other small painting projects.
Maintenance and Cleaning
Proper cleaning after each use is crucial for maintaining the sprayer's performance and longevity. Dried paint can permanently damage components.
- Depressurize: Turn off the sprayer. Turn the prime/spray valve to the "Prime" position. Trigger the spray gun into a waste bucket until all pressure is relieved.
- Remove Paint: Remove the intake hose from the paint and place it into a bucket of appropriate cleaning solution (water for latex, mineral spirits for oil-based).
- Flush System:
- Turn the prime/spray valve to "Spray".
- Turn on the sprayer and spray the cleaning solution into a waste bucket until it runs clear.
- Use the included flush valve for quick and easy cleanup.

Image: Demonstrations of the easy hose clamp, the fact that no thinning is required for paint, and the simple cleaning process using the included flush valve after use.
- Clean Spray Gun and Tip: Disassemble the spray tip and guard. Clean all parts thoroughly with the cleaning brush and solution. Ensure no paint residue remains.
- Filter Cleaning: Clean the filter located in the sprayer unit and/or spray gun handle.
- Storage: Once completely clean and dry, reassemble the components and store the sprayer in a dry, protected area, utilizing its integrated storage features.
Troubleshooting
| Problem | Possible Cause | Solution |
|---|---|---|
| No spray or weak spray | Clogged tip, clogged filter, insufficient paint, air in system, low pressure setting. | Clear tip (rotate 180°), clean filters, ensure paint supply, re-prime unit, increase pressure. |
| Uneven spray pattern | Worn tip, incorrect pressure, improper spraying technique. | Replace tip, adjust pressure, maintain consistent distance and speed. |
| Paint leaks from connections | Loose connections, damaged O-rings/seals. | Tighten all connections, inspect and replace damaged seals. |
| Sprayer not priming | Intake valve clogged, air leak in suction hose, prime/spray valve not in "Prime" position. | Clean intake valve, check hose for damage, ensure valve is correctly set. |
Specifications

Image: Detailed specifications for the AEROPRO 8629 Airless Paint Sprayer, including model number, voltage, motor size, flow rate, maximum nozzle size, maximum pressure, and output connection.
| Feature | Detail |
|---|---|
| Model | 8629 |
| Brand | AEROPRO |
| Voltage/Frequency | 110V/60Hz |
| Motor Size | 5/8 hp |
| Flow Rate | 517 ± 1.1 lpm |
| Max Nozzle | 517 |
| Max Pressure | 3000 PSI |
| Output Connection | 1/4-18NPSM |
| Item Weight | 8.69 kg (approx. 19.16 lbs) |
| Dimensions (W x H) | 12.4" W x 13.19" H |
| Recommended Uses | Painting (Interior Walls, Doors, Fences, Furniture, Small Projects) |
| Material | Plastic |
Warranty and Support
For warranty information, technical support, or to order replacement parts, please contact AEROPRO customer service. Refer to your purchase documentation for specific warranty terms and contact details.
Manufacturer: Jax Technology Co.,Ltd
