1. Introduction
This manual provides essential information for the safe and efficient operation of your ASHATA Solar Powered Pet House and Vehicle Heater. Please read these instructions thoroughly before use and retain for future reference.
The ASHATA heater is designed to provide warmth for pet houses, chicken coops, and vehicle interiors during cold seasons. It features a 30W monocrystalline solar panel for energy collection and adjustable warm air settings.
2. Safety Information
- Ensure the solar panel is placed in direct sunlight for optimal charging.
- Do not cover the heater or solar panel with flammable materials.
- Keep the heater away from water or excessive moisture.
- Do not attempt to disassemble or repair the unit yourself. Contact qualified personnel for service.
- Ensure proper ventilation when operating the heater in enclosed spaces.
- Keep out of reach of children and pets when operating, especially the heating element.
3. Product Overview
The ASHATA Solar Powered Heater system consists of a solar panel, a heating unit, and a power management component.

Figure 1: Main components of the ASHATA Solar Powered Heater. Shown are the blue-framed monocrystalline solar panel, the black heating unit with a fan, and a compact black power bank.
Key Features:
- High Efficiency Solar Panel: 30W monocrystalline solar panel for optimal energy conversion.
- Adjustable Warm Air Settings: Multiple heating levels for customized temperature control.
- Rapid Heating Technology: Provides quick warmth distribution to prevent freezing and dampness.
- Compact and Portable Design: Lightweight construction for easy transportation and installation.
- Versatile Application: Suitable for vehicle interiors, pet houses, and chicken coops.
4. Setup and Installation
4.1 Solar Panel Placement
- Choose a location that receives direct sunlight for the majority of the day.
- Mount the solar panel securely using the grommets provided. Ensure it is angled towards the sun for maximum efficiency.
- Connect the solar panel cable to the designated input on the power management unit or directly to the heater if applicable.
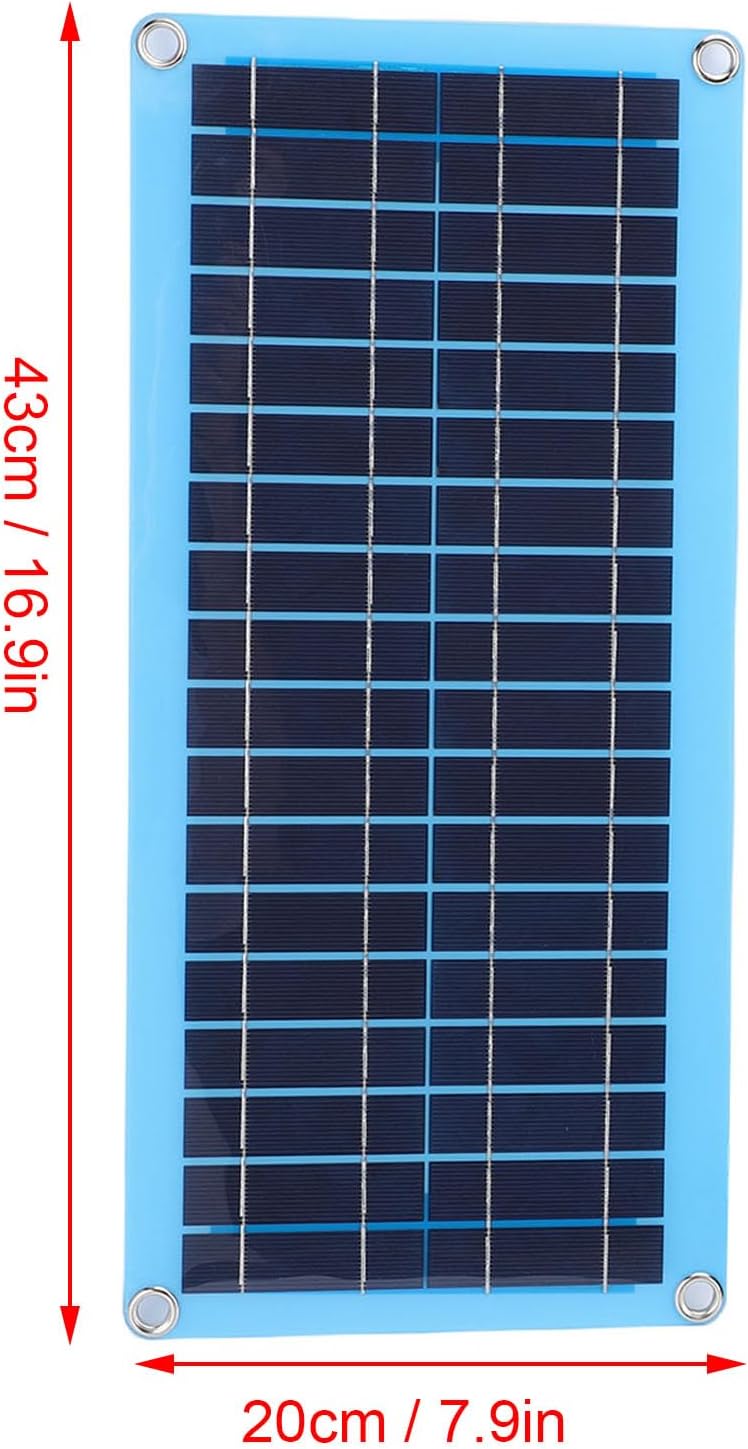
Figure 2: Solar panel dimensions for installation planning. The panel measures approximately 43 cm (16.9 inches) in length and 20 cm (7.9 inches) in width.
4.2 Heater Placement
- Place the heating unit in the desired area within the pet house, chicken coop, or vehicle interior.
- Ensure the heater is positioned to allow for optimal air circulation and heat distribution. Avoid blocking the air intake or output vents.
- For vehicle use, the heater can be placed on the dashboard or other stable surfaces.

Figure 3: The compact and portable heater unit positioned on a vehicle dashboard, illustrating ease of installation.

Figure 4: The heater in a vehicle setting, demonstrating its suitability for various environments including car interiors.
4.3 Connecting Components
- Connect the heating unit to the power management component or directly to the solar panel output, as per your specific model's configuration.
- Ensure all connections are secure to prevent power interruptions.

Figure 5: The heater unit with its power cable, illustrating the connection point for power supply.
5. Operating Instructions
5.1 Powering On
Once the solar panel is connected and receiving sufficient sunlight, the system will begin to charge. The heater unit typically activates automatically or via a power button (if present on your model).
5.2 Adjusting Warm Air Settings
The heater features adjustable warm air settings. Refer to the controls on your specific heating unit to select the desired heating level. Multiple levels allow for customized temperature control based on environmental conditions and comfort needs.

Figure 6: The heater provides adjustable warm air settings, allowing users to select from multiple heating levels for optimal comfort.
5.3 Rapid Heating Function
The heater incorporates rapid heating technology to quickly distribute warmth. This feature is designed to effectively prevent freezing and dampness, especially during colder periods.

Figure 7: Visual representation of the rapid heating technology, showing quick heat distribution to combat cold and dampness.
6. Maintenance
- Cleaning: Periodically wipe the solar panel and heater unit with a soft, dry cloth to remove dust and debris. Ensure the solar panel surface is clean for optimal light absorption.
- Ventilation: Keep the heater's air intake and output vents clear of obstructions to maintain efficient operation.
- Storage: If storing the unit for an extended period, ensure it is clean and dry. Store in a cool, dry place away from direct sunlight.
7. Troubleshooting
| Problem | Possible Cause | Solution |
|---|---|---|
| Heater not turning on. | Insufficient sunlight on solar panel; loose connection; power management unit not charged. | Ensure solar panel is in direct sunlight. Check all cable connections. Allow solar panel to charge the power unit for several hours. |
| Heater not producing enough warmth. | Low power input; vents obstructed; incorrect setting. | Verify solar panel is clean and receiving full sun. Clear any obstructions from heater vents. Adjust to a higher heating setting. |
| Unusual noise from heater. | Debris in fan; unit not stable. | Turn off and disconnect power. Carefully inspect vents for debris and remove if safe. Ensure the unit is placed on a stable surface. If noise persists, discontinue use and contact support. |
8. Specifications
| Feature | Detail |
|---|---|
| Product Dimensions | 16.93 x 7.87 x 1.97 inches |
| Item Weight | 1.58 pounds |
| Manufacturer | ASHATA |
| Model Number | ASHATA4zg1gdhpb9 |
| Special Feature | Adjustable |
| Power Source | AC/DC (Solar Powered) |
| Heating Method | As described in specification (Warm Air) |
| Solar Panel Power | 30W Monocrystalline |
9. Warranty and Support
ASHATA products are manufactured to high-quality standards. For warranty information or technical support, please refer to the contact details provided at the point of purchase or visit the official ASHATA website.
Please retain your proof of purchase for any warranty claims.
