1. Introduction
This manual provides essential information for the safe and efficient operation, maintenance, and troubleshooting of your PowerSmart 4300-Watt Portable Inverter Generator. Please read this manual thoroughly before operating the generator and keep it for future reference.
1.1. Important Safety Information
Operating a generator can be dangerous if proper safety precautions are not followed. Always operate the generator outdoors in a well-ventilated area to prevent carbon monoxide poisoning. Keep children and pets away from the generator. Ensure the generator is properly grounded before use. Never refuel a hot or running engine. Always wear appropriate personal protective equipment.
2. Setup
2.1. Unpacking and Inspection
Carefully remove the generator and all included accessories from the packaging. Inspect for any damage that may have occurred during shipping. The package typically includes the generator, a user manual, a spark plug wrench, a funnel, and a screwdriver.

Figure 2.1: Included accessories with the PowerSmart 4300-Watt Portable Inverter Generator.
2.2. Adding Engine Oil
The generator is shipped without engine oil. Before first use, add 5W-30 engine oil to the crankcase. Use the provided funnel to avoid spills. Do not overfill. Refer to the oil dipstick for the correct level.
2.3. Adding Fuel
Use fresh, unleaded gasoline with a minimum octane rating of 87. The fuel tank capacity is approximately 1.6 gallons. Do not store the generator for extended periods with fuel in the tank. Ensure the fuel cap is securely tightened after refueling.
2.4. Grounding the Generator
For safety, the generator must be properly grounded. Connect a grounding wire from the generator's grounding terminal to an appropriate ground source, such as a ground rod.
3. Operating Instructions
3.1. Control Panel Overview
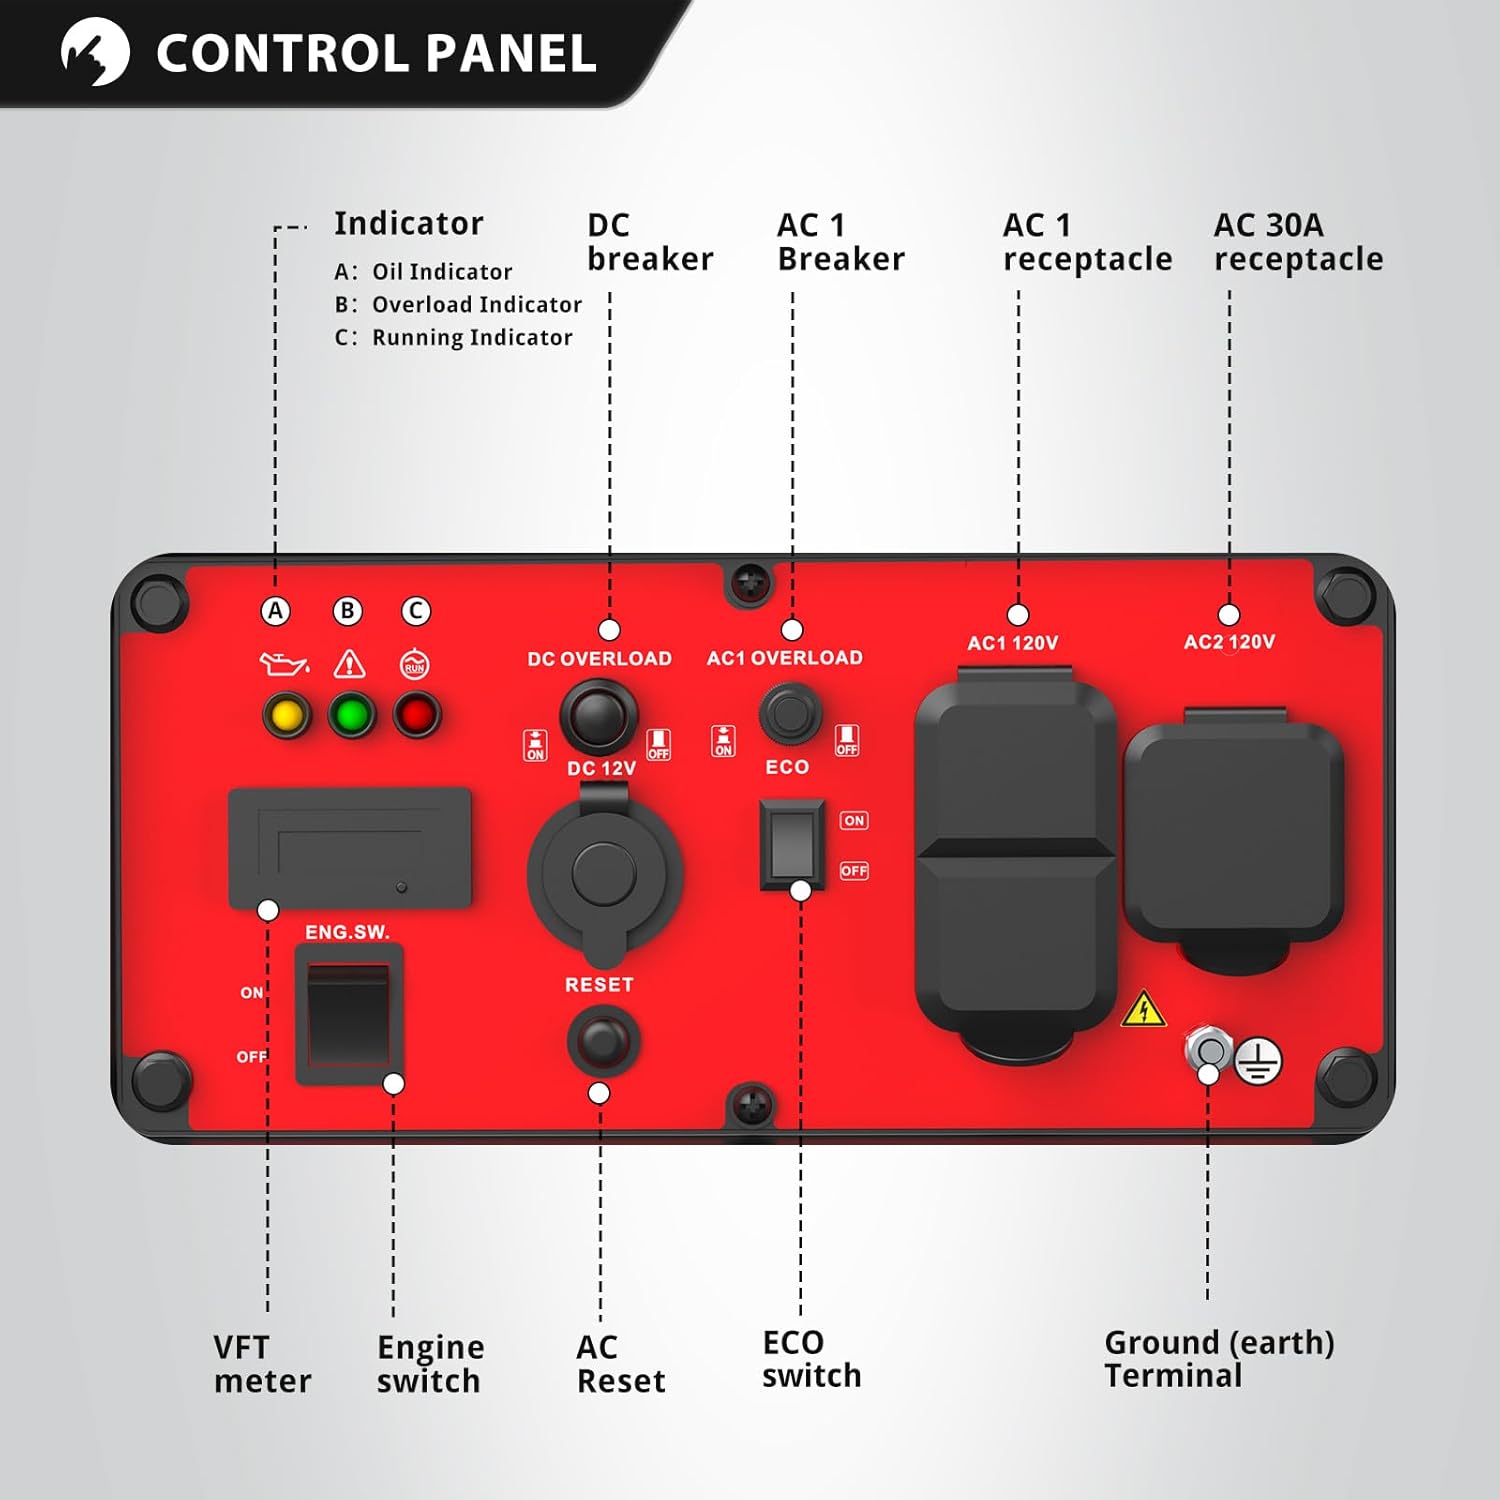
Figure 3.1: Generator Control Panel.
- Engine Switch (ENG. SW): ON/OFF control for the engine.
- VFT Meter: Displays Voltage, Frequency, and Run Time.
- Indicators: Oil Indicator, Overload Indicator, Running Indicator.
- DC Breaker: Protects the 12V DC outlet.
- AC Breakers: Protects the AC outlets.
- ECO Switch: Activates/deactivates Eco Mode.
- AC 120V 15A Receptacles (x2): Standard household outlets.
- AC 120V 30A Receptacle: For higher power demands, such as RVs.
- 12V DC Outlet: For charging 12V batteries.
- Parallel Ports: Allows connection of two compatible inverter generators for increased power output.
- Ground (earth) Terminal: For grounding the unit.
3.2. Starting the Generator
- Ensure the generator is on a level surface and properly grounded.
- Turn the fuel valve to the ON position.
- Move the choke lever to the CHOKE position (if the engine is cold).
- Turn the Engine Switch to the ON position.
- Pull the recoil starter handle firmly until the engine starts.
- Once the engine starts, gradually move the choke lever to the RUN position.
3.3. Eco Mode Operation
The Eco Mode switch allows the engine to automatically adjust its speed to match the load. This reduces fuel consumption and noise levels when less power is required. When the Eco Mode is ON, the engine RPM will decrease when no load or a light load is connected, and increase as the load increases.
- Use Eco Mode: For powering sensitive electronics or devices with low starting wattage, such as phones or laptops.
- Disable Eco Mode: For equipment requiring high starting power, such as circular saws or sump pumps, turn the Eco Mode switch OFF before connecting.
3.4. Connecting Electrical Devices
The generator provides 4300 starting watts and 3500 running watts. It features two 120V 15A receptacles, one 120V 30A receptacle, and a 12V DC outlet.

Figure 3.2: Power output and available outlets.
Monitor the VFT meter and the Overload Indicator. If the Overload Indicator illuminates, disconnect some devices to prevent damage to the generator and connected equipment.
3.5. Parallel Operation
This generator is parallel capable, allowing you to connect two compatible PowerSmart inverter generators to double the available power. Refer to the parallel kit instructions for detailed connection procedures.

Figure 3.3: Parallel connection of two generators.
3.6. Stopping the Generator
- Disconnect all electrical loads from the generator.
- Allow the engine to run for a few minutes without load to cool down.
- Turn the Engine Switch to the OFF position.
- Turn the fuel valve to the OFF position.
4. Maintenance
Regular maintenance ensures optimal performance and extends the lifespan of your generator.
- Check Oil Level: Before each use.
- Change Engine Oil: After the first 20 hours of operation, then every 100 hours or annually.
- Clean Air Filter: Every 50 hours or more frequently in dusty conditions.
- Inspect Spark Plug: Every 100 hours or annually. Replace if necessary.
- Fuel System: For long-term storage, drain the fuel tank and carburetor to prevent fuel degradation issues.
5. Troubleshooting
If you encounter issues, refer to the following common problems and solutions:
| Problem | Possible Cause | Solution |
|---|---|---|
| Engine won't start | No fuel, low oil, engine switch OFF, choke incorrect | Add fuel, add oil, turn engine switch ON, adjust choke |
| No power output | AC breaker tripped, overload, Eco Mode ON with high load | Reset breaker, reduce load, turn Eco Mode OFF |
| Overload indicator on | Too many devices connected | Disconnect some devices to reduce load |
6. Specifications
| Feature | Specification |
|---|---|
| Brand | PowerSmart |
| Starting Wattage | 4300 Watts |
| Running Wattage | 3500 Watts |
| Fuel Type | Gasoline |
| Power Source | Gas-Powered |
| Voltage | 120 Volts |
| Item Weight | 61 Pounds |
| Product Dimensions | 17.3"L x 15.2"W x 18.3"H |
| Special Feature | Portable, Super Quiet |
| Included Components | Wrench |
| Engine Type | Gasoline |
| Ignition System Type | Recoil Start |
| Total Power Outlets | 4 |

Figure 6.1: Generator dimensions.
7. Warranty and Support
Your PowerSmart 4300-Watt Portable Inverter Generator is covered by a 2-Year Manufacturer Warranty. For warranty claims, technical assistance, or to order replacement parts, please contact Amerisun Inc., the manufacturer. Refer to the contact information provided in your product registration or on the manufacturer's official website.


