
1. Introduction
This manual provides comprehensive instructions for the setup, operation, and maintenance of your KEDIERS P4 ATX Mid Tower PC Case. Please read this manual carefully before beginning installation to ensure proper assembly and optimal performance. Keep this manual for future reference.
2. Product Overview
The KEDIERS P4 is a high-performance ATX mid-tower PC case designed for gaming and high-end computing. It features a panoramic design with full-view dual tempered glass panels, offering an unobstructed view of your internal components. The case comes with 7 pre-installed PWM ARGB fans for efficient cooling and customizable lighting.
Key Features:
- Cooling System: 7 pre-installed 120mm PWM ARGB fans (3 intake on side, 3 exhaust on top, 1 exhaust on rear). Supports up to 9x 120mm fans or 3x 120mm + 6x 140mm fans.
- Panoramic Design: 270° full-view dual tempered glass panels for an aesthetically pleasing display.
- High-Speed I/O Panel: Includes 1x USB 3.2 Gen 2 Type-C, 1x USB 3.0, 1x USB 2.0, 1x HD Audio, Power Button, Reset Button, and LED Switch Button.
- Expansion Support: Compatible with ATX, Micro-ATX, and Mini-ITX motherboards. Supports 360mm radiators, CPU coolers up to 180mm, and GPUs up to 440mm.
- Storage: Equipped with dedicated trays for 2x SSDs and 2x HDDs.
- Cable Management: Large cable management spaces and a back-connect ready design for a clean interior.

Figure 2.1: KEDIERS P4 ATX Mid Tower PC Case with pre-installed ARGB fans.

Figure 2.2: Illustration of the 7 pre-installed high-performance fans and their connections.
Video 2.1: Overview of the KEDIERS P4 ATX Tower PC Case, showcasing its tempered glass and ARGB lighting.
3. Setup
3.1 Unpacking and Initial Inspection
Carefully remove the PC case from its packaging. Inspect for any signs of damage during transit. The case features tempered glass panels, handle with care to prevent breakage.
3.2 Accessing the Interior
The tempered glass side panel can be opened using the pull tab. For full access, the side panels are secured by thumbscrews. Remove these screws to detach the panels completely. The rear panel can also be popped off for cable management access.

Figure 3.1: Instructions for removing the tempered glass and rear panels for internal access.
3.3 Motherboard Installation
The KEDIERS P4 case supports ATX, Micro-ATX, and Mini-ITX motherboards. Install your motherboard onto the pre-installed standoffs. The raised motherboard area facilitates routing cables behind the motherboard tray.

Figure 3.2: Example of supported BTF motherboard models, illustrating compatibility.
3.4 GPU Installation
To install your Graphics Processing Unit (GPU), you will need to unscrew the vertical bracket at the rear of the case. Once the screws are removed, pop out the bracket to allow the GPU to slide into the PCIe slot. Re-secure the bracket after installation.
3.5 Fan Connections and ARGB Control
The pre-installed ARGB fans are connected to a fan controller board. This board requires a SATA power supply connection. Each fan has two wires: one for power and one for ARGB data. The power wires are typically daisy-chained. Connect the data wires from the fans to the controller board. Ensure the SATA power connector is plugged in correctly; it does not have a notch to prevent incorrect insertion, so verify orientation before applying force.
3.6 Storage Installation
Utilize the dedicated HDD and SSD trays for installing your storage devices. The case supports 2x SSDs and 2x HDDs.
3.7 Power Supply Installation
Install your ATX power supply unit (PSU) in the designated compartment. The case supports PSUs up to 220mm in length.
3.8 Cable Management
The KEDIERS P4 case offers ample space and routing channels for effective cable management. Utilize the back-connect design to route cables behind the motherboard tray, keeping the main compartment clean and improving airflow. The bottom area behind the fans also provides space for cable routing.

Figure 3.3: Overview of the cable management system, showing routing paths and drive bays.
4. Operating
4.1 Front Panel I/O Usage
The top panel of your KEDIERS P4 case features several ports and buttons for convenient access:
- Power Button: To turn your PC on or off.
- Reset Button: To restart your PC.
- LED Switch Button: To cycle through various ARGB lighting modes for the fans.
- USB 3.2 Gen 2 Type-C Port: For high-speed data transfer with compatible devices.
- USB 3.0 Port: For standard USB 3.0 connectivity.
- USB 2.0 Port: For standard USB 2.0 connectivity.
- HD Audio Jacks: Separate ports for headphones and microphone.

Figure 4.1: Detailed view of the front panel I/O, including USB ports, audio jacks, and control buttons.
4.2 ARGB Fan Control
The pre-installed ARGB fans can be controlled in two ways:
- Case LED Switch Button: Press the LED Switch button on the top I/O panel to cycle through various pre-programmed lighting effects and colors.
- Motherboard RGB Sync Software: If your motherboard supports ARGB synchronization (e.g., ASUS Aura Sync, MSI Mystic Light Sync, GIGABYTE RGB Fusion, ASRock Polychrome Sync), you can connect the fan controller to your motherboard's ARGB header and control the lighting via the motherboard's software. This allows for more advanced customization.

Figure 4.2: ARGB sync compatibility with popular motherboard software for customizable lighting.
5. Maintenance
5.1 General Cleaning
Regularly clean the exterior of the case with a soft, damp cloth. Avoid abrasive cleaners or solvents that could damage the finish or tempered glass. For the tempered glass panels, use a glass cleaner and a microfiber cloth.
5.2 Dust Filter Cleaning
The case is equipped with dust filters to prevent dust buildup inside. Periodically remove and clean these filters. They can typically be rinsed with water and air-dried before reinstallation. Ensure filters are completely dry before placing them back into the case.
5.3 Fan Cleaning
Over time, dust may accumulate on the fan blades. Use compressed air to gently remove dust from the fan blades and grilles. For stubborn dust, a soft brush can be used. Ensure the PC is powered off and unplugged before cleaning fans.
6. Troubleshooting
6.1 Fans Not Lighting Up or Spinning
- Check SATA Power: Ensure the fan controller board is properly connected to a SATA power cable from your power supply.
- Verify Data Wires: Confirm that the ARGB data wires from the fans are securely connected to the fan controller.
- Motherboard Sync: If using motherboard RGB sync, ensure the controller is connected to the correct ARGB header on your motherboard and the software is configured correctly.
6.2 Difficulty Installing GPU
- Remove Bracket: Ensure the vertical GPU mounting bracket at the rear of the case has been unscrewed and removed before attempting to insert the GPU.
- Alignment: Carefully align the GPU with the PCIe slot on the motherboard.
6.3 General Power Issues
- Power Supply Connections: Double-check all power connections from the PSU to the motherboard, CPU, GPU, and other components.
- Front Panel Connectors: Ensure the power button and reset button cables from the front panel are correctly connected to the motherboard headers.
7. Specifications
| Feature | Specification |
|---|---|
| Model Name | P4 |
| Case Type | Mid Tower |
| Dimensions (L x W x H) | 17.52" x 8.66" x 19.29" (445mm x 220mm x 490mm) |
| Material | Metal, Tempered Glass |
| Motherboard Compatibility | ATX, Micro-ATX, Mini-ITX |
| Pre-installed Fans | 7x 120mm PWM ARGB Fans (3x Side Intake, 3x Top Exhaust, 1x Rear Exhaust) |
| Max Fan Support | Up to 9x 120mm fans or 3x 120mm + 6x 140mm fans |
| Radiator Support | Up to 360mm (Top, Side) |
| Max CPU Cooler Height | 180mm |
| Max GPU Length | 440mm |
| Power Supply Type | ATX (up to 220mm) |
| Expansion Slots | 7 |
| Drive Bays | 2x 2.5" SSD, 2x 3.5" HDD |
| Front I/O Ports | 1x USB 3.2 Gen 2 Type-C, 1x USB 3.0, 1x USB 2.0, 1x HD Audio, Power, Reset, LED Switch |

Figure 7.1: Detailed product dimensions of the KEDIERS P4 PC Case.
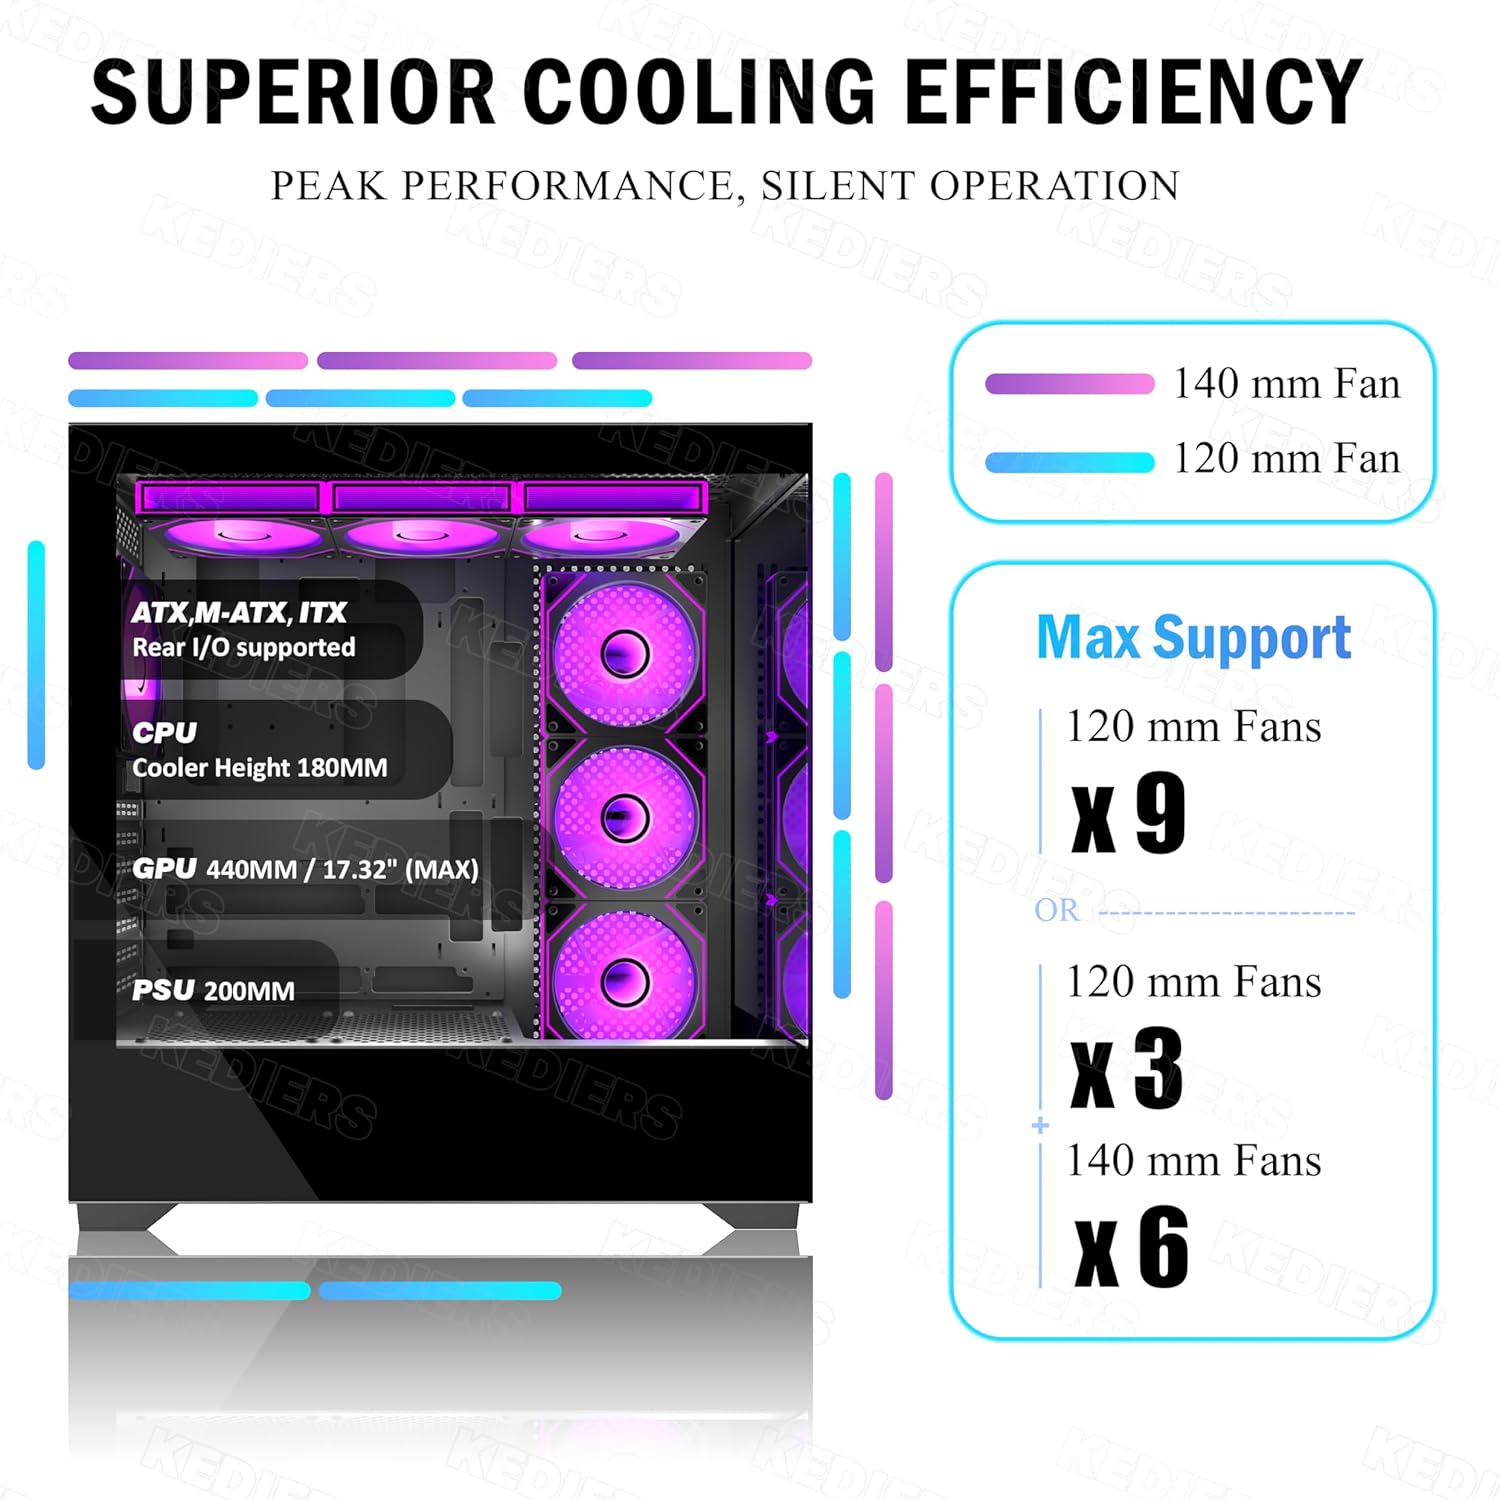
Figure 7.2: Diagram illustrating cooling efficiency and maximum fan support configurations.

Figure 7.3: Overview of powerful cooling capacity support, including fan and radiator configurations.

Figure 7.4: Diagram illustrating the dual airflow system for optimized cooling performance.
8. Warranty and Support
For warranty information and technical support, please refer to the official KEDIERS website or contact their customer service directly. Specific warranty terms and conditions may vary by region and retailer. Please retain your proof of purchase for any warranty claims.


