1. Introduction
This manual provides essential instructions for the safe and proper assembly, setup, operation, and maintenance of your INTERGREAT 5-7 Gun Safe, Model 20251016. Please read this manual thoroughly before using the product and retain it for future reference.
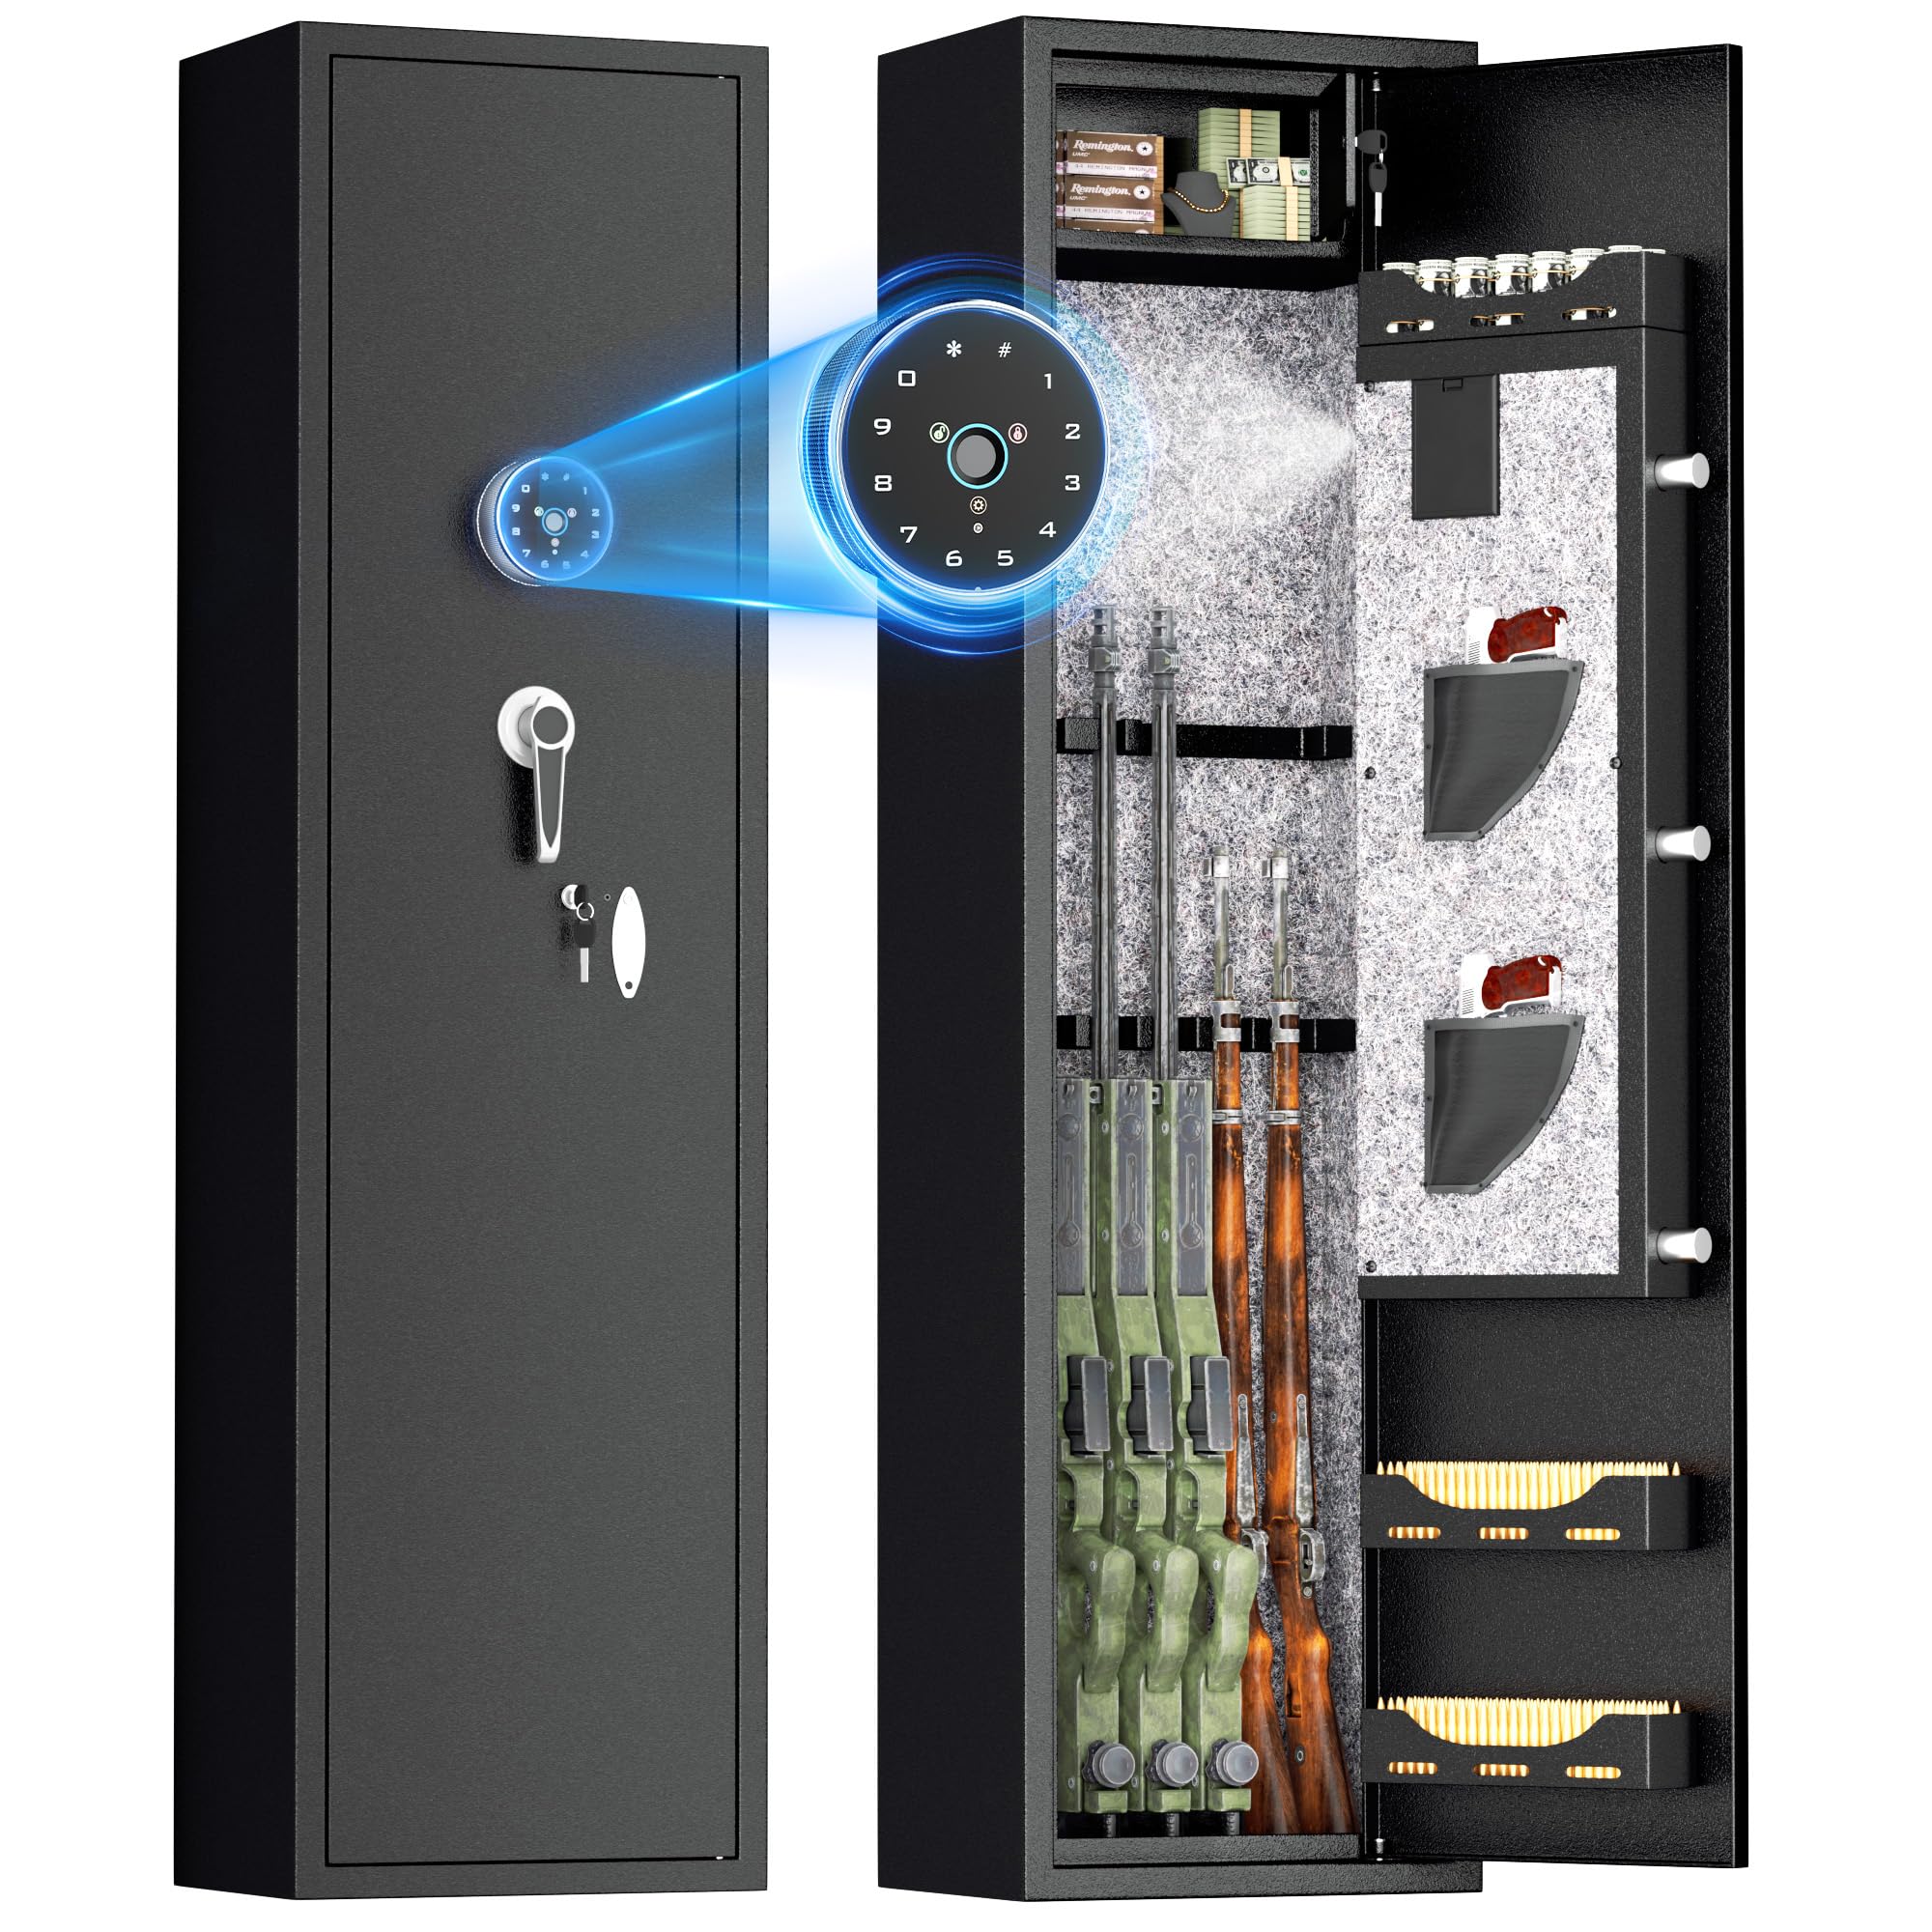
Figure 1: INTERGREAT 5-7 Gun Safe
2. Safety Information
- Always store firearms unloaded and locked.
- Keep keys and access codes in a secure location, away from the safe and unauthorized individuals.
- Ensure the safe is securely mounted to prevent tipping.
- Do not store emergency keys inside the safe.
- Keep children away from the safe and its contents.
- The safe is constructed from cold-rolled steel for durability and anti-prying resistance.
3. Package Contents
Verify that all components listed below are present before beginning assembly.
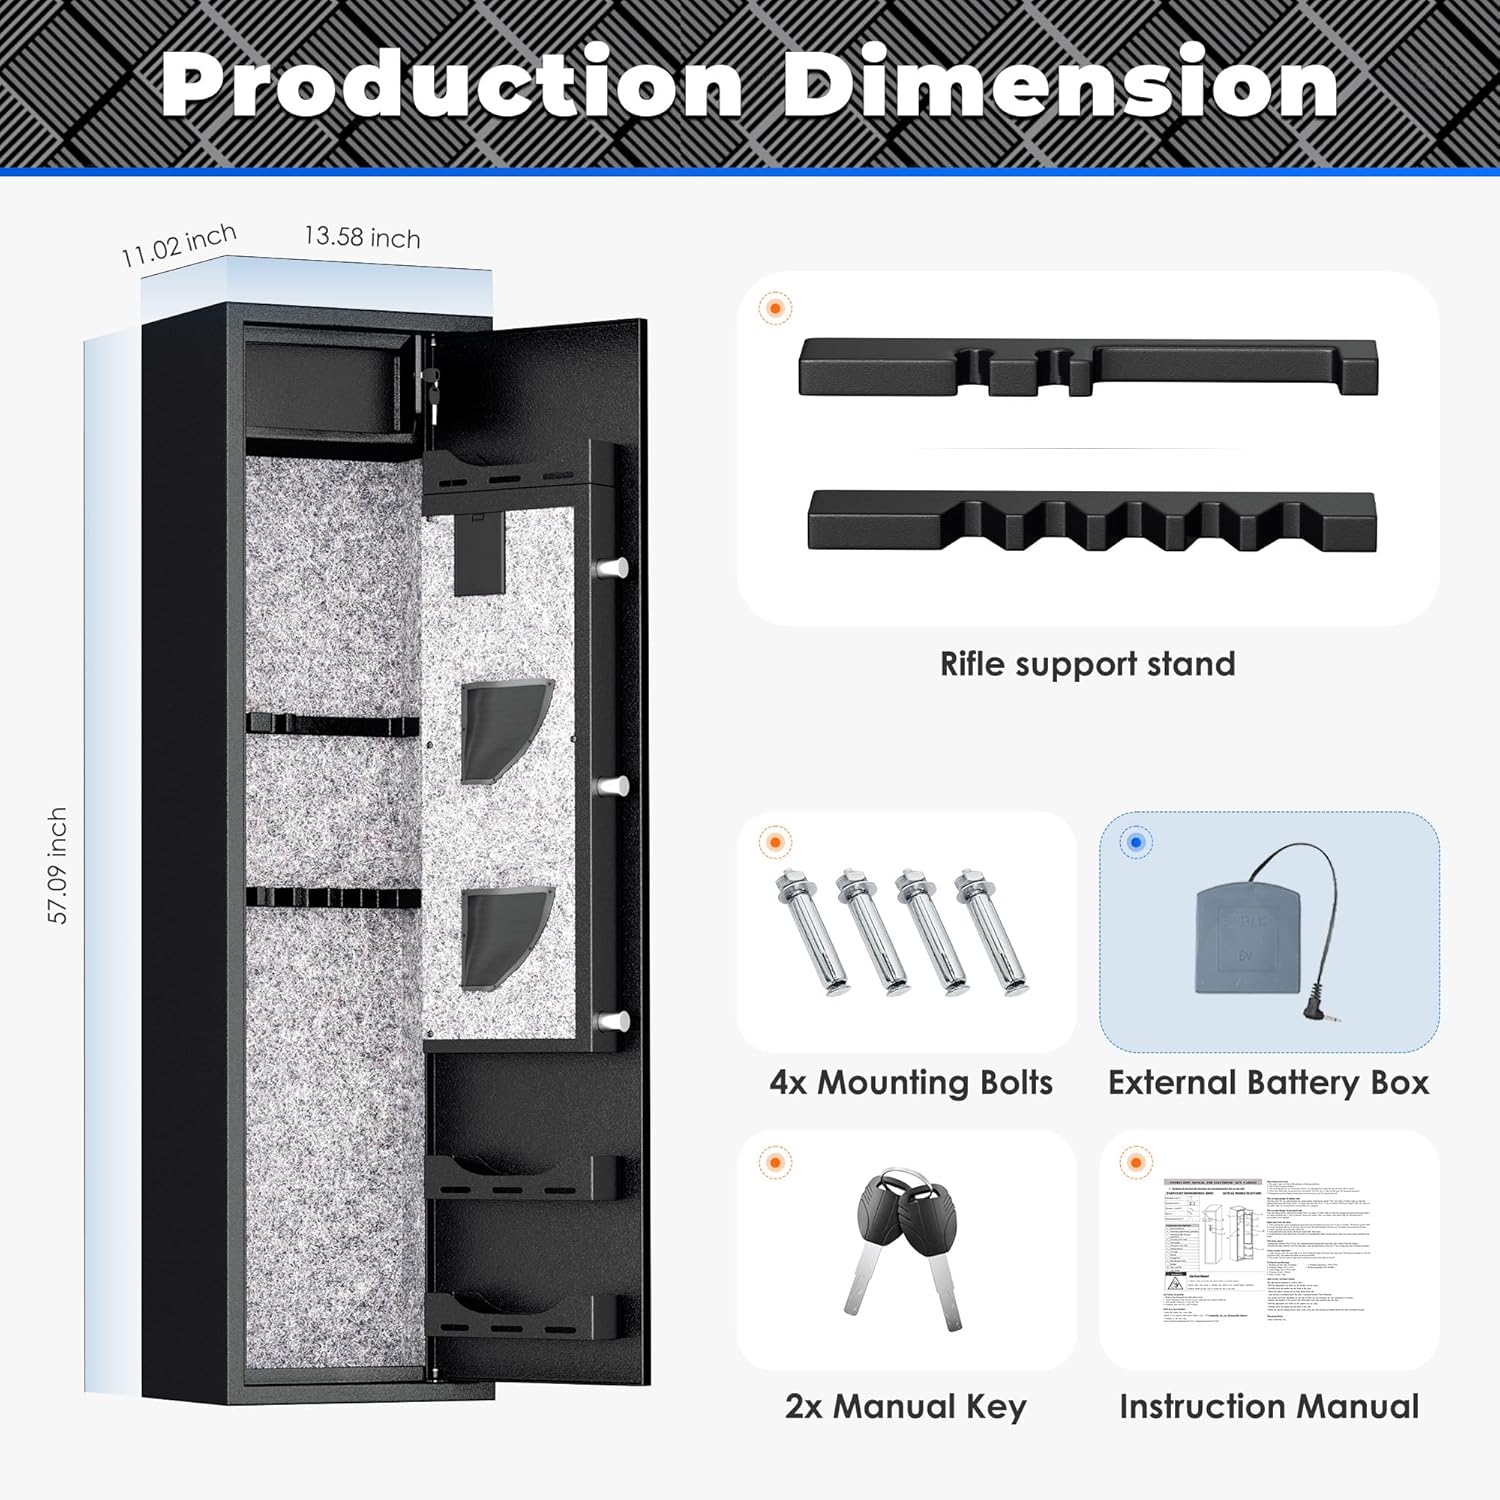
Figure 2: Package Contents
- Door Frame (x1)
- Side Panel (x2)
- Back Panel (x1)
- Top Panel (x1)
- Bottom Panel (x1)
- Removable Shelf (x1)
- Back Mesh Panel (x1)
- Gun Bracket (x2)
- Back Mesh Gun Bracket (x2)
- Gun Rack (x4)
- Self-Tapping Screws (quantity as needed)
- Screwdriver (x1)
- Gloves (x1 pair)
- External Power Box (x1)
- Shelf Buckle (x4)
- Key (x2)
- Expansion Bolt (x4)
4. Assembly Instructions
Assembly requires at least two people. Follow the steps carefully.
4.1. Video Guide for Assembly
Video 1: Gun Safe Assembly Guide
This video demonstrates the step-by-step assembly process for the gun safe, including connecting panels and installing internal components.
Video 2: Gun Safe for Home Assembly Video
An additional assembly video providing visual guidance for setting up the gun safe.
4.2. Step-by-Step Assembly
- Unpack Components: Carefully remove all parts from the packaging. Lay them out on a clean, flat surface.
- Assemble Base Frame: Connect the bottom panel to the side panels using the provided self-tapping screws. Ensure all connections are secure.
- Attach Back Panel: Secure the back panel to the assembled side and bottom panels.
- Install Top Panel: Attach the top panel to complete the main cabinet structure.
- Insert Back Mesh Panel: Place the back mesh panel inside the cabinet. Secure it with screws if necessary.
- Install Shelf Buckles: Insert the shelf buckles into the desired slots for the removable shelf.
- Place Removable Shelf: Position the removable shelf onto the installed shelf buckles.
- Attach Gun Brackets and Racks: Install the gun brackets and gun racks to the interior panels as desired for firearm storage.
- Attach Door: Carefully align the door frame with the main cabinet structure and secure it.
5. Setup and Operation
5.1. First-Time Opening and Battery Installation
- Open with Emergency Key: For the first opening, use one of the provided emergency keys to unlock the safe. Turn the handle to open the door.
- Install Batteries: Locate the battery compartment on the inside of the door. Insert 4 AA alkaline batteries (not included) into the compartment. Ensure correct polarity.
5.2. Setting Passcode
- With the door open, press the red 'Setting Button' located on the inside of the door. The keypad will illuminate.
- Enter your desired new passcode (3-8 digits).
- Press '#' to confirm.
- Re-enter the new passcode and press '#' again to finalize. A long beep indicates successful setting.
5.3. Setting Fingerprint
- With the door open, press the red 'Setting Button'. The fingerprint scanner will activate.
- Place your finger on the scanner. Lift and place your finger multiple times (typically 5 times) until you hear a confirmation beep.
- You can enroll up to 30 different fingerprints.
5.4. Unlocking the Safe
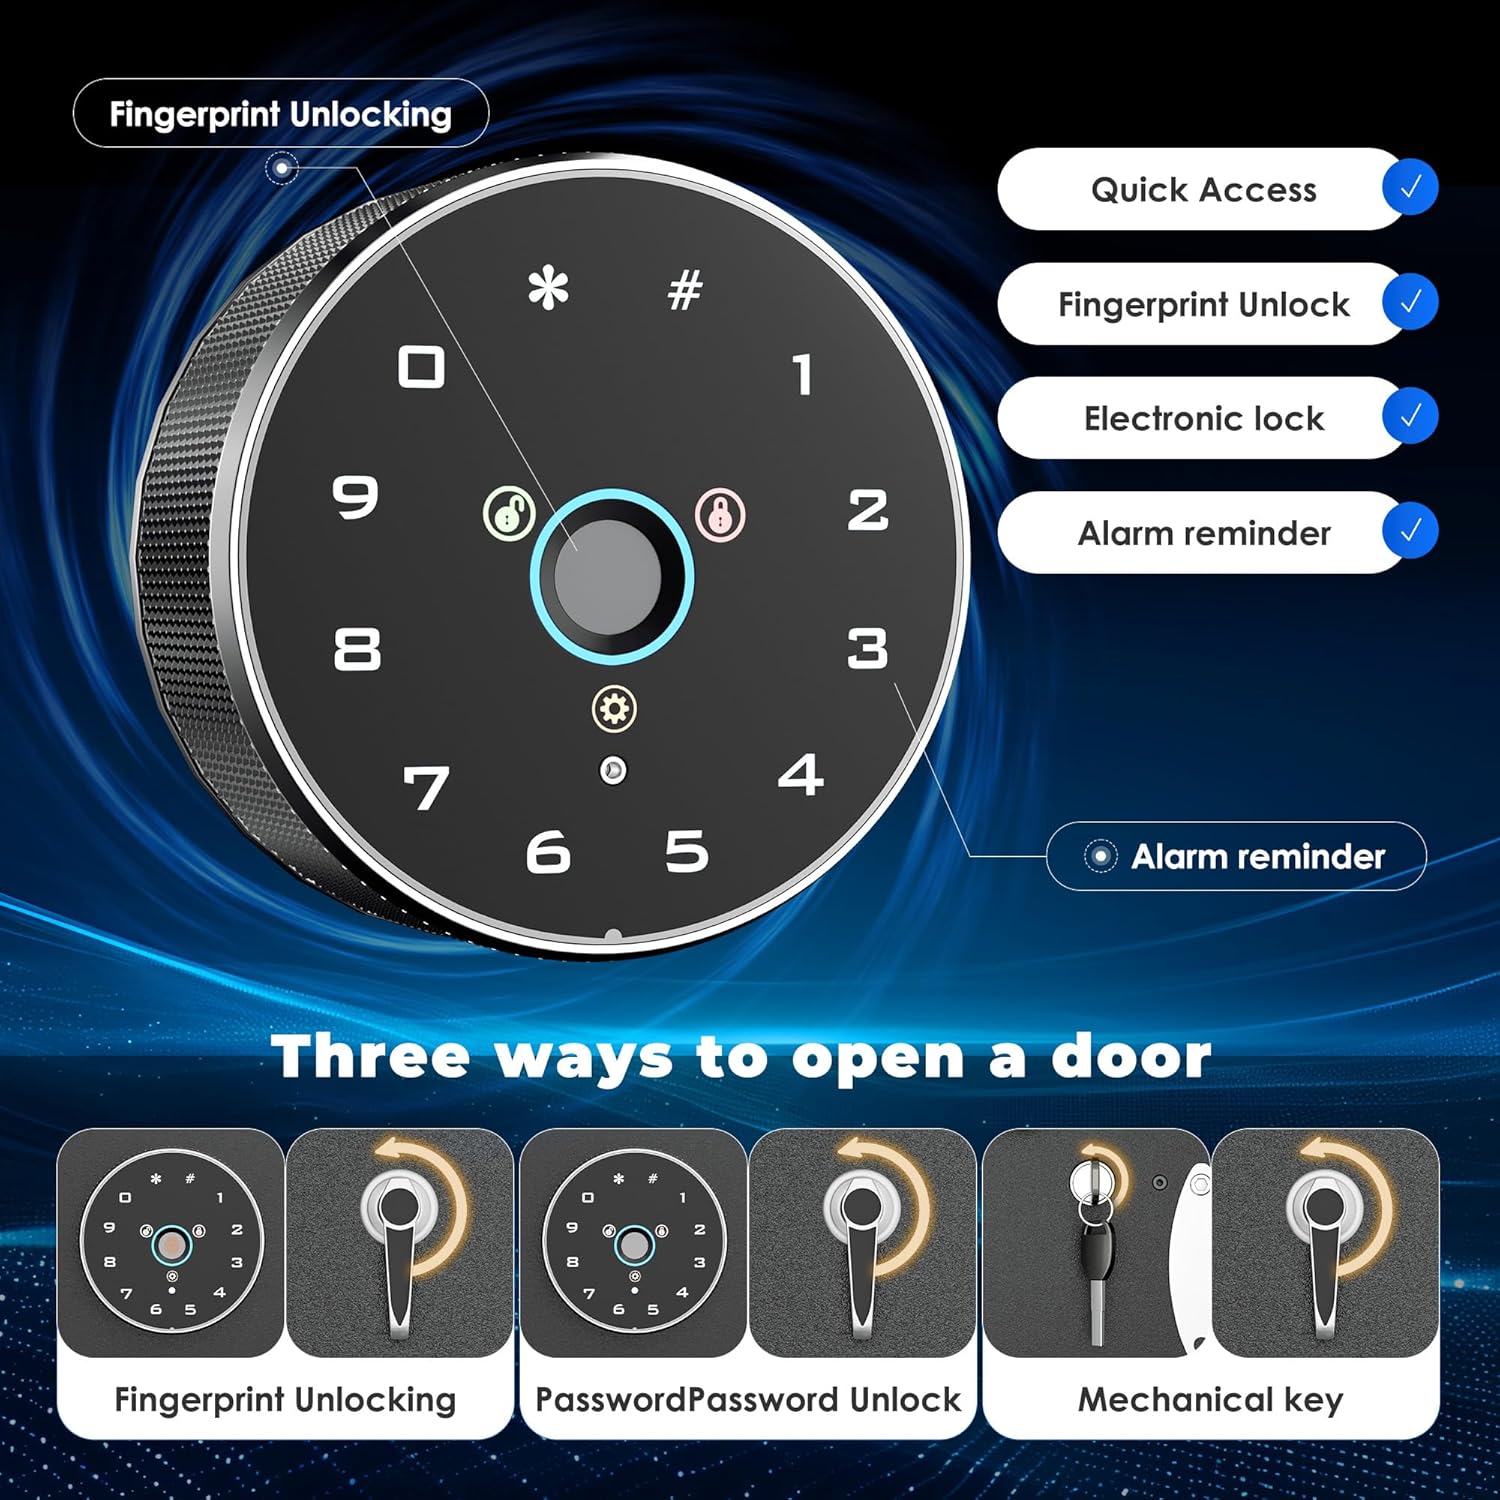
Figure 3: Three Ways to Open the Safe
- Fingerprint: Place your enrolled finger on the scanner. The safe will unlock.
- Passcode: Enter your 3-8 digit passcode and press '#'. The safe will unlock.
- Mechanical Key: Insert the emergency key into the keyhole and turn.
5.5. Dual Security Mode (Fingerprint + Passcode)
To enhance security, you can require both a fingerprint and a passcode for unlocking.
- Locate the internal switch (often labeled 'Normal/Secure') inside the door.
- Flip the switch from 'Normal' to 'Secure'.
- In this mode, you will need to provide an enrolled fingerprint followed by the correct passcode to unlock the safe.
5.6. Silent Mode

Figure 4: Dual Alarm and Mute Function
- Activate Silent Mode: Press and hold the '*' button on the keypad for approximately 3 seconds. The safe will enter silent mode, disabling audible feedback.
- Deactivate Silent Mode: Press and hold the '*' button again for approximately 3 seconds. The safe will exit silent mode.
5.7. Alarm System
- Vibration Alarm: Press '9' on the keypad to activate the vibration alarm mode. If the safe is shaken or hit hard, it will trigger an immediate alarm.
- Incorrect Entry Alarm: If an incorrect passcode is entered 3 times consecutively, or an incorrect fingerprint is scanned 5 times consecutively, the anti-theft system will activate, and the safe will emit an alarm for 48 seconds.
- Stopping the Alarm: Enter the correct fingerprint or passcode to stop the alarm.
5.8. Emergency Power Access
- If the internal batteries run out, connect the external power box (with a 9V battery installed) to the emergency power port on the keypad.
- Enter your passcode or fingerprint to unlock the safe. Replace the internal batteries immediately.
6. Storage Configuration

Figure 5: Interior Storage Layout
- Removable Shelf: The safe includes one removable shelf, allowing you to customize the interior space.
- Adjustable Gun Racks: Two long gun racks can be adjusted up and down to accommodate long guns up to 54.13 inches, as well as shorter firearms.
- Door Storage: The inside of the door features two pistol pockets and three containers for ammunition or other small accessories.
- Protective Lining: The interior is lined with soft material to protect firearms from scratches.
7. Mounting Instructions
For maximum security, it is highly recommended to securely mount your gun safe to a wall or floor.
- Location: Choose a discreet and secure location, preferably against a wall stud or solid structure.
- Drilling: Use the pre-drilled holes on the back and bottom of the safe as templates. Drill pilot holes into the wall/floor.
- Secure with Bolts: Use the provided expansion bolts to firmly secure the safe to the wall or floor. Ensure all bolts are tightened to prevent movement.
8. Maintenance
- Battery Replacement: Replace the 4 AA alkaline batteries every 6-12 months, or immediately if the low battery indicator appears.
- Cleaning: Clean the exterior of the safe with a soft, damp cloth. Avoid abrasive cleaners.
- Lock Mechanism: Do not lubricate the lock mechanism. If it becomes stiff, contact customer support.
- Mounting Check: Periodically check the mounting bolts to ensure they remain tight and secure.
9. Troubleshooting
- Safe Not Opening:
- Check batteries and replace if necessary.
- Use the external power box if batteries are completely drained.
- Use the mechanical emergency key.
- Alarm Triggered:
- Enter the correct fingerprint or passcode to disarm the alarm.
- If the vibration alarm is too sensitive, ensure the safe is on a stable surface and securely mounted.
- Keypad Not Responding:
- Ensure batteries are correctly installed and have sufficient charge.
- If unresponsive, use the external power box.
10. Specifications
| Feature | Description |
|---|---|
| Brand | INTERGREAT |
| Model Number | 20251016 |
| Color | Black |
| Material | Alloy Steel, Metal |
| Product Dimensions (H x W x D) | 55.7" x 13" x 13.8" |
| Item Weight | 90 pounds |
| Capacity | 5-7 Guns |
| Lock Type | Fingerprint, Digital Keypad, Mechanical Key |
| Special Features | Alarm System, Anti-Theft, Removable Shelf, Scratch Resistant |
| Mounting Type | Wall Mount, Floor Mount |
| Batteries | 4x AA Alkaline Batteries (not included) |
11. Warranty and Support
For warranty information and customer support, please refer to the documentation provided with your purchase or contact INTERGREAT directly through their official channels.